During renovations, various works are performed, which ultimately determine the appearance of the entire house. Leveling the floor is an important process. Any flooring material can be easily laid on a flat base. The better the work is done, the easier it is to complete the finishing touches. For this, different methods are used, such as floor screed with expanded clay. During the process, the basic requirements and regulations are observed. It remains to figure out how to make a screed in an apartment with expanded clay?
Pros and cons of using expanded clay for screed
Expanded clay, used as insulation and sound insulation, is oval granules ranging in size from 1 to 20 mm. Larger expanded clay stones must be crushed in special mill drums before being used for insulation. Like any building material, expanded clay has a number of advantages and certain disadvantages. The positive qualities of expanded clay include:
- high mechanical strength of granules, allowing this bulk material to be used as the main filler for concrete mixtures;
- low thermal conductivity and ability to absorb sound vibrations;
- chemical inertness and resistance to acidic and alkaline environments;
- low specific gravity;
- frost resistance;
- non-flammability;
- affordable price;
- the ability to perform dry or expanded clay concrete floor screed with your own hands.
Rodents, insects, and mold and mildew do not grow in this building material.
At the same time, one cannot help but mention such significant disadvantages as the ability to absorb moisture and float to the surface of the concrete mixture with an increased water content in its composition. The latter factor leads to the formation of a corrugated surface. As a result, it has to be leveled with an additional layer of cement mortar or mechanical grinding of the surface.
Application of cement-sand mortar
So, how to make a floor screed with expanded clay? Traditionally, floor leveling begins with the need to remove the old coating (if any) and prepare the area to be poured. The base is cleaned and all construction debris is removed. All openings in the floor are thoroughly cleaned, and if there are utility lines, they should be wrapped in polyethylene.
Insulating the floor with expanded clay under the screed involves the next step - waterproofing the base. It is also used in self-leveling floor technology. A special mastic can be used here, but mainly polyethylene film, waterproofing or isolan are in demand. Thanks to the use of such waterproofing materials, the following occurs:
- A damper line is formed between the wall and concrete;
- The adhesive interaction of the screed with building materials, which often leads to them drawing out moisture from the poured mortar, is eliminated;
- Possible sound transmission to wall elements and partitions is reduced.
You cannot do without treatment with waterproofing materials if you are treating the surface with thermal insulation materials, later you will be laying parquet, or pouring a base that has contact with the basement. Thus, thermal insulation materials should be laid with a turn on the walls 15 cm more than the marked level of the future expanded clay screed. After you fill, these materials should be cut to the level of the finished floor.
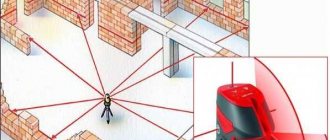
The last stage of preparation will be the placement of beacons. The most correct installation is obtained using a laser level or hydraulic level. You can learn in detail about the process of placing beacons using the example of placing beacons for plaster, or watch the previous article about the technology of work, in which we provided a video with the process of placing beacons.
Floor insulation with expanded clay in a private house can be done in 2 ways:
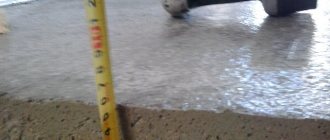
1. The first step is backfilling, compacting and leveling the expanded clay. The backfill level should be less than the level set by the beacons. The distance between the level of the screed with expanded clay and the layer of the material itself must be less than 2 cm. After leveling, everything is treated with “cement milk” to secure the elements. After they harden, the actual pouring of concrete mortar takes place. If you suddenly doubt that you can properly prepare the solution, then you can use ready-made mixtures, of which there are a great many on sale now.
2. Expanded clay is added to the mixture during the mixing process. For ease of filling, the surface of the beacons is divided into sections, which are filled one by one. The poured mixture is processed according to the rule until a perfectly leveled surface is obtained.
Which method to choose and how to insulate the floor with expanded clay is up to you. However, no matter what method you choose, the work is carried out starting from the wall you like and then moving to the doorway. By the way, both of these methods are perfect for making a subfloor for any surface.
In what cases is it recommended to use expanded clay?
Installing a floor screed with expanded clay is not always advisable. Moreover, there are options when the use of this material is impossible due to the technical conditions of the work. However, its use will be effective in the following cases :
- creating a support cushion on the ground in the absence of a cellar and basements;
- the need to compensate for large differences in heights on the floor surface and reduce material costs for the purchase of materials;
- weak floors or wooden boards as a base;
- hidden laying of utility networks or heated floors in the screed layer.
The use of expanded clay, first of all, allows us to provide a screed option with the lowest possible costs for insulation, sound insulation and the creation of a thick layer.
The best option for restoration
The best option for surface repair is a screed when:
- all communications that are on the floor are hidden;
- there are differences (everywhere) in level;
- the house has reinforced concrete floors;
- laminate, parquet, linoleum or tile are planned as the finishing coating.
Now the appropriate question is, what is expanded clay? This is a lightweight, durable, porous material made from baked clay. In addition, it is undoubtedly environmentally friendly. Expanded clay resembles in appearance granules of different sizes, either oval or round.
The strength of expanded clay is ensured by the outer sintered shell. The “merit” of the porosity of its structure can be considered low weight and low thermal conductivity. It is the combination of these characteristics that prompts many craftsmen to use expanded clay for floor insulation. This, by the way, is very reasonable. Indeed, in addition to all the above advantages, expanded clay is considered an excellent sound insulator.
Depending on the size of the granules, the thermal conductivity coefficient of this material varies from 0.07 to 0.16 W/m
A high-quality cement-sand screed with such a filler will last a long time. In this case, regular repairs or painstaking care are not required.
But in order to make it, you need to carefully study the technology and use it wisely.
Types of screeds using expanded clay and their features
When leveling and insulating floors, three technologies for floor screed with expanded clay are used:
- wet pouring with expanded clay concrete;
- dry screed;
- combined (semi-dry) option with a backfill layer.
Each method has pros and cons of screeding floors with expanded clay. The choice depends on the specific conditions and condition of the surface to be coated.
Wet screed
Monolithic filling of floors with expanded clay concrete is used only in the most extreme cases, when creating a bulk layer of insulation or using a dry screed will be impossible for some important reason. The preparation of the concrete mixture is carried out in the following sequence:
- Initially, expanded clay granules must be poured into a tray and filled with water for soaking;
- to mix the working mixture, load cement, sand and expanded clay into a concrete mixer in a ratio of 1:3:4;
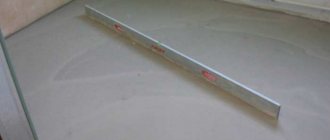
- install metal profile beacons on the floor surface at a distance of 1.2-1.5 meters from each other;
- When pouring concrete, level the layer using a plaster rule or a flat metal lath;
- During the setting period of the concrete mixture, the surface must be periodically moistened with water to avoid the formation of cracks.
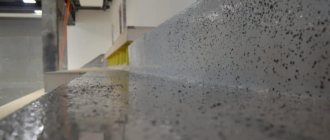
If floating granules are visible on top of the floor, then after the concrete has hardened, they must be sanded down or the floors must be additionally filled with a thin layer of self-leveling mixture.
Dry screed
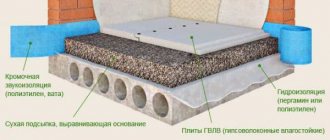
This is the simplest and most effective screed technology using expanded clay. Insulation granules are simply poured onto the floor and leveled. After this, sheets of fiberboard, plywood or gypsum fiber board are laid on the backfill and filled with a mortar made from a mixture of sand and cement with the addition of a plasticizer or liquid soap.
The thickness of the poured dry expanded clay layer is equal to the difference in which 25 mm of the cement mortar layer and the thickness of the sheet material should be subtracted from the total thickness of the screed. This method is quite accessible even to a novice builder.
Combined method
This technology is similar to dry screeding, but without the use of sheet materials for the intermediate coating. The dry method can significantly reduce financial costs, but requires certain construction skills and experience in performing the work.
Its essence lies in the fact that the surface of the bulk expanded clay layer is leveled, but not covered with sheets, but rather spilled with cement “milk” - a liquid mixture of cement and sand in a 1:2 ratio.
After the filling has set, expanded clay forms a hard layer of 2-4 cm, which allows for final leveling with conventional mortar along the beacons. Instead of a cement mixture, it is allowed to fill with sand concrete if its thickness is 30-50 mm.
Securing the guides
To ensure that the poured layer is even, use beacons. Place them 15.0 centimeters apart. The initial guide should be mounted at a distance of 25.0-30.0 centimeters from the wall. To fix the beacons, self-tapping screws are usually used. They need to be screwed into expanded clay concrete. The screws will allow you to adjust the height of the bar as needed.
Screw in the screws so that the top point of the lighthouse is flush with the horizon line. Place screws along the entire length of the plank. The distance between them is 35.0-55.0 meters. To avoid mistakes in this matter, use a two-meter building level.
Of course, you can use an alternative option - fixing the beacons on piles of cement-sand mortar. In this case, the position of the slats is also easy to adjust: either pull them out of the material or recess them into it. When the beacons are fixed, remove the remaining solution. Further work can begin as soon as the solution has hardened. We recommend reading the article on preparing the subfloor for screed.
Requirements for expanded clay for screed installation
Concrete mixture, dry backfill or material for combined technology can be of any fraction. However, it should be understood that small granules or crushed expanded clay will provide a denser backfill and better thermal insulation . Therefore, deciding which expanded clay to use for floor screed depends on the problems that you want to solve by leveling and insulating floors.
Based on the size of the fractions, expanded clay is divided into:
- expanded clay sand with particles up to 5 mm;
- sand-crushed stone mixture up to 10 mm;
- crushed stone with granules 5-10 mm;
- gravel of two categories 10-20 and 20-40 mm.
In addition, what fraction of expanded clay is needed for floor screeding, you need to take into account the category of bulk density in the range of 450-600 kg/m3 and strength grade from P75 to P125 MPa according to the results of mechanical pressure tests.
Determining the amount of expanded clay for screed
The calculation of the required material depends on the adopted technology for performing the work, the size of the granules, requirements for the strength of the coating and the brand of cement used. The brand of expanded clay concrete is determined by the volumetric ratios of M400 cement, sand and expanded clay, which should be:
- for concrete M150 – 1.0 : 3.2 : 5.0;
- M200 – 1.0 : 2.5 : 4.2;
- M250 – 1.0: 1.9: 3.4;
- M300 – 1.0: 1.7: 3.2;
- M400 – 1.0: 1.1: 2.4.
To determine how much expanded clay you need for a dry screed, simply calculate the volume of the bulk layer and multiply its thickness by the area of the room.
In the case of height differences, you can take the average between the minimum and maximum values or summarize several volumes in individual areas.
When preparing a solution or concrete mixture with expanded clay as one of the fillers, it is necessary to take into account the grade of insulation by bulk density from M250 to M800 kg/m3. At the minimum value, the test strength of the frozen layer will be at least 0.6 MPa, and at the maximum value - more than 4.5 MPa.
What to do if the expanded clay concrete screed cracks
Cracks in the screed, even small ones, are not good. They appear due to technology violations and low-quality components. Another possible reason is the drying of the screed, during which its dimensions decrease (on average, shrinkage is 1 mm per 1 meter). But to prevent cracks from appearing, damper tape is laid around the perimeter of the premises. It also reduces the level of noise transmitted through the ceilings. That is, impacts will not be heard as loudly in the apartment, and other noises will not be as loud.
To avoid cracks in expanded clay concrete screed, do not violate the recipe and technology
If cracks do appear, they must be repaired, even if you plan to pour leveling agent or lay tiles on top. If left as is, there is a high probability that the top layer will also develop cracks in the same place. Even if everything is done perfectly. The void below creates the preconditions for the formation of cracks, so they must be sealed.
So, the cracks are opened and cleaned as much as possible. The dust is removed and then filled with a repair compound for concrete floors or epoxy glue. You can wet the cracks with a repair compound, but you shouldn’t do this with epoxy. That's all. The expanded clay screed is ready, you can lay the floor covering.
Tools and equipment for work
Work on screeding floors using expanded clay is carried out in several stages. Each of them will require a specific set of construction tools and equipment.
To prepare the base for laying layers you must have:
- hammer drill or impact drill;
- shovel or large scoop;
- construction mixer;
- buckets and spatula.
In addition to this, installing beacons will require;
- strong cord or matte fishing line;
- bubble, hydraulic or laser level;
- plastering rule and tape measure;
- construction trowel;
- pencil or marker;
- grinder for cutting profiles.
When performing a dry screed, additionally prepare a screwdriver and a tool for cutting sheets. To prepare expanded clay concrete, you will also need a concrete mixer, a mixing tray, a shovel and a bayonet shovel. In the case of combined technology, the possibility of working with reinforcing mesh should be taken into account.
Preparation of mortar for screed
To prepare the screed mortar, use cement of a grade of at least M400 and construction sand, which are mixed in a ratio of 1:3, respectively. In this case, it is better to use a special construction mixer rather than an ordinary shovel.
Remember that usually add two liters of water per ten kilograms of mixture. It is much more convenient to pour the solution into water, and not vice versa, although the instructions supplied with the cement often indicate the “wrong” method.
Using a mixer, mix the mixture thoroughly for 5-10 minutes. Then leave for 5 minutes to settle, and after five minutes mix again for about 2-3 minutes. Now the solution can be used.
Preparatory work
The quality of preparation of the base surface for the installation of expanded clay screed directly determines its quality, strength and durability.
The full range of preparatory work may include the following stages:
- cleaning of debris and remnants of old materials;
- device of hydraulic and thermal insulation;
- installation of beacons;
- securing damper tape around the perimeter of the walls.
Damper tape.
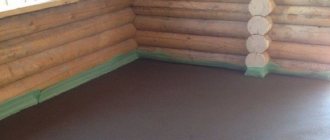
After removing debris, weak boards need to be fixed on wooden floors and rotten ones should be replaced. Level and compact the soil if there is no old coating. In concrete floors, repair holes and large cracks with cement mortar and only then proceed to the next stage of work.
Hydraulic insulation and additional insulation
Due to the hydrophobic properties of expanded clay, waterproofing is a prerequisite for any screed technology. A waterproofing layer made of rolled material can be laid under a layer of expanded clay, on top of it, or simultaneously on both sides.
Roofing felt, waterproofing, liquid rubber or bituminous soils are used as insulation. The choice of material depends on the requirements for the moisture protection device and financial capabilities.
Waterproofing film.
It is recommended to use additional thermal insulation for rooms on the ground floor or when performing expanded clay screed on the ground. Floor insulation will reduce heat losses and save you money on heating your home. The best materials for this purpose are sheet foam and polystyrene foam. Their use simplifies the work and provides effective protection.
Installation of beacons and fastening of damper tape
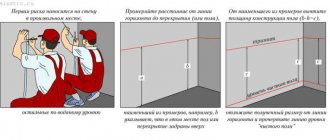
The presence of correctly installed beacons greatly simplifies the process of leveling the screed to obtain a perfectly flat horizontal surface. When doing this job:
- by measuring, the design level of the floor is determined, which is drawn on the wall in the form of a continuous line;
- depending on the width of the strips being poured, the required number of beacons is calculated;
- The profile slats are fixed in the required position.
The process of installing beacons when installing a floor screed is described here.
With a dry screed, the beacons must be removed after the mortar begins to set; in other cases, they can remain inside the poured layer.
The damper tape is fixed in such a way that a strip of 15-20 mm peeks out above the field level. It is necessary to compensate for temperature expansion of the self-leveling layer and prevent the formation of cracks.
Scheme for determining the zero level.
Detailed instructions for determining the zero floor level are presented here.
Subtleties of applying expanded clay
Low-density ingredients are often added to the screed to reduce the weight of the entire structure. Often this ingredient is expanded clay. Depending on the size of the granules, the thermal conductivity coefficient of this material varies from 0.07 to 0.16 W/m. You can equip an excellent underfloor heating system if you know the rules for forming expanded clay screed.
Low-density ingredients are often added to the screed to reduce the weight of the entire structure
Also read materials:
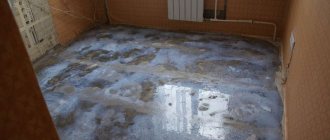
PolaRemont.ru recommends using this material to level the floor if the level differences exceed five centimeters. However, keep in mind that expanded clay granules are low in density, so they often float to the surface in the solution. Of course, it is difficult to determine by eye what layer of screed should be poured onto the expanded clay so that it does not crack and eliminates unevenness. It would be wise to listen to the advice of professionals and make a concrete layer three centimeters thick. The technology for performing such a screed can be divided into stages:
- Definition of "horizon line"
- Installation of light fraction
- Installation of landmarks
- Leveling fill
Expanded clay is a lightweight, durable, porous material made from baked clay.
Device instructions
Combined screed with expanded clay
Scheme of a combined screed.
As mentioned above, this technology involves the presence of a dry layer of bulk material at the bottom and a wet cement pour at the top. Installing a semi-dry floor screed with expanded clay with your own hands must be done in the following order:
- cover the clean, prepared surface with roll waterproofing or cover with a layer of bituminous primer;
- fill in a layer of expanded clay with a fraction size of 5-20 mm, 30-40 mm below the future level of the screed;
- compact the bulk material well and level with the rule;
- prepare cement laitance and pour it over the surface;
- after setting, which will occur in a day, install beacons corresponding to the level of the screed on the frozen surface;
- prepare cement mortar in a ratio of 1:3 or 1:4 to sand;
- pour the solution between the beacons in strips and level it with a plaster rule;
- the top layer of the screed must be pierced with a thin rod with a pitch between holes of no more than 100 mm;
- Over the next two days, the surface must be periodically moistened with water.
The complete readiness of the screed is determined at the rate of 5-7 days for each centimeter of the cement layer. After this, you can proceed to laying the finishing floor coverings.
Wet screeds with expanded clay
“Wet” screed - pouring the base with expanded clay concrete and then leveling the surface. Laying the concrete layer is carried out in the following sequence:
- pour dry expanded clay into a tray or other container and fill it with water for 10-12 hours to soak;
- install beacons on the surface of the base that will determine the horizontal level of the future floor;
- pour wet expanded clay (4 parts) into a concrete mixer, then add a little water and cement (1 part);
- After stirring for a short time, add sand (3 parts). Stir the mixture until ready - at least 4 minutes. If necessary, add water during mixing (the consistency of thick sour cream is required);
- To level the surface, use a plaster rule, which must be pulled along the beacons with transverse movements of the tool.
If, after the screed has set, floating expanded clay granules are visible on the surface, they must be sanded using a power tool. If there are a large number of such granules, you will have to lay an additional layer of self-leveling mixture on top. The complete drying time is 28 days.
Dry screeds with expanded clay
To install a dry screed, you need to purchase fine expanded clay or crushed granules, sheet material such as chipboard or plywood, sand, cement and a plasticizer. The order of work is as follows:
- Cover the surface of the base with dry expanded clay and level the surface using a level lath. When laying a construction bubble level on the slats, periodically check the level of the layer;
- remove beacons;
- lay sheet material on the expanded clay so that it covers the entire surface;
GVL laying diagram.
- check the horizontal position of the sheets using a level;
- cover the second row of sheet material in the same way. The only thing that needs to be provided is that the shift of the seams of the second layer relative to the first should not be less than 20 cm.
After this, you can begin laying the topcoat.
You can see the construction of expanded clay screed clearly and in more detail in the presented video.
Traditional expanded clay concrete screed
For its construction, a traditional solution made from sand, cement and water is used. The first 2 components are taken in a 3:1 ratio, and enough water is added to form a thick mixture.
If you do not want to measure out the required amount of materials, then you can use a ready-made expanded clay concrete mixture, which can be purchased at any hardware store.
Stages of screed construction:
- Expanded clay gravel or crushed stone is added to the prepared solution.
- The components are mixed until the granules are completely covered with the cement-sand mass.
- The finished mixture is evenly distributed over the surface of the base. Lay it down until the pre-marked level is reached.
- Leave the screed to harden for 2 weeks. If necessary, moisten the coating with water so that it does not dry out.
When is expanded clay concrete used?
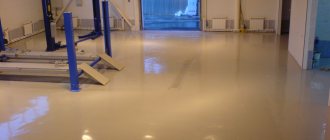
An example of an expanded clay concrete screed.
The installation of an expanded clay concrete screed is simply irreplaceable in some cases:
- If the height of the leveling layer is 10-15 cm, then the use of pure cement mortar or concrete is impossible due to too much load on the floor slabs. In this case, all that remains is to make a composition with expanded clay.
- Sometimes even a low screed is too heavy to install over an existing floor, for example, in an old building. In this case, installing a low expanded clay concrete layer will help not load the floor.
- When leveling wooden floors with wet screeds, it is also better to use a lightweight solution. In this case, the expanded clay leveling layer can be combined with a layer of foam or other lightweight materials.
- The price of cement is not small, so in order to reduce the cost of the screed, expanded clay is used as a mortar filler. According to reviews, it is cheaper to do expanded clay leveling than to use cement mortar. But don't forget to keep the proportions.