After dismantling the old base, a new screed made of cement-sand mortar is laid. Moreover, there are several options for constructing a new foundation:
- it can be firmly adhered to floor slabs;
- it can be laid on a separating layer;
- the base is made “floating”.
But the simplest and most acceptable is a screed based on cement-sand mixtures. This base is one of the heaviest. Its weight is 18-20 kg for every 1 cm of thickness measuring 1x1 meter. Various additives are used to lighten screeds. For example, bases with the addition of expanded clay weigh 14-18 kg, and self-leveling bases weigh only 12-16 kg.
If aggregates are used, the thickness of the base should be at least three times the height of the aggregate element. When using plasticizing additives, this thickness can be 3 cm. And without such additives, the solution is applied in a thicker layer of 4 cm.
Execution Sequence
Typically, a cement-sand mortar screed is performed in the following sequence:
- Layout of the required base thickness using surveying tools.
- Preparatory work (for the base of the floor).
- Primer work.
- Fastening elements for beating the floor level.
- Installation of damper tape.
- Preparation of cement-sand mixture.
- Pouring the mixture.
- Maintenance of the finished base.
Next, we will consider each of the stages in more detail.
Base thickness breakdown
The construction of a new screed begins with determining the horizon level. To do this, we use a laser or water level. By the way, it is better to purchase a laser with a beam in the form of a strip. When performing work using a laser level, we do the following:
- set the level to a level place on the floor;
- adjust its position so that the bubble in the device is in the center;
- turn on the device and make a mark at the place where the beam falls;
- carefully turn the device without disturbing the location of the bubble;
- we make similar marks on different walls in the room;
- We connect all the resulting points with a solid line and get our horizon.
When using a water level, we carry out work in this order:
- fill the bent level tube with settled water without air bubbles;
- the water level should be 10-15 cm below the edges of the device;
- to check the suitability of the device, you need to rock it, and the water level at the two ends of the tube will be at the same level;
- then on any of the walls in the room at the level of a person’s gaze, we make a mark and apply a level to it with one end 10-15 cm higher;
- another person places the other end of the level in any corner of the room at approximately the same height;
- then, moving the end of the device, you need to align the mark on the wall with the water level in the hose;
- put a mark on the wall in this place;
- We carry out similar measurements in other corners of the room;
- then we measure the distance from the marks to the floor and ceiling of the room;
- the lowest indicator will be at the highest point of the floor or ceiling;
- By connecting all the points in the corners we get our horizon.
Then, from the horizon lines obtained by any method, we carry out test measurements until the overlap. It is possible that there are unevenness on the ceiling. If it is not possible to get rid of them, then we take the lowest indicator as the control mark.
Now you need to determine the height of the future floor. To do this, you need to subtract the thickness of the floor structure (screed + coating) from the result obtained. We plot our result from the marks at eye level, connect the line and get the required level of the new floor. For the convenience of work, you can also mark the level of the screed.
Preparing the base
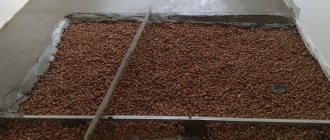
The basis for cement screed under floors is usually concrete preparation, floor slabs. Before starting work, such a coating must be cleaned of dirt, dust, potholes, holes, and wide cracks must be repaired. Then, using a water level or a building level, vertical marks are set. The highest point of the base is taken as the basis on which the beacons will be placed.
They are made from a lightweight rectangular steel profile 2.5 m long. Through holes are drilled in each element every 1.15 m, 10 cm from the edges. Nuts Ø 6 mm are welded on the bottom side. M6 bolts 20 cm long are inserted into the holes.
By screwing into the nuts, they raise or lower the beacon, adjusting it to the desired level. All beacons are placed in this way and secured with cement mortar. They are easily dismantled and can be used repeatedly. Such beacons can be made from planed wooden beams, but they can become deformed over time due to variable humidity.
After the screed level is formed, the base is further cleaned, treated with a deep penetration primer and left for 1-2 hours before work begins. A damper tape is placed along the perimeter of the walls, compensating for the linear expansion of the future screed during operation. Formwork and liners are placed in places where utility lines pass.
Preparatory work
To avoid the appearance of cracks on your newly created screed, it is worth understanding the reasons for their occurrence. Thus, cracking on screeds and their detachment from the ceiling are associated with the drying rate of the solution and the area of the screed device. Since a cement-sand mortar screed dries quite quickly, it also shrinks quickly. Due to the greater adhesion of the mortar to the wall than to the ceiling, the screed cracks and peels off precisely in places of its weak adhesion to the slabs. As you can see, all the reasons are associated with poor adhesion of the screed to the base, so the main methods for preventing cracking and detachment are careful preparation of the base.
To properly prepare the base for the screed, you need to do the following:
- Use a hammer to bend the protruding hinges for mounting the plates.
- If the surface of the slabs peels off, it must be knocked down with blows from a hammer drill.
- To detect places of delamination in the concrete surface of the slabs, they need to be tapped with a hammer. As a result, the weak points should crack and clear. If the slabs are in good condition, then it is enough to sand and prime them.
- To ensure good adhesion of the screed to the slabs, they need to be sanded using a wire brush on a drill. This will remove the dusty layer of cement and clear the way to the aggregate elements in the concrete.
- Then you need to seal small depressions in the slabs using the same cement-sand mortar that will be used to create the screed. By the way, all repair areas must first be primed using a special solution, water or cement laitance. You can also use tile adhesive for sealing, then a primer solution for the adhesive is used as a primer.
- It is also worth sealing all the holes in the places where the slabs join the walls and among themselves.
It is not necessary to equalize discrepancies in height between adjacent slabs. This drawback will be hidden due to the screed. All slabs must be cleaned of dust and debris.
Primer work
As a rule, a cement-sand mortar screed can be laid on bases primed with ready-made compounds for concrete bases. If the package says that the primer can dry out, then you can use double priming of the base surface under the screed. To apply the primer solution, it is better to use brushes, this makes it easier to cover all surface irregularities.
If the production packaging indicates that the primer solution should be applied immediately before screeding, then the work should be carried out precisely according to this principle. In this case, you should not re-prime the surface of the slabs.
Installation of beacons
To install a screed, you can use several types of beacons:
- mortar cakes;
- beacons made of pins;
- slats of metal profiles.
To perform markup, you need a rule. For these purposes, it is better to use a professional aluminum tool rather than a homemade wooden one, since the latter does not allow achieving the proper surface quality. It is better to purchase two rules at once: one is long (about 2 meters) for large rooms, and the other is shorter for narrower rooms.
The use of beacons in the form of pins can only be used by professionals who have mastered this method well. With this method of dividing the floor level, the screed can be poured in strips in any direction of the room. Here it is worth proceeding from the shape of the room and the location of the doors, since you need to move from the far wall to the doors. We install pin beacons in the following order:
- We make holes for dowels for beacons using a drill. We drill one hole at a distance of 20-30 cm from the wall located perpendicular to our pins, and the other at a distance of 30-40 mm from the wall located along the line of the beacons.
- We screw turnkey screws into the dowels. The length of the screws should be 2-3 cm longer than the expected height of the screed.
- We calculate the depth of screw tightening using a cord stretched between the horizon lines on the wall.
- When the depth of twist of both screws is known, we stretch the cord between them and install several more dowels with self-tapping screws. We check the depth of their twist using the cord.
- The pitch of subsequent screws should be slightly less than the length of the rule used. Then you can lay the rule on the pins and find the horizon by unscrewing and tightening the screw with a key. In this case, horizontality is looked at by the bubble at the level.
- We mark the next strips of pins in the same way.
- We check the screw height using a level in different directions. All screws must be screwed in level with the horizon.
The correctness of the horizon line drawn on the wall is now easy to check using beacons. All lines must converge. If you made a mistake when finding the horizon line on the wall, then it is better to trust the marks of the screws.
It is important to know: beacons in the form of pins transmit noise from impacts very well through the ceiling, so they must be unscrewed in the future.
In most cases, a cement-sand mortar screed is made using beacons from lumps of mortar. The essence of the method is as follows. Lumps or strips of mortar are placed on the base surface. To level them into the horizon, the solution can be added or removed. But this method is not as accurate as the previous one, since a beacon made of mortar can be easily knocked down with a careless movement, which cannot be said about pins made from self-tapping screws. Also, with this method it is difficult to achieve the required accuracy.
To make mortar beacons, you can use small piles of mortar leveled at the horizon or pins made from self-tapping screws. In the latter case, work is carried out as follows:
- strips of cement-sand mixture (the same as will be used for the screed) are applied to the self-tapping screws, screwed into one line along the level;
- then, using the rule, we press the solution along the top strip of the bed to the level of the screws and level it so that the heads of the pins are completely cleared of the solution;
- After preliminary setting of the mixture, unscrew the screws;
- We perform the remaining strips of beacons from the solution in the same way, and the pitch of the strips should be equal to the length of the rule used.
To make beacons, you can use aluminum profiles for plastering work. In this case, there is no need to screw in screws; it is enough to lay strips of mortar along the room and install profiles on top of them. The height of the strips should be equal to the height of the screed. Next, you need to slightly recess the profile into the solution so that its upper edge is clearly at the level of the cord of our horizon. In addition, the profile must be leveled. Then, in the same way, we install the profile on the other longitudinal wall of the room. Now you can stretch the cord between the profiles and align the intermediate strips of mortar with the profiles along it.
The last two methods of creating beacons have their advantages and disadvantages. The disadvantages include the need for preliminary priming of the solution in strips and the impossibility of installing a continuous monolithic screed, and the advantages include the occurrence of less internal stress in the screed due to its filling in separate sections between the beacons. In the latter case, our screed will be reliably insured against cracking.
If the screed made of cement-sand mortar is made as a continuous monolithic screed, then it is better to use beacons made of profiles for plasterboard . A profile with a height of 2.7 cm is ideal. We place the profile on pin beacons. Their length should be 3 cm less than the height of the screed. Then we place the profile on the beacons with the shelves up and support it with mortar cakes. After this, we place high mortar piles between the beacons and recess the profile into them to the height we need. When installing the screed, all elements of the beacons remain in place. Because of this, this method of installing beacons can only be used on the first floors of buildings. You can install the profile with the shelves down, then the height of the screws for the beacons should be 3 cm more than the screed. The profile is simply put on the beacons made of self-tapping screws with the shelves down. After preliminary setting of the screed, the profiles and beacons can be removed and the recesses can be filled with putty. The profile screed is poured in one step over the entire area of the room.
When installing a screed with beacons left from the profile, it is necessary to make a finishing layer of self-spreading mixtures. If you do not want to do it, then it is better to choose another method of constructing beacons.
Filling the screed
A day after installing the beacons, you can begin pouring the floor. Initially, you need to cover the perimeter of the floor with damper tape.
It will improve thermal insulation performance and additionally protect the screed from unwanted cracks due to temperature changes between different seasons of the year.
Among other things, the new screed shrinks slightly over the course of 1.5 years, which can negatively affect the flooring made of cement and sand.
Use reinforcement if the screed is thick
If the floor level is very high, then you need to make a reinforcing layer. To do this, a reinforcing mesh is laid on the floor, and the solution is already poured onto it. This allows the solution to set much better and make it stronger.
The prepared composition is poured from the farthest corner of the premises. The portion of the solution is equalized using the rule, and it should be carried out along the beacons with oscillating movements on different sides. Such movements improve the placement of the composition.
Each new portion of the solution is poured along the beacons. At the junction of different solutions, they should be mixed by about 15 cm. One room should be filled with screed throughout the day. This allows you to create a monolithic surface.
The installation of a cement screed on beacons makes it necessary to get rid of guide structures in the following ways:
- While the composition has not yet dried, the profile can be pulled out of the mortar, and the grooves of the floor can be filled with cement mortar and the surface can be made even with your own hands.
- When the solution dries, you can fill the reinforced cement-sand screed with a thin layer of self-leveling mixture.
To calculate the solution you will need to know some mathematical indicators. One cubic meter will weigh approximately 2 tons. About 450 kg of cement and 1300 kg of sand are needed per cube of mortar. For 1 sq.m.
a floor screed with a thickness of 10 mm will consume 20 kg of mixture (4.5 kg of cement and 13.5 sand). Depending on the thickness of the layer and the area of the rooms or house, you can easily calculate the required volumes.
Installation of damper tape
To make a damper tape, you can use any rolled material for waterproofing. It must be cut into pieces 30-40 cm wide. Then the strips must be laid around the perimeter of the room so that the cut extends onto the wall to a height slightly greater than the thickness of the screed, and also passes along the floor. Such damper tapes are needed to protect walls from moisture. To ensure good adhesion of the strip to the walls, you need to glue it with any adhesive in increments of 20-50 cm. After filling the base, the tape will press itself against the wall.
Then, to create a damper joint between the base and the wall, you need to use any rolled thermal insulation material 1 cm thick. It is cut into pieces 8-15 cm wide and glued to the wall on top of the waterproofing layer. As a result, the screed will not stick to the wall, which will reduce the internal stress in it and protect the surface from cracking. Soft insulation will allow the base to freely expand or contract as a result of changes in temperature and humidity in the room.
Marking the base for the screed using non-removable beacons
The quality requirements for the leveling screed are, as a rule, dictated by the subsequent layer, or its absence. So, the screed on the insulation in the attic can be aligned by eye; there is no need for special precision.
As for leveling ties, the requirements are much stricter. The clearance under a two-meter lath placed on a screed anywhere in the room should not exceed 4 mm. And the deviation from the design plane should not be more than 0.2% of the maximum size of the filled area.
Deviation from the plane does not always mean deviation from the horizontal. Often the screed is made with a slope, for example when → installing a soft roof.
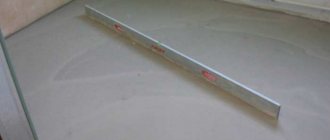
Let's look at how to achieve this quality using beacons made of galvanized profiles. Unlike reusable ones or, as they also say, “inventory” ones, they are not removed after the screed has hardened, remaining in its body, which makes the work more technologically advanced.
In cross-section, the non-removable beacon looks like an inverted letter “T”. Along its “leg”, when leveling the mixture, a plaster “rule” - a flat strip of aluminum - slides like a rail.
To get perfect floors in a room, we have to install rows of lighthouse strips over its entire area. In this case, the main thing is that the upper edges of all beacons, without exception, lie in the same plane.
Doing this is not as difficult as it might seem. We will need a hammer drill with a 6 mm drill, a laser level with a function for constructing planes (now almost any laser level has it), a regular Phillips screwdriver, a marking cord, a tape measure and, of course, beacons. Typically, a profile with a height of 10-12 mm is used for floors.
For fastenings we will purchase plastic plugs - dowels, screws and special fastening washers. You can make them yourself from ordinary tin, or purchase ready-made ones. Such a washer is a small strip of tin, on the side of which there is a slot or hole slightly more than 4 mm wide to fit the washer onto the self-tapping screw.
I recommend: Question: It is necessary to make a screed, the discrepancy across the floor in thickness is from 5 mm to 9 cm
Let's call someone to help, hold the end of the marking cord. With its help, we will mark the lines along which the beacons will be located. These lines should be approximately parallel (accuracy “by eye” is sufficient), and at a distance of no more than 2/3 of the length of the rule we will work with.
Exactly along the marked lines, every 30-40 cm we drill holes into which we insert dowels.
We install the laser level in such a way that the rays form a plane above the floor surface lying at the height of the future screed minus the beacon’s own height.
Now screw in the screws until the head of each of them is in the light plane of the level. The red laser light on the cap will let you know about this. If the height of the screed is lower than the plane of the laser beam, then we use a ruler or tape measure, measuring the same distances from the laser plane to the screw head.
All that remains is to place the beacons on the screw heads and secure them with washers (Fig. 1).
Preparation of cement-sand composition
A screed from a cement-sand mortar can be made from ready-made dry compositions, for example, a cement-sand composition M 200 or a mixture of Peskobeton M 300. Also, to make a screed, you can independently prepare a solution from a mixture of sand and Portland cement grade 400 in a ratio of 3:1. It is better to choose sand without impurities and large elements.
To install the screed, you will need a large amount of solution, so it is better to choose large containers for mixing. If there is no such container, then you can build sides like a box without a bottom directly on the floor in the room. The cracks at the bottom of the sides need to be filled with a dry compound. Pour the required amount of dry mixture into the box and, gradually adding water, mix the solution. To check the degree of moisture of the finished composition, you need to put on rubberized gloves and take a handful of the solution in your hand, then squeeze it. The result should be a lump without releasing drops of water. If water is released during compression, then a dry composition must be added to the solution. Using a mixture that is too wet may cause cracking. When making a solution yourself, first pour sand into a box, then cement, mix them and only then add water.
To make laying semi-dry mixtures easier, plasticizers can be used. They are added at the mixing stage with water in the ratio indicated on the package. By using plasticizing additives, the amount of other ingredients can be reduced. Such solutions are easy to install and are virtually not subject to shrinkage.
Pouring the composition
A cement-sand mortar screed can be laid with a thickness of at least 3 cm, and its maximum height depends on the load-bearing capacity of the floor slabs. A screed made of this material should not be made more than 6-7 cm high, as it will be very heavy. For these purposes, you can use lightweight ties made from other materials.
The screed manufacturing process consists of the following steps:
- We throw the prepared cement-sand mixture onto the floor using shovels. The height of the cakes should be equal to the thickness of the base. It is better to carry out the work in several hands: one person prepares the composition, the other drafts it.
- After filling the entire floor area, we begin tamping and leveling the applied mixture. This can be done with feet (in rubber boots) and shovels.
- As a result of tamping, the screed level will become lower than required, so you need to add a few more portions of the mixture. Moreover, you should not take a long break between the first and second application of the solution.
- Now you can start leveling the surface using the rule.
- During work, we constantly check the evenness of the screed using the rule of light. If necessary, add the solution again and level it.
- We grout the screed in a circular motion using graters. The better the grouting is done, the better the surface of the screed will be.
- If the work was carried out using pin beacons, then as the work progresses they need to be unscrewed and the holes filled with putty.
Important: when performing any work on screed installation, you must carefully protect your feet and hands from contact with the solution. Otherwise, you risk getting an alkaline skin burn, which will cause you a lot of trouble and take a long time to heal.
Calculation of the amount of materials for screed
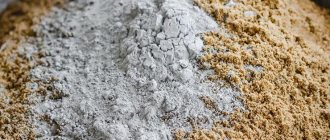
Choose sand responsibly, as impurities can worsen the quality of the future coating.
To make a solution, you should apply M500 cement and sand in a ratio of 1:3. Water must be added until the substance resembles sour cream. True, you need to select sand very carefully.
Not all sand can be used and not every type is suitable. Some types may contain many foreign elements in the composition. For example, dust or clay impurities. They will significantly reduce the strength of the entire floor and also reduce the adhesion of the components.
River sand is an ideal additive for mortar
It is recommended to use a table from which you can make the correct solution for different purposes:
| Components | Cement | Sand | Plasticizer | Water |
| For floor screed (proportion 1:3) | 50 kg | 150 kg | 40 l | |
| For masonry (proportion 1:4) | 50 kg | 160 kg | 40 l | |
| For plaster (proportion 1:1:5.5) | 50 kg | 275 kg | For a bucket of cement 1 bucket of lime | 40 l |
Using these proportions, you can make the right type of solution yourself. The ideal sand for mortar is considered to be river sand. Quarry sand, as well as washing sand, will be slightly worse in quality. The difference lies only in the structure of the grain of sand itself: river sand has a rounded shape, while quarry sand has sharper edges.
Water is added after adding the dry ingredients.
It is recommended to mix the solution in a special mixer. So, it is very easy to take into account the ratios. It is important to initially pour in the dry mixtures, and when they are mixed, you can add water.
A similar sequence can be used for screed that is kneaded without a mixer. Such a kneading can be done directly on the ground, but first you need to cover it with polyethylene film so that water does not absorb into it.
Sand is poured onto the film in a heap, then cement is added and the components are mixed from top to bottom using a shovel. Next, a depression is made in the center of the slide and some of the water is added to it.
The dry composition is gradually added from below and water is added again. As you add water, the slide will spread across the film, this is a sign that you have enough stirring.
This method can be used at home, and the solution can be smoothed over the area without any problems.
Caring for the finished base
To ensure proper reaction of water with the cement mixture and prevent its premature evaporation, the finished screed must be covered with plastic film. After a day, the film can be removed, and the beacon profiles and screws can be removed from the screed. The holes after these elements must be filled with putty. The sealing areas need to be re-grouted. After this, spray the surface of the screed with water and cover it again with film for three days. If the room is very dry and the screed dries quickly, then during these three days the surface must be periodically moistened.
After this time, the film can be removed and the surface can be checked again using the rule for light. A smooth screed made of cement-sand mortar with a minimum permissible surface curvature (up to 2 mm) is suitable for laying any facing covering. If the curvature of the surface is large, then you need to perform final leveling using self-spreading compounds. Moreover, laying the finishing mixture can be done only after the base has completely hardened.
After 9 days, the screed will acquire the necessary strength and you can now walk on it. At this stage, you need to cut off the excess waterproofing and damping strip protruding above the base level. After 4 weeks, the screed will reach the declared strength, but laying the face layer is not yet possible due to the increased humidity of the base. However, from this moment on, you can use artificial drying of the screed surface.
Screeds made from cement-sand mortar have their disadvantages. These are high noise transmission, high specific gravity and a long period of strength gain. However, it is not without a lot of advantages, including ease of installation and affordable price. Even if you do not have ready-made mixtures for semi-dry screeds, you can always prepare it yourself from sand, water and cement.
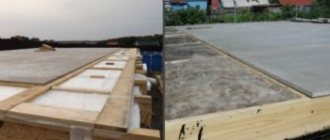
How to prepare a concrete floor
The installation of a cement screed requires a careful study of the physical state of the old cement layer. It begins after the removal of the replaced floor covering. As a rule, as a result of long-term use, cracks, chips or potholes may appear on the old screed after dismantling work.
Such defects must be removed, but before that, construction debris is removed from the floor, and the surface is thoroughly dusted. To do this, you can use a household vacuum cleaner. If the top layer of the old screed has swellings and delaminations, then they are removed with a hammer and chisel until a solid base remains.
Cracks in old cement base
Small cracks are expanded (increased in width) with a narrow spatula. Particular attention should be paid to the places where the floor adjoins the walls and the floor slabs are joined together. The prepared cracks are primed with a deep penetration compound and after 2-3 hours they are carefully sealed with sand-cement mortar.
Prepare a solution in which the recommended density of the screed is not lower than 1300 kg/m3 as follows:
- 1 part cement M400
- 3 parts sand
- The dry mixture is stirred
- Add water and mix again until a homogeneous thick mass is obtained.
Sealing cracks with cement mortar
It is important to know! Sand for mortar must be sifted and free from clay and construction debris.
The solution is made rigid so that it does not seep through the cracks and flood the neighbors. The thick mass should tightly fill the gap. Apply it with a spatula and smooth it out thoroughly. After 24 hours, when the repaired cracks have dried, you can proceed to the next procedure.
Waterproofing the prepared floor
The technology for constructing a cement-sand screed requires that this part of the work should never be ignored. Screed made of sand and cement refers to the so-called “wet” work. This means that a solution containing a large amount of water can seep through microcracks and pores of concrete and cause harm to neighbors or the room in which the repair has already been completed.
Waterproofing bathroom floor with mastic
To prevent this from happening, the old screed is waterproofed. There are several options for waterproofing the floor:
- Coating waterproofing with mastic
- Pasting insulation with roll materials
- Liquid waterproofing with cement-polymer compositions
For the first option, mastics based on bitumen and synthetic rubber are used. If you are waterproofing a bathroom, toilet or shower, it is recommended to apply a layer of mastic to the entire surface of the floor. For screeding in dry rooms, it is enough to coat the joints between the floor slabs and the places where the walls adjoin the slabs. The width of the mastic strip should be at least 15-20 cm.
Zero level marking with laser
The other two methods are recommended for bathrooms, toilets and basements. However, it is worth noting that pasting with roll materials such as “Aquaizol” or roofing felt has a weak point - the joint (make an overlap of at least 10 cm). Preference should be given to liquid polymer insulation, although it is not cheap.