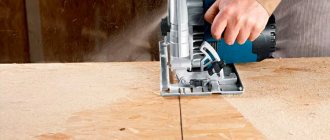
Features of puttying drywall corners
Processing the corner joints of drywall creates a smooth and reliable joint. Experts highlight several main points, which have their own nuances and subtleties.
Classic technology contains 3 steps:
| 1. Preparation. The surface is cleaned of dirt, existing defects are removed, and primed. | |
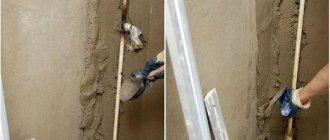
| 2. Reinforcement. Pre-prepared metal profiles or serpyanka are fixed to the corner joints of the plasterboard. Reinforcement allows you to strengthen the joints and give them the correct shape. | |
| 3. Putty. Includes application of starting and finishing solution. Each iteration is carried out after the previous one has completely dried. |
The thickness of the coating should not exceed 5 mm, and ideally be up to 2 millimeters.
It is better to perform several approaches with a smaller thickness than to immediately apply a thick coating.
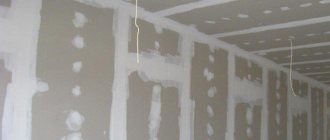
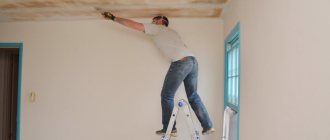
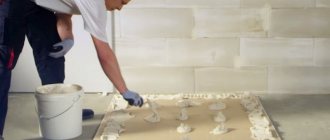
Finishing drywall corner
GKL putty does not require high skill, the main thing is to maintain consistency and accuracy. After fixing the sheets, a primer is applied to their surface. This will help strengthen the drywall surface, making it hard and moisture resistant.
To get the corners without extra layers of putty, you need to remove the protective film from the plasterboard with a knife.
Then they move on to putty. First, you need to seal the recesses for the screws, then the joints and seams are processed. To finish the corners, you need some kind of reinforcing material, for example, serpyanka. The mesh is cut according to the width of the finishing strip (40 cm on each side) and glued end-to-end, thickly spreading it with putty for the seams. Gently press the mesh into the putty layer and smooth the surface. It is convenient to do this with a spatula. The solution must be thin enough for water to saturate the surface.
Required materials and tools
Before you start finishing, you should make sure that everything you need is at hand. This is important, since the applied composition sets quickly, and there is no time to look for a suitable spatula or reinforcing tape.
Tools for work:
- a set of spatulas (several sizes flat and angled);
- knife;
- metal scissors or hacksaw;
- capacity;
- mixer;
- brushes, roller
You may also need a cloth to quickly clean your hands or tools.
Before you start finishing, you should make sure that everything you need is at hand.
Materials used:
- reinforcing mesh;
- metal or plastic profiles;
- non-woven tape;
- starting and finishing solution;
- priming.
When designing arched openings, the formation occurs using special flexible elements. Their design allows them to take the shape of the opening and fit tightly to the joint.
Sealing internal seams
Let's deal with the internal seams first, as a simpler matter. To strengthen the internal corners of plasterboard sheathing, you will need:
- putty. At this stage, the one designated as “starter” on the label is quite suitable. If you don’t want to get fancy and buy separate types of mixtures for different jobs, take those that are positioned as “universal” - they are also suitable for finishing smoothing;
- reinforcing masking tape. There are two types: elastic serpyanka and perforated paper. To make finishing the corners of drywall bring you less difficulty, buy self-adhesive sickle tape, it’s easier to work with;
- spatula - small, since the work to be done is fine, almost jewelry-like;
- sandpaper to remove excess mixture.
It will also require patience and accuracy. If you have never plastered before, these are the qualities that will help you gain the necessary experience faster and without wasting time, labor and consumables.
Back to contents↑
Puttying sequence step by step
- The putty is diluted in accordance with the manufacturer's instructions. We draw the attention of inexperienced repairers that the volume of the prepared solution should be small: over time it loses its adhesion properties.
- Sealing corners between sheets of drywall begins with the fact that you must putty the grooves - the recesses in the joint. They are filled with a small amount of putty, the excess is removed with a trowel.
- Next comes gluing the serpyanka. A piece of the required length is unwound from the reel and cut off. For the convenience of the procedure, you can buy a holder similar to the one used to measure stationery tape. In this case, the tape will not stick together until it touches the wall: its edge is fixed at the top of the seam, and the serpyanka unwinds under the weight of the dispenser. Your task is to direct it evenly so that the central axis coincides with the middle of the joint.
- The entire surface of the tape is smoothed with a plastic trowel. If somewhere it doesn’t stick well, you can coat the bottom with PVA. It is also important to ensure smoothness - wrinkles when sealing corners are unacceptable.
- The glued element is puttied: a small amount of solution is put on a spatula, it is applied to the middle of the corner and evenly distributed over both gypsum board panels.
After the putty has dried, the plasterboard corners are sanded and primed, after which you can begin finishing puttying.
Back to contents↑
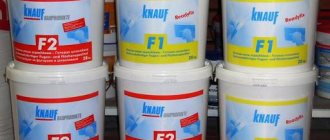
Choice of putty
Modern manufacturers provide a large selection of starting and finishing compositions. They are supplied in powder or ready-made form. Ready-made ones do not require dilution with water. Before application they are thoroughly mixed. For the powdered solution you will need a separate container, water and a construction mixer for mixing.
Ready-made mixtures reduce the time required to prepare the process.
Putties also differ in technical characteristics, ingredients, and brand. The choice is made depending on the complexity of the work performed and the quality of joint preparation . Common brands include Knauf, Semin, and Volma.
"Knauf Uniflot"
"Knauf Uniflot" is a universal mixture. Perfect for classic or moisture-resistant drywall. Allows use in rooms with high humidity.
"Uniflot" has increased strength
"Uniflot" has increased strength and low weight. It is used to cover sheets with a thickness of 9 to 12 millimeters. Technical characteristics are similar to cement grades.
Dries quickly and does not allow moisture to pass through. Not prone to cracking. Setting time ranges from 25 to 30 minutes.
The advantage of Knauf Uniflot is the ability to use it without additional reinforcement.
"Knauf Fugen"
"Knauf Fugen" is a mixture intended for indoor repairs. Unresistant to weathering and adverse external factors. The composition includes special moisture-protective additives. Requires mandatory reinforcement. It has a fine-grained structure. The minimum application thickness is 1 millimeter, the maximum is no more than 10.
“Fugen” sets quickly: within 3 minutes after application it begins to harden. This indicator must be taken into account when using. Optimal conditions are temperatures from 10 to 24 degrees and average humidity.
"Knauf Fugen" - a mixture intended for indoor repairs
"Semin"
Semin is a finishing composition that has proven itself well at low temperatures and humidity above 65%. Can be used with or without reinforcement. Supplied by manufacturers in diluted and powdered form.
When finishing with reinforcing tape, it requires double application. Easily sanded with sandpaper or a sanding machine.
Semin has proven itself well at low temperatures
JS Weber Vetonit
JS is a finishing mixture based on polymers. Has universal properties. Reliably adheres to all types of coatings. Easy to apply and does not crack. Differs in strength characteristics. Contains ground marble. Thanks to its presence, JS is used for decoration.
The disadvantages are low moisture-resistant properties. Not suitable for work in the bathroom, kitchen or other rooms with high humidity.
JS – finishing mixture based on polymers
"Volma seam"
“Volma suture” is a highly specialized gypsum mortar. Shows maximum performance when used on seams and corner joints. “Volma” is used for minor repairs, filling defects, cracks, and potholes. Allows you to hide differences of up to 5 millimeters. Withstands low temperatures. The permissible range is from 5 to 30 degrees.
"Volma" is used for minor repairs and filling defects
Selecting corners for gypsum boards
Corner profiles for drywall differ in technical characteristics and features of use. To make the right choice, you should familiarize yourself with the basic parameters of popular types.
Using a plastic corner like AquaBead
AquaBead is a classic plastic corner. An adhesive layer is applied to the inside, which allows you to secure the element without the use of adhesives.
To activate the adhesive base, the inside is moistened with water using a brush or a spray bottle.
Installation is simple. Working with AquaBead is carried out in several stages:
- The base is checked for deviations using a laser level.
- The inside of the profile is moistened with water.
- The corner is applied to the joint of the gypsum board and pressed lightly.
- 20 minutes after fixation, leveling with the starting mixture begins.
AquaBead can be purchased on the construction market or in specialized stores. They are sold by fixed meter. When repairing, the plastic is cut to the required size.
Classic plastic corner
Metal perforated corner
Metal corners differ from plastic ones only in the material of manufacture. Galvanized steel is used to create them. Such products are highly reliable. The installation sequence is no different from working with plastic:
- The quality of the walls is checked using a laser level.
- The metal profile is cut to size.
- Mix the solution to fix the structure.
- The mixture is applied in a thin layer to both sides of the joint.
- The product is pressed into the solution and leveled using a building level.
The mass that is squeezed out of the perforation is distributed over the entire height with a spatula.
An alternative to attaching reinforcing elements is to use liquid nails or a construction stapler.
Galvanized steel is used to create metal corners
Semicircular corner made of plastic
Semicircular profiles have a number of advantages over classic metal and plastic ones. They do not have sharp corners and are suitable for rooms where maximum mechanical impact is expected. High-strength ABS plastic is used for their manufacture.
Installation is carried out in several stages:
- GCR is cut in height by 1.5-2 centimeters at an angle of 45 degrees.
- A thick layer of putty is applied to the end.
- The corner is installed in the cut, pressing deep.
- The position of the product is checked with a laser level.
- Excess solution is removed with a sponge or rag.
For additional fixation, an industrial stapler is used.
Semicircular corners are suitable for rooms where maximum mechanical impact is expected
How to sew up a corner with plasterboard
Select plasterboard sheets so that in the corners they meet the original truncated edges. This is necessary so that at the stage of laying the construction mesh on the internal corners and the corners on the external corners, the reinforcing mesh and corners do not stand out on the general plane of the plasterboard sheets.
If this edge of the sheet has already been cut, a chamfer must be removed from it, cutting it at an angle of 45° to the depth of half the sheet or slightly less than its thickness. This is necessary to increase the area where plaster and putty are attached when sealing joints.
Self-tapping screws are used to secure the sheets to a metal frame. Sheathing with plasterboard will give it the necessary rigidity.
Profile fastening scheme when creating a corner structure
When installing internal corners, an L-profile is used
Before finishing the corner, it is necessary to freeze the perforated corner
Preparatory work
Preparation during renovation plays a special role. It is necessary to bring the tools and base into proper form, and helps improve the quality of the final result.
The preparatory stage begins with setting the indoor climate. If finishing is carried out inside, then the air temperature should not be too low or high, as well as excessive or insufficient humidity. The optimal indicators are:
- temperature in the range from 16 to 24 degrees;
- humidity no more than 70%.
Experts recommend protecting the room from drafts.
After this, move on to the main preparatory moments:
| 1. The drywall is trimmed along the corner, eliminating defects and irregularities. If the corner is semicircular, then the sheet is cut in height by 1.5 centimeters. | |
| 2. Wipe the cut with a rag, removing pieces of cardboard and excess dust. | |
| 3. Cover the area to be treated with a primer and allow it to dry. Drying time 1-2 hours. | |
| 4. While the soil dries, an element of the required size is cut from the profile. | |
| 5. Mix the solution in a separate container. Kneading is done according to the instructions on the package. Do not cook too much volume. |
The finished mixture should have a consistency similar to soft butter or very thick sour cream. After the entire preparatory stage has been completed, they proceed to installation.
Preparation of the solution
The preparation of the working mixture should be discussed in more detail. The reliability of the corner attachment depends on the quality of its guidance. If the material is used in finished form, then it is sufficient to stir it thoroughly before application.
To create a powdery mass you will need a container, water and a construction mixer:
| 1. The required volume is pre-measured and poured into a bucket. | |
| 2. Pour cool water into the powder in a thin stream. | |
| 3. Stir the mass with a mixer until smooth. The nozzle is completely lowered into the bucket, avoiding splashing. | |
| 4. After stirring, let the mixture sit for 5-10 minutes and stir again. |
The finished composition has the consistency of thick sour cream or soft butter.
During hovering, avoid high mixer speeds. The optimal speed is 600-800 rpm.
Surface preparation
Preparatory work when filling corners in plasterboard structures takes considerable time. As soon as the material and tools are ready, surface preparation begins. You need to do the following:
- The cut of drywall at the corner is trimmed, protruding areas and chips are removed.
- Intersections of the surface are carefully wiped with a rag, trying not to spoil the core of the drywall.
- Then comes the priming process. A brush is used for this.
- Allow time to dry.
Fitting a PU profile to the corner of a plasterboard structure
While the soil is drying, prepare the putty mixture:
- Pour the amount of water required according to the instructions into the bucket.
- Pour in the dry composition.
- Mix well using a construction mixer.
- Leave the solution for 3-5 minutes and mix again.
The mixture will be the consistency of soft butter. As soon as these steps are completed, the formation of even angles begins.
How to putty the inside corners of drywall
Puttying internal corners is a labor-intensive process. The difficulty is associated with the small space for maneuver and high requirements for the gypsum board connection. Serpyanka, putty, corner and flat spatulas are prepared in advance from the mandatory ones. Before puttingty the inner corners of drywall, carefully study the technological features of the process.
Finishing the inner corner is carried out in several steps:
| 1. The joint is covered with a small volume of the starting composition. Excess is immediately removed with a trowel or rag. | |
| 2. A serpyanka is attached to the fresh solution. The center of the tape is placed exactly at the junction of the sheets. A special holder (similar to that used for adhesive tape) allows for easier fastening. | |
| 3. The tape is pressed in using a trowel. If some areas are poorly glued, they are coated with PVA glue. The formation of folds is unacceptable. The corners should be as smooth as possible. | |
| 4. Putty is applied over the serpyanka. The mass is placed in the center, evenly distributing it on each side of the corner in turn. |
After drying, the corner is sanded and treated with a deep penetration primer. After this, they proceed to applying the finishing composition.
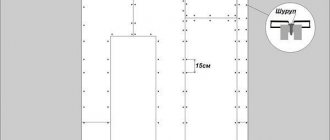
Installation diagrams for the corners of a plasterboard partition
In the diagrams below you can see how the external and internal corners of a plasterboard partition are mounted, during industrial installation, over large areas and using a PS profile from 75 mm. Installation of the corners of a plasterboard partition according to the Knauf technological map. Partition types C111 and C112.
©Gipsokart.ru
Other articles in the section: Plasterboard partitions
- Tall plasterboard partitions
- How to make a doorway in a plasterboard partition
- Interior partition made of plasterboard with a door
- Installation of a plasterboard partition
- General information about plasterboard partitions
- DIY plasterboard partition
- Partition made of two layers of plasterboard: technology of covering 2 layers of plasterboard
- Rules for installing plasterboard partitions
- Profile for plasterboard partitions
- Calculation of a plasterboard partition
How to putty the outside corners of drywall
To repair external corner joints of gypsum boards, prepare reinforcement, a knife for cutting them, and a level in advance.
Experts recommend choosing products made of galvanized steel. They are more reliable and are not subject to rust.
Fastening technology includes a number of sequential steps:
| 1. The height of the wall is measured with a tape measure. The required size is cut from the corner. | |
| 2. The slope is checked with a level for the presence of distortions. Differences of more than 5 millimeters require preliminary leveling. If there are no defects, then a small layer of putty is applied to the joint. | |
| 3. The corner must be applied to the junction of the sheets and pressed slightly. The excess that comes out through the perforation is distributed over the entire height. | |
| 4. The accuracy of placement is checked with a level. If necessary, adjustments are made. | |
| 5. The starting layer is sanded with a float and primed. | |
| 6. Finally, the finishing solution is applied. To do this, grab a nearby plane at a distance of 20-30 centimeters. It is important that there are no noticeable obvious transitions. |
The leveled and sanded wall is treated with a primer. It binds dust particles and increases the adhesion of the base.
Internal corner when covering two walls (method 1)
When forming an internal corner formed by the junction of two walls, a queuing tactic is used. A corner from a profile for plasterboard is formed by the abutment of two walls located at right angles to each other.
Screw the guides using a gasket-seal for a tighter connection
First, create a frame for drywall on one wall:
- Screw the guide profile (PN) to the floor with dowel nails in increments of 20 - 30 cm;
- The PN is fixed to the ceiling along a line strictly vertical from the lower guide profile;
- Rack profiles (PS) are placed starting from the corner. The PS is secured in the guides with metal screws L 11-16 mm (other names - press washers, bugs, screws with a mushroom head);
- Rack profiles are attached not only to the guides, but also to the wall, using straight perforated drywall hangers;
- Mount horizontal jumpers (if the height of the structure requires, increased rigidity is needed, there is a place on the wall for attaching heavy objects - shelves, cabinets, mirrors);
- Cover the sheathing with plasterboard, screwing it with metal screws L 25 mm.
After this, the frame of the adjacent wall is mounted:
- Screw the guides to the floor and ceiling, adjoining them to the already sheathed wall;
- The corner vertical stand is placed tightly against the drywall and screwed with self-tapping screws. The length of the self-tapping screws must be sufficient to penetrate the drywall and secure itself in the corner profile of the mounted wall. The pitch of the screws in the corner joint is about 250 mm.
Such a connection will withstand the loads that are inevitable during the operation of the premises, and the decorative coating applied to the gypsum board will not crack.
Install the sheathing of the second wall in the same classical way. Next, the finished frame is sheathed with gypsum board. The edge of the drywall sheet adjacent to the corner is removed at an angle of 45°, forming a groove. This is necessary so that the putty holds firmly when painting the corner and does not fall out after a while.
Professionals advise chamfering on both sides of the corner joint of the sheets. In this case, the reinforcing material (serpyanka, perforated L-shaped profile) will not protrude above the plane of the sheet, and finishing will be easier: you will not have to apply additional layers to align the protruding reinforcing material with the main plane of the sheet. Since it is easier to make a corner from plasterboard by mounting the frame on each wall in turn, this method is used more often.
Note: it is better to screw the guides not directly onto the floor surface, but with a special gasket-seal, which ensures a tight fit and promotes better insulation.
Puttying the corners of arched passages
The design of arches requires the use of flexible reinforcing structures. In order for such a profile to fit as tightly as possible, the drywall is pre-prepared:
| 1. Sheets are cut at an angle of 45 degrees to a depth of 1 to 1.5 centimeters. | |
| 2. A solution is applied to the sections, into which the metal is pressed. | |
| 3. Excess mass is distributed over the surface of the arch. | |
| 4. After drying, the starting coating is sanded and painted with primer. | |
| 5. Finally, putty with a layer of 1-2 millimeters. |
Additional fastening of the arched elements is done with a stapler. It makes it easier to hold the corner in a given position.
Forming the frame of the internal corner (method 2)
The method is used by experienced builders - first the entire frame is mounted, and then all that remains is to twist the drywall:
- The guide profiles are screwed to the floor and ceiling in the shape of an angle;
- Two corner rack profiles are twisted together so that the side of one profile is adjacent to the front part of the other to the middle. For twisting, use self-tapping screws with a press washer, in increments of 25 - 30 cm;
- This reinforced corner profile is inserted and screwed to the floor and ceiling guides;
- To enhance the rigidity of the corner, you can form L-shaped holders from profile scraps and attach them to the rough wall and to the paired corner profile;
- After forming the corner, the required number of rack profiles are set, which are attached to the NP with self-tapping screws, and to the rough wall with direct hangers.
Methods for removing old wallpaper from plasterboard walls
The structure is covered with plasterboard: first, the side where the shoulder of the paired profile is smaller. Otherwise, the thickness of the gypsum sheet will cover the area of the profile, causing the edge of the gypsum board to be fixed too close to the edge, which is not very reliable. Then they begin finishing with the finishing coat.
Note: rack profiles for walls with light finishing (wallpaper, painting) are placed at a distance of 60 cm, but with increased load on the wall, for example, when facing with stone, tiles, the step between joints is reduced to 40 cm.
Technique for correcting corners on plasterboard walls
The main problems when forming corners are related to unevenness of the base, the formation of cracks or chips:
- Excessive roughness, drops, streaks at the corners. Before gluing wallpaper, it is necessary to identify all surface defects. Smudges, drops or excessive roughness can be removed by sanding with a fine mesh, sandpaper or a sanding machine.
- Cracks. Appear as a result of technology violations. If they occur, the place of cracking is cleaned with a spatula or sandpaper and treated with primer. Then the defect should be puttied and sanded until a smooth plane is formed.
- Chips. To remove them, putty is used. The chipped area is restored and sanded after drying.
All defects must be corrected before finishing.
All defects must be corrected before finishing.
Puttying internal corners - process features
In principle, this task is not difficult to carry out, the main thing is to gain a little experience, which is done in the process of working in areas that will be covered with furniture. For work we will need putty, a sickle and an angled spatula. Now let’s look step by step at how the workflow should go.
First you need to prepare the putty in full accordance with the instructions, if it was purchased in the form of a dry powder. To do this, putty is slowly poured into a container with clean water and stirred with a construction mixer for about 10 minutes. Afterwards, you need to let it stand for another 10 minutes and mix again.
The inner corner is glued with reinforcing mesh, and its middle should be located exactly at the junction of the walls. A regular or self-adhesive mesh can be used here. If you use a regular serpyanka, then PVA glue is applied to its surface using a brush, then it is attached and the opposite side is coated with glue.
After the glue has dried, starting putty is applied to both sides of the corner using a regular spatula. The layer should not be too thick, but such that it covers the mesh. The applied putty is leveled using an angle spatula. After drying, the surface must be treated with fine sandpaper to remove all irregularities and sagging. Finishing of internal wall joints using finishing putty is carried out together with the final finishing of surfaces.
The final stage
The final work directly depends on the type of finishing:
- If the wallpaper is polymer, with texture or three-dimensional patterns, then perfect smoothness is not required. In this case, it is enough to smooth the walls with a sander and coat them with a primer.
- If the surface involves painting or gluing thin wallpaper, then the walls must be perfectly smooth. Any defects will stand out under the thin paper.
Defects are eliminated by filling the surface with fine-grained compounds. They are applied in a layer of no more than 2 millimeters. After drying, the walls are sanded again and covered with primer.
It usually takes 1-2 days for the putty to dry, and a similar time is required for the soil to set and dry.
Defects can be eliminated by filling the surface with fine-grained compounds.
Sanding corners
Sanding is the final step. It removes small irregularities, sagging, and drops from the walls. If puttying is carried out with high precision, then grinding is reduced to a minimum.
The main disadvantage of grinding is the formation of fine dust. In addition, it is time-consuming and labor-intensive. This is a painstaking process that requires patience and endurance from a specialist.
Cleaning is carried out in several steps:
| 1. Doors, floors, openings are covered with a damp cloth. It allows you to reduce the amount of suspended matter in the air. | |
| 2. Clean the walls with a sharp spatula. It allows you to remove pieces of mortar and other irregularities. | |
| 3. For grinding, use a block and a mesh with a cell of 1800-200. The movements are carried out in a circular manner, moving along the entire surface of the wall. |
To identify surface irregularities and defects, oblique lighting is used. The surface is illuminated throughout the grinding period.
If the work is carried out for gluing thick wallpaper, then perfect sanding of the layer is not required. It is enough to remove obvious defects.
Features of slope putty
Drywall is used to make slopes. This gives undeniable advantages: a smooth and even plane, the absence of serious defects. To prepare for painting or wallpapering, simply coat it with a primer.
However, in some cases additional putty is required. This happens when there are drops, potholes, or unevenness. In such a situation, work is carried out in several steps:
| 1. Pieces equal to the height and length of the slopes are cut from the metal profile. | |
| 2. The slopes are cleaned, removing existing irregularities. | |
| 3. Apply a starting mixture 2-3 millimeters thick to the corners. | |
| 4. Corner profiles are pressed into the mass and the excess is leveled. The quality of the fit is checked using a building level. | |
| 5. After the starting layer has dried, apply the finishing layer, covering the corner and the adjacent wall. The plane is leveled, trying to obtain an even layer. | |
| 6. Sagging and drips are cleaned by grinding. |
For additional protection, the slopes are covered with soil. After this, they move on to the final finishing.
Subtleties of putty for wallpaper in a new house
Renovating a new home has its undeniable advantages over secondary housing. The advantages include:
- lack of old finishing;
- absence of fungus and mold;
- flat base.
To begin repairs, it is enough to remove external contamination, eliminate existing defects and significant differences.
Puttying without leveling is not allowed if the slope exceeds 3 millimeters.
In new buildings, puttying is carried out in several steps:
| 1. The base is thoroughly cleaned of dirt. | |
| 2. Cracks and other irregularities, if any, are sealed with the mixture. | |
| 3. The base is coated with primer twice with an interval of 12-24 hours. | |
| 4. The putty is applied and leveled with a wide spatula. The sequence of work is bottom-up with overlap. | |
| 5. The quality of the coating is checked by level. | |
| 6. At the end, seal the corners. | |
| 7. The thickness of the finishing layer should not exceed 2 millimeters |
At the end of all operations, the walls are once again coated with primer.
During repairs, special attention is paid to plumb lines. The presence of blockages or incorrect slope is determined by the level.
Common mistakes when sealing corners
Novice specialists often encounter mistakes that affect the final result:
- Deepening the caps. The self-tapping screws used for fastening gypsum boards are recessed deep into the sheet. The fastening points are subsequently leveled with putty. Thanks to this, the appearance of failures or rust is avoided.
- Lack of preparatory stage. Thanks to preparation, the contour becomes smoother and stronger. If there are areas on the gypsum board where the cardboard is peeling off, then they are cleaned and leveled with the mixture. If this is not done in a timely manner, then after wallpapering or painting, the defective areas will bubble or cracks will appear.
- Checking the position of the corner. After the profile is installed, you need to check that it is positioned correctly. This is due to the fact that the reinforcing profile can be recessed unevenly over its entire height. As a result, one of the edges will be blocked.
Errors must be corrected in a timely manner, otherwise it will affect the quality of the entire work.
After the profile is installed, you need to check that it is positioned correctly to avoid errors
Corner finishing
The right outer corner of the plasterboard structure is strengthened with a metal corner, which is attached to putty mixed with PVA glue or to gypsum plaster. The outer curved corner is reinforced with a flexible plastic corner.
The inner corner of the structure is glued with a painting mesh and puttied the required number of times.
Expert advice
Additional processing of gypsum board joints makes it possible to make the wall contour more even and reliable. The aesthetics and reliability of the plasterboard floor directly depend on the quality of all operations.
To make finishing easier, experts recommend following a number of tips:
- The manufacturer is chosen based on price-quality ratio, based on numerous reviews. Particular attention is paid to the shelf life of the product. Do not purchase packages if there is less than 1 month left before its expiration or storage conditions have been violated.
- During kneading, follow the manufacturer's recommendations. The proportions indicated on the label do not violate.
- A construction mixer makes it possible to avoid the appearance of lumps and achieve a soft, uniform structure. The mode is selected at low speeds, no more than 600-800 per minute.
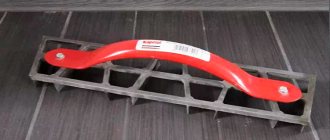
- Increased accuracy and quality are achieved by using a spatula with curved edges.
- All tools must be kept clean and at hand during work.
Puttying corners is not difficult if you carefully study the technology of carrying out the stages and approach the choice of materials wisely. It is important to remember that the finished result directly depends on the quality of preparation of the base and the correct application of the mixture.
Have you ever putty the corners of drywall yourself? What life hacks helped you? Share them in the comments.