During a major overhaul, the wall screeding procedure is one of the most labor-intensive due to the large area of this surface. The most difficult stage of the work is the corner areas: before leveling the corners of the walls, you need to decide on the method and materials.
- Other ways to align an inside corner
Why is this necessary?
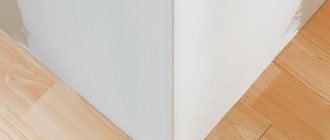
A room with smooth walls and corners looks very beautiful: in this case, any subsequent design will not encounter any obstacles. On the other hand, even if there is a high-quality ceiling surface, beautiful furniture and flooring, crooked, uneven corners will blur the entire favorable impression. There is a common belief that such defects can be smoothed out by decorating with various elements: while this can work with walls, it is almost impossible to hide uneven corners. So that at the final stage of finishing the room you do not rack your brains trying to eliminate such shortcomings, it is recommended that you initially pay due attention to this issue.
How to align corners
Despite the considerable complexity of the procedure for leveling corners, armed with clear instructions, even a beginner can implement it. The first step is to decide on a suitable method, which is influenced by the degree of curvature, the skill of the performer and some nuances of the room.
Basic ways to align corners:
- Plaster. This method is usually used when plastering the entire room, when the corners are aligned with the walls. It should be said right away that this method is quite labor-intensive, requiring both effort and time. The main material used here is a standard cement-based plaster mortar. There is also an option with dry gypsum plasters, which are much more convenient to work with, but much more expensive. Taking into account the fact that quite a lot of material is needed to finish all the walls and corners, they usually try to make do with cheaper mixtures.
Leveling corners with plaster
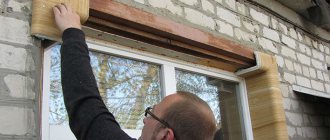
- Plasterboard boards. In this case, the share of the so-called “wet” processes, which increases the speed of work and reduces the amount of dirt. This method involves creating a perfectly flat surface of plasterboard slabs on top of the rough base. Their installation is carried out in two ways - by gluing or fixing to a pre-assembled frame. The second option is easier to implement, but it involves some loss of living space (the frame hides approximately 50 mm on each wall). As in the case of plaster, covering the corners with plasterboard is used at the same time as the general leveling of the walls.
Aligning corners with drywall
- Using a tag. Most often, internal corners are aligned in this way. A mark is placed on one of the walls with a plumb line or level, after which this area is filled with a plaster mixture (usually starting putty is used). A long spatula is used for leveling. After the mortar has set, the second wall of the corner is formed in a similar way. This method is usually used in local repair situations, when there is no need to achieve an ideal 90-degree angle: the main thing is that the area looks visually smooth. In principle, if everything is in order with the eye, you can do without a plumb line.
Align corners using a mark
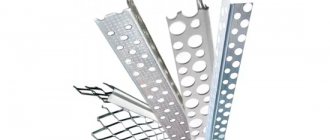
- Counter-schultz. This is the name of a special perforated corner, which is often used in painting and plastering work. It acts as a kind of beacon, installed at the very top of the corner (internal or external) along a plumb line: its sides set the directions for plastering in both directions. In this case, it is most convenient to use gypsum starting mixtures as a material - compared to cement plaster, they are more elastic and set faster.
Aligning corners with a contra-sharp
Leveling corners with plaster
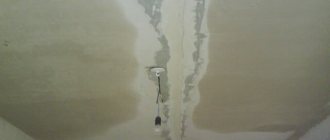
In any house or apartment there are internal and external corners, the formation of which occurs due to the connection of walls, as well as windows and doorways. Experienced craftsmen pay due attention to the joints, and they use a prepared mortar and a spatula to create them. The work occurs in the following order:
- The walls are thoroughly cleaned of dirt and previous coatings;
- Using a deeply penetrating composition, corners are primed;
- Using a plumb line, possible horizontal and vertical deviations are detected;
- Then the planes are measured to see how perpendicular they are. This can be done using a square;
- Next, beacons are installed. They will help you decide on the required layer of plaster material;
- The prepared putty can be used to level the corners, however, provided that minor errors are detected. In this case, starting plaster is not needed;
- The mortar is then poured over and stretched. From time to time the plumb line traces the vertical;
- The process is completed by rubbing the corners.
The corners are aligned using the sketch method with a significant deviation from the vertical (horizontal) line. The hardened solution will serve as a guide when applying a layer with less deviation.
The resulting bayonet is puttied and brought to perfect shape using a corner spatula. If you don't have such a tool, use a simple thin scraper and a rule.
First, using a scraper, the finishing composition forms one part of the corner, and then the rule must be transferred to the other. Only experienced craftsmen can boast of dexterity in the process of work. Beginners are recommended to arm themselves with a perforated corner, or, as it is also called, a counter-sharp.
How to align corners
Quality levels
When starting work, the first thing you need to do is decide on the required level of quality, which is influenced by the type of finishing:
- The use of complex wallpaper with a pattern, ceramic, clinker or porcelain tiles requires a very high quality base (the 90 degree angle must be perfectly maintained). In this case, each stage of work must be checked by level.
- If painting, decorative plaster, simple or liquid wallpaper will be used as the final design, leveling can only be carried out along a plane.
Materials
As for the choice of material for plaster, we are guided by the following considerations:
- For work outdoors or in rooms with high humidity levels, it is recommended to use cement, lime or polymer mortar. Gypsum plasters will get wet and crumble under such conditions.
- Dry rooms, in addition to the above materials, can be finished with starting putties (plasters) based on gypsum.
When purchasing ready-made mixtures, you need to focus only on well-known brands. The material should only be stored in dry rooms, so it is not recommended to purchase it at the market or other similar place. Typically, packages of dry plaster indicate the approximate consumption of material per 1 m² of area, depending on the thickness of the applied layer. This makes it easier to calculate the required amount of material.
Tools
To align the corners, you need to prepare the following tools:
- A container for preparing the solution (preferably plastic).
- Construction level and plumb line.
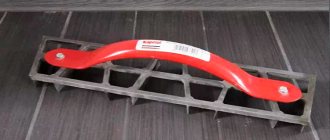
- Rule and set of spatulas.
- A foam or wood grater.
- Drill with a mixing attachment for mixing the solution.
Expert advice
Additional processing of gypsum board joints makes it possible to make the wall contour more even and reliable. The aesthetics and reliability of the plasterboard floor directly depend on the quality of all operations.
To make finishing easier, experts recommend following a number of tips:
- The manufacturer is chosen based on price-quality ratio, based on numerous reviews. Particular attention is paid to the shelf life of the product. Do not purchase packages if there is less than 1 month left before its expiration or storage conditions have been violated.
- During kneading, follow the manufacturer's recommendations. The proportions indicated on the label do not violate.
- A construction mixer makes it possible to avoid the appearance of lumps and achieve a soft, uniform structure. The mode is selected at low speeds, no more than 600-800 per minute.
- Increased accuracy and quality are achieved by using a spatula with curved edges.
- All tools must be kept clean and at hand during work.
Puttying corners is not difficult if you carefully study the technology of carrying out the stages and approach the choice of materials wisely. It is important to remember that the finished result directly depends on the quality of preparation of the base and the correct application of the mixture.
Have you ever putty the corners of drywall yourself? What life hacks helped you? Share them in the comments.
How to align an internal corner
Most often, the beacon plastering method is used for this, which is implemented in the following sequence of operations:
- Preparing the base. Both sides of the corner must be thoroughly cleaned of all remnants of the old finish - wallpaper, paint, old plaster or putty. In cases where the old plaster layer holds very firmly, it can be left. It’s much more difficult with paint: it’s very difficult to remove and you can’t leave it on. In extreme cases, a very durable painted surface is equipped with a notch (it is applied with a sharp hatchet or pickaxe). If protruding elevations are found on the cleaned wall, they must be knocked down with a hammer and chisel.
The base must be completely cleaned before leveling the corner.
- Primer. The cleaned base is treated with deep penetration acrylic impregnation. This allows you to further secure the surface and remove remaining dust. As a result, the level of adhesion between the base and plaster increases significantly. Quite often, traces of mold and mildew are found in corner areas of the wall (this is especially true for internal corners near the window). In this case, a special antibacterial agent is used for treatment along with the usual primer.
The cleaned base is primed before leveling the corners.
- Installation of beacons. The walls are leveled using special plaster beacons. To do this, the entire base area is divided into equal sections of 1-1.5 m (depending on the length of the rule) by vertical lines, along which guides will be installed in the future. The first plank is mounted at a distance of 10 cm from the corner: thick plaster or alabaster can be used to fix it. Having set this beacon at the required height, another guide is similarly mounted on the opposite side of the wall.
Installation of plaster beacons for an internal corner
It is important to clearly orient each of these planks vertically, for which you will need a plumb line or level. To set intermediate beacons, 2 nails are driven into the fixed planks (top and bottom). You can also use a plaster mixture to attach the beacons, as in the image above. By stretching a fishing line or cord between the nails, you obtain the necessary guidelines for the remaining beacons. Since leveling corners with plaster is usually carried out with a similar procedure on walls, beacons are installed over the entire area of the wall. Once installation is complete, the nails and line should be removed.
- Preparation of the solution. It is easiest to mix ready-made dry mixtures: in this case, you simply need to follow the proportions of water and powder indicated on the package. If the instructions are missing (or are printed in a foreign language), the following procedure is used: first, clean water is poured into the container, and then, creating a small whirlpool with your hand, the dry mixture is poured in (it should completely cover the water). Stirring with a mixer is carried out in two stages: after general mixing, having achieved homogeneity of the solution, pause for 4-5 minutes, after which a final short knead is carried out.
Preparing a solution for leveling corners
The situation is more complicated with cement or lime plaster: here you will need to independently prepare a dry mixture of sand and cement (or lime) in the required proportions, and then carry out general mixing with water. Regardless of the type of solution used, it is not recommended to prepare too large portions (especially if the work is being done by a novice). It is better to start with small batches, increasing their volume as you become more proficient.
- Angle alignment. It is more convenient to first align one plane of the angle, and after setting it, the second. This is explained by the fact that adjacent walls located in close proximity cannot be properly decorated, because the tool will leave grooves on the damp surface of the opposite plane. The finished solution is first thrown onto one of the walls in the spaces between the beacons, after which, using a rule moving along the guides from bottom to top, it is evenly laid on the surface. Having formed one side in this way, pause for it to set (about 30 minutes), after which they begin leveling the second side. In cases where the walls are leveled along with the corners, there is no need for such pauses: starting from the corner, they plaster the entire room in a circle.
Aligning the inner corner of the wall: first plaster the first wall, after it sets, plaster the second wall
If there is a need to achieve an ideal angle of 90 degrees, use a special corner spatula.
Corner spatula: left - for internal corners, center and right - for external corners
Sometimes it is not possible to completely level the surface in one approach due to too large unevenness, which requires applying another layer of plaster. To do this, it is advisable to wait until the starting plaster has completely dried (this does not mean setting, but complete drying over the entire thickness of the mantling). If you apply a second layer on a wet base, the moisture trapped inside will cause pockets to appear inside the finish.
How to equalize without a counter-switch
To apply this method you will need:
- Plaster.
- Spatulas.
- Typically, a flat board that is wrapped with tape.
- Sandpaper.
Using an Angle Spatula
How to perform
Prepare the walls. Remove the protrusions and fill the cracks with plaster. Then follow the following instructions sequentially:
- On the back side of the outer corner, place the strip so that it protrudes from behind the joint by a length equal to the thickness of the intended layer of plaster. Attach it to the floor and ceiling. If the length is chosen correctly, it can be used as a spacer.
- Start laying the plaster using the rule. Move the tool towards the joint with a slight downward slope. If necessary, repeat the procedure several times when the layer is dry.
- After 48-72 hours, repeat the work, applying the strip on the plastered side.
- Once the surface is dry, sand it with sandpaper.
Other ways to align an inside corner
If you need to level an internal corner locally, without treating all the walls, then there is no need to set up beacons for this. The main task in such a situation is to avoid a height difference between the finish and the rest of the base. There is no need to talk about the ideal observance of a 90 degree angle. All that can be offered here is to make the walls visually smooth, filling the visible depressions and eliminating the elevations. In this case, the so-called the “mark” method, which is implemented with a wide spatula and gypsum plaster.
Local leveling of the corner with gypsum plaster
Aligning an outside corner
For this you will need the so-called. “Kontraschultz” is a perforated corner made of aluminum, equipped with a sickle mesh around the edges. In addition to the convenience of the alignment procedure, the counter-shultz further creates additional protection for the outer corner, which more often than other sections of the wall undergoes mechanical stress. If additional measures are not taken, it may even fall off if subjected to a strong impact.
Description of the procedure for aligning the outer corner:
- Preparation. As in the case of the internal corner, here you will need to remove all the old finish from the surface of the walls and knock down any exposed concrete bulges. After this, the cleaned base is primed .
Cleaning and priming the base
- Installation of the corner. This is the most important operation, on the correctness of which the quality of the entire finish depends. The complexity of the procedure is that the contra-shultz must be adjusted both vertically and in accordance with the height of the leveling layer. It is most convenient to plant it on alabaster, checking the verticality of the installation using a plumb line. As for the height of fixation, it is determined visually: it is desirable that the thickness of the applied layer does not exceed 10 mm.
Installation of counter-switch
- Laying the solution. It’s convenient to start leveling from the bottom of the corner, on both sides at once (to avoid movement of the counter-joint, it can be additionally screwed with self-tapping screws). The prepared plaster mixture (the mixing procedure was described in the previous part) is thrown onto the wall, and then pulled together with a rule or a wide spatula. You can also apply the solution directly to the tool and pull the wall from bottom to top. There is no fundamental difference here, it all depends on individual preferences. Having plastered the bottom on one side, they immediately move to the second. Excess mortar is usually concentrated at the top of the corner: it is removed with a spatula and used for further finishing. Having finished plastering at the bottom of the corner, move on to the top: for this you will need a convenient construction trestle of a suitable height.
Instructions for installing the corner and laying the mortar
- The final stage. Having finished the entire corner, it is allowed to dry, after which another layer can be applied to finally smooth out minor flaws. In principle, finishing putty is intended to solve such problems.
You can also watch a video about installing paint corners:
Using a contraschultz
Installing a counter-slot or perforated corner is a popular method for aligning joints. A counter-shultz is a corner made of an aluminum base and perforated leaves. For leveling, corners with reinforced mesh are used.
What you will need
- Building level or plumb line.
- Roller for laying primer composition.
- Primer.
- Construction mixer, hammer drill.
- Mixing container.
- Rule.
- Set of spatulas.
- Scissors.
- Contrasults according to the height of the room.
Counterschultz
Work technology
The work begins with cutting the rolled products to the height of the walls in the corners and preparing the plaster. The composition is applied to the surface, the corner is pressed, and excess solution is removed. In outer corners, plaster is placed on the inside of the wall.
If internal joints are leveled, the mixture is applied to the walls from floor to ceiling. A perforated corner is installed. Excess and protrusions of material are removed. Additionally, you can secure it with self-tapping screws.
After the installation of the corners is completed and the composition has dried, you can level the joints with the wall. This is easier to do with a spatula. When the plaster has dried, a primer is applied. Then major leveling is carried out.