Covering interior walls with ceramic tiles is one of the most common ways to decorate rooms with high humidity. Ceramics is durable, resistant to all kinds of influences, it does not absorb moisture and odors, and no other type of cladding can compare with its wide range of shapes, colors and textures. Ceramic tiles are not a cheap material, but they fully cope with the decorative, sanitary, hygienic and protective functions. Today’s material is about the advantages of ceramics, the nuances of choosing it and the technology for decorating walls with its help.
Cladding interior walls with ceramic tiles
Advantages of ceramic tile cladding
When choosing a material, you need to make sure that it meets the requirements of the operating conditions in the room where the repairs are to be made.
The advantages of tiles include the following:
- versatility of the material - ceramics can be used in any room;
- ceramics is an environmentally friendly, safe material;
- the cladding is not afraid of temperature changes, so it can be used in unheated rooms;
- ceramics are not afraid of high humidity and direct fall of water, so they are used in swimming pools, baths, and showers;
- ceramic tiles form a strong, durable coating on the wall due to high adhesion to the base;
- If you follow the technology, you can do the cladding yourself;
- On sale you can find ceramic tiles of different shapes and sizes. Some collections are presented with original products in the form of rhombuses or polygons. In addition, ceramics are distinguished by a wide range of colors, designs and patterns, as well as imitations of the surface of other materials;
- ceramics are durable and fireproof, which is why they are used for wall cladding in the kitchen. The material does not absorb dirt and odors and is easy to clean;
- This is a hygienic material, so it is used for wall cladding in medical institutions and laboratories.
Accent wall in the kitchen
Kitchen tiles
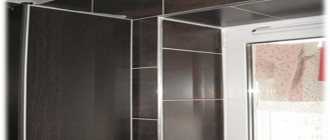
In the process of selecting ceramic tiles for kitchen walls, it is extremely important to take into account the overall style of the room and its color scheme. Wall cladding with tiles can be done not only along the kitchen work area, but also on other walls of the room.
It is important to take into account the fact that the ceramic coating that is placed in the cooking area must have good resistance to high temperatures. It should also be able to withstand prolonged exposure to water and moisture.
An important parameter will be the ability of the tile to be easily cleaned without any damage from any kind of contamination typical of kitchens.
Types of material
There are several types of ceramic tiles for interior use. This allows you to choose a material, quality and performance properties that correspond to the conditions of a particular room.
Table 1. Types of material
| Illustration | Peculiarities |
| Manufactured by dry pressing. The surface of the tile is covered with an opaque glaze. Due to the use of double firing technology, the material is quite durable and wear-resistant. Can be used as cladding in premises for any purpose. |
| Terraglia | A distinctive feature is white color. Made from expensive high-quality clay using double-firing technology. Used as an interior finishing material. |
| Material with a porous structure without a glazed coating. Has high strength and wear resistance. Features a rich assortment of shades. |
| Produced using the technology of sintering clay raw materials. The finished product has high mechanical resistance. Can be used as an external cladding material. The color and range is limited to brown and yellow shades. |
| The raw material used is not kaolin clay. The finished product does not have a glazed coating. Manufactured by pressing. The structure is homogeneous, so the policy has high mechanical strength. Can be used in rooms with high loads. |
The size of the tiles can be small 5 x 5 cm, medium 10 x 10 cm, 10 x 15 cm and large when one side reaches 40 cm.
The size of the cladding is selected depending on the area of the room and the load-bearing capacity of the base.
A separate category of material is mosaic. Small elements are glued to the backing. This allows for quick installation. Mosaic can be used as the main decoration or to decorate an accent wall, niche, column - the flexible substrate allows you to veneer structures of any shape.
The mosaic is attached like ordinary ceramics - with tile adhesive
The more joints between the tiles, the less resistant the surface covered with it is to moisture. A joint is a potential risk. The tile joints must be carefully monitored, cleaned and updated if necessary.
Mosaic in the interior
Modern grouting materials are highly resistant to moisture and mechanical stress, so they retain a neat appearance for a long time and reliably protect the base from moisture.
Choosing tiles for wall cladding
Today the variety of tiles is quite large. The wide range of types, shapes, colors and shades is simply misleading. But let's look at the main criteria for choosing tiles. It is enough to follow a few simple rules:
- If the room is not large, then choosing light tiles would be a good option. Because this will give the effect of enlarging the room, and also make it brighter.
- Note that the tiles intended for walls are somewhat thinner than the material for flooring.
- High-quality tiles must have the correct geometric shapes. And the quality in this regard is easy to check. Take several tiles from one package and place them next to each other. If their size does not match, it means that this is not a quality material.
- Each seller must have a quality certificate for the products he sells. Ask to see it.
- If you buy several boxes of tiles, be sure to check the color in each package, it must be completely identical.
- Ask the seller what kind of adhesive you need to buy for this type of facing material. Because each tile has a different adhesive, depending on the type of material, size and weight.
Suitable substrates for ceramic tiles
In terms of the type of base that can be used under ceramic tiles, the material is universal. Ceramics can be mounted on CBPB, concrete, cement screed, plasterboard and old and tiled cladding. The bases themselves are divided into those that are specially prepared for laying policies and those that are universal. Most surfaces require preliminary preparation.
Facing must be done on a solid and level base
Cement board
Cement slabs form a base ready for tiling. Of all the sheet materials, this is the most expensive option, but its high strength makes this base the most suitable for ceramic cladding. DSP can be laid on the floor and mounted on walls in any premises, including those with high humidity, where the base material is protected with waterproofing.
DSP
Fiberglass gypsum boards
Fiberglass gypsum boards are not the usual GVL or GKLV. This material is specially designed as a base for ceramic cladding. The load that such a base can withstand is somewhat lower than for a CBPB due to lower hardness and strength - this is worth taking into account. The peculiarity of the structure of the slab is the presence of a core impregnated with a water-repellent composition and a moisture-resistant coating. Therefore, this stove is used in rooms with high humidity. The fiberglass in the board further strengthens it. To make the base moisture-resistant, do not forget about high-quality sealing of the joints with silicone sealant.
Fiberglass gypsum boards
GKLV
Moisture-resistant drywall is made in green or blue. This is a universal base for painting, paneling and wallpapering. Despite the name, gypsum plasterboard is somewhat vulnerable to moisture, and therefore requires waterproofing protection when used in the bathroom.
Moisture-resistant drywall
GVL
Conventional drywall is used as a base for ceramic tiles in rooms with dry and moderately humid microclimates. In case of high humidity, it is necessary to perform high-quality waterproofing.
Regular GVL
Note! Ceramic policy is a rather heavy material that has an impact on the base. So, a plasterboard sheet with a thickness of 12 to 15 mm will not be enough. The walls are covered with a double layer of plasterboard, 12 mm thick each.
Concrete
Concrete base is one of the universal types designed for ceramic tiles. The installation process does not cause difficulties if the base is even.
Important! The concrete should not contain film-forming substances that will reduce the level of adhesion between the tile adhesive and the base.
Laying on a concrete base
Cement strainer
This type of base is a reliable and durable option for tiles. In this case, the screed itself is made on any basis. The screed is made when it is necessary to level the floor and walls, as well as to create a slope in the shower. A screed may be required when forming an irregularly shaped base, such as a round column. The disadvantage of this version of the base device is that the screed takes a long time to dry.
Laying on cement screed
Existing ceramic cladding
Laying a new ceramic coating directly on top of the existing old one is possible using cement mortar. This will save on costs and operating time. The main condition is that the old cladding must be firmly fixed along the entire wall, while the vertical surface must be perfectly flat. It is worth remembering that as a result of such installation the thickness of the coating will increase. In order for the new policy to be firmly anchored on such a base, the old one is treated with sandpaper, thereby ensuring better adhesion to the cement mortar.
Laying over old tiles
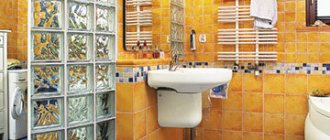
Ceramic coating for bathroom and toilet
The main requirement for tiles in a bathroom, toilet or shower is its resistance to moisture and temperature changes. For this reason, you should only pay attention to tiles that belong to the first class as they have better hydrophobicity.
Bathroom tiles can be any size, but it is recommended to use medium-sized tiles or mosaic ceramic tiles. It should be taken into account that the size of the tiles for such rooms is selected taking into account their area and general style.
Many people try to figure out which tiles are suitable for a small bathroom. This is due to the fact that in most houses the bathrooms are very small, which is dictated by Soviet austerity policies. For small rooms used as a shower or bath, small mosaic tiles or regular square tiles measuring 2 by 20 centimeters are best suited.
Features of choosing ceramic tiles
Ceramics are the best finishing option for combined bathrooms, toilets and bathrooms. When choosing it, they take into account not only decorativeness and the ability to create an optical effect of increasing space, but also the operational properties of the material.
Originally shaped tiles create a special atmosphere in the interior
Note! First, choose the tile, and then choose the plumbing fixtures and accessories.
Ceramic tiles are divided into wall and floor tiles. The second is larger in thickness and size. Often ceramics in a store are offered as a ready-made collection with elements for floors and walls. In this case, the combination of textures and shades is thought out by the designers, the collection is made in the same style, and therefore looks organic and natural.
An example of wall cladding with a finished composition
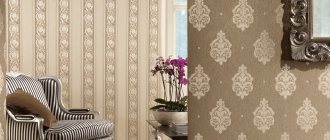
When selecting materials yourself, it is recommended to give preference to classic shades, which have a pleasant shade and are versatile in combination with other materials. These include pink, light blue, beige, as well as tiles with a pattern that imitates marble or stone.
Types of tile decor
Tile and gypsum are the main materials from which decorative tiles for the interior are made. They vary in price and external characteristics. The most incredible designs are made from these two materials.
Thanks to modern technologies, we can make the spaces where we live and work unique.
Imitation of natural stone and brick, antique or palace style design, what do you prefer? Let's look at what decors there are and what their features are.
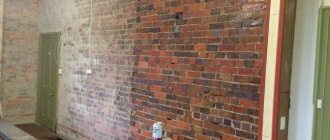
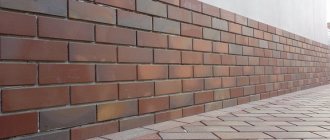
Brick
Brick-look tiles are in fashion now more than ever before. This is an excellent option for decorating an apartment: brick looks good in the hallway, kitchen, living room and even bedroom. The wall can be decorated with bricks in whole or in part, making a bright accent on the wall.
Imitation brick as a type of modern decorative tile.
Also, a brick wall will fit perfectly into the interior of a coffee shop or bar, restaurant or hotel, beauty salon or modern office. The colors are different: from white to dark red. A brick wall will look great in combination with the Baroque style: with a chic chandelier, huge paintings in stucco frames, plaster busts and ornate furniture.
Modern designers love to make brick walls, even in the bedroom.
Bricks also look great in styles such as Provence, loft, and modern. Materials suitable for brick include paint and decorative plaster, natural cork or bamboo, coarse natural fabrics, metal and wood.
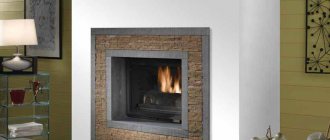
Stone
Stone wall decor is created for connoisseurs of luxury and high style. If you want to decorate your kitchen or living room in a way that is truly tasteful and dignified, then stone is your option. Tiles that imitate natural stone are most often made from gypsum. It is quite dense and heavy, and in appearance it is almost impossible to distinguish it from stone - the color and texture are like real ones.
Decorative stone can be used to lay out drawings, abstractions, and geometric shapes.
Stone on the walls looks great in various interior designs. It can become a bright accent on one of the walls, but you shouldn’t overload all the walls with such decor; there will be a feeling of heaviness of the space. It is better to combine stone with plaster, textured paint or a neutral plain coating of a contrasting shade.
The combination of different walls puts the emphasis on decorative stone.
Antique tiles
Antique tiles look incredibly beautiful: you can look at them for many hours, admiring the amazing patterns and texture. It can be made of either tile or plaster, depending on the design and model.
Textured tiles are popular in modern design.
It can be a tile with the effect of aged marble or ceramics, with beautiful abrasions and cracks, with a surprisingly realistic texture. It can also be an imitation of ancient cracked brick or stone. In any case, such “antique” tiles look very expensive and luxurious, and give the space a special charm.
Antique tiles will enhance a modern room, making it feel special.
Loft
Loft style is at the peak of popularity. Every third cafe, office or even apartment is decorated in a loft style, and such popularity is justified. Loft is comfortable, practical, nothing superfluous, and most importantly, very stylish and beautiful. The tiles here are the basis of wall decor. It can be plaster or tile, but most often artificial brick is used.
A loft-style room is especially relevant today.
Castle
Luxurious, massive ceramic tiles in the royal style, slightly worn, rough, gold-plated or marbled - it gives the feeling that kings used to live here. The castle style is good for large spacious rooms, it is often used in restaurants and will even look great in a living room.
Castle style is ideal for decorating a corridor or living room.
It should be combined with natural rough wood, gold, metal and stone decor, figurines, luxurious textiles, and tapestries. This is for lovers of true luxury!
Rustic
Cute white square tiles with blue cornflowers, ducklings or peas - their appearance warms the soul and evokes the most pleasant associations. “Rustic” tiles are used in interior design in Provence and Country styles.
Mosaic tiles are particularly popular.
It can often be found in restaurants serving French or European cuisine, cozy cafes with linen curtains and checkered tablecloths. Looks very cute, fresh and stylish.
How many tiles will you need?
Tile is not a cheap material, so you should immediately decide on its quantity. When making calculations, several nuances are taken into account. It is recommended to purchase tiles with a small margin, taking into account the likelihood of defects during cutting. In this case, the material must be from the same batch. Otherwise, shade differences may occur.
Material calculation
When measuring further under the cladding, it is necessary to pay attention to the geometric parameters of the room, namely the evenness of the walls and corners.
Methods for laying boar tile cladding
To scale, wall patterns are drilled on a sheet of paper. On each of them, mark the layout of the tile of the selected size, drill out decorative inserts, borders, and the thickness of the tile seam. Take into account the installation method - “staggered” or “seam to seam”. The layout is done so that the elements cut in the corners are not too narrow. When the calculations are completed, another 10% is added to the resulting value - for defects, pruning and inaccuracies in the calculations.
Calculator for calculating the amount of grout for ceramic tiles
Go to calculations
Calculator for calculating the required amount of ceramic tiles
Go to calculations
Video - How to calculate the number of tiles using an online calculator
What is required for quality installation?
Before installation, it is necessary to calculate the need for materials. To do this, you need to measure the area for the laying, pay attention to the corners of the room in order to provide finishing tiles in reserve. To ensure accurate measurements, the tape measure is applied in a strict direction.
When calculating the material, the presence of an old ceramic coating is taken into account. Before laying the tiles, the wall is properly leveled. If the surface is curved, then it will be difficult to make calculations, and when working, to individually adjust each tile.
Laying begins with preliminary marking of the surface and selection of the type of cladding.
A reliable and beautiful coating, of course, requires the use of a high-quality adhesive base. To prevent the material from falling from the finishing surface under the influence of its weight, the element is laid out sequentially using a high-quality adhesive base.
For example, ceramics for a living room with decorative elements are installed for a long time, so for the job you need to choose an adhesive for interior decoration. The building materials market is represented by dry and ready-mixes.
Dry materials are used in any conditions and do not require preliminary preparation of walls. When laying ceramic tiles with an ornament, the prepared mixture is applied to the surface with a notched trowel.
Self-preparation of the solution
To ensure a reliable adhesive solution, the dry composition should be added to water in small portions. The mixture will be homogeneous if you use a mixer attached to a drill to stir. When preparing the composition, it is important to follow the instructions on the package.
Wall cladding technology
After preparing the composition, you can begin to work. Before laying the first row, you need to determine their number, taking into account the seams. Laying is carried out from the penultimate row.
When installing, it is important to ensure that the adhesive solution is evenly distributed on each tile. The amount of material is affected by the installation method. There are the following types of seams:
- herringbone;
- diagonally;
- in a run;
- seam to seam.
Diagonal markings allow you to create the effect of space distortion when combining materials of different colors. The popular method of laying tiles in a row is simple, but with its use it is difficult to hide the slightest unevenness.
A staggered seam with a horizontal or vertical displacement of the material allows you to create an optical illusion. The parquet method is used for rectangular tiles. With this installation method, material consumption increases by 10%.
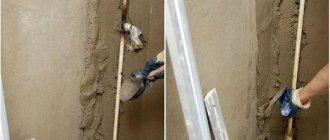
Preparing the base
The first stage of work on laying ceramic tiles is preparatory. The base for the cladding must be perfectly level. If the walls are made of concrete or brick, they must be cleaned of the plaster layer and dirt.
Wall preparation is an important stage that determines the quality of the final result.
Potholes and irregularities are sealed with cement and mortar, and after drying, sanded. The angles are adjusted - they should be 90 degrees. High-quality leveling of walls makes it easier to lay tiles and ensures economical consumption of adhesive.
To increase the adhesion of the base with the adhesive composition, shallow notches are made on the plastered wall.
Notches for better adhesion of the base and glue
Note! The quality of fastening and durability of tiles depends on the correct adhesive. There are compositions on sale for both interior and exterior work, for rooms with high humidity and special operating conditions.
Tile adhesive is selected taking into account the upcoming operating conditions and the type of tile.
At the final stage of preparation, markings are applied to the surface of the walls.
When laying floor tiles, the evenness of the base is also taken into account. An exception is when laying tiles on the shower floor, where a slope towards the drain hole or drain is required. The slope can be made at the stage of pouring the screed or as the tiles are laid by adjusting the amount of glue.
Installation of a drain ladder in the shower
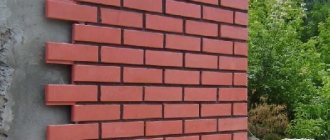
Clinker tiles
The clinker type of ceramic finishing material is used to decorate the façade of the walls of a house. This finishing material is made from special types of clay with the addition of dyes.
This ceramic wall covering is characterized by high strength and wear resistance. In addition, it tolerates contact with water and temperature changes that occur due to changing seasons.
In some cases, it is allowed to use clinker ceramic coating indoors, especially if the designer’s idea requires it.
Tools and materials
When laying tiles, you need a set of standard tools:
- A notched trowel is used to apply and distribute the glue. You will also need a regular flat, rubber and semicircular spatula to form seams;
- Control over the evenness of the surface to be coated plays an important role in the work process. To do this, use a level, plumb line, tape measure, metal ruler;
- The last step is grouting the joints. To do this, use a stiff brush or sponge;
- it is necessary to prepare a container for glue and water;
- tiles are trimmed using a tile cutter;
- A drill will be needed to make the holes.
How to cut and drill tiles
Materials that need to be purchased: the tile itself, plastic spacer crosses, adhesive mortar, grout.
Distance crosses can be replaced with SVP
Selection of finishes for the bathroom
The technology of wall cladding involves the presence of seams, which are the most vulnerable point of the coating, constantly in contact with water, even with special treatment. Therefore, large tile sizes are preferable in the bathroom - such a finish will be more durable than, for example, mosaics. The same can be attributed to the cladding of other rooms with high humidity - swimming pools, washing rooms in baths. Wall tiles for the bathroom are selected from the 1st or 2nd moisture absorption class (up to 6%). This characteristic surpasses the properties of all other materials, the use of which is possible in wet rooms.
Cladding interior walls with ceramic tiles requires preliminary selection of material. The layout of the tiles is first done in specialized programs, and then the tiling begins
Advice! The traditional solution for the bathroom is blue wall tiles, turquoise, blue, and “sea” tones. Due to the fact that they create a cold atmosphere, they are recommended to be combined with white and golden shades. Modern interior design often uses rich and contrasting combinations of black, white, and red colors.
Laying process
The technology of laying tiles on the wall is simple and, if done correctly, you can get a high-quality result.
Basic steps when laying tiles
Table 2. Installation instructions
| Illustration | Description |
| Work on laying ceramic tiles begins with markings on the walls. Laying begins from the bottom, from the second row. To do this, the tiles of the first row are applied to the wall and the line of its upper border is marked. | |
| It is advisable to lay the first row after covering the entire wall. Along the line (below it) a metal profile is fixed, which will become a temporary support for the ceramic tiles laid on top. | |
| The horizontality of the marked line is checked using a level. | |
| The evenness of the laid tiles is checked after every second row in all directions. This allows you to adjust the vertical in time, while the solution is moving. | |
| You can use a laser level to guide you. | |
| It is recommended to fix the tiles with a special tile adhesive - the additives in its composition ensure better adhesion to the base. To dilute the glue, you must follow the instructions on the package. | |
| So, for tiles measuring 15 x 15 cm, the thickness of the adhesive does not exceed 6 millimeters. Larger tiles are attached to a layer up to 10 mm thick. In a room with high humidity, glue is applied not only to the wall, but also to the back of the tile. It is not recommended to dilute a large volume of glue at once - there is a risk if you lack experience, you will have time to work it out before it begins to dry out and lose elasticity. As a result, you will have to dilute a new portion of glue. | |
| The glue is applied to the wall and spread with a notched trowel. The thickness of the adhesive layer is selected taking into account the weight and size of the tile, as well as the properties of the adhesive itself. | |
| Laying tiles begins from the center of the room towards its edges. To do this, draw a vertical line in the center. This installation method allows you to lay cut tiles in areas that do not attract attention. If the parameters of the room are such that a whole number of cladding elements can be placed horizontally in a row, then installation is carried out from a corner or a trusted opening. | |
| To form an even tile joint, spacer crosses made of plastic of the required thickness are used. After the glue has dried, they are removed. | |
| Once the glue has dried, you can begin laying the first row of tiles. | |
| The final stage is grouting the joints. This is an important process that not only gives the finish an aesthetic appearance, but also protects the joints between the tiles from moisture. The color of the grout can be matched to the tone of the tile - then the finish will look monolithic. You can choose a grout color two shades lighter or darker than the facing. The white composition is universal. | |
| Based on the composition, epoxy grout is chosen for rooms with high humidity. It is more difficult to work with, it sets quickly. Excess and stains must be promptly removed with a damp sponge. |
The operation cannot be called simple - it requires increased accuracy and attentiveness, however, such cladding belongs to the category that can be performed independently. And the nuances of the technology for laying ceramic tiles on the floor can be found in the corresponding article on our portal.
How to beautifully lay decorative tiles
Correctly laying gypsum or tile decorative tiles on a wall is a real art. First of all, you need to decide on the design in advance. Choose where the decor will be, in what quantity, and how it will be decorated. You should follow the rule of the “golden mean” and not go too far with the decor, so that there is no feeling that the space is overloaded with decorations.
Modern decor requires a minimum amount of decoration.
After this you need to prepare the wall. Laying the tiles should be done on a perfectly flat wall surface, primed and free of dust. Of course, it’s better to trust the professionals, but if the repair is minor, you can handle it yourself.
Preparing the base
Select the wall on which the decor will be placed. It should be rid of the previous covering: wallpaper, paint or tiles. The surface must be sanded and, if necessary, puttied and sanded to give it a perfectly smooth appearance.
Use the services of specialists for proper installation of decorative tiles.
After this, it is necessary to apply a universal primer to the surface in an even layer, sparing no material. You can repeat the procedure. Thanks to this, your decorative coating will last reliably and for a long time.
Fastening tiles
When the surface is prepared, it is worth marking with a pencil where the decorative elements will be. The tiles should be fixed using a special glue, which can be purchased at a building materials store. Glue can be of two types: ready-made (sold in a plastic bucket) or dry. Dry glue is cheaper, but it will have to be diluted. The ready-made mixture is easier to use, since it already has the desired consistency.
Proper installation of tiles is the key to their long service life.
Apply the adhesive with a spatula to the back side of the tile and carefully press it to the surface. After drying, you should seal the seam between the tiles with a special product, which must be selected in advance.
How to choose decorative tiles for the wall
The main criterion when choosing wall decor is your personal taste and preferences. It all starts with imagination: how do you want the space to look, what should be in it? Of course, it is better to contact a professional designer who can take into account all the nuances and prepare a design project. But you can do everything yourself, especially if you have a taste.
Choose minimal decorations to create a modern, stylish room.
You should choose based on the characteristics of the space. The tiles should harmoniously fit into the style of the room: for example, if there are lace curtains hanging everywhere and floral wallpaper on the walls, then a brick wall in the loft style will look strange.
Today there is a wide range of decorative tiles on the market.
If there is a fireplace or stove nearby, then the tiles should not be “afraid” of temperatures and have special characteristics. The same applies to moisture and mechanical damage, for example, if you choose a material for a kitchen or bathroom.
If you have knowledge of modern fashion in room decoration, you can independently make a renovation project for your apartment.
Focus on your own budget, but try not to save too much: cheap materials are difficult to care for and short-lived. It’s also useful to look through photographs on the Internet and see what decorative tiles generally are and how they are used. This will allow your imagination to run wild and you to make the right choice!
How to care for tiles
Good tiles do not need proper maintenance, especially if they are chosen correctly. You should protect it from damage, constantly wipe it from dust and do not wash it with aggressive detergents. Also, do not wash it with abrasive powders or hard scrapers, so as not to scratch the surface.
Choose correctly and tastefully, and your interior will delight the eye every day and bring only joy!
In general, tiles do not require special care. You just need to treat it with care and remember to remove dust, monitor its safety and not expose it to aggressive influences. That's all!
Floor in a new room. Stage one: screed
Floor tiles are always laid on a screed. It levels the base, which means it saves glue, and laying the tiles on a level screed will go faster. The smoother the screed, the better the quality of the finishing coating, and the longer it will last.
BoraffFORUMHOUSE Member
For me, laying tiles on an uneven base is a complete pain. It’s easier for me to first drive the screed to zero, and then just put the tile on it under the comb. Although there is more labor involved, the nerves are intact.
Our expert recommends making a cement-sand screed from a ready-made dry mixture based on sand concrete with additives and plasticizers: this is the easiest way to get a reliable and even base for tiles.
The most important thing here is to make sure that the screed is:
- equally dense over the entire floor area,
- without voids,
- no cracks or chips
- flat (permissible slope - no more than 0.2%).
Recommendations for the minimum thickness of the screed are collected in the table.
Recommended screed thickness
| Purpose of the screed | Screed thickness |
| Screed made from self-leveling mixtures for subfloors | 20 mm |
| Screed over heat and sound insulation | 40 mm |
| Screed on water heated floor | 45 mm exceed the diameter of the pipes. |
| Screed for electric heated floors | There are no special requirements: the mats are not laid in a screed, but in a layer of tile adhesive. This floor should not be used earlier than a week after installation. The temperature must be raised slowly and gradually. |
Alexander Pleshkin, dry mix specialist
At the stage of calculating the thickness of the screed, it is necessary to take into account the features of the cladding: it is possible that it will be made of tiles of different thicknesses or combined with another finishing finish. That is, in areas with different cladding, the thickness of the screed may differ.
The screed can also be laid on a wooden surface, but before doing this, the wood must be soaked with an antiseptic, dried well, the structure strengthened, for example, using sheet material, and the surface must be waterproofed.
Cutting and drilling tiles
For cutting we use a roller tile cutter, which for small volumes can be replaced with a good glass cutter. We draw a line on the surface of the tile and insert it into the tile cutter, making a movement with the handle “from ourselves”. Use a glass cutter to follow the line, then lay the tile on the surface so that the part that needs to be cut does not have support. We take the free edge in the palm of our hand and “bend” it down with an energetic movement.
To drill ceramics, we use special feather drills (the drill is spear-shaped). We use ring drills or ring bits if it is necessary to drill holes of large diameter.
Important! When drilling, hold the drill horizontally relative to the base (floor). Don't allow it to tilt in any direction! The drill should be in normal drilling mode. We start drilling at low speeds. Having drilled a hole in the ceramic, we change the feather drill to a concrete drill.
When drilling into ceramics, the surface should be moistened with water.
Stage three. How to prepare tile adhesive
For tiling a bathroom, our expert recommends choosing a universal adhesive that can be used to attach tiles to different types of bases: aerated concrete, ceramic and silicone blocks, cement and cement-lime plaster.
A good universal adhesive does not slip, it sets quickly and firmly holds all types of tiles, porcelain tiles, artificial and natural stone.
Dry mixtures of cement with mineral fillers and other additives are considered the easiest to work with.
Alexander PleshkinSpecialist in dry mixes
Before use, a bag of the mixture is diluted with five liters of clean water at room temperature (+15-+20 degrees): not water is poured into the powder, but the powder is carefully poured into the water, stirring the mixture continuously. Then everything needs to be mixed well. Mix for about two minutes, with a mixer or drill with an attachment at a speed of 400 - 800 rpm. You should get a perfectly homogeneous mixture without lumps. In five minutes it will be ripe and will need to be stirred again.
On the prepared base, leveled, primed and dry (if the walls were leveled with tile adhesive, it needs to dry for a day, if with cement plaster - from 3 days to a week), apply glue with a trowel or spatula and level it with a notched trowel.
Life hack: the size of the spatula tooth depends on the size of the tile.
Recommendations from our expert are collected in a table.
How to choose a spatula tooth
| Tile size, mm | Spatula tooth size, mm |
| Up to 100 | 4 |
| 100-200 | 6 |
| 200-250 | 8 |
| 250-300 | 10 |
| 300-500 | 12 |
An important point: you cannot immediately spread glue over a large area of the base. Only the kind that you can cover in 20 minutes. This is the glue consumption recommended by the manufacturer.
Recommended glue consumption
| Tile size, mm | Spatula tooth size, mm | Consumption, kg |
| Up to 100 | 4 | 2 |
| 100-200 | 6 | 2,7 |
| 200-250 | 8 | 3,6 |
| 250-300 | 10 | 4,2 |
| 300-500 | 12 | 6 |
When tiling walls and floors, plastic crosses or SVPs are used. If the tile is very large, then the glue is applied to it too, and not just to the wall. On the wall - as indicated in the table, on the tiles - in a very thin and even layer. If any tiles protrude, they are leveled by pressing and tapping with a rubber hammer. And you need to immediately remove excess glue with water.
When all the tiles are glued, you need to carefully remove excess glue from the seams and leave it for a day. It is important to remove the crosses before the glue gains strength. A day later, you can proceed to grouting the joints. The seams are rubbed with a special mixture; a special rubber slab is used for this. If the base is gypsum, then the seams must be rubbed with a special moisture-resistant mixture.
Surface marking
When laying tiles, it is very important that all rows are tiled perfectly evenly. To do this, before tiling, mark the surface on which the ceramic tiles will be laid.
Wall marking
- A nail is attached to one of the corners of the wall, then a plumb line is hung from it and a second nail is nailed below.
- A cord is pulled vertically between the nails.
- Install a vertical cord at the other edge of the wall in the same way.
- Beacon tiles are attached in the corners, which will serve as guidelines in the work.
- All perpendiculars are measured with a square to ensure the accuracy of the location.
Floor marking
- The floor surface must be strictly horizontal, without serious deviations. Measured using a level and a rod.
- Beacon tiles are installed in each corner.
- From each corner, guided by the edge of the beacon tiles, pull the cord.
- If the room is large, then it is better to make intermediate lighthouse tiles (this will make it more convenient to compare the rows).