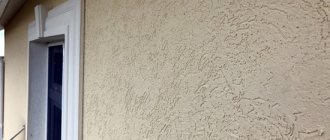
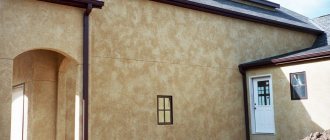
To insulate the walls and basement of a house, an inexpensive building material is often used - foam plastic sheets. But this easily destructible material cannot be left open. It must be reliably protected from negative influences. Foam plaster is usually used as a protective layer. In order for the insulation to last a long time, this work must be done correctly. This article will tell you how, why and with what to plaster polystyrene foam on the outside.
What type of foam is suitable for plastering?
In order not to pronounce the long word “expanded polystyrene”, it was shortened to the word “foam plastic”. It is also denoted by three letters – PPP.
This material has the following advantages:
- low thermal conductivity (lower than mineral wool);
- low dead weight;
- resistance to colonization by microorganisms;
- environmental friendliness;
- low cost.
The disadvantages include:
- low mechanical strength;
- low vapor permeability;
- attractive to small rodents, birds, wasps, bees;
- low heat resistance;
- susceptibility to decay under the influence of UV rays;
- lack of fire resistance.
According to production technology, it happens:
- pressed PPS (porous sheets with a smooth surface);
- pressless EPS (oval or round granules glued together by sintering).
Pressless foam is fragile and vapor permeable, but its granules do not absorb water. Moisture that accumulates between the granules can then enter the plaster, which will deteriorate faster. By using pressed PPS, you can avoid such a nuisance.
In addition, he:
- more durable;
- has a fairly low thermal conductivity;
- convenient for transportation;
- does not burn;
- cheap;
- durable.
For insulation under plaster there are special types - PSB-S-25, PSB-S-15.
Purpose and scope of application
According to their technical characteristics, primer mixtures are divided into means for increasing the strength of the coating and the adhesion of the base to finishing materials. Depending on this, their purpose differs:
- Strengthening types of primer should be used for porous surfaces. The main advantage of such solutions is considered to be a large penetration depth. It reaches 100 millimeters. In addition, after the layer dries, a high-strength protective film appears on the walls.
- An adhesive primer mixture is used as an intermediate layer, which improves the quality of the finish. This primer should be used before applying plaster and decorative types of cladding.
Is it possible to plaster polystyrene foam and why is it done?
Polystyrene foam is popular as an insulation material. However, due to constant changes in temperature, environmental humidity, and under the influence of UV rays, the structure begins to collapse over time. Protection from these factors is easily provided by a plaster layer. Finishing the facade with foam plastic and plaster, which protects the fragile material, is considered the most successful solution for insulating the walls of a building from the outside.
Advantages of the solution:
- the reinforced plaster layer protects the fragile material from mechanical stress;
- access to sunlight is blocked;
- access to moisture is blocked;
- fire safety increases, since the plaster coating does not ignite;
- a barrier is formed for insects and rodents;
- the emerging layering better absorbs noise and prevents heat evaporation.
Of course, plaster mixtures based on different bases cope with this task in different ways. You need to choose the optimal mixture.
Primer for foam plastic: composition and features
Facade expanded polystyrene has a fairly dense structure and does not absorb moisture. According to building regulations, it is required to be primed. Thanks to this, it is possible to increase the adhesion of the treated surface with the applied plaster and adhesive composition. The soil also helps reduce water absorption of the porous base.
Priming the foam before using plaster is considered an important technological operation. With its help, it is possible to increase the adhesion of mortar mixtures of finishing finishes and level the layers. The primer helps absorb excess material while grouting the plaster.
Many primer mixtures contain bactericidal ingredients. After treating the walls, they reduce the likelihood of fungi and mold.
Based on their composition, there are alkyd, polyvinyl acetate, and phenolic primers. They also come in glyphthalic, perchlorovinyl, and acrylic. The composition should be selected taking into account the performance characteristics of the plaster or tile mortar. This is also affected by the area of application.
How to plaster polystyrene foam
Based on the tasks solved by plastering, the choice of plaster is made in favor of the following compositions:
- durable;
- tenacious (highly adhesive);
- durable;
- for external work or universal, if exterior finishing is being done (if insulation is carried out indoors, any types are suitable, primarily for interior work).
Gypsum compositions for plastering foam plastic on the outside (for facade work) are not suitable.
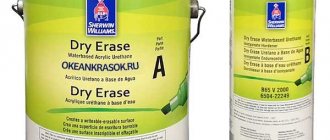
Plaster for polystyrene foam - specially developed compositions for coating polystyrene foam materials, for example, Ceresit, Ekomix, Stolit, contain additives that increase adhesion to EPS. There are certain types of mixtures designed to perform specific work:
- for gluing foam sheets to the base;
- for protective plastering of PPS sheets;
- universal.
When purchasing, it is better to purchase mixtures from one manufacturer. It is preferable to opt for universal ones, which are used at any stage of finishing work.
Simple plaster compositions on a regular cement base, although cheaper, are not elastic and can easily become cracked. If we are insulating a house, we need durable monolithic coatings. In addition to special formulations, conventional ones on a mineral or synthetic basis are also used.
Plaster mixtures based on the following are:
- mineral (quite durable, non-flammable, resistant to UV rays, vapor permeable, environmentally friendly and cheap compositions based on gypsum, clay, lime, cement);
- acrylic (durable compositions based on acrylic resins, more expensive, less resistant to fire, water-repellent, rich in color, easily fade in the sun, do not develop shrinkage cracks);
- silicone (the most expensive, durable, very elastic, vapor permeable, UV resistant, most durable).
Pros and cons of using a primer layer under foam
Penoplex primer has many advantages. The main advantages include the following:
- increasing the adhesion of the base to finishing materials;
- ease of use;
- increase in heat-saving properties;
- prevention of mold and fungi formation.
However, the material also has certain disadvantages:
- the need for careful preparation of the surface before applying the material;
- the need for the correct choice of composition;
- high labor intensity of work.
See also
Description and best brands of washable paints in car spray cans, application
Features of styrofoam plaster
We have already become familiar with the first feature - the existence of special mixtures. The second feature is foam plastering. This work is carried out using reinforcing mesh. Without it, sufficient mechanical strength of the soft EPS coating is unlikely.
The third “strange thing” is that the surface of the insulation boards is not coated with a primer. Plastering on polystyrene foam is a fairly simple but effective job. The materials are cheap and easy to use.
There are also some nuances when plastering internal thermal insulation and facades.
You cannot plaster polystyrene foam with ordinary cement compositions with sand. Cement corrodes PPS
Along the façade
With the beginning of the use of polystyrene foam, the development of buildings in which the cladding was made of different materials appeared.
The most successful technology is called “wet facade” - the construction of a multi-layer “pie” in which the materials of each layer perform their function:
- façade primer for plaster;
- adhesive plaster mass;
- layer of sheet insulation;
- plaster (adhesive) solution;
- reinforcing mesh;
- leveling plaster layer;
- primer layer;
- finishing coating.
External cladding with foam plastic is the most reasonable and correct solution, since in this case:
- The dew point (the place where condensation forms) is taken outside the room, located inside the sheet insulation, where there is nothing for condensation to form from.
- In this case, the room also does not lose its volume.
- Heat accumulation occurs and the rooms cool down much more slowly.
However, there are cases when it is not possible to place foam sheets under the façade plaster.
Indoors
Insulation and plastering of walls using polystyrene foam indoors is used if:
- it is impossible to get close to the wall from the outside, for example, there are other buildings nearby, or this is insulation and plastering of a balcony (loggia) located at a high altitude;
- the building is recognized as a historical monument;
- prohibited by the rules for decorating houses in the center of a populated area.
In addition, foam plastic inside the house may be needed to insulate the slopes of the front door, and also if it is not possible to insulate the slopes of the apartment windows from the outside.
When insulating walls inside a building, the preparatory work is carried out in the same way as before conventional plastering. Then foam plastic is glued, a mesh is attached and plastered in the same way as on the facade. The difference here may be the finishing stage; if the walls are painted or wallpapered, a particularly smooth surface is required. Putty is applied to the leveling plaster layer applied to the PPS, then dried.
Foam plaster - step-by-step technology
So, as soon as the primer has dried, you must immediately plaster the foam. You should know that you should not delay this process, because otherwise the dust will sit on the surface again and the foam will have to be primed again.
First, as expected, you will need to make a plaster solution. The proportions for preparing plaster for polystyrene foam can be found in the manufacturer’s instructions; there is nothing complicated there. The only thing you need to consider is the consistency of the solution and not to overdo it with the amount of water.
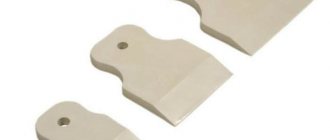
Apply the plaster to the foam plastic with a wide metal spatula, all the time ensuring the evenness and thickness of the applied layer. Ideally, the thickness of the plaster should not exceed more than 4-5 mm.
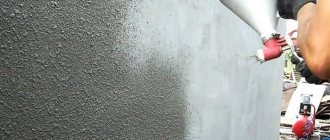
Plastering technology
It's time to talk about how to plaster polystyrene foam. Due to the hardening conditions required for plaster compositions, work with plaster is carried out at humidity up to 60%, temperatures not higher than +30°C, not lower than +5°C. If facades are being plastered, choose windless, dry weather.
The surface to be plastered is shaded and covered from rain with a canopy. When working indoors, sockets and switches on the wall being plastered are de-energized. Do not use heaters or fans to dry the wall being plastered.
During work, use protective equipment.
Plastering stages:
- Measurements are taken and the need for materials is calculated (safety factor - 1.2).
- Materials are purchased: primer, plaster mixture, reinforcing elements.
- Prepare tools and devices.
- Prepare the surface.
- Prepare a solution.
- Install polystyrene foam.
- The plaster (adhesive) composition is applied and the reinforcing elements are attached.
- Apply a leveling plaster layer.
- Rubbed out.
- Putty.
- Prepare the surface for finishing.
- Finishing is carried out with decorative compounds.
- Painted.
It is advisable for a beginner to learn how to use a spatula with both hands. In this case, you can change your hand when it gets tired, without taking breaks from working. When applying the solution, keep the spatula at an angle to the wall, without pressing too hard. The thickness of the mixture layer depends on the pressing force. The solution is applied to the middle of the working surface with a narrow spatula. They also use a wide spatula to remove residues or excess mixture removed from the wall.
When working with decorative plasters, the working surfaces of the spatula and trowel are regularly cleaned of remnants of the plaster mixture and wiped with a damp cloth. This prevents the formation of seized lumps and the resulting banding of the smear. Many decorative compositions do not tolerate excess mortar removed from the wall being thrown into them, since the excess becomes the center of accelerated crystallization of the plaster mixture. The excess is either immediately applied to the wall where there is not enough mixture, or thrown away.
Tools and materials for work
You should prepare in advance:
- short-haired roller (needed for priming);
- construction mixer;
- spatulas with a metal plate;
- trowel or trowel;
- plastic grater with sandpaper attached;
- plastic corners with reinforcing mesh;
- notched spatula;
- scissors for cutting mesh;
- level;
- containers for solution and water;
- brush;
- plaster mixture (or several types);
- primer;
- fiberglass mesh;
- masking tape.
Plastering materials are purchased in a volume sufficient to carry out the entire work (with a reserve). You should purchase products from the same company, preferably from the same batch (this is especially important for decorative color compositions).
It is better to take a trowel and spatula with rounded corners. This is especially important for applying decorative plasters.
Preparing the mixture
Usually, the process of preparing the solution is described in sufficient detail by the manufacturer himself on the product packaging. The solution is prepared from the dry mixture before application.
Stages:
- pour all the powder that is in the package into a container filled with cold water (so that all batches have the same content of components);
- mix the mass with a mixer until a homogeneous dough is formed;
- cover, leave to brew for 5-15 minutes (after this, neither liquid nor dry substances can be added);
- mix again.
Before plastering on foam plastic, the finished mixture should also be stirred to lift the settled heavy particles.
If, when mixing the solution in a container with a mixer, splashes scatter around the sides, you can change the direction of rotation of the mixer nozzle by switching the mode. Then the mixture will lean towards the center of the container.
Preparing the base
Responsible stage. The evenness and service life of the plaster “shell” depend on the quality of the work performed.
Before gluing the insulation sheets, the wall is prepared as usual:
- remove unusable old coating, knock down large protrusions;
- chips and cracks are “healed”;
- clean the base from stains of various origins (wash with water, dry, treat with special means);
- Dust is removed from the surface, remaining metal objects are insulated with oil paint;
- install the base profile according to the level;
- install foam sheets (using glue and fastening with dowels).
Sequence of preparation of the foam base:
- check the evenness of the entire surface (joining sheets of PPS must be at the same level) by running a rule along the wall;
- the protrusions are carefully cut off, the joints are cleaned with sandpaper;
- remove dirt and dust from the surface;
- To increase adhesion, the top of the foam plastic is rolled with a needle roller (the solution will penetrate into the holes formed during plastering).
Beginners often wonder: is it necessary to prime the foam before plastering? If plastering is done with special mixtures for PPS or mixtures from Knauf, then no primer is required.
But where mechanical loads can be increased (to the height of a person’s height), a primer for foam plastic will not be superfluous. You can cover the walls themselves with concrete contact or Ceresite. After plastering (for finishing), the insulated wall is primed.
Closing seams
The seams between the EPS sheets must be filled with polyurethane foam to prevent the formation of cold bridges. If the mounting foam at the joints protrudes above the EPS, it is cut off (the seams must be completely filled). If the seams are large, they are filled with strips of polystyrene foam of the required width, placed on the foam.
Selection and fastening of reinforcing mesh
The integrity and durability of the plaster shell is ensured by the reinforcing mesh. Strictly speaking, the reinforcing mesh is only needed to increase the physical strength of the plaster shell. Moreover, exactly where mechanical shocks are possible. This is the area of the wall up to a height of 1.5-2 m from the surface of the ground (on the facade) or the floor (indoors). Above this, it is irrational to use reinforcing mesh, since it is an unnecessary waste of time, effort and money.
The plaster itself is capable of holding tenaciously, protecting the PPS from UV rays and pecking by birds. But in a problem area, where human activity can lead to damage to the plaster layer, a mesh is a necessity.
An ordinary serpyanka is not suitable here. Metal meshes are also not used, since due to their rigidity it is impossible to level them, as a result the thickness of the plaster layer increases. For reinforcement, fiberglass mesh fabric of different densities is used (depending on the size of the cells and the thickness of the threads).
More often, a fabric with a density of ≥ 150 g/m2 is chosen, but not too dense.
Before installing the mesh, all dowels with caps that secure the PPS ("parachutes") are recessed so that the foam surface has no protrusions. After recessing, the recesses are sealed with an adhesive solution. Another subtlety - before starting work, a line is drawn on the wall indicating the installation height of the mesh reinforcement. They do this to save the adhesive mixture.
It is more practical to apply the mixture with a spatula. The wider the spatula, the smoother the applied strip of mortar.
Reinforcement begins with the installation of perforated corners with a mesh at the corners of the building, and also reinforces areas with complex geometry.
Stages of work:
- Prepare the corners (cut to length).
- Prepare the solution.
- Using a spatula or trowel, apply a continuous strip of solution to the corner on both sides (do not level it). Apply a corner, press lightly, check verticality with a level. Press the corner into the solution, trimming it, and smooth the mesh along its sides with a spatula (downwards and from the corner to the sides). Make sure that the corner and the adjacent mesh are evenly deepened into the solution (the solution is added where necessary), and remove excess plaster mixture.
- Having processed the corners, they take up the reinforcement of the slopes - measure and cut the corners to the required size. If the width of the slopes is correct, they are reinforced as described above. Otherwise, the corners are applied separately (similarly to that described for the solution with vertical alignment), and the mesh is cut into a strip 1-1.5 cm narrower than the slope. “Glue” onto the solution, not reaching 5-7 mm to the corner edge. The mesh strip is smoothed lengthwise, then from the center.
- Flat sections of the wall are reinforced last. Since it is difficult to glue and level large panels, the mesh is cut into strips a meter and a half long. It is easier for beginners to work with small canvases, then they have time to apply and smooth the mesh before the solution dries. If you act slowly, the solution will dry out and you will have to remove it and apply a new one. A continuous strip of mortar is applied to the wall, starting from the corner (from the drawn line down). The dimensions of the strip are the same as that of the mesh fabric. The thickness of the plaster layer is ~ 2-3 mm. A grid is applied to the solution, guided by the line drawn on the PPS and the vertical angle.
Press the mesh with your hands to the solution in several places and check the correctness of its position. After this, using a spatula, the panel is pressed against the insulation. They begin to press down the first panel from the center down and in both directions. This is done so that the solution protrudes through the cells above the mesh. When smoothing the mesh with a spatula, make sure that it is completely immersed in the solution. Where the plaster is not enough, apply a little mortar with a spatula on top of the mesh so that it is completely hidden.Some craftsmen advise not to immediately glue the edges of the mesh at the junction of the panels (the recommended overlap is 10 cm). This only complicates the reinforcement. Glue the entire mesh. Then you won’t have to crush it, and the next layer of solution will lay down without any problems. This will increase speed and improve accuracy of work.
- The next canvas is applied in the same way, only its edge is moved so that it overlaps the edge of the previous canvas with an overlap. Align the bottom sheet with the top sheet. When smoothing the mesh, make sure that there are no sagging, depressions, or stripes. The surface must be flat. The excess mixture is removed.
- Having glued the bottom mesh, the excess lower part of the canvas is trimmed. The ends of the mesh should be covered with mortar. Then the coating will look neat.
Fastening the corners
Slope reinforcement
Reinforcement on flat sections of the wall
Gluing the next layer of mesh with an overlap
It is necessary to calculate the location of the mesh so that its joints do not fall on the EPS seams.
It is impossible to leave sections of the mesh under which there is no solution or protruding above it (not recessed).
Grouting the surface
After attaching the mesh, give the layer a day to dry. Then the surface is rubbed, but not in the same way as after applying leveling plaster, which is done on a barely set layer. There is no need to wet the wall. You just need to sand down the sharp protrusions so that they do not interfere with further finishing.
For this purpose, use a grater with sandpaper attached.
The grain size is selected according to the type of future coating:
- for decorative structural plaster - coarse-grain sandpaper;
- for painting, wallpaper and thin-layer plaster coating - fine-grained.
The grater is placed flat on the wall, pressed a little and moved in a circle with even pressure, without staying in one place for long. After finishing grouting the entire surface, remove dust from the wall.
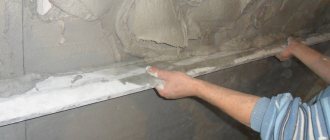
Final alignment
For this operation, the solution is mixed thinner. Apply an even layer of up to 3 mm to the wall using a wide spatula. When application is complete, the layer is dried and rubbed over again. Then the dust is removed.
Preparation before applying the decorative layer
Apply the primer with a roller, and where it is inconvenient to work with a roller, use a brush. There can be one or two layers of primer. This depends on the severity of climatic conditions. Each layer of primer is dried for at least 24 hours. The primer composition is selected according to the mixture used for plastering and the material of the finishing coating.
Finishing on such a thin layer of plaster cannot be done with paint compounds that can destroy the foam.
Colorful compositions containing:
- benzene;
- toluene;
- drying oil;
- acetone;
- xylene;
- coal or polyester tars;
- gasoline or kerosene.
Application of decorative plaster
The decorative plaster solution should be prepared according to the instructions. It is applied with a wide spatula or trowel in a thin layer. The thickness of the plaster layer is usually equal to the diameter of the filler grains. It is not recommended to use heavy compounds, for example, stone chips, since wall cladding with foam plastic is not endowed with adequate strength.
The freshly laid layer of decorative mixture is processed in the desired way.
To achieve a decorative effect, use figured rollers, various objects at hand, for example, a brush, crumpled plastic bags, etc., or plastering tools (using special techniques).
The following effects are popular for finishing facades: bark beetle plaster, fur coat, travertine, torn stone. Detailed instructions for performing various effects can be found in the articles in the “Decorative plaster” section.
As an example, let’s take the implementation of the “bark beetle” decor.
This pattern requires special compositions with a filler of a certain fraction. The essence of the method is the formation of figured grooves, reminiscent of bark beetle passages, left in the set solution by rolling filler granules. The mixture is applied with a trowel in a layer equal in thickness to the size of the large granule fraction. For the facade it is 2.5-3.5 mm, for rooms it is less (the size is indicated by the manufacturer). After applying the layer, it is allowed to dry for 5-10 minutes.
As soon as the hand stops sticking to the surface of the layer, apply a plastic grater to it and rub it in the desired direction. Lightly pressed filler grains, caught with a grater, are rolled over the layer, leaving grooves.
The direction of movement of the grater can be straight or (wobbling), which results in different patterns.
After covering the entire surface evenly with the pattern, the solution is given time for the pebbles to become fixed in the body of the mixture. After half an hour, smoothing is performed with a trowel. In this case, sharp protrusions are smoothed out. After the layer has dried, it is painted over in one (usually for facades) or two colors.
Diagram of layers of wall insulation with foam plastic and its plaster
Decorative plasters in rooms are also coated with varnish or wax. On the street, as a rule, only colorful compositions are used. These must be paints for external use. They are more resistant to UV rays and temperature changes and form a durable film.
It is more practical to choose decorative effects for finishing foam, which can be easily restored in case of damage. The bark beetle is not included in this number.
Caring for decorative plaster finishes is simple. Most compositions are suitable for washing even with the use of detergents.
Types of primer mixtures
On sale you can find a fairly large selection of primers from different manufacturers that can be used for processing foam.
Preference should be given to trusted companies. You also need to carefully study the properties of a particular product so that with its help you can really get the desired result.
Primer for painting
Before you start painting foam, most experts recommend using a specific primer liquid. In this case, you must perform the following steps.
Remove dust, dirt, unnecessary elements or objects from the surface. The surface must be thoroughly cleaned, and then any foam crumbs that remain after treatment must be removed. You can begin to apply pre-purchased primer to the prepared foam sheets. The number of layers of material will depend on the quality of the foam, what type of paint and in what quantity will be used in the future.
Primer for plaster
At the moment, in construction, plastering polystyrene foam boards is a very common phenomenon. In addition to the attractive appearance of the facades, it is possible to significantly insulate the surface of the building. In this case, priming the foam will play a very important role. The service life of the plaster depends on how well the work is done.
Textured plaster must be applied to a primer that has a quartz filler. Most professionals recommend using a special polymer acrylic mixture that contains grains of quartz sand. If in the future the plaster will only be painted, then using a universal primer would be a good option.
We prime the foam with liquid glass
When painting foam plastic, special requirements are imposed on the composition of the selected paint.
It is important to take into account such indicators and characteristics of the material as elasticity, resistance to precipitation and moisture, and to changes in air temperature. Of course, modern products have excellent characteristics and fully meet the requirements. Moreover, almost every paint contains aggressive substances that can have an extremely negative effect on the structure of the foam. To solve this problem, it is worth using a special protective substance. Quite often in such situations, “liquid glass” is used. This is a kind of solution of potassium or sodium silicate. Due to the sufficiently high surface tension of the foam grains, it is possible to achieve a high level of material reliability. Liquid glass will not penetrate into the foam and at the same time will create a protective film that will significantly improve the characteristics of the material used.
On a note! In order to increase the elasticity of liquid glass several times, it is best to add to the mixture not water, as indicated on the packaging by the manufacturer, but universal primer.
Plastering doorways and slopes
After replacing window or door frames, the best insulation of the openings formed between the frames and the facade will be to make slopes made of foam plastic with plastering. You can make slopes as soon as the polyurethane foam has dried.
The simplicity of the work is similar to installing drywall. Blanks are cut out of PPS sheets and glued to the wall along the perimeter of the frame (foam plastic also needs to be mounted under the window sill. When the glue dries, dowels with fungus are installed. Plastering the foam is done in the same way as described above (corners are placed on the mortar, strips of reinforcing mesh are attached, etc. .d.).
In order not to stain the frames, they are covered with masking tape before starting foam plastic work.
Preparing the surface and attaching the mesh to foam plastic
Plastering on polystyrene foam includes several important stages, the proper execution of which determines the durability of the finish. First of all, care should be taken to level the surface on which the foam will be attached. If the walls of the house are already insulated, then you can skip this stage and move on.
Today, there are various building mixtures for foam plastering. The most common of them are bark beetles, bayramix and others. By the way, you can read about how to apply bark beetle to polystyrene foam by going to another section of the site.
Also, before plastering the foam, be sure to take care of the necessary tools to do the job. First of all you will need:
- Graters and metal spatulas;
- Master OK;
- Empty containers for solution;
- Drill with mixer attachment for mixing plaster mixture.
So, you will initially need to prepare the surface of the foam before applying plaster. Here it is important to take into account the correct alignment of the joints with each other and the absence of any gaps between them. If they are, then it’s as easy as shelling pears to seal them with regular polyurethane foam.
Next, you need to attach the reinforcing mesh to the foam. You should not refuse to use it, since dried plaster can simply fall off the surface of the foam over time. It is better to use a strong reinforcing mesh for foam plastic, the installation of which should begin from the corners of the building.
After installing the reinforcing mesh, you need to wait 2-3 hours, after which you will need to rub the surfaces with a float or not too coarse sandpaper.
Do I need to prime the foam before plastering?
Priming the surface will increase the subsequent adhesion of the finishing material to it. The foam should be primed using a roller or a wide brush. The tool should have a small pile, and it is best to use foam rubber.
It is imperative that after the primer is applied to the foam, you need to give some time for the surface to completely dry. Only after this can you begin plastering the foam.
Consumption of façade plaster on polystyrene foam
If styrofoam plastering is done with a universal facade mixture, then the consumption per square meter will be 10 kg. Using two types - adhesive and leveling plaster, prepare 4 and 6 kg per square, respectively. The same consumption - 9-10 kg will be if a polymer composition is used. Of these, 3.5-4 kg will be needed for gluing the insulation, the rest will be needed for plastering on foam plastic. An online calculator will help you calculate the consumption of leveling plaster.
Insulating a house with polystyrene foam is becoming more popular every year. Having familiarized yourself with how to plaster polystyrene foam, what materials are better to purchase for the facade, which façade insulation is preferable to room insulation, you can easily solve many problems that arise during repairs or construction. Plastered thermal insulation will last longer if it is promptly tinted and repaired if the integrity of the “shell” is damaged. Your home will be safer, and you will be warmer and more comfortable in it.
The need for plastering foam plastic
Even despite its many positive qualities, when mechanically or directly exposed to sunlight, this material dries out and begins to deteriorate. During plastering of polystyrene foam, it is possible to solve a number of the following problems:
- Protect the insulation from mechanical damage. Due to its fairly high fragility, a hole may appear in it upon impact. Applying plaster avoids the formation of dents and other damage to the outside of the foam.
- Protect the material from moisture penetration. Polystyrene foam does not absorb water well and dries too slowly. When exposed to moisture for a long time, it loses its own thermal insulation qualities, without which the insulation becomes less durable.
- When plastered, the foam acquires protection from the negative effects of ultraviolet rays.
- Increased fire resistance. Plaster prevents the material from igniting.
Extruded polystyrene foam
Extruded polystyrene foam
– this is a material with a uniform structure, which consists of completely closed small (0.1-0.2 mm) cells. It is also called extruded polystyrene foam. Thanks to the innovative method used in production, the sheets acquire high thermal insulation and strength characteristics.
Properties of polystyrene foam as insulation
- This material practically does not absorb moisture due to its cellular structure.
- The material is capable of partially transmitting light (depending on the thickness of the sheet).
- Expanded polystyrene has high compressive strength.
- Resistance to chemicals: water, acids, oils, caustic alkalis, saline solutions, cement, etc.
- Extruded polystyrene foam has a fire resistance class of G3 and G4.
- The density of the material is 25-35 kg/m3.
Where is extruded polystyrene foam used?
In the construction of basements, foundations, roofs and floors, walls and ceilings. For the construction of enclosing structures and for the construction of roads and highways.
Advantages of thermal insulation made of polystyrene foam
- The material has excellent frost resistance and is not susceptible to rotting or fungal development.
- Extruded polystyrene foam is not afraid of sudden temperature changes.
- When installed correctly, expanded polystyrene can last 50 years or more.
- Easy to install slabs and affordable price compared to other insulation materials.
- Environmentally friendly material.
Where to buy extruded polystyrene foam
In our store you can purchase polystyrene foam insulation from the manufacturers URSA, Penoplex. You can be sure that RDS Stroy offers the best prices on the market, because we are official dealers of these companies in the Russian Federation.
From us you can order thermal insulation made of polystyrene foam with delivery to the site or pickup from a warehouse in Moscow.