Many gardeners like to decorate their plot of land with various crafts and decor. These are mainly products made of plastic and wood, which lose their beauty over time, because such materials are not durable. What if you use stone as a basis for creating various decorations? Today, such a hobby as painting stones is very popular. This is a great opportunity not only to decorate the garden, but also to show your creativity, and maybe even your sense of humor.
Tips for beginners
Before embarking on the creative process and starting to paint on stone, it is advisable to draw up an action plan, in particular this applies to preparatory activities. So, the plan to follow consists of the following steps:
- Selecting stones with a surface suitable for painting.
- Drawing up sketches for future drawings.
- Selection of paints with brushes.
- Transferring the drawing onto the material itself.
- Fixing the pattern.
If each step is strictly followed, the likelihood of errors is reduced to zero. As a result, you can get interesting decorations that will fit well in literally any garden plot. This makes rock painting an attractive option for many.
Details such as painted stones are suitable not only for gardens; they can be placed in any area, and even in a residential apartment, for example, to divide the surrounding space into several zones. Even in exquisite interiors, stones with filigree painting look good. Bedroom or living room, hallway or bathroom – the solution remains relevant everywhere.
Master class on painting stones for beginners
To reinforce creative lessons, original stone painting is offered; the master class will help you cope with it without much difficulty.
To create a cheerful family, you will need stones of a certain shape and size. The basis of the composition will be a large flat pebble. Elongated thin pebbles will act as big-eyed chicks.
All stone “sticks” are carefully glued vertically onto a flat base using any moisture-resistant glue.
At the upper ends of the columns, two large white dots are drawn using moisture-resistant paint.
Smaller black dots are applied to these white rounds.
And now, from the green grass, either chicks or gnomes are staring at you with their little eyes. The composition is ready to decorate any green space, even on a windowsill, even in a garden at the dacha. And no additional care!
Which stones to choose?
You cannot do without trips to the sea, because only there you can select the source material that has all the necessary characteristics. But some artistic techniques also look great on ordinary pebbles, which can be found on any beach.
The base itself for painting must meet the following requirements:
- suitable size depending on the selected pattern;
- flat form for fixing the stone on surfaces in a horizontal plane;
- the presence of the correct geometry (choose perfectly round or oval stones);
- absence of a porous structure (the base should be as smooth as possible, without pits or cracks);
- the color should not be too dark (this is especially important if you plan to draw on stones with acrylic paints).
Light, smooth and dense stones are the most convenient basis for work. This surface makes it easier to distribute paint evenly. It is easier to create a neat and clear pattern. However, the use of porous minerals is acceptable in some cases. They have a surface that absorbs paint in large quantities. When using some artistic techniques, this is only a plus.
You shouldn’t limit yourself by trying to find and use only ideal options. Geometrically complex shapes can also become the basis for creating unusual drawings, for example, if you want to depict houses of various sizes.
On video: colorful drawings on stones.
Painting on stones in the garden: secrets of technology + a storehouse of ideas
A garden or vegetable garden is an ideal platform for testing the possibilities of your imagination. Here you can use huge stones, bright colors and bold ideas - in a word, everything that, when decorating a house, will result in something pretentious and inappropriate.
Painting stones for the garden will cost you less than plaster sculptures from the store. And how much pleasure the creative process of creating them will bring!
To make your creative venture a success, adhere to the following recommendations:
- Choose light, smooth, dense stones. They are the best basis for drawings. If the stone has many pores, then it will absorb all the paint; if the cobblestone is chipped, the design will be distorted.
- Stones created by nature do not always have the desired shape. If you come across a fancy piece with jagged edges, try to come up with an image to go with it. If necessary, you can make stones yourself from cement.
- Since the material for the drawing is selected from the ground , it requires thorough washing in a soap-soda solution and drying.
Painting lasts only on a clean surface for a long time Source kaminy-kazan.ru
- You can decorate stones with watercolors, gouache and acrylic . But the first two types of paints have a liquid consistency, are washed off with water and crack in the sun. Better use acrylic. It dries quickly, adheres perfectly, does not fade, has excellent color brightness and turns into an elastic, durable coating.
- Before painting, apply a primer to the stone . This composition will ensure reliable adhesion of the covering layers of paint to the surface of the object. In addition, with it the acrylic will lie smoother and will not be immediately absorbed.
- To complement the drawing with small strokes and details, use outlines or felt-tip pens . They or special pencils can be used to sketch a preliminary sketch of the image. For a dark background, use a white sketch pencil.
- If the hand trembles and the line goes crooked, a solvent will come to the rescue . It easily removes errors in the form of extra specks and lines.
- Varnishing is the last stage of revitalizing the stone.
Varnishing will not only fix the painting, but also make it shine Source gidpokraske.ru
Original stone art objects will add individuality to the landscape. The following options are especially good in the garden:
- Fairytale house . If there is already a figurine of a gnome in the garden, then with the appearance of a painted stone tower it will become clear to everyone where he lives. To implement the idea, you will need a boulder with a pointed upward shape. The larger its size, the more spectacular the house will be. The dwelling can be supplemented with a path of flat stones running from its threshold.
- Representatives of the fauna . Most often, a medium-sized stone resembles the shape of a ball of a curled up animal. Lying down to rest, cats, tigers, dogs, deer, hedgehogs, ladybugs, and snails look very natural on the grass. The main thing is that they are clearly visible.
- Flora . If the garden cannot boast of beautiful flowers, then you can paint them. Stones decorated with compositions of tulips, forget-me-nots or dandelions can be placed on top of a pile of ordinary boulders.
Buckets with sea pebbles imitating cacti look great and extraordinary Source pinterest.com
- Reservoir . An excellent decoration in the garden is a stone painted to look like a pond. Here you will need a piece of rock with a spacious flat surface. On it you can depict water circles, frolicking fish and water lily leaves.
See also: Catalog of companies that specialize in landscape design services.
Manufacturing of artificial stone
Sometimes the imagination of the authors creates images that do not quite correspond to the possibilities available to nature. You may not find a single cobblestone that would be suitable for the implementation of your idea. Then a great solution is to create stones with your own hands.
The process description looks like this:
- You need to fill a basin or bucket with a small amount of water.
- Next, pour regular sand until it reaches the same level as the water. The main thing is that the moisture is evenly absorbed into the surface of the sand. There shouldn't be anything left at the top.
- With their own hands they create a special depression inside the sand mass. It should be the same in shape as the intended cobblestone for future work.
- The prepared form is lined with polyethylene.
- Next they move on to mixing the cement mortar. It then needs to be poured into the mold.
- The top of the workpiece is covered with polyethylene material. The entire structure is sprinkled with a thick layer of sand on top.
- After drying, cement stones can be painted using standard technologies. Drawing is easier than it seems.
You can add pigment or tinting paste to the cement (when mixing it), then it will be easier to create a background with the required shade. Painting on stones at home is always an effective solution.
Selecting suitable designs
Authors can use absolutely any subjects for their drawings. These can be standard patterns depicting caterpillars and mushrooms, butterflies and ladybugs. It is possible to use the most complex techniques to create dot paintings. It won't take much time to paint the stone.
In this matter, you need to rely only on your own artistic taste and level of current skills. Sketches are not only created from scratch, it is also possible to use ready-made options found on the Internet. You can draw anything you want.
But the first step in any case is to use plain paper. It is good if it is possible to adhere to the same scale as is created on the stone itself. Then the work will be significantly simplified. Even agate will not be difficult to use for decoration.
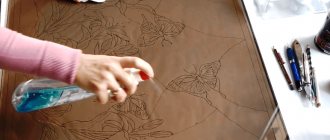
Only after sketching on paper is the picture transferred to the surface of the cobblestone. Redrawing begins with the outline, for which pencils of the appropriate variety are used. The choice of shade is determined by the base and its characteristics. After this you can paint with paints.
What colors can you paint with?
Here are just a few solutions that have gained wide popularity among artists:
- compositions used to paint ceramics;
- acrylic as a dye;
- sets with gouache;
- watercolor paints.
Watercolor and gouache differ in consistency with increased liquidity. When exposed to moisture, such materials are easy to wash off; in the sun, cracks quickly appear on the surface. But acrylic for painting is considered an ideal option. They are also easy to draw.
Acrylic paints have a thick, creamy consistency. Thanks to this, you can forget about drips and the need to re-carry out work in certain areas. The paints from the first layer are applied as evenly as possible over the surface. Using acrylic it is easy to achieve the desired result.
There are other advantages characteristic of acrylic-based compositions:
- indelible when exposed to moisture;
- ability to withstand any temperature, both high and low;
- It takes only 15 minutes for the material to dry;
- no odor or toxic substances in the composition;
- high ductility (this means that the paint will not crack in the future);
- the material never fades when exposed to the sun.
Acrylic paints are sold in both art and construction stores. Both options are equally valid. There are also acrylic-based paints with a 3D effect - the result is very interesting.
A fairly convenient option is to use so-called professional paints. But their high cost discourages those who are just starting to work in this direction. In addition, after applying the first layers, it is recommended to additionally bake the product in the oven. Then the images will be preserved for longer periods, even if they are painted with the simplest paints.
Selection of brushes
No less important than all the others is purchasing brushes with suitable characteristics. Now they sell special kits designed for painting on stones. Each of these sets of brushes contains up to 8 pieces. The devices are equipped with piles of different lengths and shapes with different characteristics.
It is recommended to treat stones with nylon or synthetic brushes. Then the paints will be evenly distributed over the surface, and the bristles will not leave streaks and lint visible to prying eyes.
About the features of the painting itself
After selecting the appropriate materials, you can proceed to the main process - coloring:
- Preparing the stone. First, the pebbles themselves are washed in soapy water in advance and then thoroughly dried. The sun or a hot battery will also provide the desired result.
- Applying a primer layer. This process promotes a more uniform distribution of the material and reduces paint consumption. You can use PVA glue, it copes well with the functions of a primer.
- Drawing a contour. The image is transferred from paper to stone, the outline is outlined with pencils or felt-tip pens.
- Background coloring. The width of the brushes and significant length of the bristles will allow you to achieve a spectacular result when applying paint.
- Drawing the pattern itself. This stage is the final one, it involves painting all the details, even the smallest ones.
The photo below shows a step-by-step master class for beginners and those who would be interested in this painting idea.
Materials for painting pebbles
In order to paint stones, you will need the following materials:
- The stones themselves. They can be of different sizes and colors, the main thing is to choose the right porosity.
- A means for degreasing the surface of the stone (alcohol will do).
- Paints. For every taste and color. Gouache and acrylic are most suitable. They dry quickly, have no odor, and are easy to use.
- Priming. Before applying the design, the surface of the stone should be primed. You can prepare a primer from a mixture of PVA glue and water, or you can take ready-made acrylic. It comes in white and black, choose as needed.
- Pencil for sketching and sketching.
- Contours. For creating bitmaps or highlighting details.
- Varnish. For finish, shine and durability.
The final part of the work
Drying each layer takes 15-20 minutes, this time will have to wait. The same is done when the drawing is completed as a whole. After the acrylic has completely dried, the stones with designs can be taken outside. And create decoration in any suitable place. Coating the stone with acrylic varnish enhances the effect, makes its appearance even more unusual, and the painted scenes and images become brighter. The surface has a glossy shine.
Master classes on stone painting (2 videos)
Ideas for inspiration (25 photos)
Owl
You will need: a stone of suitable size and shape, a simple pencil, gouache, varnish for crafts.
Master Class
- Cover the entire stone with white paint and wait until dry.
- Draw eyes, feathers and wings with a pencil.
- Mix black and white paint, then paint the owl's body.
- Paint the feathers black and wait until dry.
- Outline the eyes using black and white paint.
- Color the pupils red and orange.
- Draw white feathers on the face.
- Paint the feathers with white and wait until dry.
- Paint the nose with black paint.
- Use black lines to highlight the border of the owl's face and wings.
- Wait for it to dry and coat the craft with varnish.
The little owl is ready! I recommend watching this video!
Tutorial gatto su pietra | Tutorial cat on stone | Painting | Tutorial draw | Disegno su pietra |