Purpose and principle of operation of a cartouche pistol
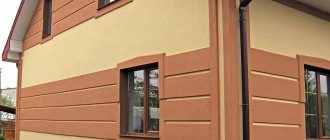
Finishing work includes not only gluing wallpaper or painting surfaces, but also creating a decorative layer from plaster mixtures. To quickly apply coloring compounds, a spray gun was invented, a relative of which is the cartouche tool. The name comes from the French word cartouche - a relief decoration in the form of an unfolded roll of paper or tape, which has a rather complex shape that does not allow it to be covered with a layer of plaster using rods, templates or a trowel. This can be done only by the “spraying” method, for which a plaster analogue of a spray gun was developed. It is used not only for finishing cartouches; its scope is much wider.
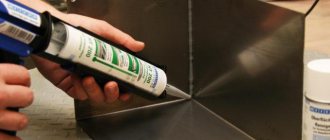
A texture or plaster gun uses the same principle of operation of the device as a paint sprayer (two effects are used: injection and spraying). The solution is sucked in, mixed with air pumped by the compressor, crushed into separate lumps-drops and sprayed onto the wall surface. Drops, overlapping drops, form a dense layer of solution.
The main difference between a cartouche tool and a hopper bucket is that in the first the mixture is supplied by suction, and in the second - under the influence of gravity. The first is used for applying a layer of up to 1 cm of less thick solutions, the second is used for starting plaster with a layer of up to 2 cm.
A tool is used to spray solutions that, due to the small diameter of the nozzles, cannot be handled by the spray gun:
- viscous heavy paints, which, due to their thickness, are not pushed through nozzles designed for conventional paint compositions;
- mosaic and texture paints;
- liquid wallpaper, primer, liquid cork and similar materials;
- decorative plaster.
Main advantages of use:
- time gain due to high productivity (high application speed);
- facilitating physical labor;
- versatility (working with various materials).
Advantages of an air gun
Applying putty with a spray gun
Using a cartouche gun may be ineffective when performing a small amount of work. In this case, the purchase of such equipment will be an additional expense, which can be completely avoided.
However, for larger-scale work (plastering a house), this tool will play a big role, facilitate the process and significantly reduce finishing time.
The main advantages of using this device in work include:
- Acceleration of work: processing 150 m2 will take only 1 day.
- Increased layer density due to supply under pressure. This will ensure good adhesion and fixation on the surface.
- Saving materials and facilitating the work of plasterers.
- The ability to use the tool for applying decorative plaster of various types (for example, “liquid wallpaper”, “American”, “fur coat”, “shagreen”), as well as for painting surfaces.
- Affordable cost of the device. On the market you can find both expensive European-made models and more budget ones that will quickly pay for themselves in the process of work.
Design and characteristics of a cartouche pistol
Structurally, the cartouche pistol is made up of several parts:
- The body is shaped like a pistol. A trigger is installed on the handle of the body, which can be pressed with three or four fingers at the same time. The trigger opens the forced air supply valve. An air supply hose that can withstand high pressure is attached to the bottom of the housing handle through a fitting. The hose is connected with a quick-release fitting or threaded connection to the compressor directly or through a receiver.
- Nozzles with replaceable nozzles. The diffuser nozzles of the nozzles can be cut at different angles and have different diameters.
- Nozzles - a suction tube with a circular cross-section, which is connected to a pneumatic line through a thread.
- A container for a cone-shaped composition. Since finishing solutions are dense and heavy, when the container is full, it is quite difficult to hold the tool when working with one hand. To eliminate the drawback, the container has a handle for holding the cartouche pistol with the second hand. To prevent the mixture from slipping out of the container when finishing the ceiling, a non-removable flap is often made on the socket (covers part of the top). The container is attached to the tube through an O-ring and clamped with a stainless steel clamp.
- Devices for purging sometimes clogged nozzles - a purge cleaning rod.
- Regulating devices (some models are equipped): an adjusting screw installed on the back side of the housing (responsible for supplying the solution), and an air valve.
Material
To lighten the body without compromising strength, aluminum alloys coated with powder decorative paint are often used to make it. Nozzles and nozzles are made of stainless steel, which does not corrode when in contact with wet compounds and is quite wear-resistant. To reduce weight, the container is made of either nylon (the lightest) or aluminum (more durable).
Dimensions and weight
Other characteristics of a cartouche plaster gun include its weight, capacity and dimensions.
- The average weight of the tool is in the range of 1-3 kg. The container is designed for 3-5 liters.
- There are models with a capacity of up to 8 liters, however, while reducing the time for refueling, they increase operator fatigue.
- The length of the pneumatic tool is 15-25 cm.
Nozzle sizes and their purpose
Actually, the nozzle is the name given to the tube in which the solution is supplied to the nozzles.
But here by the word “nozzle” we mean nozzles (or nozzles). When preparing the tool for work, install a nozzle of the required diameter.
In addition to different diameters, diffusers also have different angles of inclination and different bevels of the edges of the nozzle opening, which determine the spray angle of the solution. For example, nozzles with a bevel angle of 45° are more suitable for cement mixtures. For liquid mixtures – 15o.
For more liquid and fine-grained solutions - nozzles with a small diameter, for example, 2.5-3 mm, for more viscous mixtures with larger grains - nozzles with an internal diameter of 4, 6 or 8 mm.
Required pressure
When purchasing a plastering gun, look at the instructions section, which recommends the minimum and maximum compressor performance, air supply pressure limits and air flow. This will help you choose the right compressor (our article “compressor for a hopper bucket” will help you in the selection) with which your tool will work. The average pressure for which pneumatic guns are usually designed is 4-8 atm, with a compressor capacity of 200 to 250 liters/min.
The most popular compressors have the following characteristics:
- 150-380 l/min – air mixture flow rate;
- From 1.5/3.6 to 3/8 bar – air pressure (minimum/maximum);
- 170-250 l/min – maximum compressor performance;
- 165-170 l/min – the performance of the pneumatic unit is minimal.
Models of plaster sprayers may have narrowed operating ranges or, conversely, expanded ones.
Which cartouche gun to choose for plastering
First of all, the choice should be based on the purpose of purchasing the tool. For professional use, more expensive tools are produced and, therefore, more reliable, with expanded functionality and as convenient as possible. Such texture pneumatic guns are suitable for plastering stations. Simpler models are intended for short-term use at home. Considering the small difference in prices between household and professional tools, it is worth choosing a professional product of good quality.
Some simple tips for choosing:
- You should choose a cartouche gun by looking at the existing compressor (its characteristics), and not vice versa.
- During inspection, no defects in the housing should be revealed (pay attention to the absence of chips and cracks).
- The nut that secures the replacement nozzles should be tightened by hand easily, without hesitation.
- It’s good if the kit includes an adapter bent at 45° for installing a mortar cone. This will allow the solution to be applied not only to vertical surfaces without splashing.
- Check if there is any play in the trigger.
- If the handle (where the air supply hose is connected) has an air valve, the model is more convenient to use. When adjusting the air pressure in the handle, there is no need to interrupt once again by going to the compressor.
For professional plastering work, it is more rational to purchase a plastering station, which includes, in addition to the compressor, several pneumatic tools:
- hopper buckets (ceiling and regular);
- two air pistols (hopper pistol and cartouche pistol).
Types of cartouche pistols
As already mentioned, the tool is produced for professional use and for household use. This is the division of models into types.
Actually the difference is quite minimal:
- Household ones are produced with a tank of up to 5 liters and designed for 3-4 bar of pressure; often additional replacement nozzles are not included in the package. Sometimes there may be complaints about the build quality.
- A professional tool may have a tank with a larger capacity than 5 liters. Along with it, the kit includes various nozzles. The device is designed for intensive use.
Some models are equipped with a round disk with different-sized holes (performing the function of a nozzle), attached by a bayonet to the nozzle (tube). A bayonet is a type of fastening where one connection element has a protrusion, and the second has a recess corresponding to the protrusion. Equipping with such a disk replaces the use of replaceable nozzles. To change the nozzle diameter, simply turn the disk and install a disk hole of the desired diameter at the outlet.
How to make it yourself
A homemade compressor pneumatic gun for painting or plastering can be made from a blow gun.
On the Internet you can find two DIY manufacturing schemes:
- With replaceable nozzles and top-mounted tank. In general, it repeats the factory design.
- No change in outlet size. A very simple design of a cartouche gun, when a blow gun was inserted into a canister without a bottom and a hole was cut out to allow air and solution to escape.
Take a closer look at both methods.
The nozzle (4) of the blow gun (1) is unscrewed. A nut (2) with a 3/4-inch thread is put on the body. The washer (3) is clamped with the nozzle; the washer must fit into the nut. A tee (5) with a 3/4″ thread is connected to the nut.
On the other side of the tee, screw a fitting of the required diameter depending on the plaster and the desired intensity of spraying. On top of the tee you need to select an adapter for a funnel with a thread or some other container.
Another way to assemble a pneumatic gun for spraying plaster is simpler.
Homemade plaster gun from a canister
A blowing gun is inserted into a canister without a bottom on one side and secured. On the other side, cut a hole with a diameter of 1 cm opposite the nozzle of the pneumatic tool. The handles inside the canister are foamed so that no solution remains there.
This craft can be assembled in 15-20 minutes. Suitable for applying thick cement-sand mortars and decorative plasters with marble chips.
Types of solutions
Specially developed compositions are intended for mechanical application (as indicated on the packaging). Popular are dry mixtures, which are mixed with the required volume of water before use. They can be cement or gypsum based and contain additional modifying substances. Gypsum mixtures are used for finishing in rooms with low humidity. In other cases, compositions with a cement base are used.
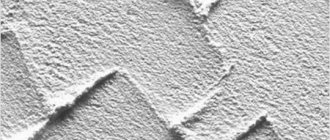
The consistency of the mixture should be close to medium-thick sour cream and should not slide off the wall when applied, but should slide freely along the walls of the cone-shaped tank. The mixture for pneumatic guns may contain marble flour and fine marble chips and mica. This mixture is used for finishing with a decorative structure (for example, fur coat plaster). If a textured surface is created using finishing tools, then the mixture for application is less viscous.
In addition to the indicated compositions, mixtures on a different basis, for example, glue, are applied with cartouche guns.
Application methods
There are several ways to apply fur coat plaster. The appropriate one is chosen taking into account the processing area, the desired texture and your experience.
Broom
This method requires a minimum of materials. Using a birch stick and a broom is only advisable for treating small surfaces, since manually spraying the solution takes a lot of time.
- A broom is dipped into a container with a solution and the composition is poured onto it.
- Take a stick in one hand, placing it parallel to the surface being treated.
- Hit the broom against the stick so that the splashes fly onto the wall.
- Repeat all operations until the wall is covered with an even layer of the composition.
The process of applying “shuba” plaster using a stick and a broom takes a lot of time, and it will be difficult to achieve an even layer the first time, so it is rarely used.
Brush
Using a brush and a plank is another outdated method of applying fur coat plaster. It is suitable for both exterior and interior decoration.
The brush is dipped into a container with a solution, brought to the wall, turned over with the bristles up and passed along it with a board, from the wall towards you. The resulting splashes will fall on the wall, covering it.
Roller
Roller application is the optimal solution for inexperienced finishers. No additional equipment is needed here; all you need is a roller, a rule and a spatula. Achieving an even first coat will not be difficult, and the work goes quickly.
The solution is taken onto a spatula and distributed over the surface. Using the rule, level the layer. Walk along the wall with applied plaster with a roller. Do this quickly until the solution dries.
If the work is carried out indoors and you need to get a fine texture, after drying the plaster is treated with sandpaper.
Compressor
Using a manual sprayer to apply “fur coat” plaster or a compressor will get the job done the fastest. The finished coating will be of high quality, the layer of solution will be uniform.
Compressors will help not only speed up the process, but also achieve the desired texture: to create a fine texture, pour a liquid solution into the device, and to obtain a coarse texture, prepare a thick mixture.
Net
You can apply plaster under a fur coat using a fine mesh - this method is also not difficult. The mesh is pressed to the prepared surface, and the solution is applied to it with a trowel. When finished, the mesh is carefully peeled off, and the plaster remains on the wall, maintaining its relief texture.
Read also: Tl431 characteristics in Russian
Instructions for use
Finishing work using a gun for applying plaster is carried out in stages:
- Preparation of the base - cleaning (removing stains, fungus, excess metal parts, peeling plaster), dust removal, repair (cracks, chips), notching (on smooth concrete surfaces), priming.
- Marking and installation of beacon profiles.
- Preparing the device (compressor and gun) for operation.
- Mixing the solution.
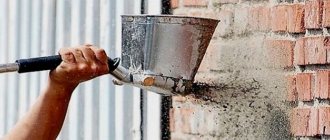
- Applying the solution using a pneumatic tool.
- Formation of a flat surface or finishing relief.
- Drying the layer.
- Cleaning the device and drying the parts.
Applying the solution with a pistol has features that you need to get used to.
Some of them:
- The trigger pull should be smooth. The trigger should be pulled evenly throughout application to ensure even coverage.
- The distance to the surface to be plastered depends on the viscosity and specific gravity of the solution. The heavier the mixture, the closer to the base the nozzle is placed. The recommended distance is 35-40 cm.
- Carefully set the power of the compressor, because if it is high, it can tear off the hose, and if the pressure is low, the solution will flow down the wall or will splash out in different directions.
- Be sure to wear glasses and protective clothing, as the gun often has to be held at face level. You need to protect yourself from splashes of the solution.
- The tool is held so that the composition flies to the base at a right angle.
- The gun is driven in horizontal lines, overlapping row after row with a slight overlap of the next row on the previous one.
- It is allowed to apply a layer of less than 2 cm at a time. It is better to apply two layers, level the bottom layer as a rule, dry and float before applying the second. A two-layer coating is stronger than a single layer.
- The hose is not disconnected when filling the tank. The mixture is poured into the container using a plaster ladle or trowel.
- Before setting up the gun, the air hose is disconnected.
The gun is disconnected when there is no air pressure in the hose.
Technology of using plaster ladles
The method of using the tool resembles the technology of working with a spray gun. First, a compressor is connected to the bucket using a rubber hose. After this, plastering begins, provided that the surface has already been thoroughly prepared.
Preliminary stage
Debris, dirt, dust and grease stains are removed from the base in advance. Beacons are installed 20 cm from the corners of the walls, which are placed at equal distances. The profiles are aligned vertically and their correct position is checked with a level. On large bases, intermediate beacons are additionally installed.
Plastering
Prepare a solution from cement and sand (for example, in a ratio of 1:3) or dilute the ready-made building mixture. Mix it with a mixer until smooth and free of lumps. The finished mass should not be too liquid; it is better if the consistency resembles porridge.
The solution is placed into the container, the device is connected and the mixture begins to be applied. It is necessary to work until the entire portion of the composition is finished. It may happen that one hand gets very tired from the movements, then you need to rest a little or start using the other hand.
When the solution begins to extend beyond the profiles, its excess is removed and the beacons are moved higher. If there are holes left on the wall, they are filled with a trowel (by hand). After the mass has dried, it begins to be rubbed and finished.
Cleaning the pneumatic bucket from plaster
After completing work with the plaster mixture, you must immediately clean the ladle of its residue. Dried lumps are quite difficult to remove. If the solution has frozen, you should spray the tool with water or immerse the container in warm water
It is also important to clean the nozzle immediately, because if it is clogged, the bucket may break immediately after turning it on again
Cartouche gun care
- Having completed the work, drain the remainder of the plaster mixture from the tank.
- Bleed the air from the hose, and then disconnect the tool from the hose.
- Loosen the clamp and disconnect the tank from the nozzle.
- The nozzle and tank are washed with water, to which special agents can be added.
- To clean the nozzle, turn it out of its socket.
- A few drops of oil are applied to the drive trigger.
- Check the integrity of the gaskets. If necessary, they must be replaced.
- After drying the parts, the tool is not reassembled and stored disassembled in a dry place, protected from dust.
The tank and gun are washed and dried after each use.
Do not use pneumatic tools in explosive areas.
Manufacturers of cartouche pistols
For professionals:
- The German manufacturer of pneumatic equipment FUBAG offers (along with paint sprayers) a high-quality texture gun DECOR G5000, designed for mixtures with crumbs up to 5 mm in diameter. The kit includes nozzles 4-6-8 mm. Tank volume – 4.5 l. Product weight 1.4 kg, pressure 3.5 bar, air mixture flow per minute – 149 liters.
- Other popular plastering guns are produced by the German company Bosch, as well as the Swiss company Brigadier and Graco.
Budget options are produced by Zubr, Fit, Matrix. For example, a texture tool from the German brand Matrix (manufactured in China), model 57350, has a tank capacity of 9.5 l, works with air at a pressure of 9 bar, and a maximum flow rate of 170 l/min.
The Cartouche Pistol is fairly easy to learn, although its use has its own quirks. By using this tool for plastering, you will reduce the time for decorative plaster or applying liquid wallpaper several times.
Comparison with hopper bucket
In addition to the cartouche gun, a similar device is available on the market - a hopper bucket (pneumatic bucket). The main differences between these two tools are as follows:
- The area of application of the solution and the consumption in a pneumatic bucket are larger, because it has several nozzles.
- The hopper bucket requires more pressure to operate to ensure that the plaster is sprayed evenly through multiple holes.
- The cartouche gun is used primarily for applying putty and decorative plaster, and the hopper is used for quickly adding mortar when leveling walls.