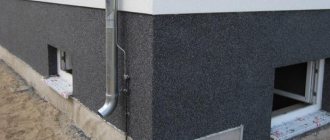
Wood putty
Kinds
First of all, it should be said that the quality of putty largely depends on the choice of composition. Therefore, first of all, we will consider how to putty wood.
Currently, there are quite a few varieties of putties, which makes their choice somewhat complicated. Therefore, first of all, let’s get acquainted with the most common of them:
| Tish putty | Peculiarities |
| Plaster | It is often used for woodworking, so it can be considered a classic option. This composition has good adhesion and elasticity, and its price is quite low. The only thing to keep in mind is that gypsum putty does not tolerate moisture. |
| Acrylic | The cost of such putties is much higher than gypsum compounds, but they have a number of advantages, such as:
The disadvantages of this composition include the fact that it is not intended for sealing wide and deep cracks. |
| Polymer | They are also considered expensive putties, but they lie smoothly, dry quickly and are highly durable. Therefore, they can be used to work with parquet and other surfaces that will subsequently be subject to significant mechanical loads. Prominent representatives of polymer putties are latex and silicone compounds. As for the disadvantages, besides the high cost, they have no obvious disadvantages. |
| Nitro putty | Resistant to chemicals and water, does not shrink and is easy to sand. For this reason it is also very popular. |
Note! Putty can be starting and finishing. As a rule, the finish is more liquid and elastic.
As we can see, each material has its own characteristics, and it is quite difficult to say which wood putty is better. Therefore, you should choose depending on the operating conditions of the wooden structure and the characteristics of the defects that need to be eliminated.
Self-production
It is not necessary to purchase the material in the store, since you can make wood putty yourself. Moreover, there are quite a lot of options for its manufacture.
So, the instructions for filling wood are as follows:
- Before you putty on a wooden window or other wooden product, you must thoroughly clean it of dust and any contaminants. To do this, you can wipe the surface with a damp cloth or even sand it with sandpaper.
- Next, the cracks are prepared - if they are too narrow, then they need to be slightly widened. Peeling or chipping parts must be removed.
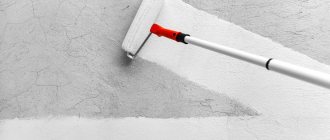
In the photo - primer for wood
- Then the wood must be treated with a primer, which will prevent it from rotting or mold, and also improve the adhesion of the putty. The primer is usually applied in two layers. Moreover, the surface is treated with liquid a second time after the first layer has completely dried.
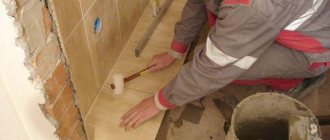
- After this, the putty is taken from the container with a small spatula and applied to the surface in a layer of 2-3 mm. The spatula should be pressed tightly and held at a slight angle to the surface.
- When the first layer has hardened, you need to remove any unevenness with a spatula or sandpaper and apply another layer. The surface must first be cleaned of dust.
- If the desired result is practically achieved, you can apply the finishing putty in a layer no thicker than 1.5 mm.
- After this, the surface must be thoroughly sanded with zero-grit sandpaper dipped in water.
- At the end of the work, the putty surface must be coated again.
Advice! When choosing a primer, you should focus on the type of putty. For example, it is better to use a nitro primer under nitro putty.
This completes the work. Now, knowing how to putty a wooden floor or other wooden surfaces, you can handle this task yourself.
Criteria for choosing putty for painting
Depending on the conditions where the wooden object will be used, the most suitable type of covering material should be selected. When carrying out repair work outdoors, an important parameter for choosing a putty composition is resistance to heating, cooling and high humidity.
Therefore, for treating the walls of wooden houses, fences and other attributes of architecture, oil putty will be the best choice. It can be used after wood components have been treated with insect and rot repellent compounds, but before final painting.
Acrylic compounds are the most versatile; they are suitable for wooden products indoors and outdoors, as they have a high level of strength and wear resistance. It should be noted that such putties are white in color, therefore they are intended specifically for applying paint on top, not varnish.
For parquet floors, furniture and other objects that people come into contact with, you need to choose safe materials, so you can use harmless aqueous compounds. Their characteristics are in many ways similar to acrylic putty mixtures, but their price is cheaper.
Conclusion
To properly putty wood, you need to choose the right putty and follow the basic rules for its application. Moreover, this work is quite painstaking and requires certain skills. However, by doing it yourself, you can get the hang of it quite quickly.
You can get some additional information on the topic discussed above from the video in this article.
When restoring wooden doors, they are often repaired, allowing you to save on upgrading the door leaf and maintain the quality of the product without dismantling. Also, the restoration of wooden doors helps them adapt to different styles, which may change during the renovation of rooms.
In some cases, it is cheaper to restore a door than to replace it
For old houses and apartments, such measures are more profitable compared to replacing them with more modern models (especially when the opening parameters do not meet modern standards).
Examples of restoration work
To repair a door and carry out restoration work, you may need various tools and materials, including: a screwdriver or drill, a hacksaw, sandpaper, paint and varnish, a brush or a spray bottle. To remove the old layer you will need a sander, solvents or a hair dryer.
DIY restoration of wooden windows and doors
A couple of decades ago there was no talk of any metal-plastic windows and doors.
Each apartment had good old “Soviet” windows, which were painted year after year, and covered with newspapers or duct tape for the winter. Same thing with the doors: they tinted the paint, polished the glass - and the whole repair was done. With the development of construction technologies, people can afford windows to suit every taste, color and budget. Those who prefer only environmentally friendly materials install wooden ones; those who don’t want to spend a lot of money choose the simplest metal-plastic ones. However, there are still many apartments and houses where, due to numerous layers of paint, the design on the trim and even on the doors themselves are no longer visible. You can also find old wooden windows, where instead of glazing beads there is old loose putty and swollen, peeling paint in places. You can breathe new life into them.
If you do everything yourself and don’t involve specialists, then restoring wooden doors will cost you 10 or even 15 times less than buying new ones. In addition, the new door also needs to be sanded, varnished or puttied and painted, and hinges and handles need to be cut into it in the same way. Therefore, if you have wooden doors and not pressed ones, then do not rush to throw them away.
Restoring wooden windows is practically no different from restoring doors. You just need to buy all outdoor materials that are designed to withstand the elements. Window restoration is more “jewelry”; everything needs to be done carefully; you can get hurt and the glass can be damaged.
The technology for restoring windows and doors depends on their condition. You can simply sand off the old varnish and, if everything is in order, coat the product with new one. You can do the opposite: remove five layers of old paint from the door, then cut out its rotten areas with a jigsaw, insert others, putty and paint. The topic of my article is the restoration of neglected windows and doors.
How to remove a door from its hinges
To restore the old cloth, it is removed from its hinges and laid on the base (chairs, workbench, floor). Such work can be done with the door attached, but this will affect the quality of the product and it may fail.
Based on insertion and fixation, there are hidden, overhead, card, hidden, screw-in, and mortise hinges. If the hinge needs to be disassembled, then after removing the door from the lying panel, it is twisted with a screwdriver. Otherwise, you will need to place bars under the door, unscrewing the hardware from the slope and panel.
After removing the hinges from the canvas, you need to remove other fittings (lock and handles) and existing inserts. To remove decor made of plastic or glass, you need to remove the fixing beads and pull the elements out of the grooves. There should be nothing unnecessary left on the wooden surface.
Plastering a doorway
Sometimes doors are not placed in the opening, but even in this case the doorway requires finishing. And the easiest way to do this is with plaster. The technology of the plaster itself is similar, but the guides and methods of their installation are different.
Plastering the doorway begins only after both adjacent walls have already been plastered. The opening itself is covered with a primer (the selection principle is the same).
The guides are installed from the sides. These can be boards, metal profiles, two rules, pieces of plastic, fiberboard, etc. One is installed on the right, the second on the left, they are fixed. The most convenient way to secure them is with clamps. If there are no clamps, you can use nails or screws - the remaining holes will then need to be carefully repaired.
The leading edges of the guides will serve as the basis along which the rule or wide spatula will move. The sequence of actions is the same: the first layer is rough, the second is finishing, if it is necessary to bring it to perfect condition, grout is done. For more information on how to putty a doorway, watch the video.
How to remove old paint
Before starting restoration work, the old peeling coating should be removed from the balcony or interior door. To do this, you can use one of several methods, i.e. choose the appropriate option for a particular case.
Grinding
If you need to process a flat door with numerous layers of paint, it is better to take it outside and clean it with a sander. Such work is very dusty, the circles quickly become clogged, but the result is good.
Numerous layers of paint are removed from doors using a sander.
Chemistry
In hardware stores there are many chemical compounds for removing the old layer (for example, B52). They must be applied to the door surface with a brush, spatula, or scraper. After a certain time, foaming of the paint and its peeling are observed. Then the unnecessary layer is removed with a spatula.
Due to the harmfulness of solvent vapors, work must be carried out in a respirator and gloves.
. A solvent must be applied to each layer of paint, since it will not cope with a thick paint coating. Therefore, this technology can be used when cleaning small areas of a door with a thin paint layer.
When working with chemical paint solvents, you must follow safety precautions.
You can make your own paint remover composition by mixing caustic soda, oatmeal and water to a thick consistency. The resulting composition must be evenly distributed over the panel and removed after half an hour with a spatula.
Gas-burner
According to fire safety rules, you need to work with a gas burner outdoors. Heated paint peels off easily, but it can smoke and release toxic substances. This method is best used if you have certain skills in working with a burner and have a certain supply of cylinders
.
Construction hair dryer
This device produces a stream of air with a temperature of no more than 600 degrees. This will be enough to heat up the old paint and remove it with a spatula. In this case, there is no burning smell, although the procedure is considered long and laborious.
You can use a hair dryer to remove old paint.
When using a hair dryer, it is forbidden to deviate towards the canvas, as there is a risk of getting burns from the hot air. Compared to using a burner, this method is safer. But you need to work carefully so as not to damage the wood and create a gap.
Drill with attachment
A rather dirty, but quick method of cleaning old canvas is mechanization. You can use a drill with a specialized abrasive brush. When cleaning the surface, you should work carefully to avoid damage or chipping of the wood from metal bristles. To process the entire canvas, you should buy several attachments.
Using abrasive drill attachments, remove the old paint layer
The large volume of dust and contaminants must be taken into account, so a respirator and safety glasses should be used. It is advisable to work outside so that paint particles do not fly around the room.
This technique allows you to correct the outer coating, carefully and gently removing complex stains and old varnish from wood, glass and metal without damage. Together with compressed air, the door surface will be coated with Armex biodegradable cleaning agent.
But this method has a significant drawback - the inability to implement cleaning indoors. The door must be delivered to a workshop, which will incur additional costs.
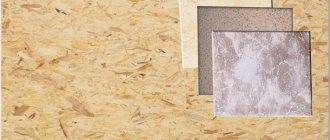
Materials for work
Wood panels, laminate, veneer, MDF, plasterboard, plastic and other materials are used for embedding. You need to prepare:
- Screwdriver Set;
- screwdriver with a set of bits;
- drill for metal.
You will also need:
- level to check;
- polyurethane foam;
- wooden slats;
- putty knife;
- fastening means.
Plaster
Plastering is the most common method. It is used to eliminate defects after the door has been installed. You will need to set the guide beacons and mix the solution. A vapor barrier is carried out on the foam seam of the door block to avoid the appearance of moisture on the internal slopes in the future. This will also help prevent the appearance of fungus and mold.
For external and internal work, a special hydro- and vapor barrier sealant is used, which can be bought at any hardware store (Stiz A, B, etc.). We seal the openings with a plaster mixture (sand-cement mortar) and carefully level them. For basic sealing, tile adhesive is sometimes also used.
Plastering work begins when both adjacent walls are already plastered and the opening is covered with a primer compound. If sounds are heard from the stairwell, the gaps are first filled with soundproofing materials. Excess plaster mortar is cut off with a float or a regular lath. When the material dries, you will need to grout it.
This video shows the plastering work of a doorway:
Putty on a wooden door
After removing the old paint, you need to level the canvas with sandpaper. It is mounted on a holder and the door is processed, which allows you to remove remaining layers from hard-to-reach areas and smooth out cracks and scratches.
After the door has been sanded, it needs to be vacuumed and degreased with white spirit. Then you need to take the primer and, after mixing, apply a thin layer to the canvas. Priming will extend the life of the wood and will also serve as a basis for applying a new coat of paint. On average, 100 grams of primer are used per square meter of product. A primer for restoration with a chalk base is suitable, and to open the varnish when doing the work yourself, use PVA glue diluted in distilled water (in a ratio of 1/1).
After removing the paint, the wooden panel is sanded and coated with primer.
If the canvas has a deep gap, then it is removed by selecting a piece of wood of the appropriate shade and size. The sliver is lubricated with wood glue and firmly driven into the existing hole. After 24 hours, the glue will dry and the surface can be primed, puttyed and painted. After this, you need to putty the door, apply a special composition with a thin spatula, which can be used to repair small dents. Next, you need to prime the surface so that the paint layer is absorbed evenly.
The putty should be distributed evenly and left to dry. Then, to eliminate small defects, you will have to treat the surface a second time with fine-grained sandpaper.
.
Materials you will need:
- Coarse putty for wood. Used to seal deep cracks and defects.
- Fine-grained finishing putty for wood. Used for finishing wood. Take white putty. It is recommended to use beige putty to match the color of wood only if you are going to varnish the product. If a window or door is in very poor condition, I recommend puttingtying and painting it with white materials. In this case, the defects are least visible.
- There is no need to skimp on putty, especially if you are making windows. It is better to take more expensive material for outdoor work.
- Deep penetration soil. Widely used for any finishing work. In our case, it is used for better adhesion of wood with putty and the putty itself with paint.
- Wood paint. It’s better to take a glossy one, it’s easier to clean.
- Wooden glazing beads. If there is no glazing, then they are unlikely to be needed.
- Nails 20 mm long for glazing beads
- Masking tape.
Glass replacement
Old cloudy or broken glass is easy to replace yourself. Instead, you can put a new one of any type (plain, multi-colored, smooth, embossed, tinted, sandblasted, transparent or matte). It is irrational to change glass 1 cm thick, since it will be expensive and you need to have certain skills.
Glass with glazing beads
Replacing glass that is secured with glazing beads is the easiest to do. First, they are dismantled, removing the fragments by hand. After this, you need to take pliers and a metal spatula and use them to pry the glazing bead. Use pliers to carefully pull out the nails, clean the opening with a knife or chisel and measure. For a non-standard opening, a shaped pattern is cut out of cardboard, but you need to take into account the dimensions of the glass, which should be slightly smaller than the opening. After washing and drying the glass, the design is transferred from the pattern and cutting is performed. To avoid damaging your hands, you need to use gloves and work with a working glass cutter on a flat surface.
Fastening glass to glazing beads
The glass opening is sealed around the perimeter, the cut section is mounted, new fasteners are sawed with a jigsaw and secured with thin nails.
Glass with hidden fixation
If the glass on the door is installed in a hidden way, then you will need to disassemble the structure and unscrew the fasteners. After this, the old glass is removed and new glass is installed in its place. In this case, the use of silicone is not allowed, which will make further replacement impossible.
A major disadvantage of replacing such glass is the risk of reducing the tightness of the canvas after assembly. It will be necessary to straighten the door with a plane. Glass can be replaced with an unbreakable acrylic mirror, which will be quite durable, aesthetic, lightweight, and quick to cut.
Door reinforcement
A door that has dried out from age can also be restored. To do this, after standard preparatory procedures preceding painting, the canvas and frame are strengthened. It is enough to level the deformed structure using a plane.
In cases where old, shriveled interior structures with large gaps between the frame and the door leaf are being restored, it is necessary to increase the size of the door leaf. To do this, a strip is nailed to the upper end part. After this, the door is adjusted to the desired size using a file or plane.
Finishing
Once you have covered up all the defects, you should choose a finishing method. The simplest thing is painting. There is a large selection of compositions on the market, among which you can choose the appropriate tone to suit the interior.
In the store you can buy overhead facades and decorate the canvas. They are fixed with PVA glue. If necessary, wooden decorative elements are used, fastened with staples or nails.
A solid wood door can be updated with special plaster, which allows you to obtain three-dimensional and relief designs. In some cases, craftsmen use cracking compounds, which causes the surface to become covered with small cracks and become “outdated.” A similar effect can be obtained after treatment with fine sandpaper.
Painting
Not everyone knows how to repair an interior door with your own hands using painting. It is not necessary to use oil-based paint. Water-based or acrylic compositions that do not smell and dry quickly are more suitable. Painting should be done in the following sequence:
- Take a roller with a fine-pored nozzle and cover the canvas with paint;
- Paint hard-to-reach places and all corners with a brush;
- Leave the structure to dry;
- After drying, repeat the painting;
- You can decorate the surface of the door with stencils.
To paint a door, it is better to use water-based or acrylic compounds.
For painting, you can use different paints and varnishes (latex, semi-gloss or gloss), apply stains and varnish them. But such a finish is suitable for well-preserved products. It is better to apply two layers of paint (one white and the other tinted). Instead of a roller, you can use a brush or spray gun. Existing glass inserts are sealed with tape.
Finishing with MDF panels
Sometimes repairing doors using simple methods does not lead to the expected results, so drastic measures have to be taken. When a complete renewal of the canvas is required, overlay facades are suitable. They are made from different materials. It is rational to buy an MDF insert, which does not absorb moisture, retains its shape, has optimal strength and rigidity, is quickly fixed and is inexpensive. As a result, the restored door changes its appearance radically.
MDF panels can be used as door finishing
You need to purchase a canvas of the required size, apply the facade to the finished base, securing it with PVA or self-tapping screws.
Finishing with natural or artificial leather
Previously, doors were covered with dermantine, which was distinguished by its elasticity and high strength. This material is easy to clean, resistant to temperature changes and humidity, retains its color under the influence of UV and is environmentally friendly.
Vinyl leather, in addition to its decorative function, has thermal insulation properties
Such restoration increases the thermal insulation performance of the structure, the level of sound insulation, and makes it more attractive. But the finishing process is labor-intensive, the material can be damaged
.
Finishing with wooden slats
The door can be finished with fiberboard or clapboard. Wooden slats are strong, durable, and are not subject to physical or mechanical stress. The wood must first be prepared, dried and coated with antiseptic compounds. This will ensure optimal strength of the panels, and the treatments will protect against fire. The panels are attached to a leveled surface to a pre-mounted sheathing or sheet.
The door can be finished using lining
Before cladding, wooden panels must be polished, stained, impregnated or varnished.
. You can choose any direction of the slats (diagonal, horizontal, vertical or geometric pattern).
Film lamination
To properly laminate the door surface, it is better not to use budget PVC film, but to choose the self-adhesive DC-FIX option. This coating will last more than 10 years, will not fade or wear out. You can take a film coating that imitates wood, stone, abstraction or another pattern that is suitable for a specific design. You need to glue the film carefully, cutting it according to the patterns in advance.
It is important to remove all air bubbles using a flat board.
Painting the door
Painting a door A
door prepared according to all the rules can be painted. We carry out the work in two stages - applying a base layer of white paint and tinting.
We choose matte paint for wood, apply it with a spray gun or brush, moving the brush along the grain. Apply one layer, making sure that no smudges appear.
Important! If there is a glass insert, be sure to seal it with masking tape so as not to stain the surface with paint.
For tinting, choose glossy or matte paint of any color, for example, dark brown. We paint the canvas in the same way. If necessary, apply another layer, but only after the previous one has dried. The more layers of paint, the more saturated the shade will be. But don’t get carried away and create too thick a coating.
How to paint a wooden door
Important! Be sure to prepare and restore the door frame. Otherwise, the updated door will contrast unfavorably with the adjacent wooden surfaces.
When the paint has dried, you can apply a layer of glossy varnish or begin installing door handles.
Prices for construction paint
Construction paint
Video – Do-it-yourself door restoration
Video - Master class on restoration of an interior door with a glass insert. Glass replacement
Restoration of a veneer door
To restore the surface of the door, veneer with an adhesive base is used.
There is an option for restoring a wooden door with veneer with an adhesive base.
The laminate is glued to the panel using liquid nails or glue. To hide the edges, varnished or painted slats are placed around the perimeter, after which the resulting frame is filled with material. The end panels can be painted the same shade.
The second side of the veneer has an adhesive backing. To attach it, cut strips are laid on the canvas and ironed.
How to laminate an interior door with film
Self-adhesive film DC-FIX walnut
Self-adhesive film dc-fix black wood
For pasting doors, it is better not to use cheap PVC film, but to give preference to the durable “self-adhesive” DC-FIX. This film is guaranteed to last more than 10 years, will not fade in the sun and will not wear out.
The film is sold in rolls with a width of 45, 90 and 67.5 cm. The length of the roll is 15 m. The average retail price of this German film is 1,700 rubles. From a huge assortment, it’s not difficult to choose an option with imitation wood, stone, abstract or other patterns that suit a specific interior.
The film should be glued carefully, with someone's help. It is advisable to cut according to patterns, and immediately remove small bubbles with a wide plastic spatula. If the bubble does not go away, you can puncture it with a thin needle. For better plasticity, the film can be heated with a hairdryer.
Note! A wooden door can be restored using adhesive-based veneer. We press the material to the canvas and heat it with an iron. We cut off the excess. We leave the restored door leaf for a while, pressing the glued veneer with sandbags.
Veneering
Prices for self-adhesive film
Self-adhesive film
Video - Pasting MDF with veneer
Video - How to glue DC-FIX film
Video - The principle of gluing film
Replacing door hinges
After the door covering is ready, inserts and fittings should be put in place. There will be no problems if the same parts are installed (lock, hinges, handle). You can replace the door hinges with new ones to avoid distortion of the structure.
Before you putty on wooden surfaces, make sure the quality of the putty
The surface of wooden floors, window frames, doors and other structures is not always ideal. This natural material tends to crack and does not resist mechanical stress well enough. To give it a smooth and beautiful look, all defects must be repaired. Therefore, let's talk about how to putty a wooden surface.
If you made wooden doors yourself or ordered wooden doors from a carpenter, or laid solid wood floors, carefully examine the surface before decorating them. Any cracks, burrs, areas chipped by a plane and holes from knots need to be treated and filled with putty. What will you need for this job?
Putty and primer
It is clear that the main material is wood putty - how to choose the right one? What properties should you pay attention to?
There are several types of such putty - water-based, acrylic-based, varnish and nitro putty. You can choose any one, paying attention to the expiration date and characteristics of the composition. They must be indicated on the packaging. Most important:
- No strong shrinkage or cracking after drying;
- Good adhesion – the ability of a material to adhere and stick to the surface being treated;
- Possibility of grinding;
- Drying speed;
- Scope of application: for external or internal work. The first, in principle, can be used everywhere, the second - only for surfaces protected from natural influences;
- Color.
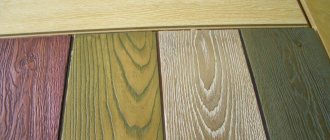
Note. It is advisable to immediately match the color of the putty to the color of the wood, since it is very difficult to achieve what you need on your own by adding pigments to it. It does not matter only if the surface is covered with opaque paint.
It is best to choose putty by color with a sample of wood in your hands, and not by its name or by a photo of the product
Also make sure that the mixture has a homogeneous composition without impurities or lumps, without a frozen crust on top. Before use, it is advisable to test it on an unnecessary piece of wood to ensure its quality. In addition to putty, you will need a primer (see Primer of wood - process features). You can use any product whose instructions allow its use on wooden surfaces.
Tools
The only tools you need are a primer brush, a spatula and sandpaper. The larger ones are for preliminary cleaning of defects and the smaller ones are for sanding putty areas.
Homemade putties
Today there is no need to prepare putty mixtures yourself: in stores there are all kinds, for every taste and budget, in different colors and volumes. And the price is not so high as to set up an alchemist’s workshop at home. But if you are interested in how to make wood putty yourself, we offer two recipes. Oil putty:
- To 30 g of powdered pumice, add 60 g of turpentine oil and 280 g of linseed oil, mix;
- Pour in 300 ml of water, 17 g of ammonia, add 19 g of casein, 19 g of gelatin and 12 g of borax;
- Mix the mixture thoroughly and heat it with constant stirring in a water bath to 90 degrees until it turns into a homogeneous paste.
To give the mixture the desired color, add wood dust to it.
Resin putty:
- Pour 200 g of rosin and 400 g of ozokerite into a metal container;
- Place the container on the fire and melt the contents;
- Add 400 g of yellow ocher without removing from heat, stir until smooth.
Note. The resin composition is applied only when hot, so before using wood putty, it must be warmed up.
As you can see, preparing such compositions is quite difficult, using many components that still need to be found. Therefore, it hardly makes sense to do them yourself - it’s easier to buy ready-made putty.
Required Tools
Do-it-yourself plastering of door slopes is impossible without certain tools. First of all you will need:
- rule;
- set of spatulas;
- container for diluting the mixture;
- construction mixer;
- construction float;
- level;
- corners;
- serpyanka;
- primer;
- stationery knife;
- brush.
List of tools required for plastering door slopes
Since slopes can be plastered using different methods, you may additionally need a metal mesh, as well as drywall and a profile for its fastening. Be sure to stock up on a set of screws for different surfaces. To fix them you will need a drill and a screwdriver.
Since it is recommended to insulate the doorway, select suitable materials in advance. They will need to be placed around the perimeter in such a way as to prevent drafts and gaps in the finish.
In order not to smear the box and adjacent surfaces with plaster, cover them with masking tape before starting rough work. It is recommended to lay a film on the floor. If possible, remove the fabric from its hinges for a while. As for the new door, it is recommended not to remove the protective film from it until the repair is completed.
Work order
Before you putty on wooden doors or floors, carefully examine the surface. If there are burrs, burrs, or loose pieces on it, all this must be removed. Then you should take the sandpaper and carefully sand all the defects. If there are large cracks, it is advisable to penetrate them by folding the sandpaper in half. To sand straight sections, you can use a float and attach sandpaper to it. Once you have finished this job and are sure that the wood is smooth, clean it of dust with a brush and a damp cloth, and then prime it.
Advice. Some putty manufacturers also produce primers of the same brand. Their combined use gives the highest quality results.
Let's move on to the main question: how to properly putty wooden surfaces. It's not difficult at all, you just need to follow these recommendations:
- Choose a spatula slightly wider than the defect to close it in one motion;
- Stir the putty before use;
- Proceed to work only after the primer has dried;
- If the depth of the gap or depression is too large, do not try to fill it at once - it is better to do this in several steps, each time waiting for the previous layer to dry.
The puttying process itself is shown in the video in this article. As you can see, everything is simple: the required amount of mixture is put on a spatula, it is pressed against the surface just above the dent or crack and drawn down. The second movement can remove excess putty, if any remains. After filling all the defects, the putty should be allowed to dry for the time specified by the manufacturer, and then all treated areas should be sanded with fine sandpaper (see What to sand after putty and how to do it correctly). At the end of the work, the surface is again cleaned of dust and primed.
Restoration of a metal door
You can restore not only wooden, but also metal entrance doors. Before work, it is advisable to remove the canvas and lay it horizontally. This will make the job easier.
How to paint a metal door correctly
Step 1. We dismantle or cover the door handle, peephole, and other fittings with masking tape.
Step 2. Use a wire brush or drill with an attachment to remove all traces of corrosion. Sand the surface with sandpaper (grit 80-150). We vacuum the canvas and treat it with a solvent.
Step 3. Treat the door with car polish. It is not recommended to use wood fillers as they do not adhere well to metal. Car polish will hide all dents and micro-scratches formed after cleaning the rust. Smooth out the applied polish with a spatula. The drying time of the composition is about 30-40 minutes.
Polish
Step 4. Polish the entire surface of the door with 400-grit sandpaper. Wipe the door with a clean damp cloth, and then degrease using a grease remover.
Step 5. Apply an anti-corrosion primer for metal to the door. It is convenient to use a roller and a narrow brush. After the primer layer has completely dried, we sand the canvas again with fine-grained sandpaper.
Anti-corrosion primer
Step 6. Paint the door with metal paint. There can be several layers, but each subsequent layer is applied only after the previous ones have dried. To apply paint we use a roller and brushes or a spray gun. Don't forget about gloves and a respirator.
Restoration of a metal door
Similarly, we clean and paint the door frame, then remove the masking tape, install the fittings and hang the door in its rightful place.
In this way, you can not restore the entire surface of the door, but only a small area, but it is important to choose tone-on-tone paint.
Stages of restoration or how to putty a door
First you need to carefully remove the door without damaging the door. Then remove the glass and all fittings. After this, the main work begins:
- Removing old coating. For this, a construction hair dryer is used: it is necessary to heat small areas, quickly removing the paint as it swells. To prevent the tool from burning, it is recommended to work with breaks.
- Sanding the door. All irregularities are removed using sandpaper.
- Primer covering. It is necessary to use deep penetration soil.
- Puttying. This should be done only after the soil has dried.
- Sanding. This is carried out after the putty has dried. The door should be perfectly level.
- Primer covering. The door is primed only in those places where it was puttied.
- Painting the door. It is best to paint the door in a horizontal position to avoid drips.
After the paint has dried, you can begin the final stage of restoration. Glass (if any) and fittings are inserted. If all these elements have long since lost their appearance, then you can easily order glass of the desired size and color, select new locks/handles/hinges, etc. After installing all the elements, you can return the door to its original place.
Any putty can be used. If the putty was applied in thin layers and sanded well, then after painting it will not be completely invisible, and the door will look like new.
Don’t worry if the door has lost its appearance and you don’t have the money to buy a new one. It is enough to putty it and repaint it so that the canvas looks perfect.
Strengthening the door
If your door has dried out from age and is no longer strong enough, it is recommended to strengthen the door leaf and frame. And this must be done immediately after the preparation, but before the staining process.
If the blade is deformed, a plane will help correct the geometry. We remove excess wood with a tool, simultaneously checking the accuracy of the corners with a carpenter's metal square.
Processing the canvas with a plane
If the door had dried out and closed very loosely, a large gap was visible between the door leaf and the frame, it is necessary to cut a thin strip from plywood or board and nail it to the end of the door being restored. Then we process the rail with a file or plane, precisely adjusting the dimensions.
Attaching the additional rail
You can strengthen the door leaf with metal corners. But so that the door does not lose its attractiveness, it is worth paying attention to the decorative carved corners and installing them (nail them with thin nails or fix them with self-tapping screws) after painting the canvas. Don’t forget to purchase a new door handle that stylistically matches the curly corners.
Decorative door corner