Previously, this part of the house was called the basement, now – the basement. Various materials are used to protect and decorate the base (foundation) of a private house. Plastering the base is the best option for protection, insulation and decoration.
Owners of a home or home under construction, when considering a renovation plan, often wonder how to plaster the foundation of a house, what materials to use, and whether it is possible to do anything with their own hands. We will try to answer the main questions.
Requirements for basement plaster
The technology of plastering the base with cement and other solutions has been known for a long time. Plastering the foundation, when done correctly, solves a number of important problems:
- protection of the monolith from the influence of water, temperature changes, ultraviolet radiation and other environmental factors;
- additional strengthening of the structure, increasing its durability, strength and reliability;
- reducing heat loss at home;
- providing decorative finishing.
Base plastering protects the building from moisture and other unfavorable factors.
Thanks to such high efficiency, base plastering has gained great popularity in private buildings. In order for the foundation coating to serve for a long time and not cause any complaints, you need to select the right materials for finishing work. Basement plaster meets the following requirements:
- Moisture resistance. Since the base is most susceptible to moisture (snow, rain, melt water), the coating must prevent its penetration to other structural elements.
- Strength. Plaster must reduce harm from vibration, mechanical impact, and other types of destruction.
- Frost resistance. Since the material will be applied to the exterior of the building, it must withstand as many freeze and thaw cycles as possible.
- Resistance to other negative factors. Good plinth plaster is not afraid of UV rays, the growth of fungi, bacteria, plants and insects.
- Low thermal conductivity. It will be good if the plaster will additionally insulate the structure, which will increase the comfort of living in the house.
- Beautiful appearance. The material for plastering work may contain dyes, stone chips, and other additives that can decorate the base of the house.
- Affordability. Since the consumption of plaster for finishing the entire plinth will be quite large, it is worth choosing a high-quality but economical material.
How to plaster the basement of a house with your own hands
Plastering the base involves covering it with sand-cement or other mortar. The foundation of the house is greatly influenced by the environment, and therefore it needs to have additional protection. The protective function of plastering the base helps protect it from freezing and mechanical damage. The plaster layer serves as a barrier against water penetration, protects against ultraviolet rays and prevents the formation of fungus. Decorative plaster can hide all imperfections and decorate the appearance of the house.
The protective function of plastering the base helps protect it from freezing and mechanical damage.
Advantages and disadvantages of using plaster
Basement plaster is a popular method, but it has its pros and cons.
The benefits include the following:
- Economical cost of performing work and materials for it;
- Relatively easy to perform, it is possible to carry out plinth plaster for exterior work yourself, without resorting to the services of specialists. No special tools required;
- The method is time-tested and has proven itself to be reliable and effective;
- It is easy to carry out repair work if necessary;
- The market offers a large number of colors and decorations through the use of paints, patterns and reliefs;
- Plaster releases water and moisture outside without trapping it inside the building.
The disadvantages include the following:
- Compared to using stone or tiles to strengthen the base, it is less stable and durable;
- As a finishing coating, it also lasts less time compared to other options;
- Low degree of thermal insulation;
- It allows moisture to pass through. To reduce this effect, special façade water-dispersive paints are used.
Plaster releases water and moisture outside without trapping it inside the building.
Advantages and disadvantages of plinth plaster
When deciding whether the plinth needs plastering or whether you can leave it unfinished, you should carefully study all the advantages and benefits of this technology. As noted, after proper application, plaster reliably protects the base of the house, insulates it and makes it more attractive, so its necessity is beyond doubt.
Plastering has other advantages:
- the material is applied over a bare base or over any insulation;
- the mixture for plaster is purchased ready-made or made independently, depending on capabilities;
- application does not require expensive tools or special knowledge;
- If desired, all work can be done with your own hands;
- the stores offer a huge range of plasters, which differ in technical characteristics and decorative qualities;
- the dried foundation is painted in any shade with different types of paints;
- vapor permeability of the walls, therefore, the microclimate in the house is not disturbed by applying plaster, moisture does not accumulate inside the structures.
Finishing the foundation with decorative plaster
There are also disadvantages to plastering the base. The plaster layer may be defenseless against serious mechanical stress. A blow, a swing with a shovel or a sharp tool, and the decorative finish will be damaged. Other disadvantages of applying plaster are:
- the total cost of work will increase, although savings in the future usually cover expenses;
- the service life of a plastered surface is shorter than after finishing with stone;
- if the solution is applied poorly, cracks may appear in it, and water that gets into them will sooner or later destroy the area;
- ordinary cement-sand plaster without additives can absorb moisture, so you will have to additionally paint the coating.
Plaster is poorly resistant to mechanical stress
Use of cement-sand mortars
The simplest option, and also affordable, is to use a cement-sand mixture. Then all that remains is to apply whitewash or 2-3 layers of facade paint.
The main advantage of cement-sand plaster is its availability and speed of processing. To work you need sand, cement, plaster mesh, as well as screws and dowels.
In general, cement-sand plaster has a lot of positive qualities. Although it is not without certain shortcomings.
The work can be done even by a novice. A good choice for those who want to save money.
When choosing facade paint over cement plaster, give preference to waterproof compounds. It is best to use acrylic or silicone paints. But they are applied in at least 2 layers.
This plaster has several disadvantages. Namely:
- the coating may crack over time;
- with constant exposure to moisture, active destruction begins;
- the cement mixture does not like severe frosts, as well as sudden temperature changes;
- even high-quality paints fade quickly;
- periodically it is necessary to carry out repairs, re-paint, repair cracks.
To prevent the repair of plinth plaster from becoming a chore, it is better to use another material. This is decorative plaster of the base.
Main types of plasters for plinths: differences in composition
The building materials market offers a whole list of plasters, mortars and mixtures. Here are their main varieties:
- Cement-sand plaster. A traditional material that is most often used in construction and repair. Usually made from 3 parts sand and 1 part cement, it is cheap and quite durable. For external use, it is worth adding plasticizers and modifiers to such solutions, and coloring pigments to enhance the decorative effect.
- Gypsum plaster. Inexpensive composition with high aesthetic characteristics. Not suitable for plinths due to fragility, strong moisture absorption, and capriciousness in operation.
- Clay-sand mixture. It can be prepared independently, and if there is a quarry nearby, it will not require spending any money at all. Absolutely environmentally friendly, safe, capable of maintaining a comfortable indoor microclimate. With the introduction of additional strengthening additives, it can be used to finish the base, and without the involvement of professionals.
- Lime plaster. Consists of slaked lime, sand or other filler, and may include some cement and clay. Without strengthening additives it is brittle and quickly cracks when used externally.
- Cement-clay-sand. It is obtained by adding clay to standard cement mortar. It has increased strength and is easy to apply.
How to save money when finishing a basement with plaster.
Involvement of construction crews.
Ordering work from specialists is the most convenient option. But professionals will charge a higher price for the work, which will significantly increase the overall cost of finishing the basement. At the same time, plasterers take into account not only the fee per square meter. m. walls, but also the number of slopes, features of the workplace and plastering of right angles.
Classification of plasters by texture
Depending on the texture, all building mixtures can be divided into two large groups.
Classic smooth plasters
After drying, such solutions remain smooth. They are usually used to create the first (base) layer, as well as to apply the second layer of facade plaster if it is planned to be subsequently painted.
Smooth facade plaster
Decorative plasters
Decorative compositions are mixtures from different manufacturers, which, after drying, form a surface with a certain texture and relief. Such compositions look very impressive and are suitable for outdoor work, but have a higher price than classic solutions. Decorative plaster can give the following effects:
- “bark beetle” - an original surface with small grooves;
- “lamb” - the base will become rough after drying;
- “Venetian” - the base will imitate a marble coating.
Base bark beetle
Stone-like plaster
Stone-like finishing is very popular in construction work on the design of facades and plinths. “Stone” plaster consists of cement, quartz sand, plasticizers, binders and fine stone chips. After hardening, the surface will become very durable and will not allow the base to collapse for many years.
Finishing the foundation of a house with stone
Methods of painting “stone”.
Basement plaster needs protection and decoration.
There are several standard approaches to tinting plasters: the use of colored solutions, their additional tinting on the wall, “sprinkling” fresh plasters with pigment, painting.
Tinting plaster mortar.
Ready-made finishing mixtures can be tinted.
When made independently, pigment can be added to them. For this, both acrylic coloring liquids and dry powders are used. A variety of shades and believability can be achieved by mixing several colors:
- The concrete solution in the trough is divided into 3-4 sections.
- Each is carefully mixed with a pigment of a specific color (such as light grey, yellowish, pale green and brown).
- The finished parts are slightly mixed so that they do not merge into one tone, but only lose their boundaries.
When using such concrete to decorate plaster “like stone”, an element of randomness of tone arises. This gives the finish exclusivity.
The easiest way of painting is concrete tinting. But it can also be supplemented by subsequent painting of individual elements.
Tinting the decorative plaster of the base and walls of the house with paints.
Produced on both fresh and dried plaster. Even if the solution initially has a suitable shade, its color can be enriched with additional tones.
They do this in the following ways:
- “ Pigmentation” of wet plaster. The freshly applied solution is “painted” with a brush, which is “dipped” into the powder pigment. Then the moistened mold is “embedded” in the plaster.
This is the most economical coloring - pigment consumption is minimal.
After drying, the plaster is coated with acrylic varnish.
- Painting dried concrete. Appropriate paints for exterior concrete work are used to coat the plaster.
- First, the general tone is applied.
- Then darker (for example, for golden - brown), but not over the entire area, but only in the deepest depressions and seams.
- When the paint dries, the most convex parts of the “stones” are covered with light paint (for golden ones - whitish-yellow).
The edges of the color inserts should be blurred with a piece of sponge or foam rubber.
To apply the last (light) tone, use a short-haired roller.
Any paint (including pigments) requires protection with varnish. And the semi-matte shine will only add naturalness to the relief.
What materials can be used
To choose a truly suitable plaster for the plinth, you need to take into account the features and technical characteristics of different compositions. For example, gypsum plasters are completely unsuitable for this purpose due to fear of moisture and low strength.
Modern polymer materials will cause a serious increase in the cost of repairs, because they will have to be applied in a thick layer, and the cost of finishing will become unreasonably high. It is better to use polymers only for the decorative coating of a finished base. Cement-based plasters with additives that are affordable and of high quality are most suitable for the purpose.
Cement-based mixtures are usually used to finish the base.
Ready-made formulations
Most large manufacturers produce specialized plasters for plinths based on cement, fractionated sand and chemical additives. The latter enhance adhesion, strength and improve the quality of the coating. Here are the most popular brands:
- "Knauf Sockelputz";
- "Volma Sokol";
- "Eunice Silin Basement";
- Bergauf Unter Bau;
- "Foundation Startwell";
- "Rusean Facade".
Bergauf Unter Bau cement-based composition for facade and plinth
Some plasters additionally contain solid mineral components - quartz, marble, granite chips. They make the coating more decorative and increase its wear resistance by an order of magnitude.
Homemade plaster for the base
If you buy enough cement and sand, you can make the plinth plaster yourself. It is only important to immediately select high-quality cement. For facade and basement work, the M400 or M500 brand is well suited, and in the first case, 3 parts of sand are taken for one part of cement, and in the second - 4 parts. The sand must also be suitable for work - quarry (not river), clean, without additional inclusions. It is sifted through a fine-mesh sieve to completely remove clay, pebbles, and plant debris. Afterwards, the dry components are combined in a concrete mixer, which will then need to be mixed with the liquid.
As the solution of the required thickness is obtained, plasticizing and water-repellent additives are introduced - PVA, polymer adhesive additive “Latex Profi”, substances “Aquatron”, “Hydrotex”, “Penetron”, etc. Also at this stage you can add pigments or colorants. The finished composition must be fluid for the primer layer, plastic for the finishing layer.
Soil waterproofing agent Latex Profi
Preparation of the solution
Preparation of the solution includes five steps:
- Sifting sand. In this case, a metal sieve will serve as an assistant. By passing sand through it, it is easy to get rid of dirt and stones.
- Mixing cement with sand. The proportion with M400 cement will be 1:3, with M500 cement – 1:4.
- Mixing the solution in a concrete mixer, and dry additives should be added first.
Concrete mixer - Mixing liquid additives. First you need to prepare water for mixing, and then add liquid additives to it. This includes plasticizers and waterproofing agents.
- Mixing liquid ingredients with dry ones. It is very important to add the liquid solution to the concrete mixer with dry ingredients gradually, thereby adjusting the density of the resulting solution.
Surface preparation
The upper part of the base can be made of different materials. Often its lower zone is monolithic, and above it there is a superstructure made of brick or foam fiber block. Depending on the specific material, the procedure for preparing the surface for plastering will be different.
Preparing a brick plinth
If the base is made of brick, it has many seams that are filled with cement mortar. Over time, the cement dries out, crumbles, and cracks appear in the seams, which sometimes expand to significant sizes. During the preparatory work, it is important to completely remove all loose particles and falling off fragments using a spatula or metal brush. You also need to finally sweep away the dust, all the smallest elements, sand. Large pieces of old plaster are broken off with a chisel or hammer. All formed defects are moistened with water, laid with bricks of suitable size, which are set on cement mortar. Small voids are simply covered with cement plaster.
Preparing a brick wall for plastering work
Preparation of rubble and rubble concrete base
Such surfaces require even more careful preliminary measures. Old, deteriorated masonry elements are removed and replaced with new ones. You can also carefully remove loose “parts”, clean them thoroughly and return them to their original place. The stones are fixed with a regular cement-sand mixture.
Strengthening the rubble foundation
Preparation of concrete and reinforced concrete foundations
Cracks on such a foundation appear less frequently. However, if they are present, it is necessary to evaluate the strength of the edge of each defect and remove all crumbling crumbs. Small potholes can be leveled with cement mixture even without cleaning. If there are signs of partial displacement of the base, it should be strengthened.
Preparing a concrete plinth for plastering
Preparing the base for plastering.
Finishing the base with decorative plaster is carried out in the same way as regular plastering of walls and requires surface preparation.
New plinth
A fresh basement wall does not require special preparation. Before applying the coating, just moisten it with water and wait until it drains and is partially absorbed.
Preparing the old base for repairs.
The old basement wall requires more attention:
- Removing old coatings. Anything that does not hold well, wobbles or moves when pressed (old concrete coverings) must be removed and cleaned.
Concrete cannot be thrown onto unstable surfaces (anything that “shakes”) and onto weaker layers (chalk whitewash, clay and lime plasters). Its connection with such a surface will not be reliable.
- Sealing cracks, lunges. Deep depressions in the wall must be repaired:
If possible, cracks and crevices are widened, a reinforcing mesh is strengthened here and “clogged” with mortar, working with energetic “slaps”.
Crevices.- Notches. Deep (more than 1-2cm) depressions in the wall are usually sealed and leveled. Plastering a plinth under a stone in a certain sense “needs” some curvature of the walls, so it looks more believable.
- Loss of masonry. Drops of stone or brick must be replenished. To do this, throw a solution into the opening and place a pebble of suitable size.
- Primer. Before applying plaster, the wall should be covered with primer. This will increase adhesion and fill the pores so that they do not “pull” water out of the solution, weakening it, and the base “stone” plaster will not fall off over time.
The prepared surface must be hard, stable and clean.
Tools and consumables for work
In addition to the ready-made building mixture or self-prepared mass, you need to prepare the following accessories for work:
- metal slats-beacons;
- spatulas;
- rule;
- trowel or grater;
- primer;
- hatchet;
- plaster mesh;
- edged boards 20-30 cm wide;
- dowels;
- electric drill with mixer attachment;
- concrete mixer;
- wide brush;
- construction level;
- shovel;
- hammer and perforator;
- hard brush;
- grinding machine;
- plastering ladle.
Tools for plastering work
If you want to obtain a colored or decorative surface of the mortar, you should immediately prepare pigments, marble or granite chips.
Base plastering technology
The process will consist of several stages - preparation, priming and application of the solution, as well as its decoration. There are several auxiliary stages in the work. Preliminarily assess the scale of action, buy the required amount of plaster with a margin of 15-20%.
Preparatory work
Preparation comes down to high-quality cleaning of the base, cleaning out dried mortar from cracks, crevices, and seams between blocks. Large cracks are expanded - deepened and made wider to prevent the appearance of weakened areas. In cross-section, the defects should take on a triangular shape. Next, they are sealed with mortar and allowed to gain strength (therefore, it is advisable to carry out restoration work in advance).
Sweep away all the dirt, debris, and dust particles. The most convenient way to clean the base is with a sander, but this can also be done manually. Notches are applied to the surface with a hatchet, which will increase the area of adhesion of the plaster to the base and increase adhesion.
Leveling the surface with a sander
Application of primer
Beginners often neglect priming, but it is a must! A deep penetration primer will strengthen the base and wall itself and provide a higher level of adhesion. It is better to choose soil with hydrophobic properties, which will increase the moisture resistance of the foundation. Products based on polyurethane, acrylic or epoxy resin are invariably considered to be of the highest quality. During processing, special attention is paid to cracks, seams, joints and defects.
Priming the base with Betonkontakt
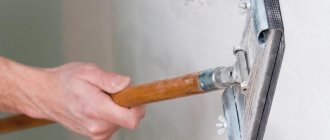
Fastening the plaster mesh and insulation
Since the thickness of the plaster layer can be significant, a plaster mesh is used to hold it in place. It is secured throughout the entire structure using expansion metal dowels with an L-shaped head, which will seriously strengthen the base.
If you plan to insulate the surface of the base, use mineral wool or tile insulation. Adhesive for thermal panels is applied directly onto the primed base, the insulation is secured, supporting it from below with a metal profile. You can also use dowels with wide heads as fasteners.
Installation of plaster mesh
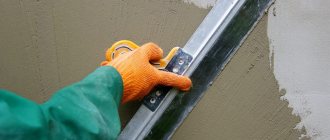
Installation of beacons
To evenly apply a layer of plaster, beacon technology is used. Beacons are installed in any convenient way over the entire surface of the base in increments slightly smaller than the size of the rule. The distance from the extreme marks to the corners should be 20-30 cm. The easiest way is to set the beacons along plumb lines, as when working with internal walls. If the house does not yet have a blind area, drive even pegs into the ground along a horizontal line parallel to the base, 2 cm from it.
Installation of beacons on the facade of the house
Splash
The purpose of this plaster layer is to roughly level the surface vertically and form a reliable foundation for subsequent layers. To perform the spraying, an edged board is placed horizontally on the top of the plinth so that it protrudes above the edge by the thickness of the plaster. To secure the board, apply small piles of mortar every 30-40 cm and level the structure.
To properly plaster the corners, place vertical boards on them, forming a fenced area. It will need to be filled evenly with the solution in the future. Spraying is done in vertical stripes manually or with a plaster ladle, which is much more convenient. The thickness of this layer should be 1-2 cm less than the upper edge of the beacons. After spraying the plaster, level it with a trowel. To perfectly secure further layers, the surface is covered with small scratches using a spatula or trowel.
Surface spray
Plastering
The next layer - primer - is applied after the spray has set (after 72-96 hours). If it is hot outside, it is recommended to cover the base with a damp cloth, periodically wetting it with water. The primer allows you to secure the base before finishing. Its thickness should be 1-3 cm. Exceeding this value threatens the appearance of cracks. After leveling the primer layer, allow it to dry completely.
Applying a base layer of plaster
Grout
The grout layer is required to eliminate the smallest irregularities and defects. Its thickness is small (2-3 mm), and the density of the solution resembles thick sour cream. It is advisable to add a little slaked lime to the building mixture, which will increase strength. At this stage, dyes are introduced, having previously diluted them in water.
Apply water to the dried soil using a wide brush to slightly moisten the surface. Then spread the solution and rub it with a trowel. When the plaster stops sticking to your hand, grout it with a construction float. Smooth the surface in a circular motion without pressing hard until it becomes smooth.
Grouting plaster
How to paint the base of a house over plaster
The final finishing is carried out after complete completion of all plastering work. Careful attention is paid to the choice of paint, because low-quality paintwork materials will quickly fade and peel. Usually, good facade paints are used on an acrylic, silicone, or combined base, which are characterized by wear resistance, elasticity, durability and vapor permeability. The color is chosen according to the general idea, taking into account the shade of the house and roof. It is also possible to paint the base with resin, which after drying will become matte and practically not subject to contamination.
Painting the basement of the house
Features of decorative finishing of the base
You can start painting 3 weeks after plastering is completed. During the specified period, protect the plaster layer with a waterproof film coating so that it is not damaged by rain and sun. The surface is sprayed with water twice a day. Next, facade paint is applied to the plaster or, if it was pre-pigmented, it is limited to transparent varnish. It is also permissible to use decorative relief plasters and even ceramic tiles.
Decorating the base by creating a relief using pre-prepared stencils is considered popular. The blanks are applied to the still wet plaster and tapped. After removing the stencil, an imprint of the design will remain on the base. Another finishing method is cutting. “Stones”, “bricks” or other decorative elements are cut into the mortar using a sharp tool. After drying, the drawings are covered with paint or varnish.
Decorative finishing of the foundation
Painting
The most successful color scheme for finishing is to choose a base color that does not contrast with the main tone of the house. It’s even better if the shade of the resulting stone looks a little darker, “heavier” than the wall material. However, the choice of color depends only on your desire, and the base can be painted or plastered:
- in one tone (the plaster is not painted or a continuous coating is done with one composition);
- two tones (the stone differs from the seam cut);
- several tones (color transitions imitate real material. This is the most expensive, effective and labor-intensive execution of finishing the foundation).
We recommend: Decorative textured plaster Munich
Decorative plaster of the plinth “under the stone”
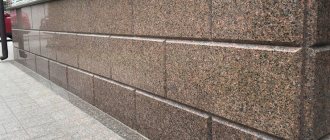
To give the base an original look, decorative plasters with a stone texture are used. You can make such mixtures yourself by adding colored quartz sand, marble chips, granite chips, and finely crushed bricks to the finished solution. The filler fraction can be 0.5-5 mm. The ideal option is to introduce stone chips into acrylic plasters, which are highly elastic and are applied to the base in a perfectly even layer.
The thickness of decorative plaster is usually 0.5-1 cm. This layer is also sufficient to imitate stone masonry, when “pebbles” are drawn directly over the applied mass using any sharp tool. To create a “travertine” texture, apply two layers of mortar with the appropriate filler and pass over the surface with a metal brush, and then smooth the plaster a little with the edge of a trowel. To obtain a “fur coat” texture, use a fur roller instead of a brush.
Basement plastered to look like stone
Plastering using “wet” facade technology
“Wet” facade is a special plastering technology for which water-based decorative building mixtures are used. The operating procedure in this case will be as follows:
- prepare the base - level it, clean it and remove serious defects;
- apply a layer of primer;
- install the base profile at a height of 30 cm from the ground using self-tapping screws;
- install the insulation using glue, let it dry for 3 days, then secure it with dowels;
- an additional adhesive layer is applied to the insulation for reinforcement, a mesh is installed, and pressed in;
- after a week, decorative plaster is applied directly to the glue.
Finishing with mosaic plaster
Plastering the base is a job that you can do with your own hands, and at the same time gain very valuable experience. There are no high requirements for leveling here, the surface area is small, so the task is feasible even for beginners.