Icer
24985 0 7
Icer November 7, 2016Specialization: master in the construction of plasterboard structures, finishing work and laying floor coverings. Installation of door and window units, finishing of facades, installation of electrical, plumbing and heating - I can give detailed advice on all types of work.
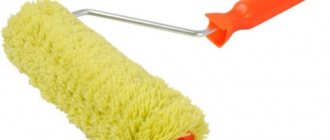
In the photo: a roller is the main working tool when applying primer
Many people think that they can use any roller to prime the walls, but when it comes to doing the work, a lot of troubles arise: splashes fly in different directions, the composition comes out with smudges, or the surface is not completely painted over. To avoid such troubles, I advise you to spend 5 minutes of your time and thoroughly understand the issue.
An inexperienced person in front of such a stand may get confused, because you need to choose one option from dozens
Why can you believe me? It’s just that I sold painting tools for 5 years and actively used them for another 10 years, so I know first-hand the features of different product options and I tell them my experience, and not theoretical calculations from advertising brochures.
Each roller is designed for a specific type of job, and it is important for you to use what works best for your application.
Fur coat material
It’s worth figuring out which roller to apply the primer so that it applies as efficiently as possible. There are a huge number of types of such tools, but only three varieties are suitable for applying primer. You should take into account the room conditions and other nuances to choose the right design.
For priming, you can use one of three rollers:
- Foam rubber is distinguished by its affordable cost and simplicity. It can be used to apply a viscous primer to walls. However, it is not suitable for liquid solution, because it will scatter it throughout the room during operation. There will be a lot of smudges on the walls. You should not save money on purchasing a tool; this type can only be used for thick solutions.
- The bellows is an extremely popular tool because it is suitable for a large number of jobs, especially when priming walls for finishing or pasting walls.
Important! If the roller has a pile length of 15 mm, then it will be universal and suitable for almost all jobs. They can apply both thick and liquid solutions.
- The velor version differs in the length of the pile, which should not exceed 5 mm. The tool is perfect for processing smooth and even walls; the soil will be distributed evenly and efficiently.
You should know! If quality does not play a special role when carrying out repair work, but speed is important, then it is advisable to use fur rollers. They can process walls as quickly as possible.
People often wonder which roller is suitable for priming uneven walls. In this case, you can use a fur tool with a long pile length or a thread roller. However, the latter will spray the solution, which causes discomfort. But it is ideal for uneven surfaces.
What types of tools are there?
Rollers can vary in type of coating:
- Foam rubber. They are well suited for applying viscous compounds, but are not ideal for priming: the mixture can splash, drip onto the floor, form streaks and stains.
- Fur. When using them, the solution does not splash and lies in an even layer. They can be with pile of different lengths, in this case it is better to take with medium pile.
- Velor. Good for flat, smooth surfaces.
Decorative, small ones stand separately. They are good for applying designs to wet plaster, but using them on large surfaces will take a lot of time.
By size:
- Mini. Used to treat hard-to-reach places.
- Midi is the optimal size, providing a combination of speed and material savings. Using such a roller, you can easily process walls, floors, and ceilings.
- Maxi. Not the best option. They are capable of covering a large area, but they are difficult for a non-professional to work with. The tool is heavy, and it is difficult to evenly prime walls with it without the skill.
Cylinder width and size
When purchasing a tool, you should consider its width, because it is important. When working, professionals recommend using a roller with a width of about 20 cm, a little more or less. However, if there are many hard-to-reach places and narrow strips, then it is advisable to use a roller with a small width.
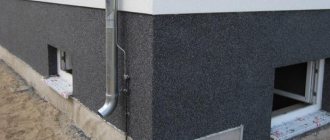
To process corners, you can use special corner tools so as not to use brushes at all. The work will be of high quality and will take a minimum of time. The internal diameter should be about 5 mm.
What are the features of primer rollers?
Priming surfaces is an essential part of repair work. And the key to successful work is not only a high-quality primer, but also a reliable tool. A roller is used when you need to prime surfaces evenly and quickly. But not any roller will cope with the task without drips and spattering.
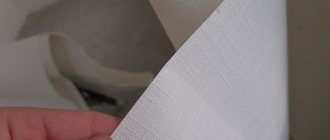
The repair tool itself is simple: the roller consists of 2 parts
- Roller Removable cylinder with textile cover
- Clasp frame handle with a curved metal part on which the roller is placed
Now the rollers are almost all collapsible, that is, if any element breaks or wears out, you can simply replace it rather than buy a new tool. For painting and priming work, it is better to choose a roller with a telescopic (retractable) handle, which allows you to reach within 2 meters to the side or up. With this handle, you can avoid the installation of ladders, stepladders, scaffolding and other obstructions, but the quality of work does not suffer.
Types of rollers
The choice of roller for a specific surface is determined by several factors.
1. Size
- Small (up to 15 cm) Used in cases where you need to “crawl” into hard-to-reach places: corners, behind radiators, under furniture.
- Medium (15-25 cm) The most suitable type, since it can quickly apply the primer, while covering a sufficient surface. Another medium size fits well in the hand, that is, it is also convenient for a worker. Suitable for any open surfaces: floor, ceiling, walls.
- Large (from 25 cm) Has another name - façade. The advantage of this size is the large priming area. But there are also disadvantages: a person who is not involved in professional repairs should not take the maximum size of the roller: the tool will fall out of the hands, become overweight, and drips may remain. Maxi size requires experience and skills.
2. Type of work following priming
- Before painting or gluing with thin wallpaper with silk-screen printing, only a velor roller is used;
- If laying tiles, puttying or pasting with thick wallpaper, the type of roller does not matter.
Technology for applying primer mixtures to the ceiling
The application process is largely determined by the chosen base. For example, in the case of whitewashing, you need to clean everything from dirt, even small ones. A small test coat is then applied to check how well the job is done.
What tools will you need?
The principle of operation and purpose are the main differences between the different primers available on the market. Some brands are universal, but most are intended only for exterior or interior use. For example, priming wood also requires special compounds.
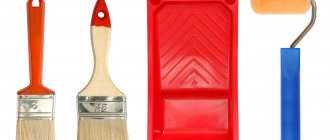
The list of tools is really modest:
- Brush;
- Pallet;
- Paint roller.
It is advisable to choose a thin pile, it is good if it is velor. Then the liquid does not splash and drips do not form. There is nothing to add to these recommendations.
It is advisable to choose a roller with a thin pile, it is good if it is velor.
Sequencing
According to some opinions, both compositions improve their properties when mixing primers with paints. This is not true, the result is only negative. The paint is diluted with clean water, and that’s it.
The sequence of actions is described as follows:
- Removing dust and dirt that formed after preliminary putty and primer. The surface is treated with a vacuum cleaner or a damp sponge.
- Concentrated soils are diluted with plain water before use. Other formulations must also be shaken thoroughly, regardless of the components. Then the prepared composition is simply placed in a container.
- The roller is lowered into a tray and rolled out a little on a special surface to get rid of excess components.
- The surface is treated evenly, it is advisable to use a thin layer.
- Brushes are used to treat hard-to-reach areas.
- You must wait for the treated surface to dry.
If necessary, priming is repeated using the scheme described above.
How to choose a roller for painting the ceiling
In principle, the choice of roller for ceilings is the same as for walls. Let us note only some important points.
It is preferable that the coat of the ceiling roller be made from natural materials, such as wool. In this case, the length of the roller coat should be medium or long.
A fur coat with short pile is not very convenient to use, as it will pick up little paint. A foam roller is absolutely not suitable for painting the ceiling, as mentioned above, due to the formation of bubbles on the surface.
The handle of a ceiling roller should have a medium or short length, since a long handle will not allow you to paint the surface accurately. Pay attention to the ergonomics of the handle, as you will have to hold it at arm's length for a long time. It is most convenient to work with rollers 25 cm long.
Advice! It is better to roll out the paint on a roller on a surface prepared for this - cardboard or linoleum. It is not recommended to do this on the ceiling, otherwise streaks will remain and the unevenness of the applied layer will be visible to the naked eye.
So, a properly selected roller is half the success in painting walls and ceilings. And if you practice a little in applying paint with a roller, the further process will go faster and better.
VseInstruments.ru presents a wide selection of rollers for painting any surface. If you cannot find a suitable model, call the phone number listed on the website. The manager will help you select the product and place your order.
How to properly dilute soil
In construction supermarkets, primers are sold already diluted or in powder form. It is permissible to independently prepare mixtures; their characteristics are not inferior to existing analogues.
To do this you will need the following set of components:
- Water in the amount of 7 liters;
- Drying oil with vegetable oil, per 100 grams;
- Laundry soap – 200 grams;
- Slaked lime – 3 kilos.
Further operation and consumption are determined by the type of walls and the composition of the primer mixtures. 1 kilogram per 20-30 m2 should be prepared if we are talking about undiluted form and surfaces made of metal and wood. The same applies to walls covered with wood covering an area of 3-10 m2. Any material can be applied to them.
Cooking at home is described as follows:
- The free container is filled with 3-4 liters of boiling water.
- Rub laundry soap on a coarse grater.
- Dissolve soap in boiling water and add drying oil.
- A separate container is used to dissolve 4 liters of water. Lime is dissolved in it.
- Combine both solutions.
- The resulting mixture is thoroughly mixed and filtered.
- The primer is ready for use when it has completely cooled. The plaster is applied afterwards.
Diluting ready-made mixtures is simpler than preparing them at home. The main thing is that after mixing the components are distributed over the entire surface. For a one-component mixture, water and drying oil are sufficient; in the case of a two-component mixture, a hardener is added. This is important information for those learning how to properly prime walls.
What is the best way to prime the walls: with a roller or a brush?
If you ask a professional painter this question, he will answer unequivocally: with a high-quality primer! And this answer will be fair, because when painting it is important to pay attention to the quality of the composition itself, and how to apply it is a matter of habit.
A surface priming roller is good when you need to prepare large, flat areas for painting or other finishing. This tool saves time and primer, but for more thorough penetration into recesses or crevices, it is better to use a brush. The priming process will take more effort, but the “adhesive” properties will manifest themselves to the maximum extent. Therefore, the choice of tool is determined by 2 points:
- Ease of use. Yes, there are those who are uncomfortable working with a roller, while others, on the contrary, do not accept a brush.
- The quality of the surface being coated. The smoother the last layer, the more likely it is to use a roller.
When applying the primer with a roller, you cannot do without a special tray for liquid mixtures. The tray has two zones: where the primer itself is located, and a place where its remains can be removed. The primer is a liquid composition and, if you do not remove the excess substance, it will drip from the roller onto your hands, clothes, and surrounding surfaces.
Roller application technology
Before starting to treat the surface with a primer, the base must be carefully prepared. Preparation includes cleaning from dirt, dust, grease stains, and old finishing materials. After this, the primer is prepared in accordance with the instructions or information indicated on the packaging. Some primers just need to be shaken several times, and some primers are diluted with water or a solvent, it depends on the type of mixture.
The finished primer composition is poured into a cuvette container; you should not pour a lot, just enough so that the liquid level reaches the squeezing grid, this will be the most convenient way to work. The first thing you need to do is process corners, joints, places near sockets, switches, slopes; for this you can use either a narrow roller or a corner version. At this stage, it is necessary to process all hard-to-reach places, which will then be very difficult to handle with a standard roller.
Next, the roller for priming the floor, ceiling or walls is dipped into the ditch several times, rolled along the squeezing grid, after which the base can be coated with primer
It is necessary to treat the surface without any gaps; it is important to ensure that no drips appear, because after drying they will be quite difficult to remove
It is recommended to apply the primer in several layers to ensure that the surface is as hardened and protected as possible, but each subsequent layer is applied only after the previous coating has completely dried. Upon completion of the work, the roller must be thoroughly rinsed from the primer, otherwise the coat will be damaged and unsuitable for priming next time.