Gluing wallpaper almost always scares almost everyone =) We were also afraid to glue wallpaper, but we finally decided, discussed this process with a familiar master, read instructions on the Internet and... we glued everything in a couple of days without any problems at all. It's very, very simple if you do everything correctly and according to the instructions of the manufacturer of the wallpaper and glue you buy. Everything is really written there on the box, and the horror stories that make our parents’ hands shake at the mere thought of hanging wallpaper with their own hands are left over from the Soviet past and low-quality materials. Now we’ll tell you how to glue wallpaper yourself, get ready - there will be a lot of photos and a little text with explanations!
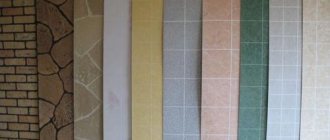
Today, there are more than ten different types of wallpaper, ranging from simple options such as paper or vinyl, to modern models such as liquid or quartz wallpaper. Each of the presented options has not only its own gluing methods, but also many other unique characteristics, ranging from service life to care requirements. It is important to study the features of one or another option in advance, choosing the most suitable type for yourself, in which you will not be disappointed even after several years.
- Paper wallpaper is one of the most popular options, successfully used for several decades. You can glue it however you like, as this wallpaper is unpretentious. Low cost and large assortment are the main advantages of this wallpaper.
- Vinyl wallpaper today is the absolute leader, as it is inexpensive, has many different color options and is quite reliable. The main advantage of this wallpaper is its washable, abrasion-resistant vinyl coating. Vinyl wallpaper can be divided into two types: non-woven vinyl and paper backed. The main disadvantage of this type of wallpaper is poor breathability and not environmentally friendly. Also, when wet, this wallpaper expands and when it dries, it contracts, which creates certain difficulties when gluing.
- Non-woven wallpaper is the same as paper wallpaper, but with the addition of polyester fibers, which gives it strength and reliability. Non-woven wallpaper is absolutely deservedly considered one of the most environmentally friendly options, with great breathability and durability. This type of wallpaper does not shrink or deform after drying.
- Fiberglass is another representative of the finishing material for walls. Mainly used in office premises. They are resistant to abrasion, do not require good surface preparation before gluing, and reinforce (strengthen) small cracks. They do not look aesthetically pleasing in residential premises.
- Textile wallpaper is a representative of the expensive finishing segment. They consist mainly of natural fabric materials on a non-woven or paper basis. They have the maximum number of advantages, are less susceptible to fading than others, but have low resistance to dust, dirt and odors.
- Liquid wallpaper - in its essence, relates more to decorative plaster, while combining high quality wallpaper coatings and the flexibility of applying plastic materials.
Wallpaper may vary in roll width. Most often, rolls are half a meter wide, but there are also meter-long models. On the one hand, it’s easier with them, you get fewer joints. However, there is also a difficulty - dealing with them will require more effort.
Wallpaper or painting walls - which is better?
If a few years ago wallpaper was the main option for wall decoration, today many people opt for painting, considering this method simpler and less expensive. Of course, painting has its advantages, such as the ability to choose any color and a long service life, but wallpaper can also be of different palettes, shades and have different textures, and the right wallpaper can last even longer than painting. It is important to understand that high-quality preparation for painting is expensive, and high-quality paint costs a lot of money. Therefore, with high-quality repairs, choosing to paint the walls will not save money. Here it is important to understand what you really want to get from your interior? If you have a large budget, you can choose any type of finish. However, if your budget is limited, it is better to choose wallpaper.
Let's make a plan
Let's first figure out which wallpaper is easier for a non-professional to hang. For a non-professional, it is better to consider simple wallpaper options, such as paper, vinyl or non-woven wallpaper. These wallpapers do not require any special approach, and anyone can handle them. It is enough to have good preparation of the walls and purchase the appropriate glue.
Regardless of the type of wallpaper you choose, you first need to prepare the wall. Level it and remove remnants of old wallpaper, if any. In many ways, the success of the entire process depends on the preparation of the walls.
Preparing walls for wallpaper is as follows:
- Removal of old covering (wallpaper, paint).
- If there are pockets of mold, treatment with an antiseptic composition is recommended.
- Surface primer.
- If necessary, level the wall completely or partially with plaster.
- Subsequent priming of the plastered surface.
- Full (2 - 3 layers) or partial putty of walls.
- Cleaning the putty surface.
- Dust removal and subsequent priming of the surface.
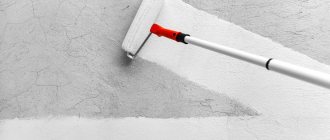
Almost any application of the main types of wallpaper begins with priming the surface with glue. Why prime the walls before wallpapering? This is necessary to prepare the wall material in advance and provide additional adhesion.
Is it possible to glue wallpaper without a primer? It’s possible, especially if you choose a good glue, but it’s still better not to miss this moment, since it doesn’t require much effort. How long after priming can I hang wallpaper? If you are not pressed for time, it is best to wait a few hours for the walls to dry completely.
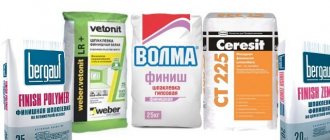
Which glue to choose
A specific glue is suitable for gluing each type of wallpaper. Manufacturers indicate this information on rolls. There are also universal mixtures that can be used for all types of fabrics. But you must adhere to the rule - the heavier the finishing material, the thicker the glue should be.
Wallpaper mixtures for wallpapering can be sold in dry or thickened form, ready for use. Some strips have a self-adhesive side. It is enough to moisten them with water and lean them against the wall.
All adhesive mixtures have almost the same composition. Manufacturers achieve different characteristics due to changes in proportions. Cellulose derivatives are used as a basis. To increase adhesion and moisture resistance, polyvinyl acetate is added. Antiseptics and fungicides protect against fungus and mold.
Should I glue wallpaper before or after the stretch ceiling?
What first: glue wallpaper or stretch the suspended ceiling? First, they wallpaper the entire room, and then install the ceiling. Is it possible to glue ceiling plinth to wallpaper? It is much easier to glue the baseboard onto the wallpaper than to adjust the wallpaper to the baseboard. How to glue ceiling plinth to wallpaper? First, the ceiling and walls are glued and dried, and then the baseboard is glued using a special glue.
Gluing technologies
How to glue wallpaper on the ceiling correctly and in what direction (ceiling wallpaper)? You should start working from the window. If there are no windows in the room, then they “go” from the street wall.
Wallpaper is glued overlapping and end-to-end. Wallpapering with an overlap is practiced only for gluing joints in the corners of the room or other hard-to-reach places. And this method requires more material consumption. Butt gluing is used in all other cases. Let's take a closer look at how to glue wallpaper end to end.
Butt to butt
The roll is cut into sheets of a certain length with an increase of 5 cm. Glue is applied to the spread sheet from the center to the edges. After which the treated strip is folded in half for more thorough impregnation. The impregnation time indicated by the manufacturer on the packaging must be the same for all subsequent strips. For a perfectly even wallpaper sticker, you can use a plumb line to draw an even line on the wall. For those who don’t know which side to start gluing wallpaper from the window or towards the window, let’s say right away that the wallpaper is glued from top to bottom from the window.
The canvas glued to the wall is smoothed with a wallpaper spatula. Excess glue, as well as air bubbles, are removed with a dry cloth or sponge and pressing firmly on the joints. The next canvas is glued end-to-end to the previous one, without the edges “creeping” over each other.
Recommendations: to prevent the edges of the wallpaper from peeling off, you need to go through each joint with a seam roller.
Attention! Excess pieces at the bottom are carefully cut off with a knife only after complete drying.
Sticking in corners
The most difficult thing for people who decide to do renovations for the first time is the corners (internal and external). But with proper skill and following simple rules, these elements of the room will look aesthetically pleasing.
- When part of the wall has already been glued and it has reached the outer corner, glue is applied to the wallpaper and the wall. The width of the canvas in this place should be such that the corner itself overlaps, and about 5 cm of material passes onto the adjacent wall. The sheet is lifted to the ceiling and applied to the wall. The fabric is wrapped around the protrusion. The upper part is pressed a little, and the lower part is cut with a wallpaper knife. The surface is smoothed with a brush or roller to remove air.
- On the adjacent wall, in the same sequence, the sheet is glued overlapping onto the first layer and smoothed with a brush.
- To avoid having two layers of overlay on the corner, the top layer is cut off. A long metal ruler is applied to the edge of the corner. A knife cuts through the layers. The top layer is removed.
Tip: to avoid folds or skew on the outer or inner corner, do not glue the entire wide strip onto it.
Internal corner
The inner corner is glued only with an overlap. An exception is glass wallpaper, which is glued end-to-end at the corners, since even the slightest overlap is very noticeable.
Steps for gluing the inner corner:
- The distance from the already pasted strip to the corner is measured, adding 2 cm to the obtained measurement result. The sheet is cut and bent along this allowance, after which it is glued to the adjacent wall. The air from under the wallpaper is “expelled” with a dry cloth.
- The same actions are carried out with the wall nearby. The sheet is glued overlapping onto the previous sheet. It is smoothed out with a brush, but the seam allowance in the corner is not pressed too hard.
- Using a knife, cut through both layers and remove the excess top layer.
- The wallpaper in the corner is pressed hard to get rid of the air.
- The bottom and top allowances are trimmed.
Attention! The denser the wallpaper material, the smaller the overlap should be.
How to properly glue combined wallpaper
How to properly glue combined (two types or more) wallpaper? You can use several different types of wallpaper in one room. There can be several reasons for using combined wallpaper: to hide imperfections in a wall or room as a whole, to focus attention on a separate area, to zone the space of a room.
Tip: buy material of the same thickness, but of different textures and colors.
Horizontal stripes
Is it possible to glue wallpaper horizontally? It is possible, but it is important to consider several points here. The optimal width of individual canvases is selected taking into account the height of the walls. For rooms with low ceilings, you should stick wallpaper up to 100 cm wide, and for high ceilings - from 150 cm to 200 cm.
The technology of gluing with horizontal stripes is quite complex, since it requires precise measurement of where the strips join. To do this, draw a horizontal line, which should be parallel to the floor.
Gluing with horizontal stripes begins with gluing the top strip, after which the bottom strip is glued. At the joints, overlaps are left that are not coated with glue. After the wallpaper has dried, cut off the excess pieces and re-glue it.
Vertical stripes
An excellent result can be achieved by covering walls with multi-colored vertical stripes. It is advisable to buy material of the same width and texture. The technology of gluing with vertical stripes is not particularly difficult. The connection of adjacent elements is carried out both overlapping and butt-to-butt. The connecting areas will not be visually noticeable, since they will lie on the border of color transitions.
Using inserts
Wall decoration using wallpaper inserts is carried out on an already prepared surface. Inserts are applied to painted walls or walls with new wallpaper. Inserts can be made of massive wallpaper, on a non-woven basis, of different shapes and sizes. The inserts are easy to glue, since their edges will be under the frame.
Classification by characteristics
In order not to make a mistake when choosing wallpaper, you need to have an idea of what they generally are. Let's start with a general classification according to various characteristics and properties.
The first thing you should decide on is how friendly the finish should be with water and how often it will need to be washed. According to this feature they are:
- Ordinary ones that can be cleaned dry - with a vacuum cleaner with a soft brush. In the most dirty places you can lightly wipe with a damp sponge. But no harsher influence - they will tear. This group mainly includes paper wallpapers, as well as some types of acrylic wallpapers (which are cheaper).
- Water resistant. Cleaning is possible with a rag and sponge, but without much effort. It is allowed to use liquid detergents in a diluted state. Such processing is permissible a limited number of times.
Graphic display of the degree of washability of wallpaper - Washable. This type of finish can be maintained using brushes. In particularly contaminated areas, the use of non-aggressive liquid detergents is allowed.
- Super washable (abrasion resistant). Moisture-resistant wallpaper that can be washed with a brush and detergents. These are mainly vinyl of various types and some others are made from natural components.
This characteristic is displayed on the label of each roll in the form of a graphic icon - a wavy line (look at the photo).
Next, you need to decide on resistance to fading. It is no secret that some materials and paints change their color on sunlit surfaces. For sunny rooms, it is better to choose fade-resistant wallpaper. In rooms with windows facing west or north, this is not so critical. For those without windows (corridors, bathrooms, toilets, etc.) this does not matter at all. This characteristic is also displayed on the label with a sun pictogram (pictured below).
Resistance of wallpaper to fading - graphic designation
Fitting the pattern may also be important. Some colors do not require pattern selection or offset at all (plain colors). Others require displacement, and by different amounts. The displacement increases the consumption of finishing material. This information is also indicated on the label using pictograms.
The adjustment of the wallpaper pattern is depicted using pictograms
All types of wallpaper are equipped with an instruction insert that displays this data. There are also pictures that show how to apply the glue. The method of removal is also shown - they are removed completely or partially. Next, we will consider the types of wallpaper - what they are made of, what advantages, disadvantages they have, and scope of application.
Wallpapering various wall surfaces
The external attractiveness of the wallpaper and its service life directly depend on the material, condition and surface treatment.
What wallpaper is best for uneven walls?
How and what wallpaper is best to glue on uneven walls? An excellent solution to this issue would be liquid wallpaper, which can independently eliminate all flaws, making them completely invisible. It is important to apply liquid wallpaper to uneven walls as carefully as possible. And if everything is done correctly, the result will pleasantly surprise you and eliminate the need to level the walls.
Concrete
Is it possible to glue wallpaper directly onto concrete walls in an apartment or house in winter, and if so, at what temperature? It is recommended to glue wallpaper in the warm season, when the walls of the room are relatively warm. If you are not afraid of uneven walls, particles of concrete that will show through thin wallpaper, or you decide to cover the surface with a dense material, then gluing is possible directly onto a concrete base.
The surface must be pre-prepared: dust free and primed twice. You can use heavily diluted wallpaper glue as a primer. The technology for gluing wallpaper on a concrete wall is no different from gluing it on a putty surface.
How to glue wallpaper on plywood
How to glue wallpaper on plywood and is it possible to do this? You can glue wallpaper onto plywood if you choose the right material and treat the surface well. Although paper wallpaper is the simplest and cheapest solution, due to its thin base, which is not capable of masking and leveling plywood joints, it is not suitable for gluing wooden sheets. Liquid wallpaper on plywood, vinyl, non-woven, textile, fiberglass wallpaper and bamboo sheets can be good options for finishing.
Surface preparation consists of processing uneven surfaces with a grinding machine and coarse-grained sandpaper. Crumbling joints can be smoothed out by gluing sickle tape and sanding with sandpaper.
How to glue wallpaper on drywall
Is it possible and how to glue vinyl paper wallpaper onto plasterboard (plasterboard wall) without putty?
It's possible, but not necessary. But first things first. Before wallpapering, drywall is primed. This is done in order to protect the walls from mold and mildew, as well as to ensure good adhesion. The primer is applied from top to bottom with a roller or brush. The joints of plasterboard sheets are sealed with adhesive sickle tape, which in appearance resembles a medical bandage. Starting putty is applied to the top of the seam. The recess is filled with putty flush with the rest of the surface. After drying, remove excess with a piece of sandpaper. When the processing of the joints is completed, they begin to completely putty the surfaces.
Do I need to putty drywall before wallpapering?
This is necessary even if the plasterboard sheets are completely new. There is an explanation for this:
- This way you can hide all the bolt heads.
- Putty will help hide the transitions of drywall sheets.
- If you glue wallpaper onto a plasterboard sheet without first preparing it, then during subsequent repairs, removing the wallpaper without damaging the surface of the gypsum board will be problematic.
Putty is a dry material or a wet mixture in a plastic bucket. There are two types of putties: starting and finishing. The starting putty is applied at a depth of 2–3 mm for preliminary leveling. The finishing putty is applied in a layer of up to 1 mm and is intended for final finishing. Only after complete drying are the surfaces sanded: starting - with coarse sandpaper; finishing - with fine-grained sandpaper.
A layer of primer is reapplied to the sanded surface to ensure good adhesion of the glue to the surface. How to glue wallpaper on a plasterboard ceiling? The technology for gluing drywall with wallpaper is no different from gluing a regular wall.
How to glue wallpaper on an OSB board
Wallpaper can be glued to OSB boards. This is a fairly common practice - OSB boards are often painted or glued after installation. Pasting wallpaper directly onto the slab is possible, but not advisable, as it can quickly peel off. For gluing, it is recommended to adhere to the following algorithm:
- secure the serpyanka mesh;
- apply primer to the wall;
- apply putty;
- re-prime the surface;
- stick wallpaper.
Tip: it is better to use a drill or mixer to mix the putty solution. This way you will get the right consistency and avoid unnecessary lumps.
Before gluing wallpaper, it is advisable to glue plain white paper to the treated surface.
How to glue wallpaper on whitewash
You can glue wallpaper onto a whitewashed wall, but you need to take into account that the whitewash contains lime, which tends to crumble over time. If there are problem areas on the surface, then the cracked areas need to be cleaned and puttied. Next, the surface is sanded to remove lumps and other irregularities. If you plan to cover surfaces with thick wallpaper material, the last procedure can be carried out less carefully. The walls are primed twice. After complete drying, wallpaper glue is applied.
Is it possible to glue new wallpaper onto old ones?
Previously, new wallpaper was often immediately glued on top of the old ones. Experts still recommend not doing this, but first preparing the walls: cleaning them from old wallpaper is not as difficult as it might seem, vinyl or non-woven wallpapers themselves easily come off the walls, and paper ones just need to be wetted with a sponge and removed with a spatula; level the walls with putty and sand them to make them even, prime the walls so that the putty does not crumble and the wallpaper sticks better. However, you should not discard the existing option of gluing over old wallpaper.
The wall to be pasted must be dry, degreased and pre-treated with a primer.
To minimize all risks of new material peeling off, the following conditions should be observed:
- old wallpaper should be thin and made entirely of paper;
- the material must adhere firmly to the surface;
- The surface to be pasted is smooth without three-dimensional patterns.
It is not recommended to glue new wallpaper onto old vinyl or non-woven wallpaper. Due to its water-repellent properties, this material does not adhere well. And its relief structure can be noticeable under the new layer. Therefore, it is easier to remove the previous coating.
Wallpapering painted walls
How to put wallpaper on painted walls? Is it possible to glue wallpaper onto water-based paint (painting on top of the emulsion)? Quite common questions that cause a lot of controversy. Yes, wallpapering painted walls is possible, but you need to take into account the type of paint applied. If it is water-based paint, then there will be no difficulties. The only thing you need to check is whether it sticks well to the wall. If the wall is covered with oil-based paint, it will have to be removed, as the wallpaper glue may fall off immediately.
A painted wall for gluing is prepared in the following way:
- all irregularities are puttied;
- the surface is washed with a weak soap solution and washed off with clean water;
- The wall is primed with a light primer.
It is not recommended to glue wallpaper with bright paint, as it can show through under thin and light wallpaper.
Advantages and disadvantages of this finish
In fact, wallpapering old wallpaper has more disadvantages than advantages. Let's try to outline them.
So, the advantages include:
- Speed. So, if you glue fresh wall material onto old one, you will be able to save a lot of time. In this case, you will not need to rip off the outdated wallpaper material, rub and prime the walls, and then wait for everything to dry.
- Saving on material costs. Again, gluing new sheets onto old ones means not spending money on putties and other Orso Bruno finishing materials to eliminate defects on the walls. And this, as you know, is also a kind of saving.
- Elimination of labor costs. So, if you don’t need to deal with the walls before pasting, then there is no need to hire specialists to perform such work.
Naturally, many of these advantages are offset by potential disadvantages:
- inability to level the surface if necessary;
- the new coating often sticks quite poorly to the old one;
- there is a high probability that even the most expensive glued rolls can come off at any time.
The conclusion follows from this: the disadvantages of this method greatly diminish the advantages. For this reason, experts strongly do not recommend going this route.
Thus, construction and repair companies convince that it is better to spend more time and money, but get truly high-quality repairs, than to save on your own comfort and get dubious benefits.