Puttying window slopes is a very labor-intensive process that requires special knowledge and construction skills. To do the work yourself, you need to first study the issue and also purchase the necessary tools and materials. An important stage is the preparation of the surface to be treated and the creation of favorable conditions in the room where the finishing will be carried out.
How to choose the right mixture
To obtain a high-quality result, it is necessary to select building materials, taking into account their compositions. The main characteristic of the mixture for outdoor work is its frost resistance. Therefore, window slopes are puttied with a cement-based solution, and the inside is treated with a composition that matches the microclimate of the room.
It is recommended to select material according to the following indicators:
- the base and outer walls of the building are plastered with cement or cement-lime mortars;
- gypsum compositions are used in rooms with low humidity (not exceeding 60%) and on stone and concrete surfaces;
- in rooms with high humidity, polymer or cement mixtures are used.
Tools and materials
Before you putty the slopes on the windows with your own hands, it is recommended to prepare materials and tools.
If the surface is uneven, then it must be treated with a starting or universal putty, and then covered with a layer of primer. If the slopes are installed in a new building, then the shape is given with plaster and only then putty is used. In this case, you should choose a primer mixture with antifungal properties.
The following tools will help you putty the slopes on the windows:
- container for preparing the solution;
- construction mixer;
- spatulas of different sizes;
- metal scissors;
- building level;
- reinforcing and troweling mesh;
- paint container;
- rollers and brushes;
- masking tape;
- putty of 2 types (starting and decorative);
- primer;
- corner;
- water-based paint.
Preparation of the working surface indoors and outdoors
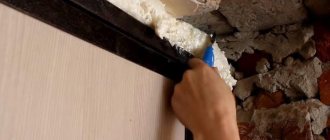
Puttying window slopes with your own hands is a very complex and labor-intensive process, the first stage of which is preparing the surface. The window frames are taped around the perimeter with masking tape, and the glass is covered with fabric or plastic film. This will help protect them from construction dirt. It must be remembered that the solution hardens quickly and is very difficult to remove from the area.
The use of a primer mixture will help level the surface and ensure a high degree of adhesion of materials. This layer will strengthen the coating and protect it from moisture and fungus. The most important thing is that the solution does not contain or emit substances toxic to humans, so it can be used for external and internal work. When choosing a material, preference should be given to specialized compounds that protect against mold and other harmful microorganisms.
Before applying the primer, the slopes are cleaned of dust, the old finishing coating, if any, and the plaster are removed. After this, the new mixture is applied with a brush over the entire surface.
Experts do not recommend buying ready-made solutions. They vary in consistency and some will be difficult to work with. Putty for windows is sold dry, and on the packaging manufacturers indicate the acceptable proportions for mixing. The composition must be prepared immediately before processing, as it hardens quickly.
Technique for doing the work: how to do it yourself?
The puttying technique depends on the curvature of the walls and the presence or absence of defects on the surface. Already plastered slopes need to be smoothed over the surface with finishing putty to get rid of:
- small cracks;
- scratches;
- roughness;
- potholes
If you need to completely level the slopes, then the work becomes much more complicated. The main composition is the starting one, it should be applied thick enough. There will be several layers. Before finishing, you should be sure that there are no sudden temperature changes. The ambient air must be maintained at least +10 degrees. The exception is cement putty, which can be applied at +5.
All slopes must be prepared. To do this, remove old finishing materials, as well as surface fragments that do not adhere well. Only after this can the block (wooden or plastic) be primed. It is necessary to cover the glass with tape or protective film. To avoid contamination, it is good to do the same procedure with the window frame.
Mixing mortar for slopes
The dry primer mixture is combined with water 5-10 minutes before starting work. It helps eliminate defects and unevenness, so the consistency should be quite thick and not spread. The building materials market offers users a wide selection of dry powder compositions and ready-to-use paste-type solutions. The latter will be an excellent option for beginners who have not encountered construction work before.
Puttying windows is a difficult process that requires a responsible approach. Therefore, experts advise choosing dry mixtures and diluting them yourself with water in accordance with the instructions indicated on the manufacturer’s packaging. This approach will help you get the consistency you need. To avoid the formation of voids and lumps, the solution is thoroughly mixed with a construction mixer.
Step by step guide:
- water is poured into the container according to the proportions (on average 2-2.5 liters per 1 kg of dry putty);
- add the powder and mix thoroughly;
- leave for 2-3 minutes for swelling;
- add a little more liquid if necessary.
The resulting solution is immediately used in work. Before purchasing, you need to pay attention to the expiration date of the product. Expired material loses its characteristics and is often no longer suitable for surface treatment.
Why plaster slopes
Plastering the slopes of a door or window opening is of great importance, so a lot depends on the quality of the work. We can identify the main reasons why such surface treatment is performed:
- Crevices. Using putty, you can eliminate all cracks, gaps and cracks around the perimeter of the opening. This will have a positive effect on sound insulation and heat retention.
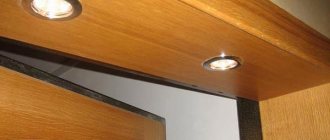
- Finished look. The slopes take on a neater appearance, the door is ready for use, and dirt and construction dust are eliminated.
- Decor. Plaster gives the opening an aesthetic appearance and can act as the main design.
- The basis for a different decor. In addition to plaster, you can use paint, wallpaper, tiles, MDF panels and other similar materials. However, in any case, you need to first level the slopes and create a suitable surface for finishing.
- Protection. Thanks to putty, it is possible to hide the mounting foam from ultraviolet radiation, which is a prerequisite for preventing its destruction.
Plastering of door slopes is carried out to protect and decorate the opening
Plastering slopes with your own hands is a very real task. To facilitate the process, you need to prepare all the necessary tools and select suitable materials.
Step-by-step instructions for puttying door slopes and windows
After completing the preparatory work, you should read the step-by-step guide. First of all, use a level to install the corners. They will help set a right angle, protect slopes from damage and ensure uniform distribution of the solution over the surface.
The corners are cut into the required parts with metal scissors, pressed against the slope corner, laid out in accordance with the level and begin to cover the starting layer. The solution is applied with a thickness of 5-7 mm. This is enough to eliminate defects in the plastered surface and obtain an even slope coating.
The putty is applied with an appropriate tool with a large plate. Broad strokes are made on a flat surface, moving from bottom to top, pressing the spatula blade tightly against the slope. To work with old slopes, a reinforcing mesh is used to strengthen the structure - plastic. The cracks and crevices are filled with the mixture to bring the entire surface level. To form the inner corner, take a special spatula.
Sometimes you need to apply several layers of mass. In this case, you need to wait until the first coat dries completely. Failure to comply with this rule may lead to cracking of the wall. After drying, the putty is primed. All irregularities in the dry area are rubbed with a sanding mesh. The process does not cause any difficulties, but great efforts should not be made so as not to scratch the surface.
All defects must be eliminated at this stage, because The finishing layer cannot be changed. Having finished grouting, all that remains is to paint the slopes with a water-based paint. The finishing composition is applied in a thin layer of 2-3 mm.
Slope leveling technology
The stages of work include leveling the walls. To do this, you should cover the entire area around with newspaper and begin leveling. To avoid touching the jambs, you can stick masking tape on them. Preliminary priming of the surface is required before puttying work. After the walls are ready, you need to dilute the mixture, if you purchased powder, and begin the main work.
Preparation of putty mixture
Puttying window slopes most often begins with making a solution. This process needs to be given special attention, because the result will depend on the quality of the mixture. The starting and finishing compositions have a similar mixing method. Let's consider a step-by-step algorithm:
- The amount of water should be equal to the required volume of putty. It is better to mix more, with a reserve. On average, this is one third of a bucket.
- The mixture should be thick. This will avoid drips.
- The solution needs to be worked out immediately within half an hour, so it is worth mixing in small quantities.
- Pour the powder into water and mix with a mixer.
- The mixture should sit for several minutes.
On a note! Before starting repairs, stir the composition again.
Leveling slopes Do-it-yourself puttying of window slopes is done after the primer has been applied. Remember that the soil must dry well. Therefore, you first need to apply a primer, and then mix the solution. Beacons are always installed at windows and alignment should begin with them, and then move on to the perforated corners. The profile material is placed on the plaster in several layers. No more than 5 mm.
You can use a wooden template or a piece of drywall. It is cut strictly along the window opening and screwed with self-tapping screws. Its thickness should be equal to the thickness of the wall. Then you need to draw out the corner using a level and apply putty. The drywall is removed only after the mixture has completely dried.
Finishing putty
After the initial processing of window slopes, we move on to the final stage. It will only be required if the finishing is not done with wallpaper or tiles. Finishing putty is carried out only to prepare the surface for painting. It is not critical to apply it even to a fresh starting layer. You will need both spatulas to work. One will pull the mixture along the slope, and the other will apply it.
The blade of a large spatula should be longer than the slope, in this case the result will be without scars the first time. After the finish is applied, you need to give it time to dry completely. Only after this you need to treat the surface with sandpaper. Work the spatulas close to the frame. It can be pre-covered with masking tape.
Sanding and painting
The windows will look perfect, but there will still be some minor flaws. They can be easily hidden by sanding and painting. The most important thing: the slope had to be completely dried. You will need sandpaper for sanding, and a brush or roller for painting. The paint should not be very thick. In this case, it will lie flat, too liquid will leave smudges. If the paint is chosen in a delicate color, then additional layers may not be required.
On a note! Give preference to water-based or water-based paints. If you want the shade to be more saturated, paint in 2-3 layers.
Possible mistakes: how to plaster and putty is not necessary
It is also recommended to familiarize yourself with the main mistakes that beginners in the construction business make. The most basic is saving on materials. The mixture must first of all be of high quality, and it is not necessary to buy the most expensive product. It is important to study the compositions and choose the optimal price-quality ratio.
How to putty slopes correctly:
- When applying a large volume of putty, you should periodically use a fine mesh for reinforcement. This will prevent the mixture from peeling off and falling off.
- If you do not wait for the material to dry completely, the finished coating will quickly crack.
- During work, tools and containers constantly become dirty. They should be thoroughly washed regularly. Otherwise, small particles of debris or frozen putty that fall on the spatula will cause grooves to appear on the finishing surface. The quality of the slope made will deteriorate.
- You need to choose the right tool. Craftsmen can use any model. For beginners, it is better to take products with flexible fabric.
- A well-mixed solution is half the battle. The required consistency is in the form of thick sour cream. The spatula in this composition should be in a vertical position.
Recommendations
Experienced craftsmen give useful advice on how to putty windows after installing plastic or wooden structures. Taking into account where the window slopes are located (indoors or outdoors), the appropriate material is selected. For exterior finishing, frost-resistant and moisture-repellent putty should be used, having first checked its expiration date. The best option is products designed for treating facades. It is recommended to begin puttying work after the primer coat has completely dried.
Slope putty has one feature. If you include an intermediate stage in the main finishing work, the quality indicators will improve, and the putty surface will not become covered with cracks from accidental external influences.
After applying the leveling layer in the corner, a spatula is passed over the fresh putty solution, forming a shallow furrow between the window frame and part of the opening. When the solution has completely hardened, this depression is filled with sealant.
Any surface needs preparation before finishing work. To do this, you need to remove the old coating, peeling plaster, then treat the slopes with a primer.
Many novice builders are interested in how to properly putty door slopes. There is nothing complicated here - the algorithm for processing door slopes is similar to finishing window slopes. The design of the entrance opening is important for the perception of the overall space of an apartment or house; the door fits harmoniously into the design and helps create an atmosphere of comfort and peace.
Preparation for finishing
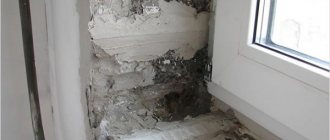
- First of all, you need to get rid of the old layer of plaster and bricks protruding from the slope. This is done using a hammer drill or manually. After this, you should proceed to the next step.
- The slope must be well treated before starting repair work. To do this, you need to remove all irregularities from the surface, and also clean the space from dust and contaminants. This can be done by wiping the surface with a regular rag or using a spatula.
- You should also cover the surfaces located near the slope with film or tape. Namely the flooring, door and frame.
- Then you need to wait until the surface is completely dry and start plastering.
- For the convenience of making slopes, profiles should be fixed at the corners, thanks to them you can clearly monitor what the layer of material on the surface should be. Fastening the corners can be done using either ordinary self-tapping screws or screws. The main thing is that the profile adheres well to the wall and does not bend under the weight of the finishing materials.
- Then you need to cut off the protruding foam with a stationery or construction knife so that it does not become an obstacle to comfortable work.
- Afterwards, you need to open up the places where the foam remains with a vapor barrier material.
Step-by-step instructions for plastering a door slope
Finished plastered door slope