What is the peculiarity of the material
The original purpose of finishing with brick-like tiles for external cladding quickly gave way to interior decoration. With its help you can create unusual compositions that are unique in appearance. Certain advantages inherent in decorative brick tiles are:
- Originality of the drawing;
- Excellent environmental characteristics;
- Possibility of designing the most inaccessible places;
- Easy installation;
- Resistance to any external influence;
- Excellent combination with other decorative elements;
- Providing additional thermal insulation;
- Light load compared to bricks;
- Reasonable price.
A wide choice for buyers is indicated by a variety of brick-look tiles in Leroy Merlin. We offer a wide range of similar types of products, different textures and colors. Here you can purchase at low prices the types of gypsum tiles that match brickwork for the interior of your home, as well as suitable options for the exterior framing of your home.
Homemade wall design options for brickwork
If you want to save money by making an imitation of brickwork on one of the walls of an apartment or house with your own hands, you can use original techniques developed by folk craftsmen.
There are interesting technologies that allow you to imitate brickwork completely independently.
There are several common options that do not require special costs for the purchase of facing slabs or panels, and also do not create any particular difficulties in installation:
- Self-production of polystyrene foam tiles with a thickness of 10÷12 mm. For this purpose, it is recommended to use extruded material with higher performance indicators than conventional white foam.
- Creating a brickwork relief using a stencil.
- Reproduce the desired design on the wall using masking tape.
Brick-like tiles made of polystyrene foam
If you plan to use the process of melting the edges of foam plastic in the manufacture of tiles, then the work should be carried out outdoors, protecting the respiratory tract with a respirator, since this material is flammable and releases toxic substances when burned and melted.
To be honest, using polystyrene foam for interior decoration is still not a reasonable solution.
- The first step is to mark the “brickwork” on the prepared, leveled and primed wall surface using a ruler, plumb line, building level and a simple pencil. The wall is drawn into horizontal stripes and vertical partitions, which determine the size of the bricks and the seams between them and the masonry rows.
- The second step is to mark the sheet of polystyrene foam into tiles of the selected size.
Sliced polystyrene foam rectangles are the future “bricks” of finishing
- Then the material is cut into individual elements with a stationery knife. The number of such blocks must correspond to the number of bricks required to decorate a certain section of the wall on which the marking was made.
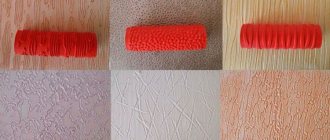
Smooth tiles will not give the desired effect, so they need to “spoil their appearance” a little
- Next, in order to achieve the most reliable effect of imitation brick, you need to work on the resulting tile - this can be done in different ways. Its surface is treated with sandpaper in different or one direction, and notches and grooves are made on it with a knife or other sharp instrument. You can also use a heated soldering iron for these purposes.
Melting the edges of the tile using the fire of a lighter
Another option is to melt the edges and outside of the tile using a regular lighter or torch. In this case, the front surface takes on soft, smooth shapes.
Expanded polystyrene processed tiles arranged in “brickwork”
- After painting the tiles in the chosen color, its relief will be more pronounced. Paint can be applied before installing the tiles or after the wall cladding is completely completed.
Painting can be done using a brush or spraying the coloring composition from a can. The main thing is that the paint does not cause dissolution or softening of polystyrene foam - it is better not to experiment with organic-based compositions, giving preference to water-soluble ones.
The same “brickwork” but after the painting operation
- Laying of foam tiles is carried out according to wall markings using “liquid nails” glue, which is applied to the back surface in three points with a thickness of 3–4 mm.
- The final stage will be the design of the seams between the bricks and rows.
- It should be noted that if the design does not provide for highlighting the tile joints with a different color, then painting the cladding can be done after the grout solution has dried.
Imitation of brickwork using a stencil
In order to make an imitation of brickwork using a stencil, you will need a cement-based mortar. It is best to purchase it in the form of a ready-made dry building mixture for plastering work, since it already has all the necessary additives that make it plastic and convenient for work.
Stencil for “brickwork” and the relief that should be obtained in the end
The solution can be made independently from two materials - this is a plaster and adhesive cement mixture, which are taken in proportions of 1:1. To increase the plasticity of the solution, add a tablespoon of liquid detergent per 5 kg of the finished mixture.
- The wall must be well cleaned, primed and dried.
- The solution can be applied to its surface using a wide spatula or simply with a rubber-gloved hand. The thickness of the applied layer should be equal to the thickness of the stencil strips. This moment will depend on what kind of surface the brick should have - smooth or rough.
- Further, so that the stencil does not have “stickiness” with the layer of applied solution and is easily separated from it, it should be moistened with water - this can be done with a sponge or damp cloth. If the stencil is made of rubber, then you can simply dip it in a basin of water, but in this case you need to wait for the excess to drain, otherwise excess moisture can ruin the whole work.
- After this, the stencil is pressed against the applied fresh plaster and carefully pressed so that the relief of the brickwork remains on it.
- Next, the stencil is removed and applied further, next to the just pressed relief. Here you need to try and apply it so that the masonry is even and its horizontal seams do not become distorted.
- When the relief has been applied to the entire surface, it is left until completely dry.
- After drying, the wall should be completely covered with one color - usually light shades are chosen for this, since it will be easiest to apply any color to them, as well as highlight it with a dark shade or leave all the masonry seams light.
It is recommended to use acrylic paints to paint the surface, and it is best to cover the relief wall with a layer of primer before applying them.
Painting imitation brickwork is already a creative process, so you can allow yourself various fantasies. In this case, of course, it is necessary to keep in mind that the chosen color will set the mood for the entire interior of the room.
Creating a brickwork relief using plaster and masking tape
For this technology of reproducing imitation brickwork on the wall, you will need the above-mentioned composition of cement plaster mortar and masking tape. Some craftsmen even use electrical tape, however, it does not adhere to the wall well, while high-quality masking tape has excellent adhesion to any surface.
This “brickwork” relief can be made using regular masking tape
The width of the tape should be no more than 14 mm, and if you couldn’t find tape of that width, you’ll have to buy a wider one and carefully cut it in half right in the skein. If its edges are not perfectly smooth, this is not a big deal at all, since this factor will not affect the accuracy of the relief, but rather will even play into your hands.
First of all, the wall is marked
- The first step is to mark the prepared surface of the wall to be tiled for brickwork.
Painting tape is glued to the wall along all marking lines
- Next, masking tape is glued along all the marked lines on the wall. It should be secured so that the edges of the horizontal pieces of tape extend beyond the edges of the surface being designed, and the solution should not be applied to them, and the vertical pieces should be well glued to the horizontal ones, always on top of them.
- Then, on the surface of the wall, on top of the glued grid of adhesive tape, using a wide spatula, apply a solution with a layer thickness of 5-6 mm - the height of the relief will depend on this parameter. Do not apply too thick a layer, otherwise you will have to cover the seams with grout.
- After applying the solution completely to the entire wall, you can walk over it with a damp rubber glove to create a textured surface. If you plan to leave the surface of the “bricks” flat, then you should not touch the mortar layer.
Carefully removing the “cobweb” from the tape will create a “brickwork” pattern on the wall.
- The most interesting stage in this method of simulating brickwork is removing the masking tape, since after this operation the relief of the wall will be immediately visible. Several strips of tape are picked up from one of the free sides and begin to be carefully peeled off from the wall, and as a result, in place of the peeled tape, seams are formed between the “brick tiles”. After removing the tape from the entire surface, the wall should be left until completely dry.
All that remains is to apply the final decoration with the selected paints
- It is recommended to prime a dry wall before painting - this operation will make the surface more pliable for the next stage - painting, since the paint will lie flat on the surface and will not be absorbed into the plaster layer. Which shades to choose for the wall depends on the preference of the master.
Video: How to imitate brickwork using plaster and masking tape
From all of the above, we can conclude that the construction market has an oversupply of various materials that perfectly imitate brickwork or other stone surfaces. Sometimes the quality of the imitation is such that when finished, it is impossible to distinguish it from real brick by texture and color. Well, if ready-made tiles or panels do not fit into the family budget, then you can use one of the more economical methods and decorate the wall using affordable materials.
General description of brick tiles
The undeniable advantages of the tile material make it possible to use it when covering wall surfaces in almost all rooms. You can safely conduct design experiments with styles that, at first glance, are completely incompatible with each other.
The ability to choose allows you to create real “masterpieces”. For example, if you need to accurately convey the naturalness of brickwork, it is best to use clinker tiles on a brick wall. The varnished smooth coating is easier to care for and looks more beautiful.
Features of using tiles
Ordinary brick is not used for interior wall cladding. This material does not retain heat sufficiently, but is durable and safe for health. But imitation brick is always in demand when finishing, as it always adds a special touch to the interior. Gluing decorative gypsum bricks to the wall is much easier than real ones. These tiles are varied in texture and shade. With their help, individual interiors are created.
The slabs are durable and resistant to moisture, which makes the repair practical and durable.
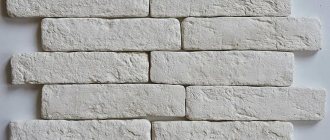
Gypsum tile base
The most inexpensive material when using decorative brick tiles for finishing is gypsum. However, it is quite fragile. Absolutely not suitable for places with strong temperature changes and constant presence of moisture. Therefore its advantages such as:
- price equivalent;
- variety of color shades;
- amazing lightness;
- the ability to create a pleasant feeling of a cozy environment,
Can be used in the living room and hallway. The version of the room with white brick tiles looks especially good. It gives a feeling of comfort and a soft, pleasant atmosphere.
Separately, it is worth mentioning that the room is provided with additional sound insulation and low thermal conductivity, which provide a comfortable aura in the spatial zone designed in this way. Gypsum does not burn and is an absolutely clean material from an environmental point of view.
It is not suitable for kitchens, baths and uninsulated balconies.
Note!
Epoxy grout for tiles: pros and cons, scope, varieties, how to work with it (instructions + photos)
Do-it-yourself tile shower tray step by step: instructions, dimensions, design, installation of communications, types of structures, photos
White tiles in the bathroom: 170 photos of the best ideas and new tile designs. Layout schemes and beautiful combinations
Pros of gypsum tiles
Laying gypsum tiles has its advantages:
- Low weight allows for faster laying, since no additional reinforcement of the base is required. Due to the weight, the overall load on the wall and structure is reduced.
- Installation work can be carried out independently, without the use of additional force. No special tool required.
- Safety. The material does not contain harmful compounds, so it can be safely used indoors.
- The color range is wide, the shade can be selected to suit the design of the room.
- Availability.
These advantages bring this material to the leading level in purchases for interior cladding of walls and structures. In addition, updating and dismantling will not be difficult.
We recommend videos on the topic:
Clinker
The strength characteristics and elasticity of such a material are achieved by the presence of varieties of refractory clays. They are fired at very high temperatures.
This product is practically indestructible and lasts for a long time. Having low weight, it reduces the pressure of the load on the wall. He is not afraid of heat, cold, or precipitation. Complete imitation of the appearance of brick.
Such obvious advantages do not greatly affect the cost. Prices are affordable. An excellent choice would be a glossy facing version of brick-like tiles, which resemble it only in shape.
Ceramics
Clay plus various fillers in the form of carbonates or quartz sand. The dye allows you to achieve the desired color. The texture is very diverse, but the most popular varieties are those with a glossy or matte surface.
Despite their light weight, the products have the ability to last a long time in conditions with strong temperature contrasts and an abundance of moisture.
Note!
Italian tiles for floors and walls: photos of beautiful tile designs in the bathroom and kitchen. Choosing tile color, style and size
Marble tiles for the bathroom: TOP-200 photos of original design, ideas for mixing and matching
Do-it-yourself tile shower step by step: instructions, algorithm of actions, dimensions, layout diagrams, photo of a shower with and without a tray
This is the reason why such brick-like tiles are often used for bathrooms or showers. Some varieties are excellent for facing fireplaces, and the apron near the stove is also decorated using special brick tiles for the kitchen.
The color of the material remains unchanged for a long time when exposed to direct sunlight. Many people prefer this material when there is a need to use brick-like tiles to lay out an apron in the kitchen or bathroom.
Advantages and disadvantages of the material
Interior finishing does not imply the presence of negative factors affecting the building material, such as temperature changes, changes in humidity levels and other atmospheric phenomena. But even in such conditions, I recommend choosing the facing material as carefully as possible.
Related article: Monolithic frame house construction technology: pros and cons
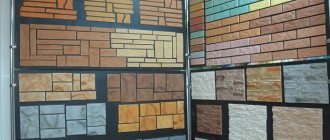
Laying brick tiles has some significant differences from working with ordinary tiles. Firstly, there is always a need to first select a pattern on the tile: it can be in the form of one brick or in the form of several bricks laid out in a row at once. You need to choose in the process of thinking through the design of the room. Tiles with imitation rows greatly simplify the installation process due to their large sizes. But there are also some disadvantages - possible discrepancies in the “chess” principle according to which the brick is laid. Naturally, this does not mean that you should completely discard this option, because sometimes imitation of masonry without traditional design can look quite impressive. Also, do not forget that in places where seams are imitated, the material can be quite thin, which makes it fragile.
However, the strength of the tile largely depends on what materials were used for its manufacture - gypsum mortar, ceramics, clinker or polymer cement. Clinker tiles are more often used for finishing facades, but recently they are no less popular among craftsmen involved in interior cladding. Due to its original use, its strength can even resemble a brick, so clinker is most often used in cases where the room needs to be finished with high quality and for a long time. This type of tile fits perfectly on any surface and holds up well. Among other advantages of its use is a wide range of color and texture solutions.
Unfortunately, it is impossible to equate brick with other types of tiles. They are significantly inferior to clinker both in price and in basic characteristics, although they retain a fairly good appearance in the interior. Gypsum or ceramic tiles with imitation, for example, are used when you need to quickly and inexpensively decorate a room with your own hands. Don’t forget that old brick is quite difficult to imitate, so don’t be surprised that the most realistic tile copies are quite expensive. But this is the case when quality is worth paying for.
Related article: How to clean a stainless steel sink
Presence of flexibility
Products in the form of flexible brick-like tiles are very similar in appearance, sold in rolls, and look almost exactly the same on the wall after sticking. This option is an excellent way to paste surfaces of round and other shapes.
A wonderful option for columns, arches and all kinds of corners. It perfectly insulates from unnecessary noise and is an environmentally friendly product. It has excellent properties for safe operation.
Style selection
Decorating the walls of various rooms with brick-like wall tiles is in demand for different stylistic trends.
Note!
Mosaic from broken tiles: step-by-step instructions on how to lay it out with your own hands (140 photo ideas)
Mosaic for the bathroom: TOP-150 photos of new designs, as well as modern ideas for combining mosaic tiles
Do-it-yourself water heated floor under tiles step by step: installation instructions with photos and descriptions, installation and connection
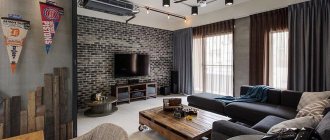
Loft is a priority direction. It is the presence of high ceilings and freedom of space without partitions that makes it possible to place unique interior details inherent in industrialism.
Along with metal pipes and other similar decorative elements, brickwork and its imitation are quite popular. Modern technology fits perfectly into this environment.
Creative youth quite often prefer such a living environment, especially since the costs of such repairs are minimal, and the atmosphere can turn out to be very unusual and very cozy.
Then comes the “rustic” style, if the appropriate texture and color palette are chosen. The use of such cladding is common in modern and high-tech themes.
Design solutions
For a long time, brick was used as a construction material, but today design specialists successfully use it in decoration. The effect of masonry made from such stone is a frequently used move, giving rooms a variety of style solutions from classic to modern. In simple terms, this is a successful option for interior decoration, capable of differing artistic properties.
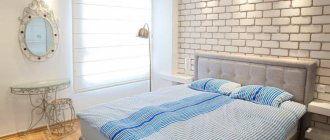
Laying tiles with bricks can transform even an ordinary room, filling it with coziness and comfort. Moreover, its use knows no boundaries and can be observed not only in the bathroom, but also in the bedroom.
The main difference between the material is the possibility of its use not over the entire surface, but only on its individual sections.
To enhance the effect of the masonry, highlighting or painting some fragments with other shades is used. Tiles are used instead of a background for paintings or mirrors, if necessary in accordance with the chosen style.
In Western countries, such unusual methods of design have long become fashionable. Many are stopped only by the fact that brick material can “reduce” space, and all that remains is to select more gentle and financially beneficial materials for finishing, and many opt for tiles that imitate brickwork.
The fear of decorating your house with brick material to resemble an ancient castle or a small casemate is absolutely groundless, because excellent compromise options are always being found to solve such a problem. If you are attracted to a brick finish, it is recommended to tile just one wall or niche. By developing a successful design concept and creating a beautiful composition, you will add originality to the design.
Having decided to decorate the room not only with imitation brick, and to create the effect of the masonry protruding in certain places from under the plaster layer, get ready - the final result can bring disappointment, because everything will look quite unnatural.
The option of combined finishing is recommended when there is a stove or fireplace in the room, so that a successful combination of fireplace masonry and wall decoration is created.
There is another way to avoid gloom - for the interior decoration of the room, choose the right color palette, in which it is not necessary to use the classic tones of brick stone.
Choose light colors for decoration, add spotlights or fluorescent lamps.
Choosing brick tile color
The material determines the color scheme. The market is saturated with various color lines, of which there is sure to be the most suitable one for a particular occasion. The combinations are the most unexpected and original.
Some tiles are specially produced for self-painting in the tone intended by the designer. Traditional white and red shades are always relevant and most in demand. Then come snow-white and brownish tones. The beige color scheme gives the room lightness and adds light. This color is especially good in the bedroom.
Colors that are unnatural for bricks are in fashion. There are “stone” imitations with tones of greenish, black, and bluish.
A certain risk that designers take is to use beveled tiled mirror material for decoration. For certain wall fragments, this is a very unique decorative element.
Making tiles like bricks
The purchased option is not always able to satisfy the creative needs of the buyer. It may be a matter of price or appearance. Then there remains the very interesting task of using the brick tiles made with your own hands.
To do this, you need to acquire special molds made of silicone material. Then there will be no problem when removing the workpiece. Repeated use of such forms will recoup their cost over time.
Polyurethane is more expensive, but it is also used for cement blanks due to its ability to resist alkaline attack. Has a longer service life.
Additionally, you will need a special container. The solution will be mixed in it. Here preference is given to plastic. It is easy to wash.
Gypsum and water are a rather fragile connection. The finishing of the room is usually carried out with tiles with lime added to it. Following the step-by-step instructions, you can make various variations of the finishing material yourself.
How is cladding done?
Wall cladding with gypsum tiles is carried out in the following order:
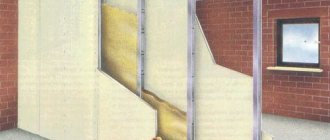
- Preparing and leveling the base (wall).
- Preparation. All elements are carefully inspected. Tiles with defects (broken, deformed, cracked, etc.) are eliminated. It is recommended to first lay out the masonry on the floor. Incomplete elements are prepared in advance by cutting the tiles with a hacksaw or grinder. The back side should be sanded for better adhesion. For porous tiles, the front side is covered with a thin layer of transparent primer.
- Preparation of the adhesive composition. It is carried out in a convenient container. For uniform mixing, it is better to use a construction mixer. The entire process is carried out strictly according to the instructions for the finished mixture. The consistency should be thick, but easy to apply.
- Laying (gluing). It is installed in rows, starting from the bottom. A small gap is left between the tiles.
- Sealing seams.
The work is completed with the final finishing of the cladding. Various methods can be used depending on the material and style chosen.
Surface preparation
To obtain a high-quality finish, an important role is played by preparing the surface on which the gypsum tiles are to be laid. This stage includes the following work:
- cleaning the surface from old coating and plaster;
- garbage collection, dust removal;
- elimination of significant defects (cracks, dents, etc.) using putty;
- applying a layer of deep penetration primer.
If the wall has significant unevenness, then the surface is leveled. The following methods can be used:
- plaster on beacons;
- leveling with sheets of drywall and sealing seams;
- for minor deviations, OSB sheets can be used.
How you can decorate your walls beautifully, see the article Wall decor using stencils.
A responsible operation is priming the surface. It ensures final leveling of the surface and adhesion of materials. The following primer mixtures are used:
- Mineral primer. It is fast drying and versatile.
- Perchlorovinyl primer. It is used when treating concrete and metal surfaces. Apply in 2 layers. Drying time - up to 1 hour.
- Acrylic primer. The material belongs to the universal category and is suitable for any surface.
The primer layer is applied using a paint brush, roller or spray gun. The second layer is applied after the first layer has dried.
Marking completes the preparatory stage. It is most relevant for partial cladding and combination with other materials.
Gluing
When attaching gypsum tiles to a wall surface using a wet method, an adhesive composition is used. It is selected taking into account the base material, the area to be tiled, the type, size and color of the tile itself.
The following recommendations should be taken into account:
- Plaster with cement. Such compositions are sold in the form of ready-made, dry mixtures, from which a solution for gluing is prepared. They are most suitable for light-colored tiles. The best known mixtures are Perlfix, Litokol K, Satyn PKG-28.
- Liquid nails (sealing compound). A common option is the “Dragon” universal type glue. Its main disadvantage is the need to hold each element with your hand for 2-2.5 minutes, which delays the finishing process.
- Ready-made liquid gypsum mixtures. This is the best option. The composition is sold in the consistency of thick sour cream and is white in color. It is easy to apply, bonds well and can be used on any gypsum tile. The hold must be ensured for only 2-3 seconds. Complete drying occurs within 24 hours, and the position can be adjusted without effort in 15-20 minutes.
Gluing is done as follows. The adhesive composition is applied to the back side of the tile with a special (notched) spatula in a thin layer about 0.2-0.3 mm thick. The tile is fixed on the surface and held by hand (usually 4-5 s). Glue is applied to the side edge to connect it to the adjacent element.
Features of using green moss can be found in the article How to make a green moss wall with your own hands?
Seams
The seam between the tiles can be of different widths depending on the chosen pattern and the room being finished. Sometimes they are placed end-to-end when there is practically no seam, but in this case elements of ideal shape are necessary. Most often, a seam is left, the width of which should not exceed 1 cm. The optimal option is 5-7 mm.
To make the cladding attractive, the seams are filled with a special grout. It allows you to mask minor inaccuracies in installation and edges of elements. The procedure begins a day after installation, when the glue dries. Ready-made gypsum putties or glue used to attach the tiles are used as grout.
If desired, you can add a pigment of the desired color to give the mixture a certain shade. Filling is carried out using a narrow spatula, and then the seam is leveled with a strip about 10 mm wide.
The stitching adds to the attractiveness of the seam. It is produced using a simple tool made from a polymer tube with a diameter of 8-10 mm, which is cut in half in the longitudinal direction. By running such a tool over the grout, a convex shape is achieved. The sealed seam is kept for at least 24 hours, after which it is processed with sanding paper.
Final finishing
Tile cladding requires special finishing. First of all, care must be taken to eliminate the hygroscopicity of gypsum. To do this, the tiles are impregnated with water-repellent compounds (water repellents). They are applied using a paint brush or roller.
The water repellent Tiprom is popular. Other compositions can be recommended: White Hill organosilicon impregnation; silicone-based impregnation “Optimist C405 - Natural Stone” and some others.
Gypsum tiles are decorated by external varnishing. The following options are used for coverage:
- Acrylic lacquer. It can be of 3 types: glossy, matte or semi-matte. The varnish is easily diluted in water. After it dries, a thin transparent film forms. The ideal option is Finnish products.
- Oil varnish. It comes in glossy and matte. Special solvents are used to create the desired consistency. Colorless (transparent) varnishes or compositions with a certain shade are produced.
- Yacht varnish. It provides the most durable coverage. Before use, it is diluted with a thinner to obtain the desired consistency. Drying time is about 24 hours.
- Shellac varnish. It is made on an alcohol basis. Widely used for decoupage and giving tiles a certain tone. You can choose transparent or colored material.
Gypsum tiles can be painted. For these purposes, you can use water-based and oil-based paint, as well as acrylic enamel.
Painting is done with a brush or roller. Paint is applied in 2 layers. It is recommended to varnish over it.
Corner finishing
Laying gypsum tiles should begin from the corners. Here you need to be extremely careful. In the inner corner, adjacent elements are fitted closely. The seam is filled with grout.
When forming an outer corner, the joining edges of the tiles are cut at an angle of 45 degrees. This operation is performed using a special tool - a miter box. The cut is carefully sanded with sandpaper. Its surface should be smooth, which allows the corner elements to fit tightly together.
Framing switches and sockets
In places where sockets and switches are installed, laying gypsum tiles requires a special approach. Their outer cover must fit tightly to the surface, which causes certain difficulties.
When framing sockets and switches, it is important to carefully form a hole (socket) for their internal installation and a platform for securing the cover. The simplest option involves a gap between the tiles in a row.
The socket box is walled up in it, and the entire space around is filled with plaster or alabaster to form a smooth platform. The color of such an insert should not differ from gypsum tiles.
Another option is more difficult to implement, when the nest is equipped under the tile. To do this, a hole is drilled in it along the diameter of the socket box. An electric drill, jigsaw and file are used. The platform can be formed in 2 ways. It can be deepened into the tile.
In this case, a square or rectangle is marked. Using a sharp knife, the plaster is cut along the markings, and then the material is carefully removed with a chisel to the desired depth. The surface is treated with sandpaper.
You can also make an external platform. It is formed after fixing the socket box. It is better to use a stencil that limits the size of the site. The space is filled with plaster (alabaster) using a spatula. The surface is leveled and polished.
How to properly connect an Internet socket, see the article Instructions for crimping an RJ-45 connector and connecting an Internet socket.
Possible errors and difficulties
The most important conditions for high-quality cladding: ensuring strength and appearance. After the glue dries, the tile may simply fall off the surface.
This problem can occur when the wall is not properly prepared or the foundation is not strong enough to support the heavy covering. Main reasons:
- Excessive porosity of the base. The glue “went” into the wall and did not fulfill its function. This error is explained by poor-quality impregnation of the base and the lack of a reliable primer layer.
- Increased humidity of the base or the presence of efflorescence on the surface. The wall must be well dried. Areas with mold, fungi and efflorescence must be treated with special compounds and plastered.
- Insufficient foundation strength. Typically, difficulties arise when facing partitions made of plywood or plasterboard. Before laying the tiles, you must make sure that the base can support their weight. If necessary, reinforcement is carried out.
The appearance of the cladding depends on the correct installation of each element, the horizontality of the rows and the uniformity of the seams. To ensure correct installation, it is important to ensure accurate markings and draw horizontal lines that serve as a guide for forming rows.
If the tile lies unevenly or has moved, it must be corrected within 10-15 minutes after installation.
Cross beacons (similar to those intended for tiles) installed in the corners of the tiles during installation can ensure the uniformity of the seams. It is important to promptly remove all glue drips from the tile surface.
Expenses
Cladding walls with gypsum tiles is quite an expensive undertaking. To estimate costs, you can give the cost of some products (per 1 sq.m):
- Monte Chiaro A465-10 - from 545 rubles;
- Ellinbrick A-320-70 - from 452 rubles;
- “Old brick” 32010I - from 528 rubles;
- white Loft - from 752 rubles;
- Brooklyn - from 800 rub.
In addition to the cost of the tile itself, you need to take into account the cost of glue. Its cost ranges from 20-40 rubles/kg, and consumption is 1.2-2 kg/sq.m. We should also not forget about the need to purchase primers, varnishes, grouts and paints.
How to save money
You can reduce the cost of finishing work by making gypsum tiles yourself. The cheapest and simplest option is “bricks” made of plasterboard. They are cut from pieces left over after building or renovating a house.
Each element is successively covered with putty, primer and plaster up to 10 mm thick. After hardening, such tiles can be used to imitate brickwork.
A more complex option is to pour a gypsum (alabaster)-based solution into a mold. The silicone mold can be purchased ready-made. You can make it yourself from silicone sealant, sculptural plasticine or paraffin.
The mixture is prepared from gypsum grade GF 10 (5 parts), coarse sand (1.5 parts) and water (2 parts). To increase plasticity, you can add a little PVA glue. The ingredients are thoroughly mixed and poured into the mold. You can remove the tiles after 30 minutes, but for complete hardening it takes 35-37 hours.
Tips and tricks
The use of a large cross maintains the same large distance during the process of laying tiles under a brick wall surface. Then the masonry looks natural.
The choice of grout is an important point. It is better not to use the usual options in such a case, since the imitation will turn out to be unreliable. You must use either cement mortar or a special adhesive for brick tiles.
Decorating the area of a fireplace or stove will require the use of hot-melt adhesive on a special basis. The applied solution should not exceed five millimeters. Otherwise, you will have to “eliminate” unnecessary protrusions of the solution.
Selection of adhesive mixture
Taking into account the area of the surface to be treated, the dimensions and color schemes of the tile material, adhesive compositions are selected for installation. Gypsum tiles can be fixed in several ways:
- dry mixtures based on gypsum and cement material. When choosing such a material, pay attention to its composition - cement should not be used for installing light-colored tiles without treatment with a varnish composition. It will absorb water, take a long time to dry, and may become deformed during work. I consider the gypsum base less dangerous, but the work requires certain skills. If you violate the technology, the tile material will get wet;
- liquid nail or sealant. It is allowed to stick tiles with such materials, but the installation process will be unreasonably delayed. Each tile element is additionally processed with sandpaper to create uneven surfaces to improve adhesion to the wall surface. In addition, after gluing, the tile is held by hand for two to three minutes;
- ready-made gypsum composition. Of all the known options, this option is the most suitable. The consistency of the glue resembles thick white sour cream, it must be applied with a spatula, setting occurs within a few seconds on any surface, complete drying is achieved after twenty-four hours. The cost of such glue is high, but the existing advantages completely justify it. In addition, seam areas can be sealed with it without using grout. Within ten to twenty minutes, the laid tiles can be easily adjusted in place.