Decorative plaster area of application
We are sure that it will not surprise anyone that decorative plaster is divided into two main groups, based on the area of application. Thus, a distinction is made between materials for external and internal finishing works. Some manufacturers, by the way, very rarely offer universal plasters suitable for street and home applications. All the options discussed above are suitable for indoor use.
Interior solutions based on them are usually abrasion-resistant. Manufacturers often allow them to be wet cleaned with detergents, sometimes using brushes. However, such compositions are not capable of withstanding harsh outdoor conditions.
Exterior decorative bark beetle plaster
Decorative plaster with the name “bark beetle” deservedly occupies the top steps of the podium in terms of quality and is one of the most popular types of facade finishing. Bark beetle plaster has different types and characteristics, it is a universal type, but is more often used for external facade work.
Based on its increased strength characteristics, bark beetle plaster is often used in apartment corridors or hallways, and also finds a place in the decoration of balconies and loggias. In service, hospital and office buildings, bark beetle plaster extends the service life of decorated surfaces.
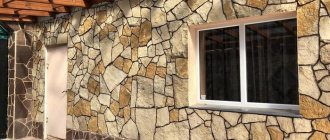
Decorative plasters for exterior use are produced with the coarsest structure, containing additives and additives that increase resistance to ultraviolet radiation and negative climatic influences. In the group of materials “external plasters” you can find special ones - stone mixtures, which are small fractions of natural stone chips in the binding component.
Decorative stone-type plaster is applied with a regular spatula, then smeared with a grater. You should not abuse such beauty by using it on façade and fence structures when creating reliefs facing the roadway. The fact is that dust gets trapped under the stones and the presentable appearance is lost, and it will not be easy to wash such a façade.
Disadvantages of decorative plaster
Each known material used for interior decoration has certain disadvantages. For decorative plaster, this list includes the following aspects:
- The high cost of decorative plaster, which often limits the choice of buyers.
- The finished coating is quite difficult to dismantle. For this purpose, you will need strength, money and time.
- Not all types of decorative plaster can be applied perfectly with your own hands.
- A number of conditions are required to prepare the underlying surface. The walls must be clean, thoroughly free of dirt, remnants of old coatings, and construction dust.
Failure to comply with any of the requirements can lead to distortion of color and pattern (especially for Venetian plaster), the formation of unevenness and gross defects, and peeling of part of the decorative layer.
Varieties
It contains additives of different colors, and after application they begin to appear in the form of inclusions, creating unique abstract designs and stains. Artistic plaster of walls may be different.
For example, after applying it to the surface of the walls, a certain texture appears, which will visually resemble one of the cladding materials. There is a type of finish that will form a relief, and each time it will be special, which will greatly depend on the method of application. His version of flock. Thanks to such wall decoration, any room will look very original.
Flock is a type of decorative building mixture that contains small particles (for example, flakes). They can be different, and also have an uneven shape (in the form of petals or stars). This type of finishing helps to give the room a special style, and also makes it possible to hide wall irregularities. The next type of decorative plaster is textured, and thanks to it, a relief pattern is possible on the walls. You can achieve the ideal effect and unusual pattern in this case when you plan to apply this mixture in several layers. The interior with this type of plaster looks special. The texture of this plaster can be glossy or matte.
Venetian plaster is incredibly popular due to the fact that once it is applied to the walls, it creates an unusual texture. It strongly resembles marble with unusual patterns. This type of building mixture has a predominantly glossy surface texture, because after the plaster has dried, it must be coated with a specialized varnish composition.
The advantage of each type of plaster material for finishing is that it is very durable. Moreover, it perfectly withstands temperature changes and is safe for use in any room (even for children). The artistic type of plaster will retain its rich colors for a long time and can be easily applied to all types of walls. You can even use it for exterior home decoration.
Types of coatings by type of material
Manufacturers of construction and finishing materials are constantly updating their range, taking into account consumer requests. In the catalogs of goods available for purchase you can find the following types of decorative coatings:
- Mineral-based compositions.
- Acrylic compositions.
- Silicone compounds.
Silicate-based compounds are no less popular. Each known type of decorative plaster has a specific area of application, a number of features and practical advantages.
Mineral finishing compounds
The main component for such materials is cement. You can purchase plaster in the form of a dry mixture, from which the working mass is mixed immediately before applying the composition to the walls. The finished mass is painted only white, and therefore is more often used for classic interior styles.
You can diversify the decor of the room with the help of modern new products on the finishing materials market - this is cement plaster with stone chips. The presence of natural stone allows you to get a gray color for wall decoration with a beautiful glossy shine.
Work principles
When using decorative, structural plaster painted in color (the color is selected separately and mixed when added to the material), you will need to form a thin base sublayer. Layer options can be from smooth to textured, rolled with a pile roller. The sublayer is allowed to dry for up to 24 hours, depending on the composition. Afterwards, a second layer with the same color or half a tone lighter/darker is applied to the dry base. This is how we create relief options. The following additional work is possible:
- Immediately upon completion of formation. Without waiting for the plaster to dry, the protruding formations are slightly smoothed out with a stainless or plastic spatula.
- In the second case, you need to wait until the sublayer has completely dried. Then go over it with sandpaper, comparing some areas of the relief.
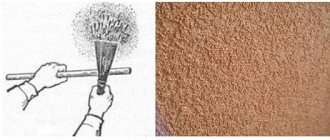
When working with textured plaster, one layer is usually enough. At the same time, without allowing the surface to dry, the grout forms the necessary relief. A prominent representative is bark beetle plaster. This material has become widespread. Usually, using bark beetles, plaster produces approximately the same options, with a horizontal pattern, differing only in color. The video clearly shows this:
Acrylic-based compositions
All acrylic types of plaster include a number of natural and synthetic polymers in their basic composition. The presence of polymer resins gives the coating proper elasticity, resistance to shrinkage and the formation of cracks in the finished coating.
Note!
Laying quartz vinyl tiles with your own hands step by step: instructions, subtleties, methods, features, installation, “Click-Drop”
Suspended ceiling Armstrong (125 photos): device, plate sizes, types, installation, calculation and installation
Textured paint for walls: types, how to apply it yourself, instructions, composition, varieties, photos of new designs
Another advantage is the huge variety of colors of decorative plaster, obtained by adding coloring pigments.
However, when purchasing acrylic materials, you should be aware of the high risk of fire of the composition.
Decorative plaster - application technique
There are a huge number of options for layering decorative plaster and further decoration, including an endless number of details, features and shades. Probably only textured plaster offers the possibility of simple execution. They applied a layer with a spatula, alternately changed the direction of movements in different directions, created grooves of different depths, added color and - it’s all in the making.
Of course, this is a common method and no one bothers you to experiment with depth and volume. The situation is completely different when you are dealing with structural plaster. The picture from almost the same actions leads to a more impressive effect and the reason for this is the most flexible compositions.
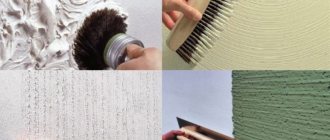
A set of “tools” for creating a decorative effect
The tools for creating a design using decorative plaster can sometimes be the simplest household materials that come to hand. The devices and mechanisms required are simple and ordinary. As a rule, these are metal trowels and graters. With their help, not only the composition is uniformly layered, but also geometric and chaotic patterns are formed.
In addition, the following may be useful for the creative process:
- Plastic and even foam floats - with their help it is easy to level and smooth a freshly formed and excessively protruding bas-relief.
- Fine-grained sandpaper will help level the surface after it has completely dried.
- Often, ordinary foam sponges for washing dishes are used.
Each time you use different tools, you can get completely different effects and results. For example, foam rubber is so multifunctional that it can create completely different surfaces. With its help, waves and protruding needles are created - if you apply a sponge and tear it off sharply. Sometimes a sponge or a twisted rag is used to form fabulous and non-existent flower buds - you just need to turn the foam 180°) in a word, there are no limits to your imagination.
Cellophane films and bags.
The versatility of the tool is off the charts. If you spread a thin, food-grade plastic film on a layer of decorative plaster that has not dried, you can form the most unpredictable relief with your hands. By surrendering to the will of your imagination, you are able to create any abstraction. When you have had enough fun and your relief is finished, leave the composition to dry along with the film; after drying, carefully remove the film and lightly sand it with fine sandpaper. The film can be removed before it dries, but we will get a different pattern.
If you want to get a chaotic pattern of a non-uniform nature, just wrap a crumpled number of newsprint in film. You will get a simple and effective tool for applying circular motions, quick pokes, long waves, line strokes, comets of various scales and the tails of unprecedented animals. Finally, by simply rolling the cellophane into a single ball, you can simply poke it into the decorative plaster and, as a result, get a Mars or lunar surface.
Rollers and decorative plaster
Light industry offers a wide range of foam or fur rollers; in addition, there are special rollers with embossing to give the walls a specific pattern. Often rollers are used to form a basic relief, the surface of which is subsequently decorated with bright and pronounced strokes. The external shade of the “basic” relief depends proportionally on the size and hardness of the pile. For example, rolling a foam tool gives the effect of small protrusions and depressions. Rolling long pile will provide clearly defined and noticeable differences.
Rubber gloves and decorative plaster
You can sculpt the craziest patterns and pretzels, the only catch is to repeat a similar pattern on the entire surface of the wall. A wide variety of brushes are available to help rubber gloves. By using brushes in finishing, you can additionally obtain a variety of stripes and wave curves, adding a unique appearance.
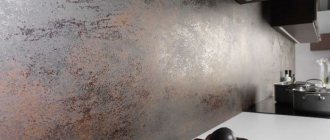
Silicone coatings in the interior
The use of silicone resins in the manufacture of decorative plaster for interior wall decoration has proven to be a very successful solution.
Silicone gives the surface the necessary resistance to moisture, excellent elasticity and ensures reliable adhesion of the material to the underlying surface. However, in practice, masters have to deal with some disadvantages:
- High price.
- High consumption of composition.
- The need to additionally purchase a special silicone-based primer.
This type of decorative plaster is used to decorate walls in the hallway, in the bathroom or on the summer terrace. The unique composition prevents the adhesion of dirt, precipitation, and dust.
Note!
Choosing a heated floor: water, infrared, film, rod, cable, resistive, self-regulating, pros and cons + instructions
Kitchen renovation in Khrushchev (155 real photos): new designs, layout options, furniture placement and zoning of a small kitchen
How to update the tiles in the bathroom without changing them or removing them: step-by-step instructions, stickers, painting, decor (140 photos)
Decorative plaster surface preparation
Each type of decorative plaster will require an appropriate level of base preparation. One of the main conditions for preparation is to select all areas that may later fall off. The base must be strong, dry, clean and necessarily treated with a primer composition. Special primers create a rough surface and increase adhesion (adhesion improves the bonding properties of materials). Once you are sure that your surface is not crumbling, get to work.
Preparing walls for relief plaster (structural and textured)
Relief plaster does not require careful leveling of walls, ceilings or other areas. A sufficient indicator of high-quality training will be the absence of differences in whiter than 9 millimeters. Decorative relief plaster is applied in a thick layer - up to 1 cm, so the master will smooth out the “flaws” of the preparation. However, you should avoid “long-lasting” unevenness, and remember that relief plaster is not a cheap pleasure. It is better to level large areas of depressions with inexpensive compounds.
Next, all the dust is swept away with a brush or broom, after which, without fail, the surface should be treated with a primer. Do not neglect this stage under any circumstances. The primer will not only bind remaining dust and increase adhesion, but will also act as an antiseptic, protecting your walls from mold and fungi. After the wall has dried, you can begin to form the relief using decorative plaster.
Structural plaster is usually applied and leveled in two layers successively. The first “starting” layer is laid evenly and serves as a base to level the surface. Its thickness depends on the components and binders and is indicated by the manufacturer on the packaging. After complete drying, we go over the base layer again with a primer. The second layer serves to form the relief and through manipulation the master creates a unique structure.
There are so-called “single-layer” plasters; when forming a relief with their help, a base layer is not required. In this case, the manufacturer allows an increase in the layer thickness during operation. You should not decide on your own to increase the thickness, as this is fraught with further cracking when drying.
Preparing walls for Venetian plaster
Venetian plaster implies a smooth surface with minimal differences. Accordingly, this group of plaster will require a perfectly evenly prepared wall. Perhaps a little less smooth than before painting, but almost the same. The prepared surface allows differences of no more than 1-3 mm per square meter.
The technological chain of actions is quite standard - first a leveling layer of plaster with a recessed painting mesh. Next, wait 24 hours until it dries completely and apply the finishing layer of putty. Once this “pie” dries, we apply a generous amount of primer over it. The process of applying Venetian plaster is shown in the video review:
Silicate-based coatings
This coating is used for finishing exclusively external walls and surfaces, due to the presence of “liquid” glass and a number of other harmful impurities in the composition.
Silicate coatings can be found on sale in finished form. But it should be remembered that the applied coating dries very quickly, and therefore it is necessary to work with the proper amount of skill.
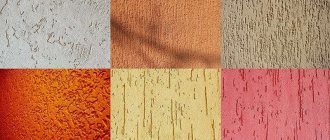
Types of decorative plaster according to filler
In different decorative materials, not only the qualitative composition, but also the texture of the finished surface can vary dramatically. There are the following types of artistic wall plaster:
- Textured mixture for application. Allows you to get a beautiful relief with imitation of various surfaces. The visual effect is achieved by using admixtures: chips from natural stone, natural minerals. An original type of material is wet decorative plaster, which is distinguished by a seamless application method, a beautiful pearlescent sheen, and a long service life.
- Structural mixture for interior decoration. Decorative plaster is applied using special tools (stamps, stencils, sponges, trowels). Rollers for decorative plaster with various patterns, ornaments, and figures can be purchased in advance, along with the base mixtures. The resulting pattern is not subject to abrasion, thinning or shedding due to the special strength of the finished coating.
As part of modern design trends, Venetian compositions are often used; the depth of color and ornament can be assessed in the photo of decorative plaster.
The mixtures are multi-layer coatings with a unique pattern and minimal consumption of finishing material.
Note!
Do-it-yourself Venetian plaster walls: types, application instructions, photos of beautiful wall decoration, colors
How to unclog a toilet if it’s clogged: step-by-step instructions, a review of the most effective methods for removing a blockage with your own hands
Decorating the inside of a balcony: types of materials, design photos, review of the best ideas for interior decoration
Cost of application work per sq.m.
Our salon presents samples of decorative plaster of hundreds of textures and shades, including in large formats - so you can easily choose your decor option. But buying plaster for walls is only half the battle; it is important to apply it efficiently and artistically. The application work consists of several stages - preparation of the base, application of the base, finishing and protective layers. This process can take up to a week or more (depending on the area of the room), since the quality of the final decorative coating directly depends on the drying time between layers.
The price for applying decorative plaster per m2 is indicated on the page of each design effect to the right of the texture image. It depends on the degree of readiness of your walls, the chosen application technique and the type of materials used (for example, the composition of the binders - natural or acrylic).
Some types of textures require particularly careful alignment of the walls and more layers to be applied - in this case, the final price per m2 will be higher. In general, the price range for application work is from 700 to 1,600 rubles. per sq. meter. An accurate estimate can be made after inspecting the walls at the site.
Instructions for applying plaster
Having prepared the necessary tools (rollers, spatulas with different shapes of the working part, metal graters, containers for mixing working compositions), you can proceed directly to the finishing work. Instructions on how to apply decorative plaster with your own hands:
- The walls are thoroughly cleaned of old coating.
- The cracks must be sealed and the protrusions chipped off with a chisel.
- The surface of the walls is treated with various types of primer, the composition of which depends on the type of plaster used (silicone or Venetian).
- The working mass is prepared according to the attached instructions in a separate container. The mass is thoroughly stirred so that the non-coloring pigments are evenly distributed throughout the coating.
- Apply the plaster to the wall surface in small portions, carefully leveling the stylish coating.
For structural material, special rollers must be used, which significantly facilitate the work of the master and create a beautiful relief, stencil design, or original print on the walls.
The next step is to use a damp trowel to follow the contours of the main design. The final stage of finishing work is carried out after the plaster has completely dried. The surface of the wall is sanded with sandpaper to get rid of defects and irregularities.
How to apply decorative plaster
As we already know, plaster mixtures can be dry, which must first be diluted with water to the required consistency, or ready-made, sold in buckets. You can choose any of them, it is only important to follow the instructions and observe the time intervals for applying the material.
1. Preparation. Decorative plaster must be applied to a flat surface, and therefore, before working with such material, the wall must be treated with a primer (for better adhesion), and then leveled with a sand-cement mixture.
Important! Most plasters do not require perfect wall alignment. Such preparation is necessary only for applying the “Venetian”.
2. Application of the base material. This is a key step which you can read about in our individual articles below.
3. Preparation for coloring. In most cases, after applying the plaster, it is necessary to apply paint to its surface. But before this, the wall must be sanded and even polished. To do this, you need to process the plaster with sandpaper, starting with coarse sandpaper and ending with finishing sandpaper.
4. Coloring. Plaster can be painted in two ways. If paint is applied to a surface, a roller or paint brush is used to carry out this process. As an alternative, you can add color to the prepared mixture, which will give the plaster a certain color. In this case, after application, the wall does not need to be painted, just sanded.
5. Finishing. Most plasters do not require finishing. But there is, for example, the Venetian, for which this is one of the most important stages. Such a surface must be coated with varnish or wax, which will give the material the necessary expressiveness and depth of design.