Methods for creating decorative relief
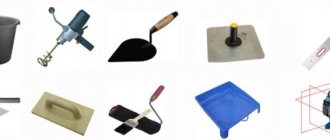
The method of applying structural plaster depends on its type and the desired effect. To work you will need the following equipment:
- tank for diluting the mixture;
- trowel, trowel, scraper;
- spatulas of different types;
- brushes, rollers, brushes, combs;
- mixer.
Please note: regardless of the type of plaster applied, the surface underneath must first be cleaned, leveled and primed.
Instructions on how to apply “bark beetle”, structural plaster with your own hands - video:
https://youtube.com/watch?v=KhGsjhz_i-M
Spray method
Plaster is applied using a broom and stick. They hold a broom in one hand and a stick in the other. The tip of the broom is dipped into the solution, and then it is hit on the stick so that the splashes hit the wall. Spraying is done in 2 layers.
An example of how to make a “fur coat” structure with an ordinary broom
Creating relief with a trowel
First, a continuous base layer of plaster is applied to the entire surface. When it dries, begin to apply the second layer, immediately forming patterns by moving the trowel in different directions. An example of how to apply structural plaster in the video:
Creating structure with a brush
A metal brush is brushed over the freshly applied layer of plaster, forming thin chaotic lines. When the coating is dry, remove small particles from it with a soft brush.
this structure is also called “bouffant”.
A simple technique for creating a “bouffant” relief - do-it-yourself structural plaster, photo
Stamping using a roller
Another way to get an interesting structure is to use a relief roller. It can be sold with a ready-made pattern, or you can create the texture yourself.
Idea: if you wrap a roller with thick threads, when applied, the plaster will imitate grass stems.
Technology of structural plaster relief “grass” using a roller:
https://youtube.com/watch?v=5x13yW9lvPM
There are many ways to apply relief. Would you like to learn more about how structural plaster is applied? Video tutorials will help you with this:
Making your own mixture
If you don’t want to spend money on a finished product, you can make structural plaster for interior work with your own hands.
To prepare a composition with a pronounced structure, prepare the following materials:
- 6 kilograms of dry putty;
- 2 liters of water;
- 0.2 kg of glue-plasticizer;
- fillers (to choose from - pebbles of different shapes and sizes, broken glass, foil, sand, parts of tree bark, beads, etc.).
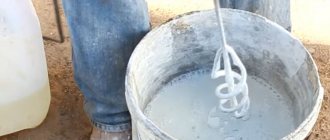
To prepare the material with your own hands, you need to take a large plastic container and mix dry putty with water in it using a construction mixer. Then add glue and filler there and mix everything well.
If you have no experience working with decorative plaster, it is better to try the prepared composition on one wall in a small room, for example, a small pantry or corridor. If the coating does not look as expected the first time, clean the wall and reapply the layer.
Peculiarities
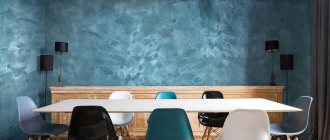
Relief structural plaster is a universal finishing material, because, thanks to the variety of possible design solutions, it will fit into almost any interior style. The properties of plaster are such that it is suitable both for residential premises and for finishing walls in the bathroom, kitchen and for cladding the facades of buildings.
A distinctive feature of structural plaster is that it can be applied to any wall base. It can be drywall, concrete, brick, wood or metal, the main thing is to choose the right composition of the finishing material, or rather the type of binder.
To apply relief plaster, you do not need to carefully prepare the base, since, thanks to its structure, it perfectly masks small defects.
The advantages include:
- waterproof;
- easy to maintain, can be washed with water or any detergent, except solvents;
- tolerates temperature changes well;
- plastic material that allows you to create various decorative effects;
- high vapor permeability due to microporosity;
- durability;
- relatively low cost.
The only downside to this type of wall covering is the difficulty of dismantling. If you decide to change the finish, it will not be easy to remove the decorative plaster, after which you will need to restore and level the wall surface.
DARK COLORS OF FACADE PLASTER
The exterior of the house in dark colors is a universal solution if you do not plan to experiment with color or use too light shades. For example, brown looks great with a red, blue, white, black roof. The same goes for other dark palettes. Each individual color has its own dark tones, which in almost 100% of cases look good against the background of the building. This is because calm and rich shades visually attract the eye and give a feeling of calm.
Brown colors of decorative bark beetle plaster
The color brown is associated with homeliness, warmth, nobility and stability. For this reason, many owners subconsciously choose brown as the basis for the future facade. In modern times, a wide variety of brown palettes are available for sale:
- Green-brown. The presence of a greenish tint allows you to apply color in areas where classic brown is not appropriate. For example, eco style and classic.
- Clay-brown. A subsection of earth tones that look very natural and blend well with the natural landscape.
- Walnut. A classic format that can be found in the style of country houses.
- Copper brown is a richer color than walnut. It is distinguished by the presence of a reddish tint.
- Red-brown. A rich, noble shade is an alternative to the fashionable color Marsala.
- Chocolate is an attractive color that is often associated with coffee.
- Cinnamon is the purest shade of brown, which is the standard.
- Chestnut - black-brown shade is characterized by increased saturation.
Coffee color – decorative plaster with brown flowers
Painting plaster coffee has a number of advantages:
- A great alternative between brown and light shade. Coffee is available in light and dark shades, which were created based on the coffee drink and its recipe. For example, coffee with added milk takes on a creamy chocolate hue, while pure black coffee turns dark brown.
- A façade of this format looks very self-sufficient and high-status. Shades of wood fill the design of the house with solidity, comfort, and security.
- A win-win solution in combination with a roof in all brown and dark shades.
Dark red color – decorative plaster of bright color
Do you love the color red, but don't want to decorate the façade with a more restrained design? Then you should pay attention to the dark red palette.
For true connoisseurs, designers recommend paying attention to the following shades:
- Bosa Nova. The calmest shade, close to brown. Woody notes evoke a feeling of stability and privacy, which is important for both interior and exterior decoration of a home.
- Hot Lava - bright, ardent, heated. The name speaks for itself. A façade in this style is popular in Scandinavian countries.
- Pompeii - often compared to cherry. It looks very juicy and attractive.
- Chilli. A rich cherry shade that will highlight the facade of the house against the background of the surrounding space.
- Red tango. Passionate, romantic, confident - these words can describe the color of tango, which originates from Spain.
- Rumba or Marsala. Noble, moderate, calm color, vaguely close to purple.
Dark green color is the classic color of plaster in the photo of facades
Decorating the façade of a house in dark green is predominantly found in the loft, minimalism, and Scandinavian style. Some may consider such a choice gloomy and inexpressive, but true connoisseurs know that this is a choice towards tranquility, solitude with nature and well-being.
All directions towards coniferous, deciduous, and marine are actively used in the design of the facades of country cottages, as well as houses in residential areas. Often plaster in these colors is combined with stonework or wood panels.
Therefore, choosing dark green allows you to choose several design technologies at once.
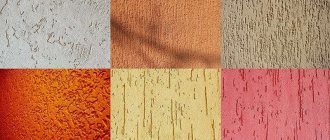
Terracotta color – decorative plaster on the facade in dark colors
Terracotta has a variety of shades - brick, orange, reddish, pale. This color combines notes of brown, orange, and red. Its versatility makes it popular in architecture. Terracotta combines especially stylishly with a dark roof or dark window frames or front door.
This color looks harmonious with dark and light shades of masonry, as well as wood panels or siding.
Application methods and tools
Structural plasters are applied to a clean, dry surface. The thickness of the layer is selected individually, from 2 to 20 mm, depending on the quality of the base and the granularity of the solution. For a thick finishing layer, for example on facades, small unevenness and cracks do not need to be straightened. Structural plaster technology requires mandatory priming of surfaces; a deep penetration mixture is recommended.
Important: If the structural plaster is tinted before application, then it is necessary to prepare the base. Usually these are 2 layers of opaque gray primer or the color of the mixture.
Tools and techniques for applying structural plaster
We have already described above how the texture of a fur coat is made. Let's consider other popular ways to create a beautiful relief surface.
To achieve the Traventino texture, the mixture is applied with a stainless steel trowel. The first layer is even and smooth. After drying, apply the second layer in small, skipped strokes. After 15 minutes, the cakes are leveled and, as it were, pulled out with a trowel. Watch the lesson on how to properly smooth out structural plaster; the video explains all the nuances of creating a pattern to look like natural stone. For greater naturalness, grooves can be made using the template to imitate masonry.
To create a bark beetle structure, plaster is applied in an even layer, with a thickness equal to the grain size of the inclusions. Without allowing the layer to dry, we treat the coating with a circular motion with a trowel.
With this technique, grains are drawn behind the instrument, forming characteristic grooves.
Rain drawing is best done with a medium-grain solution. The mixture is applied in neat strips diagonally, each layer slightly overlapping the previous one. When the solution has set, the coating is also leveled diagonally with a trowel and rubbed until grooves are formed.
The process of applying plaster with the “Rain” effect
To achieve other decorative effects, you should be creative, for example, leveling the mortar with a trowel vertically, horizontally, or in checkerboard strokes.
We will separately tell you about the possibilities of structural plaster when applying designs using improvised materials, rollers, brushes and even your hands. Here the imagination is not limited in any way, but for such work it is better to use thin and fine-grained, almost homogeneous solutions.
https://youtube.com/watch?v=RecbA_0O7lM
The principle of a textured coating is simple: first, a base, even layer of plaster is made, and the selected pattern is drawn on it using tools:
- A brush with stiff bristles – furrows, imitation of a woven surface, folds of fabric, waves.
- A roller with a medium coat helps create the texture of the rock.
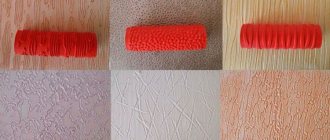
- A structural roller for decorative plaster can have any pattern, from floral to abstract; the variety is so great that the choice depends only on your preferences. In order not to buy a tool in a store, you can wrap a rope, polyethylene, or fabric around a regular roller.
- Sponges, crumpled paper, polyurethane stamps, stencils are a great opportunity to create your own individual pattern on structural plaster.
Good to know: To obtain a coating with a silk plaster effect, the instructions require the use of thin solutions; after application and drying, the surface must be thoroughly sanded and ironed.
We offer you several original ways to make structural plaster; video lessons will push you to creativity and teach you simple, but effective and beautiful decorating techniques.
After the solution has dried, the surface must be sanded, if necessary, painted and covered with a protective layer. For glazing, wax or water-based acrylic varnish is usually used, in 2 layers.
Types of decorative plaster
• Conventionally, the following types of decorative plaster can be distinguished: • Structural; • Textured; • Venetian; • Decorative plaster for exterior decoration of building walls.
Structural decorative plaster
This type of decorative plaster is characterized by the presence of elements in the plaster mixture that add volume and unevenness. Such elements can be: • Stone chips; • Glass chips; • Metal shavings; • Polymer volumetric elements of various sizes.
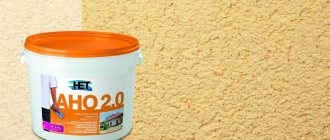
When applied, such decorative plaster is characterized by a minimum number of operations and construction tools required for work. You can purchase ready-made structural plaster at a construction hypermarket or prepare it yourself with your own hands.
Textured decorative plaster
The composition of the mixture for preparation can be homogeneous or include structural components. Unlike structural decorative plaster, the texture is created not by the color and size of the structural components, but as a result of the use of various tools used in the application process.
The work of creating the required texture is more difficult than applying a layer of structural plaster and requires certain skills in plastering and painting. But, thanks to the high plasticity of plaster mixtures during the work process, it is quite easy to correct flaws and shortcomings by applying a second or third layer of plaster or subsequent painting, masking deficiencies in the application of plaster.
Venetian plaster
The most highly decorative type of plaster, allowing you to imitate the texture of natural stone (marble). Create interiors with phosphorescent, pearlescent, artificially “aged” surfaces.
The technique of applying Venetian plaster is the most complex. It is not worth doing important work with your own hands without sufficient experience. To master the technique of applying decorative plaster, you should practice on simpler options - structural or textured decorative plaster.
Decorative plaster for exterior wall decoration
In terms of its composition and application technique, it has the same characteristics as the decorative plasters discussed above for interior decoration.
It is distinguished from the former by a composition with increased moisture resistance, resistance to temperature changes, and resistance to fading under the influence of sunlight. This type of plaster is characterized by a rough (coarse-grained) structure, which requires great physical effort during manual application and the use of special construction tools to create a more voluminous texture that will be clearly visible on the facade of the building.
Structural compositions
Despite the different names, the composition of this type of decorative plaster remains virtually unchanged. It can be based on gypsum, cement, lime or combinations thereof. The filler can be yellow river sand, flour or crumbs from various types of natural stones, for example, marble, granite, quartz and so on. Optionally, polymer additives are added to the mixture to increase viscosity, antiseptic and moisture-resistant components.
The structure of the surface after drying directly depends on the type, quality and fraction of the filler. For example, the most common structural bark beetle plaster may contain grains with a diameter of 1.5 to 5 mm. Several dispersed materials with different sizes are added to the “lamb” mixture.
Structural plaster
Making your own gypsum plaster
Gypsum decorative plaster is used most often. It dries quickly, is easy to apply and level. There are two main options for its preparation:
- Simple. It consists of dry gypsum flour and lime dough. These materials are mixed in proportions 1:3, and then diluted with water. The liquid must be poured gradually until the consistency of the solution resembles thick sour cream. At the end, color is added if necessary.
- With the addition of silicate material. The basis of the material is the same as in the first option, but liquid glass is additionally added. First, mix the basic materials in proportions of 1:3.5, then add silicate (about 5% of the mixture weight) and dilute with water.
In order for gypsum plaster to be plastic, all proportions must be strictly observed.
Gypsum mixtures are suitable for finishing work only in dry rooms; you can decorate both walls and ceilings.
Cement-sand mixture
A cheaper and more durable material is cement-sand mortar. To prepare it, cement, sand and slaked lime are mixed in proportions 1:2:1, after which silicate material is added (5% of the total mass). At the end the mixture is diluted with water. The consistency should be such that it is convenient to scoop the material onto a spatula, but not too liquid, it should not drain from the surface.
The cement-sand mixture is quite easy to prepare yourself.
The very last step in preparing structural plasters is the addition of stone chips. Let us remind you that its content should not exceed 70%.
If the question arises of how to make decorative plaster quickly and inexpensively, then the easiest option would be to purchase a ready-made mixture, without natural stone additives, and a separate filler. Even if a ready-made mixture is purchased, the cost will still be lower than a structural composition with filler already included in it. To prepare a mixture of such components, you just need to add flour or crumbs to the mixture and dilute it with water.
Relief paintings from plaster and bas-reliefs in a modern interior
With the help of structural plaster for walls, more complex finishing options are created, using it to create relief paintings. This finishing method is one of the most complex and requires not only construction skills, but also the talent of an artist. Using the plasticity of the plaster mortar, pictures with many different elements are painted on the surface to be finished. Compositions that use separately created molded volumetric elements look very interesting, giving the composition a special flavor.
The originality of such bas-reliefs is given not only by the texture of the plaster, but also by the coloring. With a monochrome solution, various shades and halftones are used, making the bas-relief image more saturated. Using 2-3 colors for decoration makes the composition more interesting, and multi-color design allows you to create real masterpieces of interior decoration. Of course, the technique of execution is quite complex, but the effort expended is justified by the result achieved.
What is Venetian plaster, what is its feature?
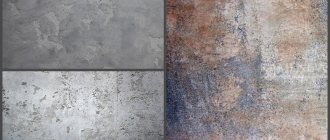
Venetian plaster always stands out as a special caste of mixtures, despite the wide variety of materials. Production is carried out using marble dust, stone chips and other minerals. This helps to create a special type of coating that replicates the stone wall.
In the photo: fresh Venetian plaster finishing
The main component of Venetian plaster is marble dust (small chips of marble). It is this that gives the surface evenness and smoothness. A picture of a real marble wall is visually created. There is a type of plaster - Moroccan plaster mixture. The materials and components do not differ from the Venetian one, but one layer is not enough:
- The first layer is plain;
- The second contains gold plating;
- The third layer repeats the first.
The visual impression is a marble surface with a golden tint.
Types of coatings with pronounced relief
Structural plaster is a heterogeneous composition of a granular nature, containing various fillers (quartz sand, mica, stone chips, wood fibers). It is used to give the surface a decorative appearance.
Thanks to various technologies for applying structural coating, it looks harmonious in the interior of any room.
The plaster mass is made on the basis of a cement-lime composition, synthetic components, and silicates. In appearance, the structural coating is a white plastic mass. The mixture is applied to the walls in a layer of a certain thickness, and then processed with special tools until the required pattern is formed.
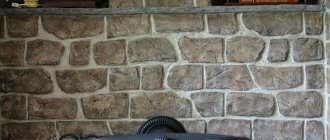
Examples of wall relief - different mortar application technologies
Structural plaster for facades is a moisture- and weather-resistant coating, resistant to abrasion, designed specifically for decorating the external walls of a building and basement. It is made on the basis of dispersion, silicone resins, silicates, or mineral additives. The coating can be applied to brick, aerated concrete, concrete, plaster using a brush, spatula, or roller. Its varieties are mineral plaster, “bark beetle”, “crocodile”, “lamb”.
high-quality structural plaster for external use retains its decorative and protective properties for up to 10 years.
Decorative structural plaster for exterior decoration of a building does not fade, and the color of the coating can be changed over time
Structural plaster for interior work is a thin-layer coating that is applied to brick, concrete, wooden walls, and drywall. It allows the walls to “breathe”, can be cleaned and washed, and is easy to maintain.
Modern decorative mixtures can imitate almost any coating, from tree bark to snakeskin, silk linen, torn stone, marble (Venetian). More information about how to apply silk plaster - instructions:
https://youtube.com/watch?v=IbrcMqCGbpM
Making your own solution
The mixture, which can be used to decorate walls and ceilings, is sold ready-made, or you can prepare it yourself. How is structural plaster made?
At home, you can prepare your own mixture for textured finishing from simple building materials. To do this you need:
- 6 kg of dry putty;
- 200 g glue;
- 2 liters of water.
First, mix putty and water. Then glue is poured into the solution, mixed and applied to the surface. A pronounced surface texture will result from the addition of a certain fraction of filler to the mixture. To imitate sandstone, a grain of 0.3 mm is used; the pattern of wild stone is recreated using filler with a fraction of 1.5 mm. For bark beetle plaster, 2 mm grains are used, and to create the effect of tree bark - 3 mm.
Important: the ratio of filler to binder (gypsum, glue) is 3:1.
A simple way to create a relief using a structural roller for decorative plaster
Varnish
You can strengthen the plaster and complete the finishing using varnish. The surface becomes semi-matte or acquires a mirror shine. To treat rooms in an apartment, it is better to choose acrylic water-soluble compounds. Varnishes based on organic solvents are more suitable for façade parts of buildings. As a result, a coating is created that protects the plaster not only from mechanical damage, but also from moisture, including precipitation.
Immediately before use, glitter or dyes can be added to the varnish. Varnish compositions are usually applied using a brush, sponge, or foam roller to create a single-layer coating.
In order to protect decorative plaster, experts advise using varnish
Textured plasters
In this case, we are talking about a material that contains fine-grained fillers, so after drying a smooth surface is formed. The plaster received this name due to the fact that before setting, various relief patterns are applied to the surface using floats, half-graters, trowels, figured spatulas, brushes and rollers. The advantage of textured plasters over structural ones is that the master has the opportunity to implement his own design solutions. At the same time, structural materials are easier and faster to apply.
VIDEO:
Cooking recipes
For wet rooms and outdoor work, cement-based material is used. To a standard bag of cement (weight 50 kg) add 10 kg of ordinary tile adhesive. After this, 0.5 kg of Rotband plasticizer is added to the mixture. Lastly, add water and mix the mixture thoroughly.
For finishing surfaces inside dry rooms, the gypsum option is better suited. To do this, you will need 6 kg of dry ready-made plaster mixture based on gypsum, 200 g of PVA glue and 2 liters of water. The process of making textured plaster with your own hands is somewhat complicated and includes the following steps:
- First of all, 1.5 liters of water are poured into the dry mixture and mixed thoroughly until a homogeneous mass is formed.
- Then PVA glue is added to the remaining water and mixed as well.
- At the end, you need to make a homogeneous mass from the two mixtures, its consistency should resemble thick sour cream.
Making your own solution from gypsum plaster, PVA glue and water
Also, do-it-yourself decorative plaster is made on the basis of white Portland cement, grade no lower than 400. The most popular recipes for making 1 kg of such mixtures:
- 200 g of lime dough are mixed with 740 g of marble flour and 50 g of cement, at the end 10 g of manganese peroxide and a little water are added.
- 630 g of white sand, 150 g of crushed brick, 50 g of cement and 150 g of lime dough are mixed and 20 g of water are added.
- 180 g of marble flour, 600 g of lime sand, 80 g of cement and 120 g of lime dough are mixed and 20 g of water are added.
What you need to level walls for painting
Plastering for painting walls requires appropriate equipment, tools and materials.
Prepare in advance with a reserve:
- priming agents;
- dry plaster mixtures, individual components for mortar or ready-made compositions:
- starting and finishing putty;
- reinforcing mesh (if strengthening of the plaster layer is required), corners, serpyanka;
- lighthouse slats;
- masking tape.
painting tools
Prepare inventory:
- containers for preparing leveling solution;
- scaffolding or stepladder;
- portable lamp;
- film for covering furniture, floors and other open areas;
- personal protective equipment;
- clean rags;
- trash container.
Key tools that will come in handy:
- trowel;
- grater and grater;
- rollers;
- spatulas;
- brushes;
- roulette;
- level;
- rule;
- sandpaper;
- mixer;
- spray;
- sponge.
Types of plaster
Depending on the base used, structural plasters are divided into the following types:
Mineral
This is the inexpensive, most popular and accessible material. It is produced in dry form, is inexpensive, and is used sparingly. The mixture contains cement or lime. The mineral base of the plaster has excellent permeability and high thermal insulation qualities.
The coating can be applied to any surface. The composition necessarily contains components that prevent the erosion of lime. Surface facades finished with this composition can be easily washed.
Silicate
The silicate composition is highly durable. The main material is liquid potassium glass. This plaster is usually sold ready for use. It is quickly applied and dries, which requires special skill in the process of application and formation of texture. Silicate decorative plaster is valued for its excellent performance, environmental friendliness and good permeability.
Acrylic
The main component of such mixtures are acrylic mixtures. They are elastic and resistant to deformation. Facades decorated with an acrylic plaster layer are easy to clean. Such mixtures are chosen for finishing new buildings. The presence of plasticizers in acrylic plasters preserves the integrity of walls during inevitable shrinkage in new buildings.
Silicone
The basis of this plaster mixture is silicone
Durability is the most important advantage of the material. The silicone composition is odorless, does not fade in the sun and is resistant to temperature changes
All types of structural plaster are distinguished by high plasticity. They are easy to work with; no special knowledge or skills are required. As for choosing the right material, professional advice can help here. It all depends on the complexity of the planned work and your design preferences. Mineral-based and silicate mixtures are more suitable for finishing facades. They look attractive, perfectly insulate and strengthen walls.
Painting tools
Depending on the coloring technique, one or another set of tools is used. In most cases, you will need brushes of various sizes and shapes (flatted, brushed, long-haired). You also need rollers (the fur coat is selected depending on the type and depth of the relief). In addition, these tools may be useful:
- Spray gun - for treating large areas.
- Painting tape - to limit the area to be painted and protect adjacent areas from paint.
- Trays – for paints and other used compositions.
- Mixer – it’s more convenient to stir the paint when tinting.
- Foam sponges.
- Rags.
If the work is carried out indoors, a stepladder will be useful. To process the facade, it is worth preparing scaffolding. The implementation of more complex ideas requires the presence of stencils, as well as gauze.
The chosen tool also depends on the chosen technique for applying the paint layer.
Features of applying different types of decorative plaster
Each type of plaster requires the use of special tools and application methods, but preparatory work is mandatory for all.
Decorating walls with plaster yourself requires knowledge of how to work with the material.
Preparatory stage
Plastering walls with any type of mixture begins from this stage. To carry it out you will need the following tools and materials:
- sandpaper or sanding machine;
- narrow and wide spatulas;
- paint brush;
- plastic film and masking tape;
- putty and primer.
The first step is to clean the surface from traces of corrosion, paint or wallpaper residues, and also remove all fasteners. Treat the surface with a grinding machine or sandpaper, and then remove the resulting dust with a vacuum cleaner or simply brush it off the walls. Fill the resulting potholes and cracks with putty and wait until it dries.
VIDEO:
To apply decorative plaster, use a wide spatula onto which the solution is scooped. Then it is applied to the walls. Such plasters take a long time to dry, so you can take your time and treat the entire surface at a time. Applying a pattern will require approximately 1.5 mm of material layer, so the thickness of the entire layer should be about 3 mm
At this stage, it is important to achieve complete coverage of the surface with the solution.
Without waiting for the material to dry, proceed to the next stage. To carry it out you will need a brush, rollers of various types or a trowel. Thanks to the relief patterns and irregularities on the surface of this material, texture will appear on the plaster. Which tool to choose and how to use it is a personal matter for each master. The only rule is that you cannot push the solution deeper than 1.5 mm. Otherwise, after drying, the material will not gain strength and will peel off from the walls.
Creating texture on the surface using a brush
A day after completion of the work, the surface is primed, painted and waxed. You will be able to touch it in about 48 hours.
Application of Venetian plaster
Plaster such as “Venetian” is considered a false material that requires professionalism. But still, anyone can do it, the main thing is to follow the instructions below:
- The prepared solution is scooped onto a wide spatula and the surface is leveled with a regular trowel.
- Then they take a special tool - a Venetian trowel and treat the entire surface with it. You need to press the tool with medium force, and the movements should be chaotic.
- Using the same principle, the second and third layers are applied at intervals of 8-10 hours.
- After this, you need to carry out ironing. To do this, a Venetian trowel is pressed firmly against the surface to be treated and “passed” over the entire area until a metallic sheen appears (hence the name of the process).
- Finally, the wall is waxed and polished with a sanding machine with a soft wheel.
VIDEO:
To summarize, we can say that cosmetic repairs in an apartment or house may not cost that much. To do this, you need to try to do most of the processes yourself. Then the repairs made will bring a lot of positive emotions.
Photo gallery: decorative plaster in the interior (16 photos)
Pros and cons of finishing an apartment with plaster:
Plaster has many advantages:
- All types of plaster have a high threshold of strength and resistance to the external environment;
- Good compatibility with different bases (concrete, brick, aerated concrete walls);
- A high level of elasticity hides small cracks and other minor imperfections;
- Resistant to cracks during shrinkage deformations.
- Moisture resistant. Can be used in the bathroom and on the outside of the building, despite snow, rain and other influences.
- Suitable for any surface quality. Of course, serious problems with the walls are not taken into account. For prevention, it is better to prime the surface and then plaster it.
- Long lifespan. The coating will please the eye for many years; it does not need to be changed as often as wallpaper. But you must follow all the rules.
But there are also some disadvantages (they are much smaller than advantages) that must be taken into account:
- Expensive materials. But they last a long time and fully justify their price;
- This type of work cannot be performed by an ordinary person; a specialist is often required. However, if you really want to, you can do everything yourself - then you will need to be patient, look at the training materials, and purchase all the necessary materials and tools.