Nowadays, decorative plaster occupies a leading position among finishing materials. It gained its popularity due to its various effects, durability and reasonable price. A fairly popular method of decorative wall finishing is “rain” plaster, which became known quite a long time ago. In this article we will take a detailed look at the characteristics of rain plaster, methods of applying it and talk about the advantages of such a finish.
Plaster texture
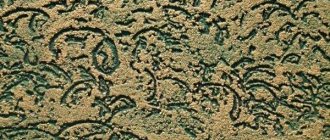
Thanks to a special technology, rain plaster imitates raindrops on the wall. These drops can flow both vertically and horizontally, allowing you to realize almost any design idea. Most often it uses an inclined position. To realize this effect, it is not necessary to purchase special solutions; you can use simple cement-based plaster. For further finishing, you can use gypsum putty. To decorate the walls of rooms with a high level of moisture: a bathroom, sauna or kitchen, we recommend using cement mortar; it will cope well with dampness and protect the coating.
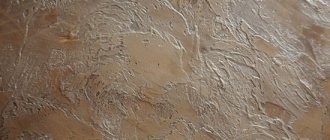
We strongly do not recommend using gypsum mixtures in places with high humidity; such finishing can very quickly become unusable. The result of applying rain plaster diagonally can be seen in the following photo.
Technology for creating rain using textured plaster
Another common way to create a rain pattern is to use textured plaster. The sequence of work must be strictly followed and consists of 4 stages. Among them:
Textured decorative plaster in the form of rain requires a smooth base, as for painting. To do this, you need to carry out high-quality putty on the surface. To obtain the required shade of plaster, the selected color is added to the solution. Then a thin layer of mortar is applied to the base using a trowel and carefully leveled. To obtain a thin layer, the solution is stretched over the wall over and over again, thus covering the maximum possible area.
Next, a second layer of textured rain plaster is applied. At this stage of the work, the required pattern is created using a brush, so it can be called decisive. Patterns are applied using vertical movements of the tool. It is necessary to ensure that the shade of the second layer is approximately a couple of tones lighter than the base layer. Important! Remember that the thickness of the mixture should be as convenient as possible for working with a brush. If the solution is too thick, then it is diluted with water, but we must not forget about the manufacturer’s recommendations.
Finish the work by grouting using a plastic trowel, using repeated movements from top to bottom. This procedure is repeated over the entire wall until the intended effect is achieved.
Source
Preparing for work
The first step is to prepare the wall. Decorative plaster is usually applied at the very end, when all finishing work has been completed, doors and windows have been installed, and the floor has been made. Preparing a wall for decorative plaster is practically no different from preparing for ordinary mortar.
First, you will need to remove the old coating from the wall: paint, wallpaper, putty. For these purposes, you can take a spatula, a paper clip, and we recommend pre-moistening the wallpaper with water. Try to clean the wall as best you can, otherwise the new plaster will peel off. Sometimes it can be quite difficult to remove paint from a wall. In case of any complications, we recommend using a grinding machine or a hair dryer.
Applying varnish
The painted rock and rain plaster is necessarily varnished at the final stage. This is necessary for a more saturated and vibrant color, as well as additional protection.
You will need:
- Varnish.
- Water.
- Wide brush.
- Paint bath.
The process consists of the following steps:
- Dilute the varnish with water in a ratio of approximately 1:1.
- Apply varnish to the surface with a brush.
- Let it dry a little and apply the next layer.
Important! To avoid smudges on the wall, squeeze the brush onto the edges of the paint bath.
After complete drying, you can glue the ceiling plinth to give the room a finished look.
Wall primer
After cleaning, the wall will definitely need to be treated with a primer. Before doing this, remove dust and other contaminants from the surface. The primer will not only increase the level of adhesion for subsequent application of plaster, but will also strengthen the base of the wall, which will prevent cracking of the material. The primer will also protect against the formation of mold and mildew. The drying time of the primer solution depends on its type and should be indicated in the instructions on the package. Under normal climatic conditions, the mixture dries in no more than a day.
If a room with a high level of moisture is to be treated, the wall will also need to be treated with a special antiseptic. It will prevent the harmful effects of dampness on the coating. If the concrete walls to be treated have cracks, we recommend filling them with putty to prevent further expansion.
Application technology
Using a trowel, or, as it is also called, a trowel, the prepared solution is used to treat the wall and level it until a thin, uniform layer is obtained.
The granules used to achieve the effect of rain reach 3 mm in dry size, so the thickness of the plaster should be approximately the same.
The solution is distributed from top to bottom, applying slight pressure. It is not possible to achieve perfect smoothness when applying “rain” plaster due to the presence of additives, however, this is not necessary at all. After completing this stage, you can begin applying the pattern using a trowel.
The basic principle of the technique is to smooth the plaster from top to bottom. In this case, the solution that will stick is removed with a spatula. After the entire surface has been treated in this way, it is given time to dry and then troweled again.
This time the changes in the texture will not be so noticeable, but the drawing begins to gain expressiveness. The resemblance to traces of rain on the walls is given to the plaster by the friction of the granules, which occurs when a float is passed over the surface. As a result, small depressions appear that look like raindrops flowing down the wall.
If decorative “rain” plaster will be applied in a room with a high level of humidity, it is recommended to treat the walls with an antiseptic before starting work - this will minimize the possibility of the appearance of pathogenic fungus and mold.
When the solution is applied, the plaster needs to be given a day to dry, after which you can begin the final finishing of the wall surface - painting. For this purpose it is better to use a roller. After a day (that’s how long it will take for the layer to dry), you should re-paint it. Often, pearlescent paint of the desired shade is used to obtain a decorative effect.
To remove excess mortar from the roller, it is recommended to periodically run it over an additional surface (this could be plywood, hardboard). In this case, the mixture is applied to the work surface without applying pressure. The second layer will also need a day to dry.
Leveling and grinding the surface
When all the preparatory work has been carried out, you will need to inspect the walls to find out how smooth they are. If the walls are crooked or have defects, we strongly recommend treating them with putty or plaster. This finishing will become the basis for further application of decorative plaster “in the rain.” When applying the solution, be sure to use a reinforcing mesh, which will help increase the strength of the coating.
It is necessary to pre-level the walls only if you plan to apply decorative plaster in a thin layer. If you plan to apply a thick layer or no special defects are found, there is no point in leveling the surface.
After leveling, you will need to sand the surface. Sandpaper is best suited for these purposes. Next, clean the wall again from dust and apply a second coat of primer.
Rain at an angle - difficult, but beautiful
Many people advise doing decorative rain plaster at an angle of 45 degrees. This coating should look more natural than the traditional version (vertical). However, this method of creating texture is not suitable for beginners due to its complexity. What is the reason?
Grouting at an angle is done in the same way as the traditional version, with the only exception that grouting is done at an angle and not vertically. This is the only difference, but it is very significant. The problem is that all the grooves created must be parallel for the coating to look good. In the case of the vertical method, it is not difficult to make parallel wiring, but to carry out the grouting in such a way as to work the float along the entire wall at the same angle is a difficult task.
The best way out of this situation is to draw the wall with a pencil. This way you can measure everything and draw parallel lines under the ruler, and they can all be at an angle of 45 degrees. However, in this case, you will have to apply the solution at an angle along these same lines. And then you will need to grout, using the solution applied at an angle as a guide. The method is a little complicated, but nothing could be simpler. So if you fundamentally do not like vertical rain, then you will have to adopt this method.
Marking for plaster
Before proceeding to the finishing of the wall, you will need to make a marking depending on the chosen location of the drops - vertically or at an angle. To get it right, draw a line from the ceiling to the floor at approximately three strokes intervals. With the width of the iron being eighteen centimeters, the pitch of the stripes should be a little more than fifty centimeters. The marking process is quite complex, but the beauty of the interior depends on it.
After finishing the marking, you will need to stick masking tape along each line. It is better to start gluing from the upper right corner, this way you will avoid splashes of the mixture on the already treated coating. Masking tape will not only help break up the wall into work areas, but will also serve as a guide for direction.
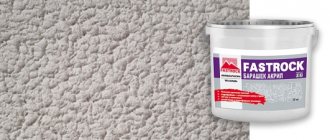
Decorative plaster rock
Decorative rock plaster is the simplest method of application and is perfect for beginners. You don’t need to buy a special mixture for the job—you can use a finishing putty based on cement or gypsum.
Important! For the walls of the bath, toilet and kitchen, only cement-based decorative plaster is suitable.
Work process:
- Before applying decorative rock plaster, prime the walls. Plus, to improve the quality of the coating, it is advisable to apply a layer of putty.
- Place putty on a trowel and apply to a small area of about 0.5 square meters. m. layer about 3 mm. The thicker the layer, the rougher the texture.
- Distribute the solution evenly over the wall and begin creating a pattern. To do this, clean the trowel and press it against the wall on fresh putty, firmly, while lifting the bottom edge of the trowel, and make a downward movement at the same time.
- Having completed the first section, proceed to the second. Do this overlapping so that there are no gaps.
- Leave it to dry for at least a day, and then proceed with further painting.
Recommendations for application:
- To create a pattern, you can use different strokes with a trowel. For example, criss-cross, herringbone, horizontal or vertical.
- Remove the trowel from the solution smoothly so that no marks remain.
- Smooth the surface and start again if something doesn't work out.
- Clean the trowel after each application of the mixture to an area.
- Avoid sudden changes that may be immediately noticeable.
Applying plaster
It is best to start plastering the wall from the upper right corner. The mixture is applied from right to left in a free motion, so drops of the solution will fall to the left or down on the untreated surface. If you are left-handed, then it is better to start the procedure from the upper left corner of the wall.
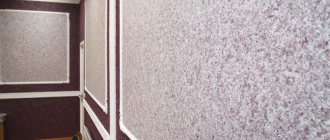
Rain decorative plaster should be applied in a layer of at least five centimeters, the strip should be a meter long and the width of a trowel. To create a rain effect, apply the trowel to the still fresh solution and then remove it. There is no need to press hard on the wall. As a result, the plaster will stick to the trowel and slightly lag behind the wall, thereby creating a raining effect. We process the entire strip using this technique. Next, clean the tool from adhering plaster and run along the treated strip again, lightly pressing the trowel. As a result, you will smooth the needles in one direction and thereby create a raining effect.
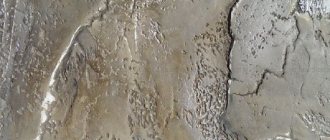
The relief of the finish will depend on the thickness of the applied layer and the pressing force of the trowel. The greater the layer and the pressing force, the clearer the decorative texture of the wall will be. The photo shows horizontal rain.
During work, the plaster can creep onto the tape dividing the wall into zones, so after treating one area, it is better to remove the limiting material from the wall. Thus, the joint between the zones will be smooth and will not require additional finishing. Subsequent layers of rain plaster are applied in a similar way, and they are given a relief structure. Each subsequent layer should be applied with a slight overlap on the previous one.
We do not recommend taking long pauses during the process of applying plaster. If you take long breaks, after drying the joints between the areas will be very noticeable.
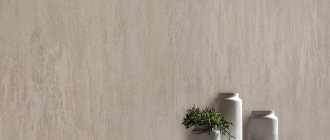
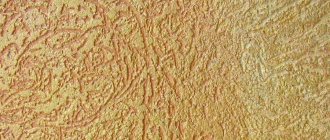
After the decorative plaster has dried, the wall will need to be treated with sandpaper. This will remove minor finishing defects and make the surface uniform in height. In the next photo you can see the result of applying rain plaster to the walls.
How to make rain plaster coating with your own hands?
You can make decorative rain plaster in different ways. As a rule, compositions with large grains are used, which develop a pattern when grouted with a float. In this case, we consider the technology of creating a pattern using a stiff brush and a profile decorative coating “silk threads”.
Preparatory stage
Before applying the leveling layer, it is necessary to clean the surface and dismantle the old finish. Stock up on latex gloves. For work you will need:
- plastic container for mixing;
- construction mixer;
- metal beacons (4–5 pcs.);
- nylon roller;
- H-shaped and trapezoidal rule;
- laser level;
- a brush with hard bristles;
- porous sponge;
- painting spatulas - 70 mm and 180 mm;
- plastic spatula - 160 mm;
- universal deep penetration primer;
- metal trowel;
- interior water-dispersion paint;
- decorative coating “Silk threads”;
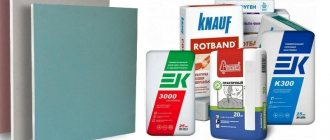
- rotband Knauf;
- starting putty.
In this case, the Parade “Silk Threads” decorative coating and acrylic primer, also from the same manufacturer, are used. Features of surface preparation:
- treat the paint with an acid remover, then remove it with a scraper;
- the plaster is wetted, then cleaned off with a hammer and chisel;
- wallpaper is removed the old fashioned way - with a spatula or chemical or heat treatment;
- cracks are filled with starting putty solution;
- the recesses are filled with putty, in which the serpyanka is embedded;
- the serpyanka is covered with a second layer of composition;
- when the fragmentary rough finish dries, apply 1 layer of primer;
- After waiting 12 hours to dry, apply a second one.
When the soil is dry, you can begin to create a leveling layer . If the base is concrete, give preference to concrete contact rather than primer. Soil consumption is on average 80 ml per m2.
Step-by-step application technology
Rain decorative plaster can be applied to a pre-leveled, primed, dry surface. The technology involves two methods: diagonal and vertical. Below we discuss the technique of creating a vertical pattern.
Wall alignment
Before leveling, measure the height of the wall in increments of 0.8-1 m to identify problem areas with significant differences: metal beacons will be installed there.
For 10 m2 of area you will need 5 pieces. It is best to level the walls with gypsum rotband. Before this, the surface must be primed and dry. Stages of work:
- using a mixer, mix the gypsum in a plastic container according to the instructions on the package until the lumps are completely eliminated;
- Using a spatula, transfer the composition to the trowel, at an angle of 45 degrees, create a plaster marking for fixing the beacons;
- profiles are installed in increments of at least 1-1.5 m, the density of the braid must correspond to the thickness of the beacons;
- drown the profiles in the plaster and cover with the compound to securely fix them;
- use a trowel to sketch out the composition, filling the space between the profiles, making jerky movements with a characteristic slap;
- At the lower base of the wall, set an H-shaped rule and level the tent with a vertical upward movement 2-3 times;
- after 10–15 minutes, remove excess solution with a wide spatula, moving horizontally;
- correct defects by smoothing them with a trowel, tighten the mortar using a trapezoidal rule in 1–2 approaches;
- after 25–30 minutes, pry up the upper end of the profile with a spatula, dismantle it with a smooth vertical shift;
- fill the cracks with plaster, smooth with a trowel, remove excess mortar with a wide spatula;
- after 20–25 minutes, moisten the porous sponge in water and “wash” the mantle in a circular motion;
- Having treated the entire surface of the wall in the same way, leave it to dry completely for 24 hours.
If you have a grinding machine, it is recommended to sand the finished surface to eliminate roughness. Use attachment No. 240 or 320. After installing the beacons, check their vertical position with a laser level.
Advice
The rotband is not filled with water, but poured into a container with gradual mixing. To make the solution set longer, add a little citric acid to the water. Before use, let the plaster sit for 5-7 minutes, then stir again.
Base layer
Pre-prime the wall in 1-2 layers with a break for drying. Dark-colored water-dispersion interior paint serves as the base for thin-layer polymer coatings. It will reduce the absorbency of the surface and increase the setting speed. It is better to use a fur roller.
Stages of work:
- pour paint into the tray, dip the roller;
- roll lightly until the roller is sufficiently wet;
- apply paint using vertical movements, moving from the top edge of the wall;
- process the wall area, avoiding gaps;
- the overlap may not be rolled in, since the paint will be covered by a layer of decorative coating;
- leave to dry completely for 2-4 hours.
Do not use a foam roller or paint brush. Foam rubber absorbs a lot of paint without releasing it to the surface, and the brush will leave characteristic strokes and slight unevenness. It is necessary to work quickly in one approach, as the composition dries quickly.
Second layer
If you are using a dry mixture with coarse filler, knead it by hand or at low mixer speed, otherwise the grains will be damaged. The finished compositions must be mixed with a spatula to lift the fraction from the bottom. If the surface is being prepared for surface painting with tinting, the second layer is applied with a non-tinted white compound.
Technology:
- use a spatula to transfer a small amount of the composition onto the trowel;
- Apply plaster using vertical movements, moving from the top edge of the wall;
- do not scoop, but smooth out the mixture, setting the trowel at a slightly flat angle;
- Use a spatula to collect the remaining mortar from the trowel, then transfer it back to the tool;
- the overlap is not smoothed out, since the layer is prepared for the design;
- Without waiting for it to dry, start forming the pattern.
The thickness of the second layer should correspond to the diameter of the filler, but not exceed 1-1.5 mm. It is recommended to carry out fragmentary processing in increments of 3–4 m2 of the wall. Try not to leave straight boundaries between the fragments to make it easier to fit into the outline.
Creating a rain texture effect
Creation of the rain texture begins immediately after applying the second layer. If the diameter of the filler is more than 2 mm, the relief can be created with a polyurethane trowel. The thickness of the coating must be at least 2 mm. It is easier to create a distinct structure with a stiff brush or a brush with natural bristles.
Technology:
- soak a decorative plastic brush in water;
- attach the tool to the surface at the top edge of the wall;
- Using vertical movements with medium pressure, move the brush towards the floor;
- try to maintain a vertical arrangement of lines, avoiding waves;
- attach a plastic spatula to the base and smooth out the tears, moving in the direction of the lines;
- Before each use, wipe the spatula with a foam sponge.
Hold the spatula at a slightly shallow angle, less than 45 degrees. Otherwise, the texture will be too smooth. To simplify the work, it is better to wet the brush before each use, but not excessively. If the plaster contains coarse filler, then a hole is created by vertical smoothing of the trowel. The crumbs are evenly distributed over the base, forming lines reminiscent of rain.
Surface painting
At the final stage, the surface is painted and tinted. In this case, gray Parade Tessuro interior water-dispersion paint and universal silver pearlescent enamel are used.
Technology:
- pour some paint into the tray;
- moisten the fur roller generously without rolling it too much;
- Apply 1 coat of paint to the wall using vertical movements;
- do not allow gaps, make sure that the relief is completely filled;
- leave until completely dry for 2–4 hours;
- apply a second coat of paint in the same way, leave until dry;
- pour some mother-of-pearl enamel into the bath;
- roll the roller until it becomes semi-dry;
- Apply mother-of-pearl to the wall in the direction of the rain;
- treat the entire surface area.
After the enamel has dried, apply 2 layers of acrylic urethane parquet varnish. It will increase moisture resistance and protect the coating from damage. As an alternative, decorative varnish “pearls” is used. Then the holes are not tinted with enamel, but the decorative composition is applied with a fur roller. Excess varnish is removed with a trowel in the direction of the pattern before drying.
Important
Make sure that the enamel does not fill the relief, but emphasizes it. It is necessary to carefully roll the roller until it is almost dry.
How to paint
The final stage of applying rain plaster to the walls will be painting it. Almost any paint will work for this: acrylic, latex, water-based and others. The main thing is to follow the basic rules so that the plaster does not lose its basic decorative properties.
If the plaster is painted with one color, the decorative effect may become invisible, so we recommend using different colors with the wash technology. The relief of the plaster in the rain is directed towards the inside of the coating, so when processing such a surface you should be extremely careful.
To paint rain plaster, we recommend using a long-haired roller. It is better to choose moisture-resistant paint, especially for a bath or kitchen. Before you start painting, be sure to prime the wall again to improve the adhesion of the paint to the wall and reduce material consumption.
Painting with wash technology is quite complex, but only it will help emphasize the decorative effect of the surface. For this treatment, take dark-colored paint and cover the entire surface of the wall with it. Wait a little so that the solution has time to dry. Next, take a damp cloth and wipe the wall, this way you will partially remove the paint and the color will become more faded. In this case, the paint in the recesses of the relief will remain and will stand out significantly against the general background.
After washing, we recommend treating the wall with several layers of varnish. It is better to use a water-based varnish, first diluting it in a one-to-one ratio. If the solution is too liquid, you will need to apply two layers. To process, use a brush and do not pause so that the color is uniform over the entire area of the wall. The result of painting rain plaster can be seen in the following photo.
Finishing plaster
The final stage should begin after the decorative coating has dried. Applying a finishing layer is necessary not only to change the color of the surface. Afterwards, the walls become more durable and are able to withstand the effects of various external factors.
Painting the coating
One of the finishing options is painting. Almost any dye is suitable - latex, acrylic, water-dispersion composition, including enamels. The specific type is selected depending on the type of room. For bathrooms and kitchens it is worth taking moisture-resistant compounds.
The process can be performed according to the following scenario:
| 1.The paint is poured into the container. | |
| 2. A roller with long pile is dipped into the composition, which is transferred to the wall as the first layer. You need to make sure there are no spaces. | |
| 3. Drying the paint takes from 2 to 4 hours. | |
| 4. A second layer of solution is applied and also dried. | |
| 5. Now pearlescent enamel is poured into the container. | |
| 6. Take a clean roller, dip it in paint and roll it until it is semi-dry. | |
| 7. In the direction of rain “drops”, mother of pearl is also applied to the entire wall in 2 layers. |
When painting, it is important to ensure that the enamel does not fill the “rain” grooves.
Other finishing coatings
In addition to paint, it is permissible to use other finishing options. With the help of a varnish coating, the surface acquires a characteristic shine and at the same time strength.
Another alternative is a wax solution applied over the decorated wall. This treatment gives an original shine and increases the wear resistance of the plaster coating.
Conclusion
Using decorative plaster you can achieve very impressive results. This type of finish has long been used by professional designers due to its cost-effectiveness and good durability of the coating. Rain plaster will make the room feel cozy and you will be in a good mood. The solution itself is made from environmentally friendly components and will not cause any harm to humans or pets. Due to its harmlessness, such cladding can be used even in a children's room or in special institutions. A variety of decorative plaster will allow you to realize almost any idea, and further painting will give the room bright colors. To see the process of applying rain plaster, we recommend watching the following video:
Recommended Posts
Decorative wall decoration to look like brick
How to properly install beacons for plastering walls
Venetian decorative plaster
Decorative putty plaster
Decorative plaster mosaic
Decorative plaster: master class on application
Expert advice
Useful recommendations from experienced finishers allow you to get the desired result:
- It is better for beginners to practice on separate pieces of plywood.
- To arrange the “drops” diagonally, you should choose a coarse-grained mixture and work with a grater.
- It is advisable to purchase building materials on behalf of a common brand (plaster, primer, paint).
- The surface should dry naturally without the use of hair dryers or other similar equipment.
- Coarse plaster is painted over the finished coating, since coloring can damage the granules.
The drying process of decorative plaster should occur in natural conditions
Due to the complex implementation of the diagonal technique for creating “Rain”, it is better to form a team for work.
Decorative plaster “Rain” has been used by professional designers for a long time. Upon completion of the work, the room becomes more comfortable, the facade takes on new shape. The technology is suitable for both private real estate, including apartments, and public institutions.
Did you learn something new? Share in the comments!