What is dry plaster
When asked what dry plaster is, an ignorant person will answer that it is a loose dry mixture, otherwise SS. He is partly right; the powder belongs to dry plaster, which is used for finishing rooms and facades. But there is a well-known sheet type of plaster, which is also called dry, and this is gypsum board, otherwise known as drywall.
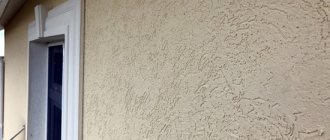
Dry plaster can be a special loose mixture or sheet material
Features of the process of dry plastering walls
Dry plaster is used to eliminate large irregularities on walls, differences in relief, chips, potholes, and completely level the surface. The sequence of work is as follows:
- Before starting work, thoroughly clean the surface, removing dust particles and smoothing out unevenness.
- The first stage of treatment - priming the surface, is carried out to improve adhesion - the strength of adhesion of the solution to the wall and reduce the absorbency of the material to which the solution is applied.
- Preparation of the solution. The required amount of the mixture is added to clean water, stirred manually, with a mixer or a drill with a special attachment at low speed.
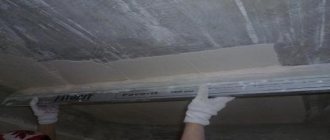
- Mounting beacons. A small amount of mortar is applied to the wall using molds, metal beacons are pressed into it and left until dry. The distance between the beacons is 10–15 cm less than the width of the rule.
- Applying the solution using a spatula by throwing it over. The thickness of the applied layer of solution is 5 to 50 mm. The time it takes to apply the mixture before it hardens is 20 minutes.
- Leveling the applied solution using the rule according to the beacons. The excess is removed, and in places where there is not enough solution, it is added.
- The complete drying time for the plaster is 7 days. This means that you can paste or paint the room no earlier than a week after plastering.
Experienced craftsmen carry out work without disturbing the sequence of the technological cycle, use only high-quality materials, and maintain the required proportions. values its reputation and guarantees the quality of work performed by our teams. We carry out plastering work by machine, which allows us to do the work several times faster than by hand!
Purpose of dry plaster
As an alternative to the usual loose plasters, dry plaster is used to level walls, ceilings, doorways, and slopes on the inside of a window opening. To decorate the arches, flexible sheets of plasterboard were created. The bending angle of such plates is 30º.
Due to the diversity of the protective layer of cardboard and the components of the core, dry plaster is used for different purposes.
The composition of drywall includes:
- gypsum dihydrate – 93%;
- mineral and chemical additives;
- organic fillers - starch;
- special soap that foams the solution;
- accelerator (catalyst) of solidification.
Drywall components
Cardboard envelops dry plaster and protects it from external factors. The edges of drywall are rounded, beveled or trimmed.
Many types of gypsum boards have been created, each of which has individual operational capabilities:
- standard - used in a room with humidity less than 70%, it is used to decorate walls and a thinner version - on the ceiling;
- fire-resistant - fiberglass is added to the composition, which prevents the spread of fire; it is used to line fireplaces and chimneys;
- moisture-resistant - the structure is impregnated with fungicidal preparations, the core contains silicone granules, the cardboard is coated with a water-repellent agent, used in damp rooms where the moisture level reaches 85%;
- perforated - for sound insulation;
- flexible - the composition includes fiberglass threads;
- combined - the core contains expanded polystyrene (EPS) for insulation;
- vinyl - the boards are covered with oilcloth film of different colors, otherwise called laminated and are used for finishing coating; the joints between the sheets are covered with special strips.
Types of drywall
Each type of gypsum board differs in thickness, strength and color; they cannot be confused with each other.
Pros and cons of using
Dry plaster has clear advantages compared to dry mixes:
- ease of use;
- easy to calculate material costs and cut;
- eliminates large differences on the surface with low material costs;
- during the finishing process there is no need to wait for drying time, as happens when working with dry mixtures;
- even a beginner can cope;
- the ability to hide communications under drywall: wiring, ventilation, plumbing and drainage;
- when used frameless, it takes up little space;
- light weight.
Dry plaster sheets are lightweight
The disadvantages include:
- inconvenience during delivery, since the slabs are bulky and take up a lot of space;
- corners may break off during transportation;
- if stored incorrectly, the plane becomes bent;
- instability to moisture - with prolonged exposure to water, cardboard swells;
- insufficient strength - it is not recommended to hang heavy objects and equipment on the walls.
Corners of sheet plaster may break off during transportation.
Bulk dry mixtures have their advantages:
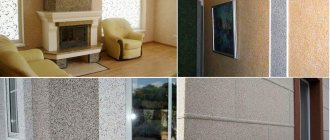
- high strength;
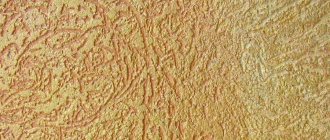
- you can choose different textures;
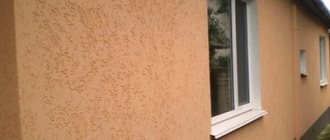
- outdoor use;
- seamless coating;
- if the layer does not exceed 2 cm, then it is cheaper than SS;
- does not require frame construction;
- takes up less space compared to frame dry plaster;
- Depending on the components, it is used in rooms with high humidity.
Dry plaster has high strength and can be used in high humidity conditions
The disadvantage of mixtures is the complexity of the technological process. Experienced professionals prefer to plaster walls using the old method - dry mixtures.
Composition of plaster mixtures
In order not to get confused at the sight of a significant selection of plasters, it is important to know which one is intended for what. So, if façade work is to be done, then the choice is limited to cement or cement-sand dry mixtures. But if work is carried out indoors, then gypsum plasters are also added to the list above. What do these materials represent?
All dry mixtures for plaster are divided into several types depending on the binder.
Cement plaster
One of the most popular and sought-after compositions. cement is used as a binder sand is used as a filler , but sometimes the composition may also contain additives that improve plasticity or adhesion. This is a universal plaster that can easily be used for both external and internal work, while ensuring durability and resistance to external negative factors. The advantages include their long-term viability: you can immediately mix a fairly large amount of plaster, for example, in a concrete mixer, and be completely sure that it will not harden in the container during operation. The list of advantages is complemented by the strength of the finished surface and the low cost of the mixtures themselves.
But it is not without its drawbacks : long-term viability also results in a long period of drying of the plaster layer, so the next stage of wall finishing can only be started after a couple of weeks, and further work will require putty. Cement-sand plaster does not have very good adhesion to smooth concrete surfaces, and the process of applying it is not the easiest. In addition, you need to be prepared that a lot of dirt will form, and dust particles from cement and sand may fly in the air.
Lime plaster
This mixture consists mainly of lime and sand , but there is also a small proportion of cement , as well as a variety of additives that impart certain properties. This plaster is best used indoors, but, in principle, it is also suitable for outdoor use. Its advantages include ease of installation, as well as relatively quick hardening. Moreover, it does not require any additional processing, has excellent antibacterial properties, and therefore protects the walls from the appearance and development of fungus. Another bonus is excellent adhesion to almost any type of surface. In terms of price, this is one of the most profitable options, since lime is cheaper than cement when it is used as a binding material.
Lime plaster also boasts a number of other advantages : it has excellent thermal insulation properties, which are several times higher than those of its analogues - gypsum and cement plaster. It is also characterized by a higher ability to vapor permeability, so the correct microclimate is then created in the room, in which it is pleasant to be and easy to breathe. In addition, the finished surface is resistant to heat and remains in its original form for a long time when exposed to high temperatures. You can also add elasticity and environmental friendliness to the list of advantages, but the disadvantages include unrecord strength, which is much inferior to the same cement plasters, as well as poor resistance to moisture.
Gypsum plaster
The composition of gypsum plaster mixtures includes gypsum and various mineral additives . They are used only for interior work, due to a number of properties. Thus, such plaster is not resistant to moisture, which limits its scope of application. Continuing the topic of its disadvantages , it is worth noting that it is not very viable, and the finished solution hardens very quickly, so you will have to prepare it in portions. The resulting surface resists mechanical influences very weakly, and in this indicator, gypsum plaster is much inferior to cement and even lime plaster.
But the list of advantages can cover all the disadvantages of such compositions. Thus, gypsum plaster hardens very quickly and does not require further processing, so the duration of repair work can be minimized. The application process is also as simple as possible, and one person can plaster about 30-40 m2 per day, and the layer does not slip, lies flat on the surface, is highly plastic, does not shrink or crack after drying, and the application process itself is not so messy and dusty.
Adhesive plaster
This is not a very popular type of mixture, which is characterized by a high price. The composition includes sand, cement, polymer additives and fibers that give the composition certain properties. Typically, such plasters are used during installation of insulation, or for leveling walls when laying mesh.
Peculiarities
When using dry plaster, you need to take into account its features:
- Dry plaster cannot be used for exterior use, since gypsum does not tolerate prolonged exposure to moisture, even if the composition contains moisture-absorbing granules, and the cardboard is impregnated with a moisture-repellent coating.
- When using gypsum-based slabs, it is unacceptable to stick ceramic tiles on them to protect them from water. Sooner or later this will lead to its detachment.
- Wall masonry can be made of different materials, even if dry plaster is glued.
- The standard thickness of plasterboard is 9.5 mm or 12.5 mm, side dimensions are 200 mm x 120 mm, 250 mm x 120 mm, 300 mm x 120 mm. When covering walls, these material features are also taken into account.
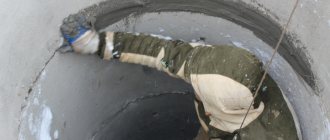
- Due to the large size of the gypsum boards, installation work is carried out with a partner.
The sheets are large in size, so installation work should be carried out together with a partner
If you decide to cover the walls with dry plaster, then, in addition to the characteristics and features, you need to familiarize yourself with the nuances of installation work.
Nuances of installation work
Plastering walls with plasterboard requires the right approach before installation work, and therefore:
- in rooms with high humidity, you cannot use standard sheets, but only moisture-resistant ones;
- all necessary communications are laid before installation;
- in rooms with a high risk of fire, the walls are sheathed with fire-resistant gypsum board, its sheets are treated with a fire-resistant composition;
- installation is carried out at temperatures above +5 ºС, otherwise there is a possibility of the cardboard separating from the core.
The room temperature when working with drywall should not be lower than +5 degrees
If these recommendations are taken into account, dry plaster will last a long time, and the cardboard covering will not peel off over time.
What is the composition of decorative plaster?
Based on the type of connecting element, the coating is divided into four types.
Acrylic
A universal, elastic mixture based on acrylic resin. It can be painted any color using pigment paste. The products are sold ready-made, packaged in buckets. It has the following properties.
- Dries quickly.
- Suitable for rooms with high humidity levels and temperature changes.
- Durable - service life up to 15 years.
- The finished surface is easy to clean.
The mixture also has three disadvantages. It ignites easily, can crack under the influence of ultraviolet radiation, and has poor vapor permeability.
Mineral
The composition of this decorative plaster includes lime, cement, mineral particles, stone chips and clay. Below are a few features.
- The coating is most in demand because it is inexpensive and easy to apply.
- Sold in dry powder form.
- The finished layer is not afraid of moisture and frost, is resistant to abrasion and is the most environmentally friendly of all.
- Before work, the wall must be well primed and all uneven surfaces must be puttied.
Three more advantages: fire safety, ease of maintenance, breathability. Disadvantages: fragility (maximum period - 10 years), the ability to paint only after complete drying, and low elasticity.
Instagram @interiors.store
Instagram @interiors.store
Silicate
The most durable type of product. The binding element in it is liquid potassium glass. The silicate type of coating is considered hazardous to health, so it is more often used for finishing facades. Repels dirt and water, stays on the surface for up to 20 years.
- Walls
Facade plasters for a country house: what they are and how to work with them
Silicone
Another flexible, durable resin-based mixture. Its only drawback is the high price. Otherwise, the material is perfect for decorating the interior walls of apartments and houses. It contains various fillers, pigments and antifungal additives. Among the advantages are:
- breathability;
- strength;
- easy care;
- moisture resistance;
- resistance to fading;
- good grip on any surface.
The coating is easy to apply and is sold ready-made, which eliminates mixing errors. Disadvantage: the wall must be pre-treated with a primer from the same manufacturer. This increases the cost of work.
Installation methods
Drywall is mounted on a surface in two ways: on a frame and with glue, and each of these types has an individual application technology.
Walls are covered with sheets of dry plaster in two ways.
Frameless
This method involves gluing dry plaster to the wall. You can attach gypsum boards to:
- mounting adhesive, which is applied to the surface in a circular motion, maintaining a distance of 15-30 cm between strokes;
- polyurethane foam;
- gypsum-based mastic;
- mastic with sawdust, the peculiarity of this solution is that it takes the shape of the surface;
- tile adhesive;
- liquid Nails;
- special adhesive for installing drywall, which is produced by manufacturers from well-known companies.
To attach gypsum boards to the surface, various compounds are used that ensure strong adhesion of the mounting plates to the base.
Each method is good in its own way, but the choice is made in accordance with the masonry of the wall - what material it consists of and its compatibility with the adhesive base. If there are significant deviations in the wall, cut pieces of drywall are placed in the gaps.
For additional strength, the sheets are attached to the wall with self-tapping screws, having previously made recesses for the caps so that they do not protrude above the surface. Plasterboard slabs are installed vertically joint to joint using a bubble or laser level.
It should be taken into account that with this method of installation, gypsum boards are not glued to the ceiling, and insulation is not placed between the walls and slabs. Combined plasterboard is used for thermal insulation.
After gluing the gypsum board to the surface, fix the sheets with self-tapping screws
Frame
When wall deviations are 5 cm or more, it is better to use the frame method of fastening gypsum boards. Installation on a frame requires the presence of aluminum, galvanized or wooden profiles and self-tapping screws. Initially, the walls are cleaned, strongly protruding places and deep cracks are eliminated.
The last option for surface treatment is needed to ensure that the dowels do not fall into the void when attaching the profiles or do not fall out with fragments of the old plaster from the masonry after fastening. With the frame method of dry “plastering,” ceiling design is welcome, and it is possible to place expanded polystyrene (EPS or EPS) slabs under the frame.
One way to mount the frame on the wall:
| 1. Buy 60x27 profiles and guides for them, having previously calculated how many pieces and what length of material is needed. | |
| 2. Two starting guide profiles are installed horizontally on the floor and on the ceiling so that they are in the same vertical plane, and two on the sides. | |
| 3. You shouldn’t mount it close to the wall; it’s better to step back 1-1.5 cm from it in order to hide the wiring behind the frame. | |
| 4. The longitudinal profiles are inserted into the guides in increments of 40 cm and screwed with self-tapping screws and a press washer. | |
| 5. To ensure that the channels hold tightly and do not vibrate, perforated hangers are used, preferably with four holes for fastening, which are attached to the wall every 55-60 cm with dowel nails, and to the profiles with self-tapping screws. | |
| 6. To ensure that the channels are in the same plane, an auxiliary U-shaped profile is screwed in the middle of the vertical slats with press washers, and then the hangers are attached, focusing on the tightness of the horizontal profile to the vertical one. | |
| 7. Upon completion of work, the auxiliary rail can be removed. | |
| 8. The next stage is the fastening of horizontal profiles; they fasten four vertical slats at the bottom and four at the top, that is, in a checkerboard pattern. | |
| 9. The crossbars are processed with a grinder so that the edges overlap the surface of the perpendicular profile and they can be screwed with self-tapping screws and press washers. | |
| 10. After the installation of the frame is completed, the channel cuttings remain. By cutting the edges with metal scissors and bending them at the cut points until a rectangular corner is formed, you can further strengthen the structure - screw one edge of the corner to the wall, the other to the profile. |
The installation of the frame is complete and you can begin dry plastering. For walls, it is better to take plasterboard with a thickness of 12.5 cm. The ceiling is mounted in a similar way, only lightweight sheets are taken, the thickness of which is 9.5 cm.
How to attach dry plaster to a wall
If the walls are fairly even and do not fall more than 50 mm, and there are no obvious defects, then the plasterboard sheets can be attached directly to the wall. For this purpose, adhesive compositions are used. Self-tapping screws can be used for additional strengthening.
In other cases, you will have to engage in frame installation of plasterboard sheets. The frame installation method is also used when installing partitions and curved surfaces. In any case, the surface of the base is prepared before installing drywall.
Glue installation
There are several techniques for adhesive (frameless) fastening of dry plaster.
First way.
Used for unevenness or deviation of walls from the vertical within 5-20 mm:
- Mark and cut drywall.
- Cover the wall and back of the gypsum board with a water-based penetrating primer and dry.
- Lubricate the glued side of the sheet with glue: if the wall unevenness is up to 10 mm, apply the glue in a continuous strip around the perimeter and spread one strip horizontally in the middle of the sheet (level and remove excess using a notched trowel); if the unevenness of the base is up to 20 mm, the glue is applied in round cakes along the same lines, maintaining a distance of 200-300 mm.
- Press the sheet against the wall, level it and hold until the adhesive has set.
Applying primer
Applying glue to drywall
Press the sheet against the wall
Marking a sheet of drywall
The second method.
If the deviation is up to 50 mm, cut strips of gypsum board up to 18 cm wide are placed between the base and the glued sheet (glue several together, gaining the required thickness). The strips are attached to the base, leveled, creating “frame” lines. To increase strength, the strips are additionally secured with self-tapping screws, deepening the caps into the recess. If necessary, short cuttings are placed in the recesses under the strips. Each strip is also treated with a primer.
The third method (injection).
Mounting on a wooden base using polyurethane foam, which has a low expansion coefficient. The foam has elasticity and partially absorbs the deformations of the “playing” wood. Before installation, the surface of the sheets from the rear and the wooden base are treated with an antiseptic.
Subsequence:
- each sheet of gypsum board with a small distance (5-10 mm) is attached to the base using self-tapping screws (through gaskets);
- at equal distances (30-40 cm) holes are drilled in the sheet, sufficient for the gun tube to fit in;
- small portions of foam are blown into the holes (in order for the doses to be approximately the same, you can count the seconds by pressing the hook);
- allow the foam to dry (do not touch the foam that has come to the surface until it dries);
- Excess foam is cut off flush and sanded.
If the wooden wall is smooth, then you can glue the HA sheet in the usual way.
Installing sheets on the frame
The above method does not allow placing sheet insulation between gypsum board and the wall and leveling walls with deviations of more than 50 mm. These problems are solved with the help of a frame made of aluminum profiles.
Frame installation sequence:
- the profile starting rail is screwed to the floor along the wall;
- after marking, attach the second rail to the ceiling so that it, together with the first, lies in the same vertical plane;
- install vertical slats (40 cm pitch), attaching them to the starting profiles;
- for fastening to the wall (every 60 cm along the vertical slats), U-shaped brackets are installed;
- GCL is attached to the mounted frame with self-tapping screws.
Starting bar on the floor
Starter bar on the ceiling
Installation of U-shaped brackets
Installation of vertical slats
Installation of drywall sheets
Types of dry mixtures
Dry plaster mixtures vary in type:
- binding components;
- size of fractions;
- purpose.
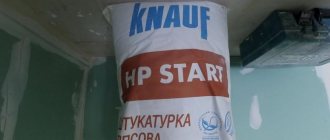
Unlike dry plaster, mixtures come in powder form, packaged in paper bags, and in the form of a solution, which is poured into plastic buckets of different sizes.
The mixture is produced in paper bags or packaged in plastic buckets
Plaster
Gypsum plaster is distinguished by the fact that it sets quickly, and therefore experienced craftsmen work with it, since in unskillful hands the solution of this mixture can turn into stone. In this case, the gypsum mixture:
- environmentally friendly;
- durable;
- vapor permeable;
- plastic;
- repairable;
- does not shrink;
- has fire resistance;
- sticks well;
- easy to sand;
- does not crack;
- does not require a topcoat for wallpapering.
Gypsum dry plaster is environmentally friendly, plastic, and has good adhesion.
Along with the advantages, this material has a significant drawback - fear of water. Therefore, plastering walls with gypsum plaster is carried out only inside the building and in dry rooms.
Another drawback is that gypsum does not work well with cement. To connect two incompatible materials, deep penetration soil is used.
Limestone
Slaked lime is used for plastering. Just like plaster, it is afraid of water, so they do not work with it outside. It gets along well with cement and is not susceptible to fungal diseases. The advantage of such plaster is its low price. Due to the fact that lime is a caustic substance, when working with it, protective equipment is used: mask, goggles, gloves.
Lime plaster is durable and perfectly resistant to mold and mildew.
Cement
Such dry mixtures are characterized by high strength, resistance to moisture and immunity to frost, ultraviolet radiation, and natural precipitation. They are universal in use and are used for finishing facades and interiors. The disadvantage is the large weight of the mixture and long drying time.
All of the above plasters are mineral, so they do not tolerate building shrinkage, mechanical stress, vibration, and also have a short shelf life in dry form, but are durable in structures.
Cement mixtures can be used for street work, since the plaster is water and frost resistant
Tips for working with dry plasters
It is rare to find perfectly smooth wall surfaces in private houses or apartments. Depressions, vertical deviation, curvature - such defects in internal walls are a fairly common phenomenon that almost every homeowner has encountered.
Plastering or leveling curved surfaces can present some challenges in applying the plastering mixture and creating a smooth, straight wall.
To significantly facilitate this difficult process, it is recommended to use plaster beacons made of galvanized metal slats in the form of a profile. Such beacons are attached to the wall using a plaster mixture (preferably gypsum) strictly level and at a distance of up to 1 m in width. The construction plaster mixture is applied to the wall between the beacon slats and leveled using a metal plaster rule, while the excess mortar is evenly distributed over the surface.
Another option to make finishing work easier using plaster mixtures would be to pre-glue the surface of the walls with a plastic reinforcing mesh, over which it will be very convenient to apply layers of plaster.
A small addition of detergent directly to the mixing water will allow you to increase the plasticity and increase the mobility of the plaster mixture.
You can familiarize yourself with the instructions for plastering beacons by watching the video:
Application technology
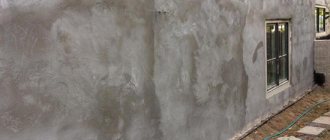
Initially, the walls are inspected, cracks, efflorescence, grease stains, mold, and, if possible, strong protrusions are eliminated, especially with “drunk” masonry. They pass over the surface with a coarse grater to remove large particles and moisten it with deep penetration soil.
Then they find the most protruding part of the plane, and, guided by it, install beacons, which can be aluminum, galvanized, plastic, or wood. Or they are made from plaster by drifting. The master, taking into account the pros and cons of each type, makes his choice.
Wall plastering technology
The dry mixture is diluted with water according to the proportions indicated on the package. Using a trowel, spatula and usually the solution is applied to the surface. After drying, the beacons are removed, the grooves are rubbed, the surface is sanded and primed.
Preparation and application of material
One package is intended for one batch. But if you follow the proportions, you can immediately prepare the required amount of solution for work.
The work looks like this:
- Prepare clean and dry containers of the required volume. For example, if the package with the mixture weighs 36 kilograms, then you will need two containers of at least 30 liters each;
- mix the mixture with water taking into account the proportions indicated on the package.
Sometimes the mixing process can be difficult. To achieve the correct consistency, be sure to thoroughly mix the mixture with water and do not allow air to enter the resulting solution. If you have a concrete mixer, you can use it. If not, you can use a powerful low-speed drill equipped with a screw attachment for mixing. It must be of sufficient length to ensure that the entire solution is well mixed.
When the plaster is ready, be sure to prepare the wall surface for work: remove dirt and level it.
The mixture is applied using two methods:
- manual;
- mechanized.
The second method is used to treat large areas and requires subsequent surface treatment after applying the plaster.
When working, be sure to take into account the indoor temperature and air humidity. It is not recommended to carry out finishing at temperatures below five and above 30 degrees and at relative humidity up to 70 percent.
The algorithm of actions is as follows:
- surface preparation;
- preparation of solution;
- installation of beacons, if necessary;
- throwing onto the surface of the solution;
- removal of beacons;
- plaster screed;
- surface leveling;
- grout.
Depending on the type of mixture used, the thickness of the application layer is 5–50 mm. According to existing standards, the optimal figure is about 20 mm.
Which option should you prefer?
If there is a need to save money and time, preference is given to gypsum boards.
But they take into account the fact that the secondary school takes up more space. To make walls and other surfaces as durable as possible, do not skimp on plaster. If you plan to decorate the topcoat with decorative mixtures, then it is better to choose SS.
Using dry plaster saves money and time
Everyone is free to choose what they like and can afford, but old-school masters will always give preference not to new technologies, but to time-tested methods. Regardless of what type of plastering was chosen, a beginner, making repairs with his own hands, will gain valuable experience and new knowledge.
Could you compare the work with different mixtures from your own experience? What advice would you give to beginners? Leave them in the comments.