If you want to understand how to make stained glass on paper, then this article is for you. Stained glass on paper is also called squiggle design - this is an unconventional technique for making stained glass. This is mainly a children's activity. Making a wonderful picture using this technique is quite simple and interesting. Cardboard, glass, plastic, plywood are suitable for the base of the picture. For wall paintings, it is better to use opaque materials.
It’s up to you to decide which subject to choose for the picture. The image affects the atmosphere of the room. For a nursery, of course, it is better to choose children's drawings, for the kitchen - geometric drawings or abstraction. For the remaining rooms, you can choose a variety of ideas that will fit well into your interior and will look stunningly beautiful. Stained glass has been known for several centuries and is an element of luxury and a sign of wealth.
What is needed for the job? The basic list of required materials and tools may include:
- Paper – sheet A4;
- Simple pencil;
- Marker or black felt-tip pen;
- Cardboard;
- Eraser;
- Watercolor paints;
- Frame.
A little about other types
There are many types of stained glass. The technology for making stained glass from colored paper is almost the same as using paints.
First we make a sketch. On a sheet of paper we draw a frame of 3-4 cm and transfer the drawing to it in full size. The contours should be wide. We color the outline with a black felt-tip pen. Cut out fragments of the design using a sharp knife. Then you need to cut out the parts from colored paper and glue them to the back of the work. Trim off excess. Your stained glass window is ready!
You can make a stained glass window with your own hands.
Filled stained glass is a unique process of imitating stained glass, which is performed on a whole sheet of glass using self-made paints. To do this, place a large sheet of paper on the table, with a working glass on top. Trace the outline of the glass. Transfer the sketch to paper and trace all the contour lines of the sketch well and place the glass on top. Use the prepared paint to draw all the contour lines. Now prepare the fill paint and fill the fragments between the contours with paint. Fill in 3-4 layers, and the varnish should dry for 10-15 minutes after each pour. Then cover the top of the drawing with clear varnish and leave to dry completely. In 2-3 hours your stained glass window will be ready.
Let's go to the lesson
Stained glass always starts with an idea. In order to make a picture out of paper using watercolors, you will need: a pencil, scissors, half a sheet of white Whatman paper.
How to draw a stained glass window and make such a beautiful picture with your own hands?
Step-by-step work:
Stage 1: determine the size of your stained glass window.
Stage 2: draw a stained glass pattern with a pencil. You can draw a sketch for a future painting yourself or download a ready-made template.
Stage 3: paint the remaining stained glass colors. First, paint all the fragments of the pattern with the same color. Let the paint dry to avoid mixing colors, then apply another color, etc. Having painted all the fragments, leave the picture until completely dry.
Related article: DIY flower vase made from newspaper tubes with photos and videos
Stage 4: fill the space around the main pattern.
Stage 5: draw the outline in black. You can also paint it black with a thin brush or use a black felt-tip pen. It is better to start drawing from the upper left corner so as not to smudge the drawing.
Little tricks
Stained glass is a decorative picture that can be made in any style.
Masters often keep silent about some, in their opinion, insignificant details. Here are some tips to help you make stained glass:
- Never start learning with the most complex, start with the simplest. Never take on a large drawing with many small details at once. Try a simple pattern first, and when you master the technique a little, you can take on complex designs.
- use different types of paints for your work, they all also apply to the drawing differently. The brightness and light transmission of the design depends on the number of layers of paint.
- To carefully adjust the pattern, use ear sticks and cotton pads.
- Use a sharp knife or blade to remove defective lines.
- Use wet alcohol wipes on your hands.
- The lighting should be good both from below and from above the work in order to immediately reveal the shade of color and the density of the coating.
- One of the main components of beautiful and neat work is its quick completion. For example, if you apply the contour paint too slowly, it will vary in both color and thickness. If poured slowly, the paint will lay down in an uneven layer and this will affect the quality of its surface.
Making stained glass on colored paper: step-by-step master class with photos
To make a picture from paper, you will need half a sheet of Whatman paper, scissors, and a pencil.
- Prepare a sketch of the future painting, draw it yourself or download a ready-made template.
- On a sheet of paper, draw a frame of 3–4 cm and transfer the drawing to it in full size. The contours should be made wide.
- Color the outline with a black felt-tip pen.
- Cut out fragments of the design with a sharp knife.
- Cut out pieces from colored paper and glue them to the back of the work. The excess needs to be cut off.
- Frame the finished painting.
This picture can be made on glass. Thin colored paper will partially transmit light and your painting will glow.
Imitation of stained glass with watercolors
How to paint a stained glass window with watercolors? Very simple. Try to make a picture like this with your own hands.
To work you will need:
- Cardboard.
- Eraser.
- Watercolor paints.
- Paper – sheet A 4.
- A simple pencil.
- Black felt-tip pen or marker.
- Frame.
Doing the work:
1. Draw flowers and leaves on a sheet of paper with a simple pencil. You can download a ready-made template.
2. Then paint all fragments of the pattern with watercolors, first with one color, letting the paint dry to avoid mixing colors, then with others, etc. When all the fragments are painted, leave the picture to dry completely.
3. Contour lines can also be drawn with black paint using a thin brush or outlined with a black felt-tip pen.
4. The finished work should be framed.
How to paint with watercolors correctly
Beloved by many artists, young children and fairly experienced adults, watercolor can be used for painting in a variety of techniques. Even a novice artist can easily understand how to learn to paint with this magical paint. Beginners will be able to quickly master drawing techniques, and professionals will have inspiration and a whole galaxy of new ideas.
There are 7 basic watercolor painting techniques for beginning artists.
Paint with a flat brush
First, you need to draw an image of a square or triangle so that the beginning and end of the layer are marked. Then choose darker shades. Immediately use the upper left corner. Gently touch the brush to the paper, draw a line straight to the top right corner and draw a masterpiece!
Left-handers should draw in the reverse position - starting from the right corner.
Gradient
Start drawing with a square or rectangle. Choose a darker shade by mixing on the palette. Next comes a layer of light shade, it will merge with the previously drawn one to achieve an interesting combination of color transitions.
Glaze
Improvise, fantasize: a combination of light transparent tones will allow you to get great combinations.
You need to wait for each layer to dry.
"Wet" technique
For spectacular designs, you need to evenly distribute the moisture over the surface of the paper - this will provide a satin look. Start with the background. This drawing technique allows you to achieve a hypnotizing effect.
Dry brush painting lessons
First you need to sketch the image with a pencil. You need to apply the paint after you have removed the excess with a napkin.
No excess moisture
You will need to stock up on sponges. Excess moisture must be removed from the sheet. Do not rub the paper vigorously. This job can be done well with makeup sponges.
Technique for bleaching paint that has dried
You will need clean matter and water. It is necessary to wet the area of the drawing, gently wipe and remove any remaining moisture using a dry brush.
Techniques for using different paints
How to paint with acrylic
Acrylic paint perfectly combines the best properties of watercolor and oil, and after drying the paintings are not afraid of moisture and sunlight. Even a child can make simple drawings with such paints.
The universal properties of acrylic lie in the ability to apply each subsequent layer to the previous image. Unlike watercolor, you don't have to wait for a layer to dry before applying a new one. Read the easy instructions and get started!
To begin with, you can learn to use six colors. Later, the palette will gradually expand to 18 shades. Also prepare:
- The surface for the painting is wood, glass, plastic, paper, cardboard, canvas.
- A set of brushes made of synthetic and natural materials.
- Palette.
- Water.
To obtain high-quality paint, it must be diluted with a solvent or water. Undiluted paint is used on synthetic surfaces and dries faster.
There are several techniques for painting with acrylic:
- Wet - on a canvas that has been moistened with warm water.
- Dry - using several brushes.
- The method of glazing in layers is to apply a thick layer and then paint a picture.
- “Impasto” – similar to oil paints, with wide, clearly visible strokes.
For a drawing, a novice artist needs to choose a base surface and paint in a jar or tube. Choose a drawing technique that interests you. Prepare a palette of colors.
Synthetic brushes are more suitable for working with undiluted paints. If you choose a watercolor technique, it is better to use natural bristles.
At the end, you can additionally apply strokes with a felt-tip pen, ink, marker, gel pen, or pencil. Even a child can master the simplest drawing technique from scratch.
Once you master the basics of the technique, you will be able to draw on fabric and glass, create aerial landscapes or portraits. Even painting your favorite T-shirt will be easy if you learn how to work with acrylic.
On video: step-by-step acrylic painting lessons.
How to draw with gouache
Children master drawings with gouache paints for beginners at an early age. This paint is loved by kids for its ease of application and because the image does not blur, unlike watercolors. Gouache allows you to get more vibrant drawings.
For older people, instructions from the Internet will help them create a unique landscape. The basis of the pattern can be the following surfaces:
- Paper.
- Plywood.
- Glass.
- Fabric.
There are the following types of gouache:
- Artistic.
- Poster.
- For children.
- Acrylic gouache.
Immediately draw a sketch with a simple pencil. When learning to draw, start with dark shades, gradually moving to light tones. Mix paints on the color wheel. Step-by-step drawing with children will allow you to get beautiful images on paper.
If you mix adjacent colors in a sector, you will get a dirty shade. Shadow can be rendered with green, blue or purple, but not black.
Whatever technique you choose, the main thing is that inspiration comes to you. We wish that all your works are successful, that you like them, and that they give you ideas for further creativity. With the help of such an activity you can throw out your emotions and impressions. Draw with confidence and pleasure!
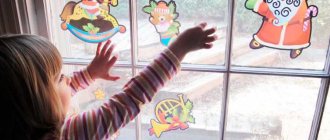
DIY stained glass for children
Tags: from 5 years
Author: Artist Natalya
Difficulty: (4 out of 5).
Age: from 5 years.
In this lesson we will create a stained glass window with our own hands - a contour stained glass window. This is something we can easily replicate at home. Glass is taken, onto which the outline of the image is applied with special paints. The contour itself is applied volumetrically (a special contour for stained glass) to give greater texture and bring it closer to the resemblance to classic stained glass. When the entire contour has been applied, it must be allowed to dry. After which they move on to the interesting stage - pouring. To fill the gaps formed by contour lines, a special paint is used, which differs from contour paint in that it has a more liquid consistency. Therefore, it spreads easily.
All children are crazy about this type of art. It is very interesting when an ordinary sheet of paper can be replaced with something else. This arouses their interest and a lot of emotions. Special paints are also used. The children will be delighted! Therefore, they immediately become attentive, serious and responsible.
We will need:
- Photo frame, for children it is better to choose plastic instead of glass (Ikea ones work well).
- Special water-based paints for stained glass (suitable for children), a contour (usually in the kit there is one) for stained glass, if not, then choose it separately with a thin nose, which will make it easier to apply fine lines.
- Masking tape (insulating tape), only if glass is used in the work. We glue the ends with it.
- A printed outline of the future work, or you can come up with an idea yourself and draw it yourself. One of the main conditions is that the objects in the picture are not small.
We make sure to instruct the child on how to safely handle breakable objects.
Progress:
We take out the glass (plastic). Peel off the protective films and place the finished outline under the glass. For reliability, so that the sheet under the glass does not move, you can secure it with scrapers on several sides.
We begin to trace the outline over the glass. All lines must meet, because any gap will lead to mixing of adjacent colors. In this stained glass technique you should not be afraid of mistakes. Any unsuccessful stroke can be quickly removed with a cotton swab.
The contour must dry well, and only then can it be filled.
How to draw a giraffe step by step for children?
How to draw a horse step by step for children?
How to draw a panda step by step for children? Read here.
Let's start filling.
Try to pour evenly. There is no need to pour paint in one place, otherwise you may miscalculate and it will spill over the sides. Maybe for the first time it’s better to decorate (choose colors) on paper first. Do not fill adjacent cells so that in case of overflow, the paint does not mix.
This is what you should end up with. Let the work dry thoroughly. It should be kept horizontal until completely dry.
Decor.
The work can be framed (especially since we already have one) or can be mounted on a window, and it will delight you with multi-colored rays on a sunny day.
When framing it, place a white sheet under the glass, this will add brightness!
Creative success to you and your baby!
Works for children from 4 to 10 years old
Briefly about stained glass.
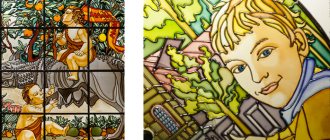
There are two opinions on the origin of the concept of stained glass. One of them comes from the Latin word vitrum - glass. And another opinion is that it comes from the French word vitre - window glass. Stained glass has an ornamental character and is a work of decorative and fine art. Stained glass consists of pieces of multi-colored glass that are held in place by partitions made of lead, copper, or brass.
Most often, stained glass windows decorate window openings, which we can admire in the architecture of cathedrals and temples. Many people like to use stained glass to decorate their homes.
In the modern world there are more than twenty types of stained glass. Contour stained glass and stained glass where the main paint is applied with a brush are well suited for children's creativity.
Comments ()
Write a comment
Other materials in the section
Drawing lesson: How to draw a bouquet with the inscription Love? How to draw a bouquet.
Drawing Santa Claus step by step
Drawing Kopatych
Do not use a brush!
(movements with a brush or sponge or whatever you paint must be perpendicular to the surface. It is unacceptable to paint in the usual way - tilting the brush and dragging it along the stencil)
Do you remember? Fine. Now let's move on to the most common stencil painting technique called "dry brush". In addition to the excellent result, this method is also convenient because acrylic or latex paints will dry almost instantly. For each color, take a separate DRY brush.
Shake the closed paint can well to create a miniature palette on the inside of the lid. Dip just the tips of the brush hairs into the paint.
Then, on a paper towel or piece of paper, make several circular movements with this brush. Vigorous rotation of the brush will lift the paint up the bristles. Make one final turn on a clean towel to remove any paint from the bristles. All this sounds strange at first glance. But just try to blindly repeat our advice - and the result will surprise you!
Before you start stenciling, make a test stroke on a piece of paper and immediately run your finger over it. Are you blurry? Then go back to the paper towel! It's amazing how little paint you need and how long it lasts. In the picture below - too little paint (top), too much paint (left), almost just right (right).
Tamponing or padding occurs by tapping the flat part of your brush against the painting surface. In this case, the brush should always be strictly at an angle of 90 degrees to the surface. Only in this case the bristles of the brush will not fit under the bridges on the stencil.
Another method, different from painting, is to rotate the brush over your design. Start circular movements from a larger radius to a smaller one, that is, right into the stencil itself inside the design. This method is often and very aptly called “tickling.” Result - You will get a very natural and voluminous color transition from dark to light.
You can see the results of using each of the two stencil techniques in the example below. The bird and the branch on the left are drawn using the “tickle” rotation method. And the hairstyle on the right is done using the stuffing method (tapping, tamponing). The difference is clearly visible.
Well, that’s all, you are already a stencil painting professional! Jokes aside, but even this brief instruction is enough. so that the result pleasantly surprises you and pleases your loved ones, relatives and guests.
Not only children dream of learning to draw, especially since many adults have talents that remain unrealized. There are various easy techniques that allow you to make drawings with paints for beginners. The easiest way to learn creativity is with gouache; you can also use watercolors or oil paints, but working with the latter requires certain skills.
Artist's kit - components
To learn to draw, you cannot do without paints. It’s better to buy high-quality paints right away, because too cheap paints adhere worse, and therefore the learning process will be less productive. A beginner should not spend money on a professional set: to start drawing from scratch, all you need is basic colors:
- titanium white;
- yellow (lemon, medium yellow, yellow ocher);
- red (carmine, cadmium);
- blue;
- emerald and light green;
- black.
It is easiest to work with gouache, but an adult or schoolchild can easily cope with watercolor. The ideal option is not an ordinary children's one, but a watercolor for artists, which is of the best quality. Budget sets of 24 colors cost 400-500 rubles. In principle, five tones (red, blue, yellow, white, black) are enough for an artist, and the rest can be created by mixing. To combine paints, you need to immediately buy a palette. The shape and material can be any. There are round, oval, square palettes, wood and plastic products on sale. The size of the palette is also left to the user’s choice.
It is equally important to choose a good brush. For beginners, three brushes of different sizes are enough. You can also additionally buy a thin brush for making dotted drawings and small details. The most popular are squirrel brushes - they absorb water well, release it longer, and therefore paint without spots or streaks. This brush is good for glazing or creating clear contours.
A kolinsky brush – round, with a sharp tip – is also suitable for a novice artist. It is also convenient for working out thin contours and elegant details using the technique of painting with watercolors. The kit must include a flat, wide brush for filling. It is used to create a background or stripes over a large area of canvas or sheet of paper. Over time, fan, linear, and retouching brushes are usually added to the collection of brushes. It is important to inspect the brushes for the reliability of the connection between the bristles and the handle - it should be very strong.
Other accessories in the artist's kit:
- Paper. For watercolor paints, you should buy special paper with low absorption, which will not allow water to wet the sheet before it is completely dry. On plain printer paper, watercolors tend to bleed. The best option is hot-pressed paper; it additionally has a very smooth surface.
- Thinners. Special solvents will be required to dilute oil paints. Typically, linseed oil or turpentine is used for this. It is not recommended to use organic solvents - they spoil the structure of oil paint and remove the beautiful shine. However, to clean paint from brushes you need to buy turpentine and white spirit.
- Canvas. Typically used for painting with oils or acrylics. The stores have ready-made canvases on stretchers made of linen, cotton, and synthetics. Natural fabrics are dense, sag little, and patterns look more beautiful on them. You can also make your own canvas. To do this, you need to buy a stretcher, cover it with fabric, and then prime it. As the primer dries, drag the canvas a little tighter.
- Easel. It is recommended to purchase it if you plan to take up drawing seriously. The easel is placed at eye level, which gives an excellent overview of the painting, helps to work correctly and quickly look for flaws. For small canvases, mini easels are available for sale.
- Protective varnish. It is advisable to coat the painting with varnish, this will help protect it from ultraviolet radiation and make the colors richer.
Also, to create an artist’s kit, you need to buy jars for brushes, wet wipes, and cotton rags. To work with oil, you will need a palette knife - a spatula for thick paint, removing dried material and applying beautiful strokes. It is also worth buying oil cans with clips (single or double) that contain paint and are easily attached to the palette.
Watercolor painting techniques
You need to learn different drawing methods step by step, moving from the easiest to the most complex. At first, most artists use sketching, then they begin to show imagination and create their own masterpieces. It is recommended to start learning to work with watercolors with the techniques described below.
Painting with a flat brush
If the drawing is invented, you should follow these steps step by step:
- Draw a square or rectangle to indicate the beginning and end of the layer. Use a dark shade to draw a thin line from the top left corner to the top right corner.
- Wet the brush with watercolor. Make the second stroke from the bottom edge of the first line, covering the paint that has accumulated below. You need to work quickly to avoid watercolor drips, or carefully wipe them off with a cloth.
- Repeat this action again with the next line. It is better to use the flat edge of the brush for strokes, which will make the bottom of the stroke smoother. Intermittent strokes must be re-drawn immediately.
- Completely fill in the outlined outline, repeating the steps in the same way. It is important to maintain an even tone of paint and not change the brand of watercolor. On paper that is too thick, the strokes may be uneven. Then it is recommended to lightly sprinkle the sheet with water, blot it, let it dry, and only then start drawing.
At the end of the work, you need to rinse the brush, squeeze it dry, and use it to remove all clumps of paint at the bottom of the last stroke, avoiding discoloration of the drawing. To give the picture some texture, you can leave it to dry on an angle.
First, you also need to work out a square or rectangle (in the future this will be the drawing required by the artist). Then you should take the following steps:
- dip the brush in a dark shade of the required color, draw a vertical or horizontal stroke;
- wipe the brush with a cloth or paper napkin, dip it in a lighter shade of the same color, draw a stroke overlapping part of the previous one;
- rinse, wipe the brush, make another stroke (lighter, darker or a completely different color);
- repeat until the figure is filled;
- rinse the brush, dry it, pick up the remaining paint.
Using a gradient, you can create very interesting transitions that form the basis of a future painting.
Watercolor glaze
The glaze technique requires the artist’s imagination; with its help, landscapes, images of autumn and summer, and landscapes come out well. Description of the technique using the example of a landscape:
- paint the sky above and the river below using blue watercolors;
- dilute the paint with water, draw a waterfall;
- make pink clouds in the sky;
- decorate the bottom of the picture and the mountain in yellow;
- let all layers dry thoroughly;
- use dark blue to shade the horizon of the mountain and its top, and you can also use it to beautifully decorate a waterfall;
- make the banks of the river orange, shade the sky a little;
- as the drawing dries, draw bubbles on the waterfall in purple;
- you can draw trees along the banks of the river - trunks in brown, leaves in green;
- tint the sky and water blue;
- Draw the grass in blue and green;
- you can depict trees and fruits under them.
The point of glazing is that all layers of paint interact with each other, overlap one another and, when overlapped, give even more interesting effects.
Before drawing, you need to moisten a sheet of paper with water. Of course, you need paper that is thick and does not sag. Wetting is done using a sponge, having previously wrung it out. The moisture should be evenly distributed over the sheet and not shiny, otherwise there will be too much water on it.
Next, you can make any drawing on paper, for example, an autumn bouquet:
- first draw the background, choosing any light shade;
- draw a vase;
- draw leaves in a vase using yellow, red, orange;
- Apply each new shade after the previous one has partially dried, the blurriness of the lines creates very interesting effects;
- at the end of the work, you can place accents using brown, dark brown, burgundy, and create shadows;
- Use a wet, clean brush to blur the edges a little, but do not overdo it to avoid the sloppy appearance of the drawing.
You should not combine cold and warm tones in one drawing, this will create visual dissonance.
Dry brush painting
It is not difficult to draw using this technique. You need to take the paint on a dry brush, then make a stroke on paper. It is recommended to first sketch in pencil. At first, the sketches will be quite rough - for example, the outlines of the sky, trunks and branches of trees, a river. After the first layer has dried, details are added, shadows are created, and texture is drawn. Then they create a background around it and place the necessary accents.
When drawing, you need to change the pressure on the brush, which will allow you to add or remove texture. It is important that the brush does not remain too wet after rinsing and blotting. Otherwise, the paint will not give a textured effect and will look flat.
The technique is well suited for drawing clouds and streams of light. Before you start, you need to prepare several sponges or facial sponges. First, strokes are made with a dry or wet brush, then they are rubbed with sponges. It is important not to rub the sheet too hard to avoid damaging the paper. Highlights can be done with paper towels. Afterwards, if necessary, the contours of the drawings and accents are drawn with a thin dry brush.
Discoloration of dried paint
In this case, the already dried drawing is lightened. The desired areas need to be moistened with a cloth and gently wiped with a dry brush. It's best to use brushes with stiff bristles that can scrape up a bit of the paint. Actions must be careful, otherwise there is a risk of damaging the paper. Instead of using a cloth, it is permissible to spray the paper with a spray bottle, and then moisten the moisture with a paper towel. Another option is to carefully rub the design with sandpaper, then you do not need to wet it first.
Other types of stained glass
Stained glass on glass using paints is the easiest to do at home, but there are other types and methods of such work.
- classic soldered stained glass;
- Tiffany stained glass;
- fusing;
- frosted stained glass;
- Plastic Lead stained glass windows;
- stained glass windows made using casting technique;
- film stained glass window made using SGO technologies;
- faceted stained glass;
- bending;
- combined stained glass;
- stained glass window made by etching;
- laser engraving.
If you decide to decorate glass with stained glass, then before starting the main work, practice on small glasses, so to speak, get your hands on a little.
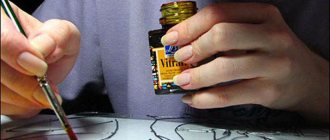
I would like to share with you my “works of the art” in the technique of performing stained glass work.
I don’t paint from a stencil, I paint directly on glass. I do not focus my attention on drawing straight lines with a contour, but simply make, as it were, sketches with a contour. This is where my technique differs from classic stained glass. I feel free in my creative works.
Necessary materials and tools: glass, stained glass contours (any glass), stained glass paints (I only use vitrail), white spirit for degreasing glass and cleaning brushes, synthetic brush from Grail company number 1,2, small containers for diluting paint (for background), alkyd-urethane varnish (for the background), geramik paints (I use it as a pigment to create a new color).
Step-by-step work on stained glass.
1. After degreasing the glass with white spirit, a contour is applied. I take 2 contours: one shades the dark lines, the other light (for example, white and black). And I draw my idea, making the lines thicker in some places (for texture, highlighting the object), and in others thin, fading to nothing (leaving them even without an outline).
2. Misses can be removed with a cotton swab and white spirit. If you haven’t yet fully come up with a plot, for now do what is already clearly stuck in your head. In this work, my middle was empty.
Z. I have completely decided on the color. I opened the required jars and started painting. One leaf at a time. First I applied the dark one, then the light one. The palette is an ordinary piece of paper from a notebook, and I mix it on it (a drop from a brush with an even smaller amount of added paint). You can't teach mixing paint. All you need here is personal experience. And I use transparent vitrail and opaque geramik paints, and sometimes I mix them, and sometimes I dilute them with transparent varnish. The main thing is to do it quickly and subtly. If you make a mistake, wipe it off with a cotton swab and spirit. But if the paint starts to harden, don't smear it.
4. When you have drawn most of it, let it dry and decide on the unfinished areas, and finalize it with an outline.
5. And when you have drawn everything, see if you need to add something, perhaps express it more vividly, then go over these places with paint, but only dry!
6. Background. For the background, I pour alkyd-urethane (matte) varnish into a small plastic jar and add drops of stained glass paint. Sometimes I add drops directly to the background and create living shadows. Sometimes I use the prisme fantasy series in the background, partly as a background.
7. Let the work dry, check that everything is painted, and apply a thin layer of alkyd-urethane varnish over the entire work without adding color. This will protect the work from ultraviolet fading and once again connect the elements of the plot with the background.
When creating stained glass windows, knowledge of academic painting (color, chiaroscuro, composition) will, of course, help you.
If you are interested in my technique, try it and you will succeed! I wish you success!
Demonstration of stained glass drawing step by step in 5th grade
View the contents of the document “Master class “Step-by-step execution of stained glass drawing”, grade 5”
Drawing stained glass on paper
What is needed for the job? The basic list of required materials and tools may include:
Paper – sheet A4;
Marker or black felt-tip pen;
Let's go to the lesson
How to draw a stained glass window and make such a beautiful picture with your own hands?
Step-by-step work:
Stage 1:
determine the size of your stained glass window.
Stage 2:
draw a stained glass pattern with a pencil. You can draw a sketch for a future painting yourself or download a ready-made template.
Stage 3:
We apply the remaining colors of the stained glass with paints. First, paint all the fragments of the pattern with the same color. Let the paint dry to avoid mixing colors, then apply another color, etc. Having painted all the fragments, leave the picture until completely dry.
Stage 4:
We fill the space around the main pattern.
Stage 5:
draw the outline in black. You can also paint it black with a thin brush or use a black felt-tip pen. It’s better to start drawing from the upper left corner so as not to smear
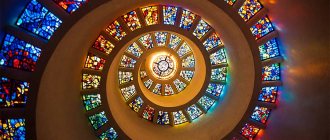
Stained glass in its original meaning is an ornamental or narrative composition of colored glass that fills a window opening. It was in this form that stained glass was used in medieval cathedrals and monasteries.
Streams of daylight, passing through the stained glass window - round or lancet - filled the interior of the temple with a magical rainbow glow.
At the same time, the stained glass pattern created by the dark adhesive contour became clearly visible. To achieve this impression, old craftsmen spent years melting the glass and creating lead fittings within which they were fixed.
But the effort was worth the artistic effect. To this day, the Gothic churches of Western Europe amaze with the fantastic shine of their stained glass windows.
Features of oil paints
Experienced artists greatly value oil paints, which are available in a wide range in specialized stores. The paints contain minerals, organic and synthetic components. They are diluted not with water, but with linseed oil, which gives brightness and richness of tone. Paints take a long time to dry, but the design can be adjusted over a period of time. To dilute dried, thickened paint, a special oil is also used, which is sold in art departments.
Types of oil paints
There are three types of oil paints:
- Highly artistic. They are usually used for professional painting. The price of the material is high due to the excellent quality of the components. For decades, paints do not lose color or fade.
- Sketchy. Suitable for beginners, inexpensive, can be used in different techniques.
- Studio. They have an intermediate price between the two listed options and are suitable for artists and beginners.
Oil paints can also be transparent or opaque. The latter are denser and do not allow light to pass through. If the packaging is o, such material is very durable and lasts a long time. The more stars, the higher the quality of the paint.
Rules and techniques of drawing
The oil painting looks very beautiful. Each stroke looks on its own, although achieving such an effect is quite difficult. There are two main techniques: one coating (alla prima) and several layers. To apply multi-layer paints, you will have to try - work quickly, do not dilute the material, know its properties and how one tone will look on top of the second. Oil consumption for multi-layer application is usually large.
A single-layer pattern has its disadvantages. So, over time, brushstrokes can crack due to paint shrinking, so most professionals dry the first coat and apply at least one more. This way material costs can be reduced.
Recommendations when working with oil:
- the lighting must be good, otherwise there is a risk of creating unnecessary shadows in the drawing;
- First you need to draw a contour, then apply oil strokes along the lines;
- colors can be mixed, knowing the basic principles of combining tones;
- Usually they paint pictures starting with bright elements, highlighting the darkest and lightest points;
- after completing the sketch, outline the contours and details, make the necessary accents;
- the finished painting should be allowed to dry for three days, but on the second day you can make some edits;
- After drying, the canvas should not be rubbed or touched with hands.
How to paint with acrylic correctly: tips for beginners
Acrylic paints combine the properties of oil and watercolor; they do not fade and are not afraid of water. You can apply layers directly on top of the previous ones without waiting for them to dry. To begin with, it is better to buy a set of 6 colors, then expand to 18. You should paint with acrylic on paper, canvas, fabric, glass, plastic, stones. Dilute the paint with water and solvents. The following techniques are used:
- dry – on paper, canvas;
- wet - on a dampened canvas;
- glazing - applying a thick layer and then shading it;
- impasto - painting with clearly distinguishable strokes.
To give the drawing a complete look, you can apply individual strokes with felt-tip pens, markers, pencils, and pastels. First they do simple pictures, then they move on to still lifes, views from the window, and portraits. For learning, it will be useful to use the abstraction technique - making spots and adding details, giving them an image.
Tips for working with acrylic are:
- You should have a spray of water nearby to wet the quick-drying paints;
- by adding water, you can make a more transparent material from acrylic paint;
- Do not add too much water; after drying, the paint may crumble;
- Before wetting the brush in paint, you need to dry it;
- adding a solvent rather than water will help slow down the drying of the material;
- To preserve the design, it is coated with varnish.
Drawings on fabric
It is quite difficult to make fabric drawings; it is better to practice on a different basis. If you have experience, it is quite possible to paint on silk, synthetics, and natural fabrics. First, the fabric needs to be washed, ironed, stretched over a frame or placed on a flat base. Place oilcloth under the fabric and make a drawing with a special felt-tip pen for fabric. Then do artistic painting. The easiest way is to work using ready-made stencils, but you can make a drawing yourself. After a day of drying, you need to iron the product, after 2 days it can be washed.
Paintings on canvas
For acrylic, canvas is the ideal base. The paints must be prepared in advance and diluted with water. If mixing is planned, it is better to use a special solvent, otherwise the material will dry out quickly. The palette should be periodically sprayed with water. They begin to draw the largest details, and as they draw smaller lines, change the brushes to thin ones. The norm for diluting paints with water to create more transparent tones is less than 20%.
Drawings on paper
It’s worth trying drawing on paper for the first time. Since the structure of the paints is dense (it is, in fact, liquid plastic), ordinary thin paper will not work. It is better to take cardboard or special thick paper. Drawings can also be done on paper wallpaper that is already pasted on the walls. This is a popular design technique that allows you to decorate a plain material and give the room an original look.
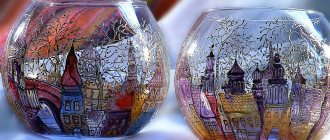
Glass painting
Pictures on glass look very beautiful, reminiscent of finished stained glass. The outlines of the future drawing are made with a thin marker according to the sketch, which is placed under the glass. Afterwards, paint is applied in layers, forming the desired color combinations, accents, lighter and darker areas. At the end of the work, acrylic varnish is applied to the painting.
Colors give endless scope for imagination. Learning to draw is not difficult. Even without talent, you can make beautiful drawings with enough diligence and perseverance.
Glass painting
Painting stained glass windows with your own hands is quite simple if you stock up on the necessary materials and patience. The most difficult thing is to choose the perfect pattern and colors that will look harmonious. The best solution would be to make templates and sketches in advance to imagine what your window, room partition, mirror, vase or favorite mug will ultimately look like.
Important note! Ordinary paints (gouache, watercolor) will not be suitable for painting stained glass. They are easy to wash and make cleaning difficult. To make stained glass painting look natural, you need contours on the glass and special paints. Let's look at their types:
- Contour paints. They can be found in any art store, the main companies are Pebeo, Decola, Hobby Line. These paints are thick and have a special cap to make contouring easier. They will imitate soldering of glass, and it will seem that your stained glass window is real and not painted.
- It is best to fill the space between the borders with special paint, for example, solvent-based. However, this material has a sharp, characteristic odor, so it is best to work with a respirator and in a well-ventilated area. If you just want to practice, you can use simple artist's paints (inexpensive and easily available). Main companies: Pebeo, Marabu.