Probably everyone who has ever done their own repairs has encountered the problem of uneven paint. It seems like he tried hard, carefully selected tools and paint, prepared the base, and the result was stains and stains, which were clearly visible in bright daylight. Most of those who have encountered this effect immediately come to mind with the “saving” idea of applying a second layer. But, usually, such a solution is not the best solution. It will only get worse. Paint it at least five times in a row, the effect will be the same. Stains and stains will only become more noticeable. What is the reason and how to paint the ceiling without streaks correctly? Our tips will allow you to do this job efficiently.
Materials and tools
Putting the ceiling with your own hands involves preparing the appropriate materials:
Primer
A special deep-penetrating emulsion will be very appropriate here, acting as a connecting layer between the ceiling and the finishing material. In addition, the absorbency of the working base is reduced, its resistance to pathogenic microorganisms (mold, mildew) is increased, and the paint is applied more smoothly and efficiently. If the primer is used to treat concrete floors, then it is necessary to choose a solution with a penetration depth of up to 5 mm. Universal mixtures give a good effect.
For information! It often happens that when painting a ceiling, the putty falls off. To avoid such negative consequences, it is recommended to use a primer and putty from the same manufacturer.
The emulsion should be used after cleaning the ceiling from the old coating, twice - the first time before the initial leveling of the uneven surface, the second time before the final puttying. The average drying time for the ceiling after applying the primer mixture is a day.
Putty composition
Necessary for leveling a crooked ceiling. At the initial stage, it is necessary to use a starting putty that can fill existing cracks and crevices well, as well as achieve the most even plane possible. There are many putties on the market (adhesive, oil-adhesive, latex, acrylic, PVA-based), the choice should be based on the characteristics of the working substrate. It is recommended to take into account the specific conditions of the room. If the room has a high degree of humidity, then it is more rational to use water-repellent compounds to prevent peeling.
If it is necessary to repair large differences in the ceiling, the solution is applied repeatedly, allowing time between drying each one. It is good to use a reinforcing mesh for such work, which prevents the formation of cracks.
The final putty of the ceiling for painting is carried out after the starting and priming. Due to the presence of small particles in the composition, the finishing putty allows you to achieve the ideal condition of the ceiling surface. It must be applied in a thin layer.
Suitable tools for applying putty:
- An electric drill equipped with a mixer attachment will allow you to prepare a working mixture efficiently.
- A roller equipped with a long handle for comfortable use will be needed for priming and painting
- Metal spatulas
- Rubber spatula, trowel
- A grater for leveling the base, abrasive mesh, sandpaper (preferably of different grain sizes)
- Building level
- Nylon cord with a colored tint, you can use it to create straight lines
- Containers for preparing the mixture, for working with primer solutions, paint
- Grinding machine for cleaning the ceiling and widening cracks
- Brushes of different sizes
- Respirator, protective mask necessary to protect air channels during construction and finishing work
Reasons for the appearance of streaks after painting
All kinds of stains and stripes on the surface appear for the following reasons:
- The wrong tool was selected for the job. A roller with a coat that was not suitable for the chosen type of paint was used.
- Using a low-quality paint mixture can also lead to this problem.
- During the work, the technique for applying the color mixture was not followed.
- The tone of surfaces painted with different tools may vary slightly. This happens when work is carried out with a roller and brush, or when they combine the use of a spray gun and other tools for applying the paint mixture.
Important! A surface painted with a brush appears darker than one painted with a roller or spray gun.
- If you decide to change the shade of non-tinted paint by adding pigments, then stains are a consequence of such a violation.
- Stains appear when the pigments in the tinted paint are insufficiently mixed.
How to get rid of streaks on a ceiling after painting
The easiest way to decorate a ceiling surface is to paint it. There are a huge number of coloring compositions available: different shades, thickness, shine, and so on, so there are no problems with selecting options.
However, even in such a simple matter there are some tricks.
Stripes and spots
The appearance of streaks after painting is not such a rare problem. And, by the way, this defect is not always caused by a lack of experience working with a roller and sometimes occurs even where stripes themselves are excluded - when painting with a spray gun.
The most common causes of "disaster" are as follows.
A ceiling made of a porous, highly absorbent material is the most “inconspicuous” reason for the formation of streaks. A painted surface looks especially untidy when the porosity is also uneven. In this case, a primer made according to all the rules does not help, since more effective measures must be taken: areas with increased porosity are primed additionally and in several layers.
Painting is done only after the sanded, primed surface looks completely smooth under oblique light.
Excessively thick composition - paint that is too “heavy” will not be able to be evenly distributed by a fleecy roller, let alone a brush. Of course, the recommended degree of dilution is indicated on the product packaging, but sometimes special methods are required to get rid of streaks and stains. Therefore, before painting the entire surface, it is recommended to conduct a test to observe the behavior of the paint.
The most common scheme is the following: first, the ceiling is painted with a 50:50 solution - primer, and then twice with a solution with the consistency of thick sour cream. If overlaps are noticeable in oblique light, the paint will have to be diluted more. It is better to apply two additional coats than one coat that is too thick.
Painting must be done perpendicular to the previous direction. This way you can get rid of stripes caused by overlaps. A good result is obtained by collecting excess paint by rolling a semi-dry roller, always in the direction away from the window.
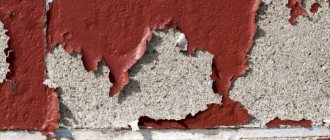
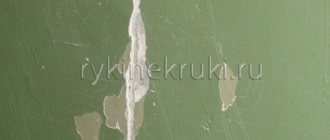
The cause of defects on the ceiling can even be an unsuccessful tool - the pile is too long or too sparse. And even incorrect lighting, since light can both emphasize irregularities and hide them. The photo shows a defect on the ceiling after painting.
How to get rid of streaks
If defects already exist after painting, then it’s too late to lament the lack of compliance with technology. However, it is quite possible to achieve a decent appearance.
If the problem was simply insufficient lighting, then most likely the imperfections will disappear with another coat of paint in the correct lighting. It is recommended to start from the wall opposite the window and always in the direction perpendicular to the last layer.
If the difference between the stripes that appear after painting is only in color, that is, the defect is insignificant, then again, reapplying the paint, but in a very thin layer, gives a good result. The consistency should be liquid.
With unevenness and differences in texture, cosmetic techniques are no longer enough. In this case, to get rid of defects, you will have to sand the ceiling, preferably before priming, prime the surface again and repaint, following all the necessary recommendations: dilute the paint in a suitable proportion, paint in a direction perpendicular to the previous one, and remove some of the paint with a second roller.
If the cause of the stains turned out to be unremoved traces of leaks or rusty water, then neither re-priming nor painting will help. Until the damaged material is removed, a smooth, evenly colored ceiling cannot be obtained.
When repeating work, you should make sure that the reason does not lie in poor-quality primer or paint, for which a fragment of the surface is primed and painted.
How to get rid of streaks on a ceiling after painting
Recommendations on how to avoid or get rid of streaks after painting.
TOP 6 reasons for defects on the ceiling
A complex of reasons will not always influence a disastrous outcome. Even one of them is enough to ruin everything. This is what the totality of all possible factors that cause bald spots looks like:
- illiterate actions;
- poor quality or too thick emulsion;
- using the wrong tools—a roller made of the wrong material;
- absence or insufficient amount of primer impregnation;
- temperature changes, draft, unstable humidity in the room;
- insufficient cleansing of foreign stains.
In addition to unskilled actions, there are other factors that can ruin even an ideal job. However, most of the responsibility lies with the quality of the mixture and technique.
How to paint a ceiling with water-based emulsion with your own hands
Each of the water-based paints has instructions for use on the can. The operating procedure is described there. Some compositions just need to be stirred well before use: undissolved polymers may settle at the bottom of the jar. Some formulations require dilution. The amount of water added is also specified in the instructions and depends on the application method. For spray guns, the dilution is stronger; when using a roller, thicker formulations are required.
Paint tray makes the job easier
When diluting the emulsion with water, add it in small portions. Stir thoroughly and try on a surface area. If the paint goes on evenly and almost completely covers the base, you can paint.
It is more convenient to pour the paint into a special container with a tray and a ribbed platform. You can use a regular basin and a clean piece of oilcloth spread nearby. It's not as convenient, but less expensive.
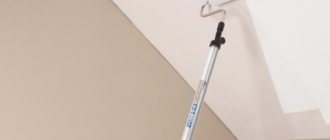
Which roller to choose
A roller for painting the ceiling with water-based emulsion is needed with dense short pile. You need to examine him carefully. The pile should “sit” firmly and under no circumstances should it “climb out”, even if you pull on it. Then inspect how the seam is made. Under no circumstances should he stand out. It must be difficult to find. It is best if it is made obliquely.
Rollers for painting the ceiling with water-based emulsion
Pay maximum attention to choosing a roller: the quality of painting - the absence of stripes on the ceiling - largely depends on how good a tool you have chosen. It is more convenient to whiten the ceiling with water-based emulsion not from a stepladder, but from the floor. To do this, the roller is placed on a long handle and secured well.
How to paint without streaks
To avoid streaks on the ceiling, painting the ceiling with water-based paint should be completed no later than in 20 minutes. Immediately after application, water begins to actively absorb/evaporate and stripes appear at the junction of the dried and “fresh” paint. Therefore, it is advisable to prepare the room. It is necessary to turn off (wrap up) the heating radiators and prevent a draft. It is also advisable to wash the floor immediately before whitewashing; even if you work during the day, turn on the lighting, this will allow you to better control the quality of the paint. Afterwards you can start working.
Ready-to-use water-based paint is poured into a container, a roller is dipped into it, then rolled well over the site, achieving uniform distribution over the entire surface. When the roller has a uniform color, they begin to paint.
The corners are painted first with a brush. After applying a little paint, take a small roller and roll it out well. Then they begin to paint the main surface. The first layer is applied parallel to the window, the second - perpendicular.
You need to stand so that you look at the area to be painted at an angle. This will give you a good look at how evenly the paint has spread, as well as where you have already painted and where you haven't. Move systematically, without jumping from one piece to another.
It is more convenient to paint from the floor, and to do this, the roller must be attached to a long but light handle
The width of the strip painted at a time is slightly larger than the width of the roller. After wetting the roller, place it approximately in the middle of the strip. Quickly roll the paint in both directions from one wall to the other. Don't waste a lot of time: you don't have much of it. On average, the water emulsion dries in 10-20 seconds. If you didn’t have time to apply the strip next to it before, the border will be clearly visible, which you won’t get rid of. Having distributed the paint more or less evenly over the strip, dip the roller into the paint and roll it out again from the middle of the ceiling. At the same time, go beyond the already painted strip by about 10 cm. All this at a good pace without stops and smoke breaks. The edges of the painted strip should not dry out. In general, these are all the rules.
After applying the first coat of paint, some areas may not be painted as well. You need to wait for it to dry completely and paint it a second time. This should already be enough to obtain a flat surface. If even after the third layer of water-based paint you still have streaks and stains on the ceiling, you will have to redo it again. It is necessary to level the surface with sandpaper, prime it again and paint again.
What color
The easiest way to achieve perfect evenness is to use “snow-white” paint. All pigments clearly highlight even small irregularities, so the process of puttying the ceiling should be given maximum attention or use an acrylic or silicone-based water-based emulsion.
BuildRemPlan. Stains and stains after painting the ceiling
Probably everyone who has had to do their own repairs has at least once encountered the problem of uneven painting.
It seems that he tried hard, selected paint and tools, prepared the base, and the result was stains and stains, clearly visible in bright daylight. The “saving” thought immediately comes to apply a second layer.
However, this, as a rule, does not solve the problem, but, on the contrary, aggravates it. Make at least five layers - it won't do any good. Stains and stains will become even more noticeable.
What is the reason for the failure? How to fix the situation? What rules for painting the ceiling will allow you to avoid streaks and stains?
| No matter what anyone says, it is difficult for a novice master, armed only with video instructions on how to paint a ceiling, to achieve perfection in this matter. Small stains, stains, and unevenness spoil the impression of a freshly renovated room. But don’t rush to call a paid technician to fix the problems. This article provides ways to solve many problems. How much does it cost to correct mistakes when painting a ceiling? Call! Problem 1. Yellowness after dryingDirty yellow stains on the ceiling can be caused by a number of reasons. It is necessary to paint 2 times, the cost of work is from 200 rubles. per sq. m. 1. If there was flooding from above, moisture will seep through any number of layers of primer and putty. They will absorb it like sponges, and rusty spots will appear on the surface. The decision was to use a special primer, Aquastop. It will create a film barrier between moisture and subsequent layers. The area with the stain must first be treated with an antiseptic to destroy bacteria and prevent the growth of fungi. 2. A popular method of dealing with yellow spots after flooding on the ceiling and walls is chlorine-containing preparations, for example, inexpensive Whiteness. If you wet the wall with it, after a few minutes the dirt will dissolve a little. The room is ventilated, the surface is moistened again and this is repeated until the result is achieved. Problem 2: Spotted ceilingThe ceiling may acquire a spotted color for the following reasons: 1. If the room is smoky, nicotine tar deposits look like gray spots, which, if you sniff, smell like tobacco smoke. When treated with a regular primer and when using water-based paint, nicotine dissolves and, accordingly, appears. For such a case, Aquastop or a similar blocking material is purchased. The surface is treated with an antiseptic and primed.
To remove these stains, mix a teaspoon of ammonia with 100 ml of water and add a little dishwashing detergent. The dirt is washed with this solution until it is removed. The ammonia mixture can be replaced with kerosene. 3. Smudges on the surface may appear if the primer or putty is not thoroughly mixed or the primer is not applied evenly. In this case, you need to wash off the paint, re-prime it, putty it, sand the flaws with an emery tool, apply another layer of primer and paint. 4. If shadow-like spots are visible in refracted light, this is a putty defect. They check it this way: in a dark room, they direct a flashlight beam from below at the problem area. If the stain disappears, it means the ceiling is uneven. You need to thoroughly rub the defect with a 240-320 grit sanding tool, putty, then apply a layer of primer and paint. Problem 3: Stripes on the ceilingZebra most often appears due to incorrect paint consistency. If spots or streaks are visible after the first coat, there is no point in painting over them. You need to rinse and prepare the surface again. 1. Paint that is too thick does not apply evenly, and traces of a roller or brush are clearly visible on the dried ceiling. The paint, even if the instructions say Ready for Use, must be diluted with water (the solution behaves unpredictably with a primer) to a consistency at which drops from the whisk fall into a bucket and immediately spread without forming lumps. It is better to use a velor roller with medium pile, trimmed at the edges. 2. Excessively diluted paint dries faster than the painter can apply the second coat. The edges of the layer tear when applying the next one, changing the texture. After drying, folds will be noticeable in the direction of the roller stroke. Solution: the ceiling is washed out, primed, and repainted using the correct technology. If the room is large, it is better to paint with several hands. Before work, you should close the windows and doors of the room and wash the floor; high humidity will prevent the layers from drying quickly. You need to complete all the work in 20–30 minutes, without smoking breaks or lunch breaks. The tools are prepared in advance so as not to be distracted during the process. 3. Streaks on the ceiling mean that the paint was not mixed properly. To do this, it is better to use an electric mixer or drill. |
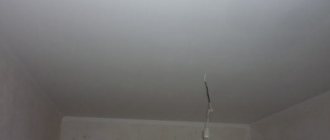
How to fix a painted ceiling.
Is the ceiling poorly painted? Are there any stains on the ceiling after painting with water-based paint? How to fix a painted ceiling? Call me! I'll fix it!
And for those who came just to look, I post information and photos below.
Arrived upon request to a room of 17 square meters. On the ceiling I saw the beautiful outlines of iridescent water-based paint: shadows, spots. These scams were done by a master who does not charge much for his services.
The result of cheap painter services: an uneven ceiling in the form of stripes and springboards. In this situation, there are two options: completely remove the paint and reapply a smooth finishing putty.
This option is financially expensive and is suitable for those who appreciate a flat ceiling.
Second option: leave it as is. We do not remove the paint. If you need to do it in a day, then we do a light restoration without putty. If time and finances allow, then restore the ceiling without cleaning the paint with a leveling layer of putty. In this case, the option to do it in a day was chosen. The most economical option for correcting errors. Which I successfully did.
Everyone is talking about ceiling design. Why don't you like a design project? Look at the photo.
The poorly painted ceiling created a dark cloud effect. Cheap and free. At the end of the calculations, the work came out to be twice as expensive. It’s easier to hire an expensive specialist right away than to choose services at a discount.
Incorrect paint consistency, poor qualifications and the wrong tool leave visual marks on the ceiling.
Chips and craters on the ceiling after painting. This suggests that a cheap primer was purchased, which did not fulfill its main role - to firmly glue the layers of putty together. When rolling with a roller, the wet putty flies off the ceiling.
The effect of paint layering in “pieces” should not be allowed to appear. This is the application of several layers of paint on top of each other without rolling. Thick paint and lack of understanding of the process will turn a smooth ceiling into bumps.
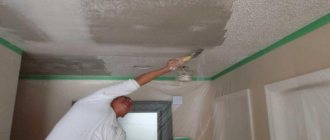
It is better to entrust the ceiling putty to a specialist who can see the layers of putty after moving the spatula. The photo shows poor application of putty. The edges of areas of the finishing layer are torn. There is no unity of mass in the mixture.
Next, my work began. I look for irregularities with my eyes and correct defects in the ceiling.
I cover the holes to the level of the ceiling plane. There should be no protrusions.
The putty takes longer to dry than my work takes. Restoring sections of the ceiling is a difficult and time-consuming task.
The drying process of wet putty is accelerated by a hair dryer.
The corrected areas on the ceiling have a different color and appearance.
The edges of the putty do not look nice against the background of paint.
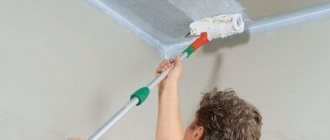
I begin to remove unevenness on the ceiling. I sand the putty. After sanding, the putty is smooth and even.
Water-based paint Duf Superwise. For this order, the choice of paint brand is optimal. It's hot in the apartment. The heating does not turn off - there is no jumper. Dufa paint is plastic. The viscosity of the paint is adjusted to any temperature.
On the can of duf it is written about the properties of the paint. In reality this is true. The snow-white shade of duf paint looks great on the ceiling.
A ceiling of 17 meters requires 5-7 liters of duf paint. Consumption depends on the quality of the finishing preparation of the ceiling: sanding, priming. It is better to prime twice before painting.
I use a regular roller. Manufacturer China. Paint bath 250 mm wide.
To avoid staining the wallpaper with paint, cover the walls with film. The photo clearly shows the process of attaching the film to the baseboard.
Protective film on the wall gives freedom of action. When I add paint to the paint bath, I can rest a dirty roller on the wall.
The condition of the film after painting.
The wallpaper under the film is in perfect condition after painting. I recommend painting first and then wallpapering. If you couldn’t do it in this order, then cover the walls as shown in the photo.
Painter's tools. Paint bath, brush, roller and clean stick for stirring paint. You can use a drill with an attachment to mix the paint. Experience will tell you what is the best way to mix paint.
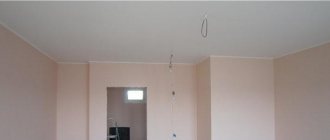
The ceiling after applying the second coat of paint.
Ceilings are always painted in two layers.
In my article, I described in detail the technology of how to fix a painted ceiling after painting.
How to fix a painted ceiling
Is the ceiling poorly painted? Are there any stains on the ceiling after painting with water-based paint? How to fix a painted ceiling? Call me! I'll fix it! And for those who came just to look, I post information and photos below.
How to paint without streaks: tips for beginners
In order for the ceiling to be beautifully and efficiently painted, experts recommend first learning the theory, that is, studying the basic rules for preparing the surface and its further painting. Here are some recommendations for beginners:
- We do not neglect the preparatory work. We always thoroughly clean the surface - this way we will save ourselves from having to redo the whole job again.
- Don’t forget to protect the existing furniture in the room before starting the painting process. Ideally, we paint the ceiling in an empty room.
- We comply with the temperature conditions specified by the manufacturer on the packaging (primers, paints).
- There should be enough light in the room where the ceilings are being painted. Poor lighting is fraught with unevenness and imperfections, which will then have to be eliminated.
- We try to ensure that the room being treated has normal humidity. Experts say that ceilings are painted better in summer than in winter. The reason is higher humidity levels in the warmer months.
By following these simple and understandable tips, even a novice, inexperienced master will be able to properly prepare the ceiling for painting, and subsequently coat it with the chosen composition. We wish you productive work!
Repair of suspended ceilings
It also happens that the suspended ceiling is flooded by neighbors, and something needs to be done about it. Stretch ceilings, although considered one of the most leak-resistant, are still susceptible to water. Even if the volume of water was not very large, and all the consequences of flooding have long been eliminated, yellow spots on the stretch ceiling may still appear. The fact is that water marks do not appear immediately, but gradually appear on the canvas.
The most common conditions look like this: a special elastic film is used as a canvas, and the cause of the appearance of red spots is water entering from above the apartment. The simplest option for eliminating damage would be a suitable means for cleaning a stretch ceiling. Such products are available in a variety of formats - gels, sprays, various solutions, etc. The cleaning product must be used strictly in accordance with the instructions.
If there is no opportunity to use such means, then you will need to think about how to bleach the ceiling using improvised means. For example, you can make a tampon from gauze and cotton wool. Such a swab is moistened in a 10% solution of ammonia, after which they need to wipe the stain, going into clean areas. To complete the work, you will need to wash the entire ceiling with ordinary detergents - then the ceiling surface will look uniform.
Another good option is soda ash. It is diluted with water to a 5% solution, after which the resulting composition is applied to the contaminated areas of the ceiling. The dried solution is washed off from the ceiling surface with warm, clean water. However, if we are talking about using a film ceiling for cleaning, then most suitable products will do - unless you use aggressive compounds. It's all about the smooth surface of the stretch ceiling, which is quite easy to clean.
If fabric was used to decorate the ceiling, the process of removing stains may take longer. The list of acceptable products is the same as in the case of film materials - but they can only be applied and washed off with soft bristled tampons. Detergents must be designed for delicate work. To get rid of very strong stains, it would be better to replace the canvas or contact a specialist.
How to locally repair a painted ceiling?
If local painting of the ceiling is carried out, the following tools and materials will be needed for the work:
- plaster and alabaster;
- putty;
- high-quality ceiling paint (the same as previously used);
- spatulas of different sizes;
- hammer;
- roller, spray gun or brush for applying paint;
- a special remover (needed if the ceiling was previously painted with a waterproof paint mixture);
- ladder;
- painting mesh;
- rags or sponge for cleaning the surface;
- containers for paint and primer;
- sandpaper;
- protective clothing.
We carry out local repairs to the ceiling surface in the following order:
- We clean the place where the defect is located from the paint coating. To do this, wash it off with water, a special remover, or clean it with a spatula or sandpaper. In this case, you also need to capture the area of undamaged finishing. If the cause of the coating defect is stains, then the paint is removed to the very base.
- We carefully wash off dust and small debris from the ceiling and let it dry.
- If the cause of the defect is cracks in the base, then we widen them using a hammer and spatula. We remove dust from the resulting groove and prime it. We putty small cracks, and seal large defects with plaster or alabaster. If the defect is very large, we strengthen the layer of plaster using a painting mesh.
- Next, apply two layers of deep penetration primer onto the prepared base.
- Let's start applying the putty. During the work, we make sure that the surface is at the same level as the entire ceiling.
- When the putty has dried, the section of the ceiling is sanded again and covered with a primer.
- After this, the area of the ceiling surface is repainted. At the same time, the technology for applying the coloring mixture is strictly observed.
If you don't know how to fix a ceiling after painting, the video below will help you figure it out:
The result of the work depends not only on the choice of paint and tools, the preparation of the base and adherence to application technology, but also on the correct temperature and humidity conditions in the room during painting and drying. That is why follow the manufacturer’s recommendations regarding paint application conditions indicated on the container with the coloring composition.
Methods for removing stains on a concrete ceiling
In most cases, the ceiling structures are concrete slabs. Whitewash often acts as a finishing material. It is difficult to remove yellow stains from such a ceiling after a leak, but it is possible. You need to use one of the possible options:
- combined;
- mechanical;
- chemical.
Mechanical method
Work to restore the ceiling structure after a leak should be carried out in stages. The algorithm of actions is as follows:
The first step is to assess the scale of the work. If finishing material (putty or plaster) has crumbled due to flooding, this layer must be removed. Then the formed bubbles must be broken with a hammer, and the exfoliated elements must be cleaned with a spatula. If rust marks appear in entire areas, they will also need to be completely scraped off. The cleaned structure must be allowed to dry thoroughly. Metal parts can often be hidden in the ceiling. Of course, the reinforcement that is located near the rust must be restored and isolated from the finishing layer
To prevent the concrete structure from delaminating, you need to carefully tap it with a hammer. Cement leveling compounds can be used to eliminate dips and unevenness. Tile adhesive is quite suitable as such a mixture.
After applying the first layer, you need to let it set, and only then proceed with subsequent processing. At the next stage, finishing is carried out with gypsum putty. Often it is applied in two layers, leveled and left until completely dry. After this, the coating is sanded. Before painting the ceiling after a flood, you need to prime it. To completely remove marks, you will likely need to apply several coats of paint.
Chemical method
If your flooded neighbors have high-quality waterproofing of their floors, it will be much easier to get rid of the consequences of a leak in the ceiling structure. This is due to the fact that in such conditions the risk of damage to finishing materials is minimized. Therefore, the likelihood increases that you will only need to remove stains on the ceiling after a flood.
It is important to understand that to remove marks on floors, a set of measures must be carried out. This is because yellow spots are not uniform, so there is no universal way to solve the problem
Of course, the mechanical method is much more effective, but good results can also be achieved using chemistry. The work is carried out step by step. Procedure:
- First you need to remove the paint layer. Due to the fact that the ceiling structure is wet, the process will be much faster and easier. You should not count on the fact that wet paint is not damaged - the structure of the material is destroyed under the influence of water. If you neglect these manipulations, soon the entire coating will begin to peel off.
- Then you need to let the structure dry. After this, the ceiling should be thoroughly degreased to remove oils from the surface that got along with the water. For these purposes, a nitro solvent is often used. Degreasing will help remove dirt not only from above, but also in all layers.
- The next step is to bleach the red spots. To do this, use any chlorine bleach. Manipulations must be carried out carefully, applying the product using a sponge. There is no need to keep the washcloth in one place for a long time - this may cause the putty to fall off.
- When the stain stops changing color, you need to stop working and leave the overlap for several hours. This is necessary so that the chlorine can complete its interaction with the contaminant. This is an important aspect that should not be neglected before whitening yellow marks.
- After a while, you can continue cleaning operations. This time you should use the usual means - powder, laundry soap to remove any remaining chlorine.
- At the final stage, the structure is washed with clean water to completely remove traces of detergents.
Methods for removing streaks and stains
Depending on the problems that arise, suitable methods for eliminating them are selected. So, when stains and stains form, coating repair is as follows:
- To get rid of persistent alkaline stains, use a low concentration hydrochloric acid solution. Wash the area with the defect with this mixture and dry it well. Then the ceiling is re-primed, puttied and another coat of paint is applied.
- To remove rust stains, the ceiling is washed with alkaline and acidic solutions. Then the base surface is opened with alcohol varnish. When the composition is completely dry, the ceiling is painted again.
- To protect against the appearance of streaks and stains, the surface to be painted must be primed. Treat the joints of the planes and the corners of the room with particular care.
- For work, choose high-quality compositions with a normal pigment content.
- To remove defects, wash away the old paint layer. Let the surface dry and reapply the adhesive paint mixture.
- If the stains appear due to low-quality pigments included in the paint, then the coating is washed off, dried and repainted with a good quality mixture, which includes persistent dyes.
Advice! Alkyd paints have a special composition that protects against the appearance of streaks and stains on the painted surface.
Technology of painting the ceiling with a roller
At first glance, the task may seem elementary - you just need to dip the roller in a bucket and roll it along the ceiling. However, the technology for properly painting horizontal surfaces involves a number of nuances. Begin by diluting the colorant according to the instructions on the label or in the application. There is no need to experiment with proportions; dilute the paint, regardless of its type, strictly according to the instructions. Some coloring compositions do not require dilution at all; this is necessarily indicated in the instructions.
Ceiling painting scheme
Before touching the work surface with a roller soaked in paint, it must be rolled out on a special tray. This is necessary for uniform distribution of the composition throughout the instrument. The tray is a small stand with a corrugated surface installed at an angle. Instead of a tray, you can use a piece of linoleum spread on the floor.
Paint tray and roller
If the roller is not rolled out first, this will lead to the formation of holes on the painted surface - unpainted areas. Even if you cover them right away, the coating in this area will differ in shade from the main one. Having evenly distributed the paint composition over the roller, you can roll it out onto the ceiling. The paint is applied in parallel strips up to 1 m wide so that their boundaries intersect by at least 10 cm.
It is better to start painting from the window. When applying the first layer, pay attention to the direction of the roller - the latter should go in a straight line, without lifting off the surface. The easiest way for beginners to master the so-called. square-cluster staining method. It involves dividing the ceiling into squares with a side width of 0.7-1 m. They are painted over gradually, horizontally or vertically - whichever is more convenient to work with. Don’t worry that after the paint has dried, the borders of the squares will be visible - subsequent layers will cover them. It is recommended to paint one square “in one go”, without smoking breaks - otherwise the edges of areas that have already dried out will stand out.
How to paint a ceiling with your own hands
If, after the first layer has dried, unpainted “holes” remain, it will no longer be possible to cover them up unnoticed. Therefore, it is most convenient to work with four hands - one paints, the other dilutes the paint, rolls out the roller and monitors the quality of the coating.
How to paint a ceiling with a roller
The saturation of the coating and its texture depend on the number of layers. Water-based and acrylic paints are applied in at least 3-4 layers, with an interval of 12 hours. Experienced painters recommend starting painting the ceiling in the afternoon, then in the morning you can begin applying the next layer. You cannot apply the second layer before the first has dried, as the structure will be damaged and unsightly stains will remain on the ceiling.
One of the most common mistakes beginners make when painting ceilings is sagging. They remain if you do not press the roller tightly to the surface or hold it askew. Paint sagging can only be removed before the layer dries using a foam sponge. If the paint has already dried, only sanding this area will help remove the sagging.
Stains and stains on the ceiling, causes and methods of correction
Probably everyone who has ever done their own repairs has encountered the problem of uneven paint.
It seems like he tried hard, carefully selected tools and paint, prepared the base, and the result was stains and stains, which were clearly visible in bright daylight.
Most of those who have encountered this effect immediately come to mind with the “saving” idea of applying a second layer. But, usually, such a solution is not the best solution. It will only get worse.
Paint it at least five times in a row, the effect will be the same. Stains and stains will only become more noticeable. What is the reason and how to paint the ceiling without streaks correctly? Our tips will allow you to do this job efficiently.
Stains and streaks on the ceiling and how to prevent them from appearing
So, how to paint the ceiling correctly. This, like other types of work performed during repairs, has its own subtleties, so to speak, the secrets of painting.
A negative effect can occur as a result of one mistake or several at once.
After familiarizing yourself with the main reasons for the appearance of stains on the ceiling, you will understand why this happened.
Reason one, thick paint
Viscous paint is much more difficult to distribute evenly than liquid paint. It is most important to dilute it before applying the base (first) coat.
Paint manufacturers recommend diluting them by a maximum of 10%. Although most often the cans indicate that the paint is ready for use and does not need to be diluted.
Popular painting mistakes
It doesn’t matter who will do the work - a beginner or a master with extensive experience. Errors are inherent in both. But admitting your own delusion or incompetence will help you cope with the task.
What does the master miss?
Competent craftsmen with experience can list the “weak points” for a good and high-quality coating in a time or two. For the rest, it’s better to familiarize yourself with them in order to influence the quality of the result:
- Emulsion thickness. Sometimes the manufacturer's instructions exclude the need to dilute the composition. However, you should only focus on the consistency and, if necessary, add a solvent. A good consistency of the composition is a smoothly flowing liquid. When the solution is prepared for the second application, the consistency may be slightly thicker.
- Tools. You can paint well only with a roller that has short or medium pile. It is not recommended to use velor or foam models. You cannot use different tools for actions on the same area, or combine a roller and a brush. This is the direct reason for the difference in shades. The only places where you can use a brush are corners, borders, and baseboards.
- Speed of action. The stroke made with the tool can dry quickly, and the new rolled product forms a visible stripe-border. However, paints do not harden in a minute, so it is quite intensive to work on them. It takes no more than 20 minutes for a medium-sized room.
- Surface preparation. The new material does not combine well with the old one, so the step of removing the previous coating cannot be ignored. You should then check the area for any rust or other highly noticeable stains. You definitely need to go through the priming stage. The main misconception is that fresh emulsion will “hide” all imperfections. In fact, this will not happen - it will only “reveal” the spots.
There are also reasons for the appearance of shortcomings - adding another pigment, color to the solution, or simply not painting. But they are not so common and, rather, relate to exceptional reasons.
Typical beginner mistakes when painting a ceiling
Finishing the ceiling with painting is a popular way to give it a decent and updated appearance. This option is inexpensive, does not require special preparation either from the surface or from the master, and therefore is possible for independent execution.
True, after the end of the event and drying, unpleasant stains are often observed. It’s unlikely that this is exactly what a freshly renovated ceiling should look like, so it’s doubly offensive for your own efforts. It is all the more important to find out the popular mistakes that lead to defects - this way you can prevent them in advance.