The paint is sprayed onto the surface evenly and efficiently if the spray gun works reliably and without interruption. To do this, before starting painting, the spray gun is adjusted.
The process is divided into 4 stages: preparing the paintwork, controlling the size of the torch, setting the pressure, adjusting the paint supply.
An incorrectly working spray gun applies an uneven layer, with smudges and sagging, and the coating takes a long time to dry. This is why adjusting your spray gun is important.
When I hear the word "painting" I grab my gun...
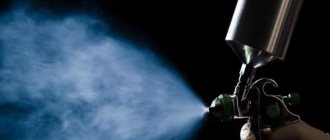
All guns used in car refinishing work on the principle of pneumatic spraying. This means that the paint and varnish material fed into the spray gun and exiting its nozzle is broken into small particles by a stream of compressed air escaping at high speed from the air cap holes.
As a result, a so-called paint torch is formed, consisting of particles of paint and varnish material moving towards the surface to be painted. Having reached the surface, the particles settle on it, forming a paint coating.
Design and design features of spray guns
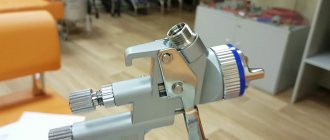
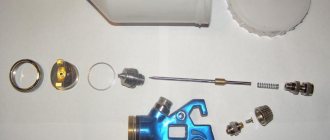
The design of spray guns includes:
- housing with channels for supplying compressed air and paint, equipped with needle valves,
- release lever that controls valve switching,
- output nozzle for mixture formation and formation of a torch of the required shape,
- reservoir (tank) for paint,
- adjusting screws for changing air flow, paint and spray pattern adjustment.
SATA spray gun design
The design features also include the trigger mechanism. It is designed in such a way that when pressed, the compressed air supply first opens. Further pressing causes the paint supply valve to operate.
Functions and location of controls
As already mentioned, there are several adjustment screws on the body of any modern spray gun.
- The first, the top one (on some spray guns, such as SATA, can be located on the side), is responsible for adjusting the size and shape of the spray torch.
- The second is responsible for adjusting the needle stroke and the amount of material supplied.
- Many spray guns also have a third screw, with which the air supply at the inlet is regulated. As a rule, it is located at the bottom of the pistol grip. For SATA, this screw is located “at the back” - under the material feed adjustment screw.
Regulators on the body of the SATA spray gun
The issue of adjusting the spray gun comes down to choosing the correct air-material balance.
With the right ratio, these parameters make it possible to obtain the most uniform paint spray across the entire width, and the same uniform distribution of the paint and varnish material over the surface.
Tips for use
Scheme of using a spray gun.
In order for the equipment to work correctly and efficiently, it is necessary to provide conditions for its operation. After each use, the spray gun must be washed so that the nozzles are not clogged with paint residue. All ventilation holes in the tank must be blown out and checked to ensure there is no sign of clogging. Blockages lead to an uneven supply of paint mixtures, the paint flows intermittently, and the torch can deviate greatly from the axis.
After cleaning, dry it if any drops of water remain. The spray gun must first be disassembled so that there are no traces inside the nozzles. For cleaning, use soft, non-abrasive products; metal brushes should not be used. If this rule is not followed, the nozzles and air heads may be damaged. When cleaning with a solvent, under no circumstances should the spray gun be completely immersed in liquid and left there. The equipment should only be stored in a dry place. Before each use, the spray gun must be assembled and checked. The correctness of its settings largely depends on the state of the device.
Spray gun system
Depending on the amount of compressed air pressure at the inlet to the spray gun and at the air cap (outlet), all paint guns can be divided into three main groups:
- conventional (high blood pressure);
- HVLP (High Volume Low Pressure - large volume of air and low pressure);
- LVLP (Low Volume Low Pressure - low air volume and low pressure).
Different types of paint guns look almost the same in appearance.
The “highlight” is hidden inside the design. Today, the last two types of sprayers are the most progressive, economical and meet environmental standards. As the name suggests, they are characterized by low operating pressure: if conventional conventional guns spray the material at high pressure (approximately 3-4 bar), then guns of the HVLP and LVLP systems spray at low pressure (approximately 0.7-1.2 bar).
What does this give? The main advantage is the high paint transfer coefficient. At low pressure, less paint turns into useless mist around the part (the so-called overspray, “overspray”), and more is transferred to the surface being painted. For low-pressure spray guns, the transfer coefficient reaches 65-70% (compared to 30-45% for conventional sprayers). Considering that metallic and pearlescent paints are not cheap, you can calculate how much money such a spray gun will save you.
The most accurate way to measure outlet pressure is to use a special air test cap with two pressure gauges.
To set and control the pressure of the HVLP gun, SATA produces a test head with two pressure gauges
Unfortunately, such attachments do not come with the gun, so this value is controlled indirectly, by the pressure parameter at the inlet to the spray gun. We will begin adjusting the spray gun by adjusting this parameter.
Inlet Pressure Setting
The pressure at the inlet to the spray gun is a standardized indicator and recommended by the manufacturer. It is always indicated in the technical documentation for the spray gun.
It is advisable to adjust the inlet pressure using a regulator with a pressure gauge connected directly to the gun handle. Because on the way of compressed air from the compressor to the spray gun, losses of up to 1 bar, and sometimes higher, are inevitable (this depends on the length of the air line, the number of “local” resistances, the condition of the filters, etc.). A regulator connected to the gun handle will allow you to adjust the pressure more accurately.
Setting the inlet pressure using a pressure gauge-regulator
The process of setting the inlet pressure itself is quite simple.
1. Open (unscrew) the air supply and torch size regulators to the maximum values. Adjusting the paint supply does not play a role in this case.
2. Then press the release lever of the spray gun to start supplying compressed air. At this time, rotate the air supply adjustment screw on the pressure gauge to set the recommended inlet pressure.
Let me remind you that for conventional spray guns this value is from 3 to 4 bar; for HVLP and LVLP system guns, depending on the model and manufacturer, this value can vary between 1.5-2.5 bar (mostly 2 bar).
Adjusting the inlet pressure using a pressure gauge-regulator connected to the gun handle .
1. Fully open the air supply. 2. Fully open the torch width regulator. 3. Press the trigger. 4. Set the recommended pressure on the pressure gauge. 3. After adjusting the inlet pressure, fully open the paint supply (3-4 turns of the regulator). After making sure that all adjusting screws are open to the maximum, and the viscosity of the paint or varnish is as specified, you can begin testing. But more about tests later.
If the gun is equipped with a built-in pressure gauge
Setting the inlet pressure is even easier on advanced models equipped with built-in digital pressure gauges.
SATAjet 4000 B RP Digital with integrated digital pressure gauge
If the gun is equipped with a built-in pressure gauge . 1. Fully open the torch regulator. 2. Press the trigger. 3. Set the recommended pressure by rotating the air supply regulator on the spray gun.
If the pressure gauge is without a regulator
If the pressure gauge is without a regulator . 1. Fully open the air supply. 2. Fully open the torch width regulator. 3. Press the trigger. 4. By rotating the adjusting screw on the compressor gearbox or filter group, set the recommended pressure.
If there is no pressure gauge at all. Least accurate method
If your spray gun is not equipped with any measuring instruments, you can very roughly and approximately set the pressure on the compressor gearbox or filter group pressure gauge.
When choosing pressure in this case, remember that the pressure drop in a serviceable and clean filter is 0.3-0.5 atm (and in a clogged one - much more!), and about 0.6 a for an air hose with an internal diameter of 9 mm and a length of 10 m .
If there is no pressure gauge at all. Least accurate way! 1. Fully open the air supply. 2. Fully open the torch width regulator. 3. Press the trigger. 4. Set the pressure on the reducer so that for 10 m of hose (internal diameter 9 mm), the pressure on the reducer is 0.6 bar more than the recommended inlet pressure of the gun.
Regulators and their purpose
To successfully calibrate any device, you should know which elements of its design are responsible for changing performance indicators. The effectiveness of setting up the tool configuration directly depends on a clear understanding of the purpose and operating principle of these elements. Fortunately, adjusting the spray gun is not very difficult and boils down to rotating 2-3 valves (depending on the model), which we will discuss later.
Torch size regulator
A screw element that changes the position of a rod with a cone-shaped tip, reminiscent of a thick awl. Regulates the air pressure going to the head of the instrument by moving the rod closer or further from the through hole. The further the tip is located from the nozzle, the stronger the air pressure enters the head, creating a larger torch. The approach of the rod, on the contrary, limits the flow, reducing its influence on the formation of the torch. The maximum size of the torch is an elongated oval, and the minimum size turns it into a point.
Material supply
The flow of paint from the tank to the nozzle is blocked by a special needle, whose cone-shaped tip fits tightly to the inner walls of the nozzle. When the trigger is fully pressed, the needle moves back slightly, allowing the material to fall on the head of the spray gun and break into millions of tiny droplets under the pressure of the air flow. The feed screw adjusts the distance the needle will retract. Minimum paint supply means that the gap between the cone and the walls of the nozzle is very small and is not capable of passing a large amount of mixture. The maximum adjustment value, on the contrary, indicates that the needle moves a long distance, completely opening the exit to the air head.
Air supply
Fundamental setting of the optimal value of the input pressure required for the correct operation of the tool. Despite its importance, not all models are equipped with a built-in screw, forcing owners to resort to using third-party gearboxes (pressure gauges with regulators). Fortunately, more and more modern spray guns have the ability to change the air supply, without the need to connect third-party devices. Unlike the settings of the torch or material supply, which can be adjusted based on your needs, the volume of supplied air must have a single value specified by the manufacturer in the technical documentation. Reducing or exceeding the optimal threshold will distort the shape of the torch, making it unsuitable for professional work.
If the recommended inlet pressure is unknown. Configuring “no name” pistols
Let’s say we bought an inexpensive spray gun on the market with the only “brand” “Professional”, and we don’t know any more information about this gun - neither the type, nor recommendations for setting, nor even the manufacturer. In this case, the inlet pressure can be determined experimentally.
Fill the spray tank with enamel or varnish of standard viscosity, fully open all the adjusting screws and, by rotating the regulator on the pressure gauge, achieve the most uniform imprint of the torch at a distance of about 15 cm to the test surface. The pressure recorded in this case will be the desired working pressure at the inlet for this pistol
It is worth saying that if you resort to this setting, you may be disappointed in many spray guns. The main problem with setting up cheap guns is that to obtain a uniform spray, either a huge amount of air is needed, which requires more powerful compressors, or they have high outlet pressure, which does not allow high-quality application of base enamels containing a lot of aluminum grain.
A high-quality professional spray gun differs from a cheap one, even if it looks beautiful, just as clearly as a branded Swiss watch differs from Chinese consumer goods.
SATAjet 3000 B HVLP. On the left is the original, on the right is the fake.
A good painter can paint a car with a bad gun - and it will turn out well. Painting the second one is also good. And on the third, for example, problems will appear... So for car painting virtuosos, it’s simply a sin to spare money on their main tool.
Torch size when painting
As practice shows, the highest painting efficiency is achieved when working with a torch of maximum size. The wider and more uniform the torch, the more evenly the paint will be distributed over the surface with fewer passes.
Of course, in some cases, for example, during partial repairs, painting various small parts, hard-to-reach places, etc., the torch size, paint supply and inlet pressure can be adjusted based on the need at the discretion of the painter. But in most cases, when painting, the torch size adjustment screw should be opened to the maximum.
Remember that the maximum torch size can only be achieved with sufficient paint supply.
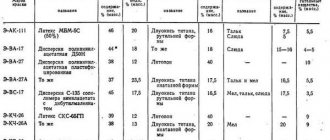
Nozzle diameter
It is also important for a car painter to select the diameter of the spray gun nozzle - this can achieve optimal atomization of materials with different viscosities. The thicker the paint material, the larger the nozzle diameter. And vice versa.
Each paint manufacturer clearly indicates which nozzle should be used for which material and what type of work performed. As a rule, these recommendations correspond to the following values (or are not far from them):
- base enamels - 1.3-1.4 mm (for light colors 1.3 is better);
- acrylic enamels and transparent varnishes - 1.4-1.5 mm;
- liquid primary soils - 1.3-1.5 mm;
- filler primers - 1.7-1.8 mm;
- liquid putties - 2-3 mm;
- anti-gravel coatings - 6 mm (special sprayer of anti-gravel materials).
It is easy to understand that the diameter of the nozzle significantly affects the amount of paint passed through and its consumption. For example, varnishing a large hood with a 1.3 mm nozzle will be quite problematic (according to some craftsmen, you could shoot yourself). Even if the paint supply is opened to full capacity, the throughput with such a nozzle for paintwork materials of such viscosity will be clearly not enough. Through a 1.5 mm nozzle, all other things being equal, the paint and varnish material passes through a third more than through a 1.3 mm nozzle.
The variation in nozzle diameters is also due to the habits of painters: some like to apply “thinly”, while others are used to “flooding”.
Preparing paint for work
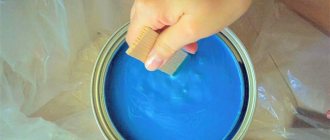
To properly prepare the paint for application, you will need a separate plastic container or measuring ruler. Typically, manufacturers indicate on the packaging the proportions in which the mixture is mixed with the activator. For example, the 2x1 marking indicates the need to mix two parts of the paint volume with one part of the activator volume.
For accurate proportional mixing you need a measuring ruler. If it is missing, you can use a plastic container. Uniform graduations should be applied to it, which will help to accurately measure the proportional parts of the hardener and the painting material itself.
For effective spraying and obtaining an aesthetically attractive gloss, such a factor as the viscosity level of the composition is important. To achieve the required performance, a solvent is added to the activated paint. Difficulties may arise here, since not all manufacturers indicate in the instructions the recommended ratio of coloring agent to solvent.
Experienced specialists prepare the mixture by eye, adding the second component in small portions and observing the consistency.
Expert opinion
Ilya Vyacheslavovich
Consultant for body repair at krasymavto.ru
Ask a question For beginners, it is best to select a painting material with detailed mixing instructions when purchasing paint. If the can says, for example, 2x1+10%, this means that 10% of the total solvent is added to the paint, activated in a two-to-one ratio.
When you plan to paint a surface with a metallic effect or with additional protection from external factors, a two-layer coating is done. In this case, the base paint is applied first, and then the acrylic varnish.
Acrylic varnish is prepared in accordance with the manufacturer's instructions. The components are mixed in the proportions indicated on the specific packaging. With a two-layer coating there is no need to activate the paint. Its drying is ensured by the evaporating solvent.
Testing the spray gun
There are three simple tests that allow you to evaluate the serviceability of the spray gun and the correctness of its adjustments:
- test for the correct shape of the torch imprint;
- test for uniform distribution of paint in the torch;
- spray quality test.
The main one is the first one, and we’ll start with it.
Torch imprint correctness test
To carry out the test, we need a sheet of clean paper or cardboard, previously fixed to the wall. Then we proceed as follows.
- Make sure that all adjusting screws of the spray gun are open to the maximum, and that the viscosity of the paintwork in the tank is normal.
- Bring the gun to the test surface at the distance recommended for the type of your spray gun (20-25 cm for conventional sprayers, 10-15 cm for HVLP, 15-20 cm for LVLP/RP).
- Direct the nozzle axis perpendicular to the surface of the sheet and literally press the release lever for a second.
- We look at the imprint of the torch. By its appearance you can judge how correctly the gun is adjusted.
The most effective and visual way to check the correct operation of a spray gun is to control the shape of the spray spot.
The procedure should be performed every time before staining. Test spraying is carried out on the surface of a clean sheet of paper or cardboard, fixed vertically. If the spray gun is in full working order and correctly adjusted, the torch imprint should be a clear, strongly elongated oval of evenly applied paint (possibly with a slight blurring of the edges). Its sides are smooth, without any protrusions or depressions, and the paint and varnish material is evenly distributed over the entire area of the stain.
If the torch print does not correspond to the standard, the reason is often trivial - an unbalanced ratio of air supply to paint supply. So, if there is an excess of material in the center or at the edges, try reducing the supply of material by turning the screw no more than one turn and repeat the test. If the torch is shaped like a figure eight (very narrowed in the center), reduce the inlet pressure. The fingerprint takes the shape of a banana if one of the side channels of the air cap is clogged.
Read more about other reasons for incorrect spraying here.
For an experienced painter, not only the shape is important, but also the degree of saturation of the spray spot (dry, normal, with smudges forming). Based on this information, you can preliminary estimate the speed of movement of the paint gun and select the optimal distance to the surface to be painted.
Test for uniformity of paint distribution in a torch
We unfold the air cap or the entire spray gun so that the torch imprint becomes horizontal. We press the trigger and spray the material until the paint begins to flow down in streams. By observing the flow speed of these streams and the distance between them, we can draw conclusions about the uniformity or, conversely, unevenness of the distribution of paint in the torch.
Test for uniformity of paint distribution in a torch
For high-quality and effective painting, the material must be distributed evenly or with a slight concentration in the center of the torch. Examples of correct and incorrect distribution of material are given below.
Keep in mind that there are air caps specifically designed for high concentration spray in the center of the spray.
Spray quality test
To finally make sure that our spray gun applies the paint and varnish material evenly, we will conduct one more, final test that simulates the painting process itself. We make a pass along the test surface at the recommended distance and at a uniform constant speed with the sprayer on. The size of the paint droplets in the resulting strip can tell us something.
Spray quality test
Firstly, you should not try to achieve very small droplets of the same size. The size of the droplets depends on both the spray pressure and the degree of pigment grinding. Therefore, a uniform distribution of smaller droplets than the rest over the print is a normal situation. It is also normal for the droplet size to decrease slightly from the center of the print to the top and bottom.
Remember to use the minimum required pressure to achieve a good spray. Too much pressure will lead to increased fogging, excessive material consumption and an excessively “dry” rough coating.
Summary
- When completely painting the body, painting individual parts and other large surfaces, the correct setting of the spray gun is considered to be one in which the air flow, paint supply and torch width regulators are fully open, and when the trigger is pressed, the recommended pressure at the inlet to the spray gun is set. In this case, the torch imprint should be as uniform as possible, without any flaws or geometric displacements.
- For partial painting, painting small parts and hard-to-reach places, the width of the torch, material supply and inlet pressure can be varied depending on the situation. The main criterion always remains the correct shape and uniformity of the torch imprint.
- The recommended inlet pressure, depending on the model and manufacturer of the spray gun, varies between: 3-4 atm for conventional sprayers and 1.5-2.5 atm for HVLP and LVLP (RP, Trans Tech). For exact recommendations, see the documentation for the spray gun.
- If the recommended inlet pressure is unknown, it is selected experimentally until the most uniform spray pattern is obtained (with all regulators on the spray gun body fully open).
- The spray nozzle must match the viscosity of the material being sprayed.
And don’t forget to perform a simple “ritual” of setting up the spray gun before starting any painting work.
Actions upon detection of breakdowns
The main problem that owners of spray guns face is clogging of knots. Action: clean all elements at once to avoid difficulties. To do this, you must use gasoline or thinner.
Important! Usually problems arise with the valve. The part is very small, and therefore needs to be cleaned carefully.
Also, the paint nozzle and nozzles become clogged very often. To clean, use a solvent and a small brush. At the same time, it is necessary to make sure that no scratches are formed during cleaning, since this can lead to distortion of the shape of the torch (this must be avoided - otherwise there will be a sad lesson for the future).
The information provided is enough for a novice master to understand what setting up a spray gun is.