Festivals of colors have recently gained more and more fans. The idea of holding a celebration itself belongs to the Indians. In this way they celebrate the onset of a wonderful time - spring. There are several versions of the origin of the holiday. The most frequently voiced of them is the legend about the girl Holika, who was not afraid of fire. It was she who became the personification of the passing of winter in India. However, today such a festival is held not only to mark the end of frosty days. Such events are relevant at any time of the year. So, how to make Holi colors with your own hands, and how safe is such a product? Let's figure it out.
Peculiarities
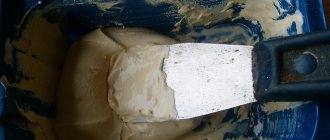
Regardless of the type, most people perceive paint as a purchased product, but making it with your own hands at home is not so difficult.
As a rule, such a mixture contains only 2-3 main ingredients that must be included, which can be purchased on the market without any problems. Expensive paints and varnishes from the best brands can show much higher quality due to inclusions of various additives, but for unpretentious use, homemade paint will also work.
Making your own paints allows you to significantly save on buying expensive paint and make the product exactly the type and color you need.
It is quite possible that such a material will be somewhat inferior to expensive industrial analogues, say, in terms of durability or the ability to withstand negative external influences, however, for relatively minor repairs in the garage, this option is ideal.
A few words about the use of paints
Holi colors differ from other similar substances in their plant origin, and therefore they are considered completely harmless to the health of participants in the festive event. To make paints, they use starch and corn flour, to which food coloring is added. The most popular ingredients are the following:
- phalaenopsis;
- turmeric;
- sandalwood.
The extract or food additive when making your own Holi dye produces a wide variety of colors. But such coloring substances are used not only at festivals; they can also be used in other areas:
- make a bright, unforgettable photo session;
- used in body painting;
- at festive events for children and adults;
- at theatrical performances.
Manufacturing methods
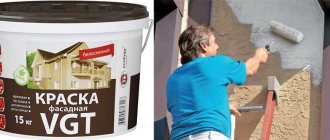
There are many recipes for making your own paint at home - it all depends on the type of paint and varnish material that you plan to prepare. It should be noted that it is better to buy too complex types of paint (such as facade or heat-saving) because they contain a huge amount of additives. You can and should try to do everything else yourself.
Slate
Chalkboard paint paints any surface in such a way that it creates an imitation of a chalk board. There can be quite a few ways to practically use such a finishing material, but first of all, children’s eyes should light up - it’s very convenient to write on a painted surface with chalk!
The composition is absolutely non-toxic even in the factory version, so its use in a nursery is quite appropriate. The home version differs from the sold one only in that the surface scratches faster.
The simplest method involves simply adding two spoons of cement to a glass of any acrylic paint.
There is a more complex recipe: to three parts of acrylic paint, add one part of matte varnish based on the same acrylic, cement (or putty, or grout) and water. In both cases, the mixture is thoroughly mixed. The creator chooses the coloring at his own discretion .
To turn a wall or furniture into a full-fledged slate, you can add a small amount of magnetic chips to the cement - then the resulting substance will be able to attract metal objects . It is not difficult to calculate the amount of such crumbs: the more there is, the higher the magnetic properties of the dye.
Oily
The paints used by artists for oil painting are very similar in their formulation to their construction counterparts, and people of art traditionally prepared materials for creativity on their own.
The most difficult thing to get is pigments, that is, coloring substances. You won’t be able to prepare them yourself, so all you have to do is buy them in a store or order them online. The manufacturing process can be toxic, so you should take care of personal protective equipment in advance : a respirator and gloves.
The procedure should be carried out only in a well-ventilated area.
Separately, it is worth saying that the finished composition can react with metal, so metal utensils are not suitable for such operations .
Then everything is simple: the pigments are thoroughly mixed with linseed, nut, poppy or hemp oil. There is no exact proportion, but the manufacturer’s task is to completely wet the pigments and bring them to a homogeneous liquid state with a minimum of oil used, otherwise the paint will quickly turn yellow when dried. For kneading, use a glass rod or a special artistic tool - a palette knife .
You can also add a little wax (provides a matte finish), resin (adds shine) or turpentine (helps thin the mixture).
Acrylic
Making acrylic paint is not difficult in words, but its composition includes many ingredients that are unlikely to be found in the home of an ordinary person. As in the case of oil paint, you will have to independently find and select ready-made pigments that are mixed with water to obtain a colored paste. After this, the resulting liquid dye is combined with an acrylic dispersion, which will also have to be purchased specially. The thickness of the composition is adjusted by adding the required amount of water.
Since going to the store for complex ingredients is a must, you can explore the possibility of using other additives. Special antifreezes will help the paint and varnish material better withstand low temperatures, fire retardants will make the composition resistant to high temperatures and fire.
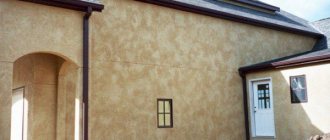
Textured
Stylish modern renovations are characterized by the use of textures that differ significantly from smooth and even surfaces. To decorate walls, special textured paint is often used, which is a cheaper substitute for expensive repairs using natural stone, sand, and so on.
The variety of finished products cannot be replicated at home, but the simplest varieties can be made yourself.
The basis for such experiments will be acrylic paint of any type. To give it a characteristic rough texture, you need a filler, which can even be made from ordinary putty.
For something more intricate, you can go to a hardware store to buy granite crystals or building sand, which will add texture to the paint.
Experts pay special attention to the fact that the use of ordinary river or sea sand instead of pure construction options is not recommended due to the heterogeneity and size of the fraction, and this does not contribute to good adhesion.
Basic recipe
Components:
- Acrylic dispersion;
- Coloring element - pigment;
- Water.
The pigment substance and water are mixed to a paste-like state. The paste is mixed with acrylic dispersion until smooth. The consistency is adjusted by adding liquid. The dye is ready. Adding various ingredients gives it additional qualities. Additives can be antifreeze, fire retardant, thickeners. Thanks to them, the CM becomes frost-resistant, not afraid of fire, and wear-resistant.
Other options
Recipes for different types of paints are quite numerous and strongly depend on the type of surface to be painted and the required properties. In particular, the so-called Finnish paint has gained enormous popularity for outdoor work . It is heat-resistant and designed primarily for wood, but is also suitable for concrete and various types of roofing .
A large bucket of such paint requires: 8 liters of hot water, 1 kg of rye flour, 1 kg of iron sulfate, 120 g of kitchen salt, 0.8 liters of drying oil and 4 kg of ocher. The same recipe can be found everywhere on the Internet, although in each case the proportions may differ slightly. For painting roofs, a Finnish recipe with twice the drying oil content is usually used.
Decorative types of paints are often made for home use, for example, stained glass or for glass painting . In most cases, the base is the same acrylic paint, and all that remains is to understand what to add so that the composition acquires the desired properties. Thus, marker paint is obtained by adding polyurethane and epoxy resin to an acrylic dispersion, which provide it with smoothness and elasticity combined with water-repellent properties.
Any paint becomes fireproof by adding the right types of fire retardant , and the metallic color can be complemented with a characteristic texture by adding metal chips.
Rubber and powder paints , widely used in the automotive industry, are perhaps the only paint and varnish materials that are usually not made at home due to the complexity of the process and the impossibility of obtaining all the necessary ingredients of proper quality.
The dangerous side of paints
Of course, it is generally accepted that formulations made from natural ingredients are completely harmless, not only for adults, but also for children.
At the same time, at the festival of colors (even in India), the number of those for whom the product caused an allergic reaction increases every year.
This is due to the sensitivity and perception of each individual person.
Since the dye is powdery, it easily disperses in the air, and therefore enters the respiratory tract of most of those present. For people suffering from allergies, with problems with the bronchi or lungs, this is extremely dangerous. After all, there is a risk of deterioration of the condition as a whole.
If paintwork gets into your eyes, it can even lead to loss of vision. In any case, the inflammatory process and other problems are guaranteed.
What aggravates the situation is mixtures made from synthetic components, in which case even healthy people are susceptible to allergies.
The presence of sandalwood is very dangerous for pregnant women.
In this regard, regardless of whether a person is healthy or has certain diseases, it is imperative to protect the mucous membranes, respiratory organs and skin.
It is not advisable for allergy sufferers, pregnant people and asthmatics to attend such events at all.
Getting started - preparing the palette, brushes and paints
To properly prepare your workplace and choose work clothes, you need to know the features of acrylic. When dry, it becomes water resistant. If the drops get on your shirt or on a wooden table, it will be impossible to clean them. Therefore, before starting work, you should put on an apron, wrap the table with cling film and cover the floor with thick paper. If acrylic does get on clothes or furniture during work, try to quickly wash the stain with water or fill it with solvent.
For work you will need the following materials:
- base: paper, cardboard, plywood or canvas;
- set of acrylic paints;
- thin and thick brushes;
- palette;
- glass of water.
For beginners, it is better to take thick paper with a rough texture or white cardboard as a basis: it is easier to draw on them. Having mastered the basics of acrylic technique, you can move on to canvas, wood and other materials.
If the painting surface is a little dark, prime it before starting work. Art and construction stores sell special white acrylic primer. Apply it evenly to the surface with a wide brush and let it dry completely before painting.
Acrylic paints are sold in individual tubes and in sets. For beginners, a set of 12 colors is suitable. It’s worth buying an additional jar or tube of white acrylic: this is the most popular color, it runs out earlier than others. For specific surfaces (fabric, wood, glass, plastic), it is worth choosing the appropriate set: the type of paint should be indicated on the box. Any paints are suitable for drawing on paper and white cardboard.
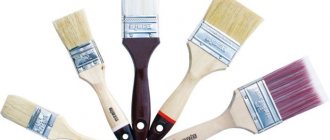
For those who are just learning to paint, it is recommended to choose brushes made from squirrel fur as a material, although brushes made from fox fur are more common on sale.
Palettes for acrylic paints are sold in art stores. Most often it is a white plastic board with a hole for your fingers. This palette is easily washed off from paint that has not had time to dry. Sometimes palettes are made of plexiglass: they are in no way inferior to plastic ones, but are heavier in weight. You can make your own palette from scrap materials (even from a disposable plastic plate).
Before starting work, put a little paint from each jar on the palette. To make it convenient to mix colors, artists place white paint in the upper left corner, warm shades (yellow, orange, red, brown) along the upper border of the palette, cool colors (green, blue, purple) along the left border. It is better to lay out black paint after blue or purple.
Artistic brushes differ in size, shape (round or flat), composition (synthetic or natural), and hardness (bristles and synthetics are stiffer than ponies and squirrels). Since acrylic paints are dense and heavy, medium-hard synthetic brushes hold them better.
Beginner artists should stock up on 3-4 brushes of different sizes. A wide flat brush is convenient for painting the background. Use a wide round brush to make textured strokes. Medium brushes are useful for painting most objects, while thin brushes are useful for drawing details. High-quality round brushes, even large ones, have a thin, elegant tip. It allows the artist to change the thickness of the line and move from broad strokes to drawing small details without changing the tool.
Brushes should be rinsed in clean water. Pour water into 2 cups, so that in one you wash off most of the paint, and in the other you completely rinse your brushes. Renew the water regularly as it becomes dirty. Place a clean, dry cloth next to the cups to blot your brushes and remove excess moisture.
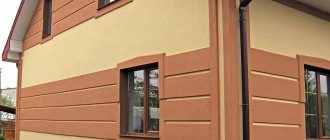
DIY textured paint
The relief coating of the walls inside the house or its facade is done with textured paint. Self-made paint is in no way inferior to factory dye.
The material is based on acrylic paint. Depending on where it will be applied, the composition for interior or exterior work is selected. Granite crystals are added. They are sold in hardware stores and at an affordable price. Special sand can be used to create a relief surface. On the wall the coating will look like painted sand.
You cannot replace sand material for relief with sand from the sea or river coast.
Acrylic acts as a binder that is wear-resistant to external factors. There is no need to dilute, since the composition is ready for application. The material fits on any surface.
What types are there?
In every specialized store you can find three types of paints:
- Highly artistic. These are paints that are purchased by professionals in their field. They consist only of high-quality components, and therefore have a high cost. But for a good painting you need good paints that will not lose their shine or change color over time.
Related article: Techniques for painting with acrylic paints on fabric
- Studio. They are no less in demand than the first option and behave well on canvas. Suitable for both professional and beginner artists.
- Sketchy. They are more suitable for beginners in the art business, since at a low cost you can purchase a sufficient number of paints and choose your own application technique.
Manufacturers of oil paints are located in many countries around the world. Experienced artists have already selected for themselves the options that are suitable for the job. Many people combine their sets from different companies, which is also acceptable.
Oil paints are also divided into transparent and opaque. The latter are denser in structure and therefore do not allow light to pass through them. Each package must have special markings. For example, the designation “*” indicates the durability and longevity of the paint on the canvas. The more such symbols on the paint, the longer the finished canvas will last. The best paints last more than 100 years.
The symbol in the form of a filled black square indicates that the paint is not transparent; if it is half transparent, it is translucent.
The pigments that give paint a particular color can be divided into organic and inorganic. The first type gives brighter shades, and the second gives natural colors. With a good ratio of pigments, manufacturers achieve beautiful and high-quality shades.
For the production of oil paints, imported linseed oil is usually used, since flax, which does not grow on the territory of the Russian Federation, has unique properties, thanks to which art paints have their own unique quality characteristics.
On video: how to choose paints for oil painting.
How to make red
It is possible to make a red color only taking into account the presence of industrial conditions and the participation of special colors in the process. So, when printing, printing houses use strange combinations of dyes to create this color on paper:
- purple and yellow,
- fuchsia and yellow,
- yellow and black,
- blue and orange.
Professionals know the strict proportions of color combinations, sequence and technology. A similar procedure is carried out in textile production when dyeing fabrics.
In painting
While in a printing house it is possible to create a new base color, this will not happen in painting. Even using the same dyes in accordance with the typographic tables will not provide the required result. That is, it is impossible to make red by mixing gouache or another type of paint, and the artist will have to purchase it ready-made. But combining the basic red tone with other colors is only welcome, because through experiments you can get stunning shades.
In computer graphics
To create red on a computer, the RGB system is used. It allows you to build the desired model and get any tone, even a basic one. The development of such programs is carried out by programmers and computer engineers, creating colors using digital codes. There are other similar programs that build models of basic colors, and graphic editors help to diversify the palette of their shades and make the colors pure.
Natural dyes
Not so long ago, people made their own hair dyes, pigments for fabric, thread, knitting wool and other needs. They used dyes that are found in nature. Red color can also be obtained from natural materials. Here are the main ways:
- take bedstraw flowers, combine equal parts with alum, cook for 30 minutes, the result will be a bright red solution,
- mix St. John's wort and safflower flowers, cook in water until the broth becomes thick and has a reddish tone,
- cut the orange lichen, sprinkle it with soda, after 3-4 minutes cherry-colored juice will stand out.
You can even get the red color from a special type of worm that lives in hot countries. But for painting it is better to use store-bought paints, because natural pigments can give unpredictable results. Clothes painted with natural colors fade quickly and leave marks on the skin; this defect can only be corrected by the use of chemical paint fixatives.
What can you paint with acrylic paints?
Acrylic is suitable for any idea. You can paint landscapes, still lifes or portraits from nature or copy from photographs. An art set with a palette of natural shades is suitable for conveying the beauty of nature and people as naturalistically as possible.
For fantastic scenes, it is better to additionally take a special set of decorative acrylic paints. They have specific properties (for example, a fluorescent glow or metallic luster) and are suitable for drawing details and bright accents.
With acrylic you can apply a decorative pattern to fabric or glass, paint wooden furniture or decorate plastic items. The dried drawing adheres to any surface quite reliably. An art store employee will tell you how to select materials for any design idea: from decorating leather shoes to decorating Christmas tree balls.
But from frequent contact with hands or other surfaces, the drawing will sooner or later be erased. Therefore, acrylic should not be used for painting silicone smartphone cases or cutlery: the paint will quickly crack or wear off.
Photographic quality drawing
High quality painting with acrylic paints
Drawing with acrylic paints
The art of realistic painting
Realistic drawing of animals with acrylic paints
Sketches with acrylic paints
Drawing as a method of self-expression
Interior paintings with acrylic paints
How the first paints were made
People have been painting for more than a millennium. You can verify this by going to any exhibition of ancient art or studying the catalog of ancient rock paintings.
If there is a drawing, then there must be paint with which it was painted. But how did the ancient people, who decided to capture their complex, primitive life, get it? However, the answer lies on the surface. Surely the ancient people noticed that many berry crops had good coloring ability, and they decided to use this quality. In addition to the plant palette, primitive man learned to use clay, soot and several mineral pigments available to him for his creative needs.
The first painter in human history experimented on a grand scale. His first and main goal was to have his work preserved longer. Therefore, the paint must be durable and long lasting. And for this you need a binder. This role can be assigned to clay, animal glues, or an egg. By the way, egg yolks are still used in the manufacture of paints as one of the connecting links of the paint system.
To diversify the color range of the first paints, people used ocher and umber.
Basic principles of acrylic painting
Acrylic painting can be airy and transparent - like watercolor, dense and bright - like gouache, voluminous and rich - like oil. Beginners should first make a sketch in pencil, and then cover the drawing with paint. The easiest way is to take a wide brush or palette knife and fill the background with broad strokes, and then add small details.
To see the pencil sketch, you can add more water to the palette and create a light, translucent watercolor background, and then gradually paint over it. The more water you add, the lighter and more transparent your brushstrokes will be.
Brushes should be washed frequently and thoroughly. When acrylic dries, it becomes viscous, resulting in rough brush strokes. Do not leave dirty brushes: they will dry out unnoticed and become hopelessly damaged.
Use a spray bottle of water to keep your palette moist to keep your paints from drying out longer. But under no circumstances splash water on the paper: it will get wet and go in “waves.”
Leave the finished drawing on the table until completely dry. Carefully put the remaining clean paint that was not used during the painting process back into the jars. And if you need to take a short break during your painting session, simply cover your palette with cellophane or cling film.
Options for obtaining charcoal tone
As noted earlier, a completely black shade does not exist in the world, therefore, it is impossible to obtain it. However, there are recommendations for creating tones as close as possible to the required ones.
The easiest way is to combine red with blue and yellow. Gouache and oil paints are suitable materials for artists.
Watercolor won't produce deep, rich color, but if you need a translucent black “veil,” this is ideal.
Professionals often use not classic basic tones, but their shades - purple, cyan, alizarin, cadmium yellow, royal blue. Although an ordinary basic palette will also work.
All colors are taken in equal quantities. Place a drop of each color on a palette (or white dish) at a short distance and stir them with a spatula or brush until the streaks and inclusions completely disappear. The movements are made in a circle.
To lighten the resulting shade, add a little white. To reflect the color of the night sky, you need to add a little purple or blue. Dark forest thickets are depicted with black paint with the addition of greenery.
Reflections of sunlight from dark objects are painted with black and orange paint.
It is not very easy to obtain these fairly saturated colors on your own, so if necessary, you can (and are recommended) purchase ready-made store-bought paint.
Below is a list of color combinations to obtain colors that are close to the desired paint tone.
Red + green (preferably alizarin and emerald) give an interesting result, however, the color may have an olive, purple or brownish tint.
Blue paint with orange.
Yellow paint with purple.
Blue with brown. The most successful combination according to experts.
Increasing the proportion of brown will create a warmer “charcoal”, while blue will, on the contrary, cool the resulting color. If the shade obtained in this way is diluted with ordinary water, you will get a high-quality gray color.
Tips and tricks to help with acrylic painting
Acrylic dries quickly. Do not keep jars or tubes open while painting. It’s better to put the required amount of acrylic of all the shades that you plan to use in your work on the palette, close the containers tightly and open them next time only when the paint on the palette runs out.
To prevent the paint from drying out longer, use special acrylic solvents. Add a drop of thinner to the palette as you mix colors to achieve the desired shade. This will increase the drying time of the paint and make it more flexible.
When purchasing paints and solvents, ask how these types and brands fit together.
Acrylic has good covering properties (almost like gouache or oil). This means that you can paint with it in several layers to correct a bad part of the drawing. Unlike watercolor, acrylic allows you to paint with light shades over a dark background.
When drying, acrylic becomes noticeably darker. How much depends on the quality of the material and the manufacturer. Therefore, choose a shade that is a half-tone lighter than you need (add a drop of white when mixing shades). After drying, evaluate the result and, if necessary, darken the drawing.
Vitaly (Wednesday, 23 November 2021 00:58)
Tatyana and Alexander, thank you for the information about color and paints and for sharing it with beginners and not so artists. Issues of mixing paints are always quite difficult, especially for inexperienced artists. And experienced ones often act on instinct, transferring a lot of expensive paint and ending up with dirt. The reason for everything is a lack of understanding of the essence of this process. Why do we see yellow paint, for example, as yellow? The answer is known from a school physics textbook - it absorbs all the rays of light falling on it (for example, daylight) and reflects only the yellow part of its spectrum. OK! And blue reflects blue, absorbing everything else! So far everything is clear. Now we will mix these two colors - yellow and blue. Blue in the mixture absorbs all rays (including yellow, reflected by yellow). Yellow will absorb everything, including blue (reflected by blue paint), and yellow reflected by it will be absorbed by blue. The colors will mutually absorb each other! And what color should this mixture be? She must be BLACK! All the light falling on it will be ABSORBED by it! But how can this be? Everyone knows that blue and yellow make green. What's the matter? The trick is that of all the pigments available to the artist, not one can be called pure. Colors such as pure red, pure yellow or pure blue simply DO NOT EXIST. Paints can be perceived as monochromatic and are often described as such, but this is not entirely accurate. Any color is a combination of shades. Any red color is either red-orange (for example, cadmium red) or red-violet (kraplak, carmine). Any shade of blue is either blue-blue (FC blue, Prussian blue) or blue-violet (ultramarine). And any yellow is either yellow-green (citric cadmium) or yellow-orange (light cadmium). Any artist who wants to become a pro (and who doesn’t want this?) is simply obliged to distinguish such nuances of color and for him there should not be just yellow or just blue, as a musician distinguishes, say, C from C sharp. We perceive yellow as yellow due to the fact that most of the reflected light is yellow, other colors REFLECTED BY YELLOW are simply lost in the reflected yellow color. And by mixing yellow-green cadmium lemon (which, along with yellow, also reflects a significant part of GREEN!) with blue-green blue FC (in the reflected spectrum of which there is, in addition to blue, a GREEN part), we get a rich bright green paint, which, as it were, “ is released" from this mixture after blue and yellow mutually "extinguish" each other! By mixing yellow-orange (cadmium yellow) with blue-violet (ultramarine), we get a neutral green olive color (sometimes you need one!) due to the fact that cadmium yellow, like ultramarine, reflects a very SMALL PART OF GREEN, unlike the previous example . The same applies to obtaining purple and orange. Red-VIOLET kraplak and blue-VIOLET ultramarine will give a pure and rich violet, while red-orange cadmium light and blue-green ceruleum will give faded violet shades, since the original paints almost do not reflect violet (in fact they do, but in very small quantities ). And, accordingly, the brightest orange will be obtained by mixing red-ORANGE light cadmium and yellow-ORANGE yellow cadmium. All this is true both for body paint mixtures and for glaze painting. Thus, ideally, it is desirable to have not three primary colors, but six (two in each color). This is why in printing (in the CMYK system) it is very difficult to obtain a pure and bright orange, since it is produced using lemon yellow (which is yellow-green) and magenta (red-violet) - paints that almost do not reflect orange! All this is not as difficult to understand as it seems at first glance. You just need to keep the color wheel in mind, and knowing these things will save you from wasting expensive paint trying to find the right color. I apologize for such a long comment, but as it went, it went like this :) Regarding the paints of Rembrandt and his contemporaries, they certainly had blue ones (expensive ultramarine from lapis lazuli, azurite is also a mineral paint, smalt). From 1430 to 1600, painters used only eleven pigments. In the 17th century there were already thirteen. Of the yellows, the most common in those days were ocher and lead-tin yellow (massikot in the de Wilde manuscript). Among the green ones, the Flemings had malachite and verdigris. Since 1630, green earth has been found. The main reds among the Flemings and Dutch are cinnabar and organic red. This information is in the famous de Mayerne manuscript. The unstable paint “yellow varnish” (stil de grain) was widely used; its fading in composite greens explains the blue foliage of trees in the paintings of Vermeer, Pieter de Hooch, etc. Thanks to everyone who read this comment to the end. I hope this helps someone in their work. Thanks to the authors of the site for the opportunity for those who wish to speak out on different topics! Good luck and creative success to everyone!
About drawing techniques
Preparing for creativity does not take much time, especially since in modern art stores you can purchase everything you need for work. Already stretched and primed, canvases can be found in any size - from the smallest to the largest.
A painting done with oil paints looks very impressive. The strokes applied by the artist look as if they are separate from each other. Many people think that oil painting is a fairly simple activity, but this is absolutely not the case. Let's try to figure out how to learn to paint with oil paints.
Related article: Amazing acrylic painting on glass for beginners
How to make paints for painting at home
You will need the following ingredients:
- 0.5 cups starch (or flour)
- 0.5 glasses of water
- Food coloring (can be taken from the egg coloring kit or purchased separately at the store)
Also suitable as a dye are the following products: juices of beets, carrots, berries (raspberries, strawberries, cherries), the spice turmeric (ochre).
You can also add salt (1 tsp) and vegetable oil (1.5 tbsp).
Preparing paint for painting:
Combine water and starch. Mix with a fork so that there are no lumps. Pour the resulting mixture into jars (for example, baby food), add your own color (dye) to each. Stir again.
Advantages of homemade paints:
- Not expensive
- Natural, simple ingredients
- Any quantity can be made
- Safely
- Funny
Now you know how to make your own paints quickly and easily! You can start drawing!
How to make finger paints for painting
Another option for paints that you can easily make with your own hands at home, using simple ingredients that any housewife can find. Finger paints in the store are relatively expensive (500 - 700 rubles), but they don’t last long. It happens that in one go a child can use up all the cans of paint in a creative impulse. And the creative process must not be interrupted under any circumstances.
What you will need:
The ingredients are the same as for the first option, but in a different proportion
- Wheat flour - 1 cup
- Salt - 1 tablespoon
- Vegetable oil - 1 teaspoon
- Water - 100 ml. (0.5 cup)
- Food coloring (a set for coloring Easter eggs, or juices from vegetables (beets, carrots) or berries.
How to do:
Mix flour, salt and butter with a whisk, gradually adding water. The consistency will be thick sour cream. Next, pour the mixture into prepared separate jars (you can take it from other empty paints or use baby food jars). Add your own dye to each and mix thoroughly. Ready. Let's start drawing!
See how easy it is to sew an apron with your own hands for a child so that he doesn’t get his clothes dirty while creating - Pattern of a children’s apron.
How to make green food coloring
How to make your own green food coloring? Rich emerald pigment can decorate both sweets and desserts, as well as main dishes and snacks. To achieve the desired shade, use one of the following methods:
- Make blue and yellow dyes separately. Mix them in one bowl and get a deep emerald color.
- Combine powdered matcha green tea and spinach. To get a beautiful emerald pigment, place 1 tbsp in a blender. l. matcha, a bunch of fresh herbs (or a handful of frozen) spinach and a third of a glass of water. Whisk the ingredients, then separate the juice from the pulp. The green liquid can add brightness to spaghetti dough, pizza and other products.
- Use spinach leaves and stems. Grind the spinach to a paste. Then squeeze the juice through a sieve or cheesecloth. The famous Russian restaurateur and culinary specialist Alexander Belkovich recommends adding spinach directly to the pasta to give the dish a bright color and unusual taste.
How to make material
“Puffy” paints for painting are a popular activity in preschool educational institutions. With their help, you can create interesting pictures that your child will like. Paint recipes will be especially useful for those who are already bored with painting with gouache and watercolors. You can make creative materials at home using one of the recipes below.
Foam paints
The cosmetic product has an unconventional application - it is suitable for creating three-dimensional paints for children. To prepare them from shaving foam you need to take:
- foam itself - 2 parts;
- PVA glue – 1 part;
- any color (food color, gouache).
It is enough to mix the glue and pigment, dissolve the latter well so that no veins remain, then add foam. The finished product should be voluminous, so it must be mixed carefully.
Puffy flour paints
This recipe is also easy. It is necessary to prepare the following components:
- pancake flour – 1 part;
- salt – 1 part;
- water;
- dry pigments.
The easiest way is to take colors from Easter sets; they have rich colors and give very bright shades.
If you don’t have pancake flour, you can use regular flour, although the former gives a more pronounced volume. First you need to combine flour, salt, mix. Afterwards you need to add water a tablespoon at a time so that the mass is like thick sour cream. It is poured into glasses and pigments are added. To create luminous paints, fluorescent dyes are used, which are sold in office supply stores and supermarkets. Instead of salt, you will need baking powder, mix it in equal parts with flour, add water in small portions, then add colors. The difference with regular paints is this: luminous paints are painted in the dark with the UV lamp turned on so that the fluorescent dyes begin to appear.
What you need for drawing
Making your own paint is not difficult at all. First of all, you need inspiration and desire. And everything else is the most ordinary things:
- palette or board for diluting paints,
- canvas or other material for drawing,
- PVA glue,
- the simplest set of gouache (6 or 12 colors are enough),
- brushes (preferably flat),
- a napkin for wiping brushes.
Drawing a three-dimensional picture
For drawing you will need cardboard, thick paper, thick disposable plates. You can also work on fabric, but it should not be too thin either. First, you need to prepare a sketch - a sketch of the drawing, then you can draw lines using 3D paints on it. They do this in the following ways:
- Cotton swab, brush. These are the easiest methods that do not require special preparation. You just need to take your equipment and start the creative process.
- An envelope. You can make an envelope from a file (multifold). The file is folded diagonally, one side is sealed with tape. The required amount of paint is placed inside and tied with a rubber band. The tip of the file is cut off, after which the material will be easily squeezed out.
- A bottle. Take a thin plastic bottle of office glue with a spout and fill it with paint. Used for drawing.
Strokes are applied generously to the paper, without skimping: they should be juicy and bright. After completing the picture, it must be dried. If foam and PVA were used to create the materials, the design is simply laid to dry for 3 hours on a flat surface. “Flour” paints are dried in the microwave for 10 seconds at maximum power. After turning off the device, you can notice that the picture has increased in volume and acquired a 3D effect. It will look original and beautiful, which will certainly interest your baby!
Volumetric shaving foam paints
To prepare you will need:
- shaving foam;
- PVA glue;
- coloring (food or any paint).
Mix glue and shaving foam in equal proportions. Divide the mixture into cups and very carefully, so as not to knock off the foam, mix in the dye.
It is best to draw on thick cardboard using cotton swabs or ice cream sticks. You can invite your child to first draw a picture with a pencil and paint it with airy paints. Or you can make an application. This paint will take several hours to harden.
wonderbaby.org
Features of gouache
Gouache paints are made from pigment dyes mixed with white and glue and diluted with water. They have a dense texture. Their difference is color saturation and resistance to abrasion. After drying, the gouache makes the surface matte, velvety, and fits perfectly onto the painting. Its advantage is the ability to correct mistakes by applying a new layer on top. In addition, it is fun to experiment with it, mixing it with white and achieving all sorts of shades.
Set of 10 gouache paints
PVA glue is used in various types of artistic creativity and repair work. When combined with PVA glue, gouache acquires a lot of positive qualities:
- strength,
- durability,
- relief,
- ability to hold volume.
You should not apply an excessively massive layer of paint: after drying, it may crack and crumble.
If you don’t like the painting or are simply bored, it can be easily washed off the canvas almost without a trace, and the canvas or other blank will be useful for the next painting.
Puffy flour paints
You will need:
- Wheat flour;
- baking powder;
- salt, water and dye (food or paint).
Prepare small containers for paints, pour 1 tablespoon of flour, 3 teaspoons of baking powder, 1 tablespoon of salt into each. Mix everything well, add a little water to the consistency of thick sour cream and coloring.
Now you can draw, paint or make appliqués. After the child finishes drawing, the drawing will need to be placed in the microwave (or oven) for 10 to 30 minutes so that the paints swell well.
blogspot.com
happyhooligans.ca
For convenience, the paint can be poured not into jars, but into tubes with a narrow spout, spread out a large Whatman paper for the children and give freedom to creativity.
DIY natural house paint recipe
Natural paint is 10 times cheaper! A very sensible article with personal practical experience!
When was the last time you painted your house? :)
This year I had to feel the price of paint. And at the same time I felt how the system... “protects” us from unnecessary knowledge and feeds on it.
I decided to paint a house that is already 6 years old, as well as a workshop and a guest house. Until they turn gray. And how it began: jar after jar, this wasn’t enough, this didn’t fit. As a result, paint is the second largest expense this season - 20 thousand rubles.
I think this is unreasonable. It’s like when a woman buys a dress, if she sews beautifully herself, but is too lazy to find a suitable pattern.
It’s one thing to buy seedlings, seeds, mycorrhizae for 20,000 rubles - this is an investment for centuries! Or dig a pond forever. Or buy 20,000 boards and roofing to add a veranda - it will definitely last for 20 years.
What about paint? Firstly, nothing in life changes significantly. Secondly, the paint only lasts for 5-7 years, then it spoils the mood with its appearance.
I decided that it was unwise to invest money in insignificant things. Moreover, you can make the paint yourself. Better quality, in any quantity and very cheap!
I first learned about homemade paint from friends in Kovcheg - they painted their house this way. Several years have passed and I have matured. The following is information from them.
Hello, Vadim!
Here is the Finnish composition that we used and the recipe for its preparation. I don’t remember where I copied it from.
Finnish paint recipe
REMEMBER how Tom Sawyer struggled when Aunt Polly made him paint the fence? It turned out that we all spend so much effort on painting wooden structures in vain.
Practical residents of Finland have found that oil paint does not contribute to the durability of wooden houses. Studies have shown that moisture accumulates under the paint, creating an optimal environment for the development of microorganisms that destroy wood.
It’s better to use our Finnish composition, they say. Indeed, such houses, picket fences, stand for decades without being destroyed. I propose to promote more widely in Russia the Finnish composition for painting houses, buildings, and fences. This will save billions and better preserve the housing stock and outbuildings. The Finnish composition, frankly speaking, is a godsend for village residents and gardeners.
Finnish composition for coloring:
rye or wheat flour - 720 g iron sulfate - 1560 g table salt - 360 g dry lime pigment - 1560 g water - 9 l
The highlight, as they say, lies in strict adherence to the technology for preparing the Finnish composition. First, prepare the paste. Take flour, gradually add cold water in order to bring the flour to the consistency of thick sour cream. The remainder of 6 liters of water is added while hot. Now the paste is filtered and put on fire.
Stirring constantly, add salt, then iron sulfate, dry lime pigment. Now pour in the rest of the water (hot) to obtain a working paint composition.
Apply to the surface with a brush in two passes. Solution consumption - 300 g per square meter. If the house or picket fence was previously painted with oil paint, it should be completely cleaned off. No primer required. A picket fence treated with a Finnish compound can last up to 20 years without repair.
It is known that houses painted with oil paint have poor air flow. The composition is free of this drawback. It would be advisable to start producing kits of Finnish composition with instructions attached. Everyone will benefit.
Our experience:
We read this recipe, got inspired and decided to try it. Iron sulfate is no longer sold in stores (or you have to look hard for it), but it was at the Bird Market in Moscow. Surely it is on some bases.
I believe that any person, having a telephone directory and a telephone number, can easily cope with the search for vitriol even in a small town (especially if, in response to the answer: “We don’t sell vitriol here,” ask: “Perhaps you know where it is sold?”). As a rule, people willingly share this information).
The “lime pigment” was a bigger mystery for us. It took a little longer to find him. First, it was necessary to understand what it was in order to be able to explain to the sellers (they all, as one, ask again: “Lime?” - “No” - “Chalk?” - “No, it’s a pigment. Lime.” - “What?” This?")
As the name suggests, a pigment is an additive that sets the color of a mixture. Apparently, pigment used to be a common commodity. Most often it is finely ground colored clay. This is perhaps the best and most environmentally friendly option. For example, I would avoid pigments based on chromium oxides (green) and so on. Moreover, they are noticeably more expensive than ground clays.
As a result, we found some base in the Moscow region selling pigments. We made a joint purchase, collecting orders for the settlement.
When we had all the ingredients, we prepared the paint according to the specified recipe. We wrapped the bucket in a blanket and painted the house with the hot mixture, using regular brushes and cut plastic cans as temporary containers.
Notes
1. If there are wooden elements on the house that you want to leave their natural wooden color, then do not touch them with paint: iron sulfate immediately darkens the wood. This is not visible under the paint, but if you wash it off, there will be gray wood (the same as uncovered old boards).
2. The heads of galvanized nails will lose their zinc layer (iron is reduced from vitriol, oxidizing zinc. So you don’t have to buy galvanized nails, but just simple iron ones, they are cheaper).
3. You need sunny weather during painting and a couple of days after it.
4. When it rains, a wet wall becomes slightly smudged. We reassure ourselves that the walls of the house were not built to be rubbed against in the rain.