Is it possible to apply plaster over paint?
Plastering the wall is allowed, but some factors should be taken into account when decorating the premises.
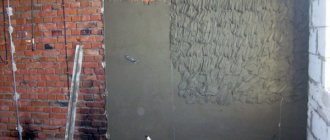
It is necessary to carefully inspect the coating: if it is in good condition, there are no damages, cracks or peeling on the base, then such a surface can be used for building material. The plaster is applied directly to the wall. If paint (or other type of coating) comes off, the substrate should be cleaned.
To do this, carefully scrape off the layer with special tools until the surface becomes smooth. After this, the wall is coated with a primer-sealant.
Preparatory work
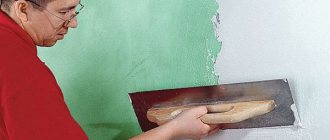
Before plastering, inspect the wall and repair all defects
The standard plan of action for a previously painted wall is as follows:
- Explore the surface. Plan the thickness of the future plaster layer. Clarify the appearance and character of the old paint. By carefully inspecting, assess the possibility of applying plaster without removing it.
- Check the condition of the decorative base of the surface. All damaged areas are removed using a paint spatula.
- Final cleaning is carried out in various ways depending on the type of paint and the condition of the coating.
- Clean the surface from dust and dirt. If necessary, use detergents. Then rinse completely with clean water.
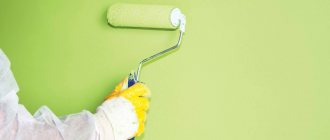
- Again control the plane. Penetrating primer is then applied using a paint roller. It should be applied as carefully as possible to avoid smudges and unevenness.
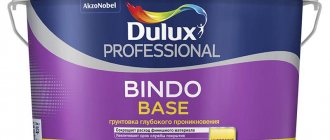
- A special paint primer is ideal for gluing putty to the base. It contains small particles that improve the adhesion of the putty to the surface, for example, quartz. The liquid primer seeps deep into the paint layer and sticks to it. After this treatment, the perfectly smooth surface becomes rough. This creates good adhesion of the putty to the wall.
- After this, confidently begin plastering the surfaces of walls and ceilings.
In what cases is plaster over old paint acceptable?
Whether it is possible to plaster over paint or not depends on the condition of the wall, the type of mixture, etc. Some coatings are not suitable as a base for building materials (for example, emulsion compositions, etc.).
First, you should check the type of base: to do this, moisten the cloth with water and wipe the wall. If the paint foams and wears off, there is an emulsion on the surface, and plaster should not be applied to painted walls. Other mixtures (for example, acrylic) can be covered with building material, provided that the layer does not separate from the base and does not crack.
Is it allowed to apply plaster over water-based paint?
To the question of whether it is possible to apply plaster on water-based paint, the answer is unequivocal - no, because... the solution will not hold firmly. This surface should be cleaned before starting repair work. If you lay plaster over water-based paint, the coating will begin to absorb a large amount of moisture (from the building material) and then crumble. This will negatively affect the quality of repairs.
Plaster over oil paint
It is allowed to apply plaster over oil-based paint (provided that the coating adheres tightly). The strength of the layer is checked using a sharp spatula. A tool is passed over the surface: if the mixture separates and crumbles, the base should be cleaned before laying the solution.
To increase the adhesion of the new coating, notches are made on the painted walls (using a hammer drill, ax and other tools).
Is it allowed to apply decorative plaster over paint?
Many consumers are interested in the question of whether decorative plaster can be applied to paint. Specialists carry out such finishing, but take into account some factors, for example, the type of coating, the condition of the wall, the type of building material (gypsum mortar, acrylic, cement-lime, etc.).
Examination of a painted surface
The water-based emulsion has a porous structure, which makes it easier to apply plaster.
Before you start plastering a previously painted surface, you need to determine the composition of the old paint.
The following options are possible:
- Water-based paint. It is easy to work with because it has a porous structure. Plaster can be applied without preliminary surface preparation, but when it comes into contact with gypsum plaster, the paint begins to peel off.
- Oil paint. Previously, it was used to save on decorative finishing in old-style houses and public buildings. Forms a dense film on the wall surface. The leveling mixture does not stick.
How to plaster a painted wall
After completing the preparatory work, they begin to apply the mixture.
First, make a solution. You can find ready-made or dry powdered plasters on the market.
Mix the solution yourself in this way:
- A plastic bucket is filled with clean water (the liquid should be at room temperature).
- Dry plaster is poured (the amount of the mixture is calculated in accordance with the manufacturer’s instructions).
- Mix the mixture with a mixer until smooth (there should be no visible lumps in the composition). The consistency of gypsum plaster (and other compositions) should be similar to sour cream. If the solution is too thick or thin, it will reduce the quality of the coating.
After preparation, the mixture is applied to the wall. It is possible to apply building material to glossy painted surfaces, but in this case, high-quality mixtures must be used for finishing.
How to plaster:
- The building material is placed on the wall with a spatula. Most often, craftsmen purchase tools of different shapes for repairs (one spatula for finishing smooth surfaces, the other for processing hard-to-reach places).
- Wait until the plaster has completely dried.
Examination of a painted surface
First, inspect the coating.
Craftsmen try to clarify the following points before laying plaster:
- how long ago the wall was painted;
- whether there are cracks, grease stains and other defects on the base;
- Are there areas where the paint is peeling off?
Preparatory work
Before applying the plaster, prepare the base: clean it of dirt, dust and various stains.
Stages of processing a painted surface:
- Remove remaining grease and wash the walls (greasy areas can prevent the plaster from adhering). The surface is cleaned with soap and other means (this will give a better chance of good adhesion).
- Use sandpaper to sand the wall to remove the glossy layer.
- After preparing the surface, apply primer or tile adhesive in 2 layers (before using plaster). The materials provide the following advantages: they help the new coating adhere more closely to the base, and increase the drying speed of the mixture.
Many craftsmen recommend grinding the treated surface to give it maximum smoothness. The base is also coated with antifungal agents to minimize the occurrence of mold and mildew.
Applying plaster to paint
After preparing the walls, apply 2 layers of plaster (to obtain the best result). However, in this case, the thickness of the mixture should not exceed 2 mm.
If the plaster layer is more than 10 mm, reinforcement is required to prevent the material from separating from the wall.
Applying primer and plaster layer
The use of a special composition applied with a starting ball onto the top layer of the supporting structure, ready for the decoration stage, is mandatory for strong adhesion of the plaster to the wall.
To obtain a rough finish, apply the primer smoothly and carefully using a special paint rolling tool. After priming is completed, the structures are decorated with plaster. This method can be used everywhere and no matter what material the walls were previously covered with or how they were preserved. The mixture will still coat the structure in a straight, flat ball without any lumping or discontinuity. Apply primer at least 2 times. First, with deep impregnation so that it gets into the recesses, then with a special solution, which is used to optimize the adhesion of the surface to finishing materials, for example, concrete contact. Make sure that the adhesive mixture is specifically for finishing surfaces coated with oil and alkyd materials, and not for building material made from a mixture of cement with water, sand and crushed stone. For problem walls, use tile adhesive.
If the plaster ball is thicker than 1 cm, use a special mesh attached to the supporting structure. This reduces the possibility of the plaster peeling off and cracks appearing during drying. When carrying out activities in the middle of the room, take a mesh made of thermoplastic polymers.
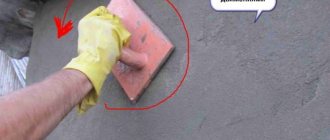
Apply the plaster by spraying in small quantities for a reliable base. After drying, you can smooth the wall with special tools that are used to spread and pre-level the surface during plastering work, the so-called “ironing” boards for plaster.
After laying the plaster, wait until it dries. Then decorate the top ball. Follow the rules for applying plaster!
In what cases should you not apply plaster to old paint?
Plastering a painted surface is often unacceptable. This increases the risk of the new coating peeling, cracking or falling off. In such a situation, it is necessary to completely remove all old material. The cleaning process can be complex and time-consuming because... building mixtures from most manufacturers are durable and of high quality.
It is not allowed to place plaster on painted surfaces under the following conditions:
- The coating peels off from the base.
- Presence of cracks and other defects.
- Emulsion coating.
Paint coating analysis
The first thing you need to start with when plastering paint-coated surfaces is a thorough study of the composition of the coating. Today, there are two main types of materials that are most often used for painting walls:
- Water-based paints. Due to its unique, porous structure, water-based paint is easy to use, durable and has high adhesion to various materials. This painted surface can be leveled without any preparatory work. However, it is worth remembering that water-based paint is not compatible with gypsum mixture (for example, Rotband products can be cited).
- Oil paints. Just a few years ago, oil-based paint mixtures were used only for decorative finishing of walls in industrial, construction sites and old-style residential buildings. When using oil paint, a dense and smooth film is formed, which does not allow plastering - the plaster mixture simply will not adhere to such a surface.
How to remove old paint from walls under plaster
The plastering process may be delayed when finishing the premises due to the need to clean the wall. However, the procedure can be speeded up using several interesting methods.
There are 3 effective ways to remove a layer from the base:
- heat treatment;
- use of chemicals;
- manual or mechanized method.
Methods for cleaning the surface depending on the type of coating applied:
- Water-based compounds are removed as follows: the entire base is moistened with warm liquid (a special sponge or soft cloth is used for wiping). Leave the wall for 10-15 minutes, after which the layer is separated with a spatula. Water-based mixtures are much easier to remove than, for example, oil-based ones. After preparing the surface, they begin to apply plaster.
- The rate of removal of oil compounds depends on the quality of the mixture, method of application and other factors. You can use a grinder to remove the coating (however, this method is labor-intensive and time-consuming). To clean the wall from the old coating, a hair dryer is often used. The melted mixture is separated with a spatula. After complete cleaning, the base is sanded and prepared for plaster.
Removing paint from drywall:
- The procedure begins with cleaning the walls (using soap and hot water to remove dirt and other stains).
- After this, the residues are removed with a grinding machine and scraper. They also use chemicals to clean the surface: apply the mixture to the base and wait for some time. As soon as the paint begins to bubble, remove it with a scraper.
When working with chemical mixtures, you must use special gloves, old clothing, safety glasses and a mask. The room must be ventilated.
Tools for work
To clean the wall from the old coating, craftsmen use the following devices:
- Coarse sandpaper
. A budget option, but the work process is complex and lengthy.
- Chisel
. The tool is convenient, but not suitable for cleaning large surfaces. A spatula and chisels are used most often in cases where the painted areas peel off on their own. The tools are suitable for processing hard-to-reach places (behind batteries, pipes, near switches and electrical outlets).
- Hammer
. The device is efficient, cleans the surface well, but is very noisy.
- Electric drill
. Is a good tool for cleaning the wall. To work with it, different attachments are used. During repair work, you should wear a respirator and safety glasses, because During cleaning, a lot of dust is generated.
- Grinder with different attachments
. The tool is most often used in large production facilities. During finishing, a lot of dust is generated, which makes work difficult. The grinder is not suitable for processing wooden walls, because... a strong tool can damage their structure. The disadvantage of an angle grinder is that it can spark a lot at high speeds.
- Construction hair dryer
. Thanks to its good power, the tool helps speed up the work process. The base is treated with hot air and immediately cleaned with a chisel. After this, the wall is thoroughly washed with warm soapy water and wiped with a towel. The disadvantage of this method is that the tool cannot be used in the kitchen, because... this will increase the risk of fire. In addition, a hair dryer is not suitable for treating large surfaces.
- Manual scraper
. An effective and budget option. It is the most common means for removing coatings from surfaces. However, the cleaning process is slow and labor-intensive, and it will not be possible to completely remove all the paint with this tool.
The choice of the appropriate method and tool depends on many factors. If there are pregnant women, people with allergies or asthma, or small children in the house, then the chemical method is not practical.
Technical factors may also influence the choice of the appropriate method and tool:
- ventilation level in the room;
- type of paint and its composition;
- wall condition;
- availability of necessary tools.
Mechanical method
This is the most common method of cleaning walls. A grinding machine is used for work. Many craftsmen claim that such a tool is optimal for finishing and is suitable for all types of surfaces to be cleaned.
You should know how to properly clean the base using sandpaper.
The method includes several stages:
- First, the wall is washed with hot water and soap (the cloth is moistened with water and the surface is wiped). The procedure helps remove dirt and traces of the old coating, making further work easier.
- Then use a grinder. The surface is treated with the rough side of sandpaper: the layer is removed, and then the dust is wiped off.
- After completing the work, use a scraper to remove any remaining unnecessary paint. It is important to use a protective dust mask when finishing.
The mechanized method may require the following tools and materials:
- textile;
- soap;
- sandpaper;
- grinding machine;
- scraper;
- hard brush;
- putty knife;
- Bulgarian.
Thermal method
The base is heated using a hair dryer; under the influence of hot air, the layer begins to separate from the surface. The melted mass is removed with a sharp wide spatula. The method is effective, but not everyone has a powerful hair dryer.
Some craftsmen replace it with an iron. The surface of the walls is ironed with a hot device through special paper. The method is not suitable for all rooms (high temperatures are not allowed in some areas, for example, exposed cables, switches and other outlets).
Work should be carried out in a special mask, because Irons and other similar tools produce harmful fumes. It is important to use safety glasses, a suit with long sleeves, and thick gloves during repairs to avoid burns.
The thermal method requires the following tools:
- construction hair dryer;
- scraper for removing paint.
Chemical method
It is the most common, simple and effective cleaning method, as it does not require much physical effort. All you need to do is purchase the necessary liquid to remove old paint. There is a wide range of chemicals available in the market.
A solution is prepared in a special container, after which the mass is applied to the surface. Chemical compounds destroy the structure of the paint and help separate it from the walls. The mixture is placed 0.3 cm thick (so that it does not dry out too quickly). The shelf life of the product depends on the composition (information is indicated in the instructions). The chemical process can take minutes or hours.
After applying the mixture, the paint will begin to bubble. Remove it with a scraper or spatula. If there is a multi-layer coating on the wall, then the procedure is repeated several times. After preparing the base, begin applying plaster.
Surface treatment rules:
- The mixture must be placed on the wall quickly.
- The layer should lie tightly and evenly.
- The curing period must comply with the instructions proposed by the manufacturer.
- Clean the layers with a scraper or chisel (start scraping from the bottom of the wall), after which the base is washed with baking soda (room temperature).
- You cannot mix different chemical compositions, because the effect may be unpredictable.
- Before starting work, furniture is removed and the floor is covered with special protective materials.
- The chemical method is most suitable for oil and acrylic coatings.
- The method is not recommended for people suffering from allergies, pregnant and lactating women.
- Work must be carried out wearing protective gloves, goggles and a respirator. In some cases a gas mask may be required.
- The room should be well ventilated during repairs, because... toxic fumes can accumulate if there is no fresh air supply.
- The mixture can only be disposed of according to the instructions indicated on the packaging (due to its high toxicity).
When working with chemicals, the following tools and materials may be required:
- sheet of plastic;
- kraft paper;
- chemical resistant gloves and old clothing;
- scraper and other tools.
Traditional cleaning methods
Some craftsmen use simple recipes to remove old paint:
- Mix ammonia with turpentine. The components are diluted in a ratio of 2:1. The prepared solution must be placed on the base (kept for 1 hour). After this, they pass it along the wall with a special spatula and scrape off the layer.
- Mix potash and quicklime with the required amount of water to obtain a mass of viscous consistency. The prepared solution is applied to the base and left for 12-24 hours (so that it is well absorbed).
- Mix lime and chalk to a paste, add caustic soda. The resulting mass is applied to the surface in a layer of 2-3 mm. After 1-2 hours, the coating is removed.
- Apply glue (intended for wallpaper) to thick paper and place it on the wall. After the composition has dried, use a spatula to separate the sheet along with the paint.
- Mixes iodine and water (in proportions of 250 g per 10 l). The solution is applied to the wall and wait until cracks appear on the base. After this, use a chisel to remove the coating.
- Add a glass of ammonia and 2 kg of chalk to 1 liter of water. The resulting solution is placed on the base and waited for 2-3 hours. The separated layer of paint is removed with a spatula.
Methods for cleaning surfaces from paint
Remove oil-based paints most carefully.
To remove water-based paint, most often proceed simply - moisten it with a sponge, soft cloth or spray bottle, leave for 15-20 minutes, then remove the paint layer with a spatula, wipe with a damp cloth and allow to dry completely.
Building surfaces, walls and ceilings previously painted with lime, glue or casein paint are completely cleaned of stains, washed with water and dried well. This is especially true if you plan to cover them with wallpaper later.
Oil paints and compounds must be removed carefully, since traces of drying oil greatly interfere with the application of plaster.
A construction hair dryer softens the paint, which is then easier to peel off.
There are three ways to remove oil-based paint:
- Chemical method. Special compounds that soften the enamel layer are used. They are very toxic and should not be used indoors. Then the softened layer is easily removed with a spatula.
- Thermal method. This method takes advantage of the fact that the paint coating becomes soft when heated. A hair dryer is used to heat the paint, and then it is also cleaned with a spatula.
- Mechanical method. To remove paint from all surfaces, use a metal brush mounted on a sanding machine or simply scrape off the paint with a spatula. This is a very dusty and labor-intensive job, so often the paint is stripped only where it comes off, and the remaining areas of the walls are treated with a primer.
The advantage of the described technique is that it is universal. The plaster will be of high quality and long-lasting, regardless of what composition may have been used to paint the wall or ceiling before the renovation and what condition it was in.
The disadvantage, of course, is the labor intensity and large amount of work. To remove the decorative layer, you will have to put in a lot of effort, especially for an old surface painted with oil paint.
Latex compounds
The main point of working with this type of dye is to dry the material, which gradually transforms into a thin but durable film layer. Thanks to this property, you can carry out wet cleaning in the house, as well as outside, because all compositions made on this basis are not afraid of direct contact with liquid.
The composition of this paint has both a glossy and matte surface, which is well suited for painting plastered walls. If the wall has decorative plaster, then the latex composition is most suitable for it, this is all because no other material can highlight the volume and texture of a putty pattern of this type.
Source
Preparing painted walls for plastering
Regardless of the type of old paint that once covered the wall, you must:
Thin film plaster in 11 color shades with synthetic binder resins contains natural stone. Suitable for external and internal areas with high voltage, such as stairs, corridors, stairs and various halls, respectively. plinths and columns. Fences can be applied over horizontal insulation.
Tape strips imitate cutting masonry, as was and is used in the classic design
Features: Abrasive, waterproof, alkali-resistant, impact-resistant and scratch-resistant. Eco-friendly and odorless. The use around the entrance is not just aesthetically pleasing. In this case, tiled strips protect the occupied part of the façade from damage. They can create original, very impressive interiors.
- check the strength of the surface: to determine voids and poorly adhering parts, tap the wall, scrape off weakly adhering pieces with a spatula;
- final cleaning is carried out after moistening: soaked small particles will be removed more easily.
The plaster will adhere very poorly to a smooth surface painted with oil paint or enamel. To increase adhesion, notches are applied on the painted wall at a distance of 10-12 cm from each other, slightly deeper than the thickness of the paint layer. This is done with an axe, hammer drill or chisel. For 1 sq. m there should be about 100 notches.
It can be used, for example, in restaurants or wine bars. The natural optics of cut masonry make every home original. They can only be used on solid masonry and on thermal insulation systems. The wide range of shades offers many possibilities and combinations of how to make facades according to the individual ideas of each investor.
Facade paint based on acrylic dispersion, reinforced with siloxane
As a high-quality facade coating, it is characterized by optimal protection against moisture, high water permeability for mineral plasters, dispersion plasters and synthetic resin plasters with high air permeability to water vapor. It can also be used as a restoration paint on porous concrete supports.
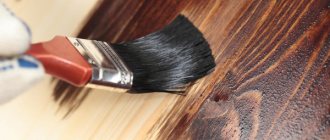
Then the painted wall is carefully treated with sandpaper with a coarse abrasive No. 60 or 80
. It is advisable to almost completely remove the top, thinnest and smoothest (glossy) layer.
After treatment, the wall is thoroughly dusted, wiped with a cloth and dried. If the work is carried out in the kitchen, then the surface is additionally degreased using solvents. After all, even the thinnest layer of fat can significantly reduce the adhesion of the plaster to the base.
The color of the facade is silicate, reinforced with siloxane
For high-quality coatings with high weather resistance. As a high-quality façade covering, it provides optimal moisture protection and high water vapor permeability. Matte hydrophobic, highly diffused, excellent cover.
Matte facade paint with silicone binder
It has good resistance to rainwater and high vapor permeability, and is suitable for painting mineral facade plasters, as well as for new coatings. Due to its specific properties it is also suitable for monumental and protected objects and lime plasters.
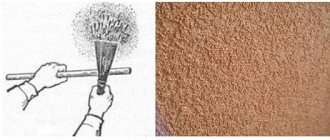
The last stage is treatment at least 2 times with a primer.
The first time with a deep penetration primer so that it penetrates into the notches, and the second time with a “concrete contact” type composition. Essentially, it is an adhesive mixture with the addition of quartz grains, which, after drying, forms a rough surface and significantly increases the adhesion (adhesion) of the plaster to the painted wall. When processing, it is necessary to ensure that the solution penetrates into the notches. Be sure to check that the concrete contact is intended specifically for treating oil and alkyd walls that cannot be removed, and not for treating concrete. A good alternative to expensive primer is tile adhesive for “particularly difficult surfaces.”
Good vapor permeability, hydrophobicity, good coverage, excellent resistance to aggressive components of polluted air, serum-free, quick-drying, easy to process, water-soluble. First, it's good to know what a primer is. This is part of the preparation of the wall before painting, when the artist dries the roller or brush with the so-called. and place the substance on the wall. This is an excellent solution if you want to protect the wall from excessive paint absorption and strengthen the color adhesion to the surface.
The effect will be uniform and, above all, you will definitely use less paint. Because of the types of pavement, we distinguish three types of ground. They can be used for primer, mineral plaster, drywall, plasterboard and easy-to-dissolve paints. – they are also acrylic earths, except that they are enriched with additional ingredients. It is used for thin surfaces, such as old glue scrapers or very soft plasters that are easy to crush. - this is a separate category of land, the task of which is to simultaneously combine color and prime the wall.
- So called. acrylic, belong to the most universal earth.
- It's just a stain.
- Thanks to the primer, we get a completely uniform coating.
Answering the question of whether it is necessary to prime the walls before painting, the answer is definitely yes.
When the thickness of the plaster layer is over 10 mm, the walls are additionally reinforced
– covered with a plaster mesh, which is screwed to the wall. Since it takes on part of the load, the likelihood that the plaster will begin to peel off is significantly reduced. In addition, such a mesh protects the surface from cracking during the drying process.
This way we reduce the absorption of the wall, so we use less paint. On the other hand, a good primer or primer paint is an added boost, so you'll end up with a color you'll enjoy for years to come. Thinning the paint does not guarantee that the color will be prettier or more durable. First of all, you have to remember that the products usually come from different companies. In practice, this means that the chemicals it contains can react with each other.
As a result, you will get a different effect than expected, and at best nothing will happen. What to do to get a beautiful wall color? Protect them properly only with priming. The output itself is very low compared to the overall cost of the painting. In return, you can be sure that the walls will be secured, strengthened, and the beautiful color will last longer. The main argument that prevails over primer is paint preservation. After surgery, the walls are much less absorbent, so we use less paint.
For interior work, you don’t need to use a metal mesh - just purchase a product made of PVC or propylene. It is simply pressed into the still uncured solution, which is then leveled with a wide spatula. Additional fasteners are not needed - the thrown plaster will create a fairly durable layer. Only a metal mesh is attached to self-tapping screws if heavy concrete mortar is used.
Just remember not to mix soil with paint: there's no benefit to it, and it could end up being another, unnecessary expense. Buildings Enclosed buildings are divided into different spaces or rooms so that they can carry out different activities for their intended purpose, such as housing, manufacturing, education, healthcare, recreation or entertainment. The buildings are equipped with the necessary means for work and comfort: water, sewerage, electricity, heating, air conditioning, vertical transport. b) Miscellaneous structures Whether buildings are closed or not: roads, railways, bridges, tunnels, dams, canals, reservoirs and tanks, viaducts, stadiums, patiniars, gas stations, industrial buildings.
The wall prepared in this way can already be plastered and you can be sure that the finish will adhere to the old paint.