A spray gun is a tool that is used to paint surfaces evenly. To do this kind of work efficiently, you need to understand how to properly dilute paint for a spray gun. This is exactly what is discussed below.
A spray gun is a device that can be used to evenly paint any surface.
What kind of paint can be used in a spray gun?
There is one important condition - the paint should not be too thick and clog the spray gun nozzle. The range of coloring materials presented for sale in stores can, conditionally, be divided into five varieties:
- Acrylic paint. Used during construction, as well as for painting surfaces made of wood, plasterboard and metals.
- Water-based paint. This option is the most budget-friendly.
- Oil paint. The basis is drying oils and pigment. The composition is toxic and has a rich, bright shade.
- Nitro enamels. The composition includes nitrocellulose varnish and coloring pigment. Often used for painting metal products.
- Alkyd enamel. Mixes well with other substances and dries quickly after application. Used to color wood, concrete and even metal products.
Important! Each composition is characterized by a certain level of viscosity, so before you start diluting, it is important to measure the viscosity of the mixture and use a solvent to bring the indicator to the desired level.
Brief characteristics of solvents
Solvents available in the retail chain have a complex composition and are used to dilute a certain type of coating:
- No. 646 is not the best option. It is aggressive towards paints: it not only dilutes them, but also makes changes to the composition. Most often used for primers and acrylic-based materials.
- No. 647 is relatively aggressive in properties, dissolving nitro enamels and nitro varnishes. Special care is required when using.
- Solvent No. 650 is widely used for dissolution due to its mild interaction.
- Alkyd paints are diluted with R-4, which contains polymers.
The following recommendations will help you properly dilute paint for your spray gun. This will help to obtain a high-quality, uniform coating without streaks or defects.
Why is it so important to know how to properly dilute spray paint?
When the working composition for a spray gun is made incorrectly, difficulties arise during the work that prevent the mixture from being applied to the surface efficiently. As a result, many defects appear and the work has to be redone, which entails additional costs and loss of time.
Incorrect pigment dilution can cause instrument failure
There are many reasons to understand how to dilute paint for a spray gun:
- It is almost impossible to apply viscous and thick paint evenly over the entire surface, for example, a car, in the thinnest layer. In addition, in this case, the mass consumption increases, and an excessively thick layer applied to a car or any other element takes longer to dry.
- When surfaces that are inclined or in a vertical position are painted with a thick or liquid mass, for example, if it is a ceiling or wall, smudges form, which can only be eliminated by new painting.
- Not every device model can withstand the supply of liquid paint.
- An excessively viscous composition, for example, if you need to paint a home gate or an iron fence, will not be able to fill the unevenness of the canvas. As a result, the coating will be uneven, and corrosion will form on surface imperfections after a certain period of time.
- You will have to apply a too diluted and liquid mass in a large number of layers, and the work itself will take much more time.
Attention! Regardless of the price of the spray gun, it is necessary to choose a high-quality coloring mass for it.
Why thin the paint?
As is known, the diameters of spray gun nozzles can vary significantly and vary from 0.1 to 4 mm. And we don’t yet take into account cartouche pistols, which are also included in this group of tools. Reasoning logically, it becomes clear that an airbrush with a nozzle of 0.1 mm will obviously not be able to actively spit out thick enamel, but will require a mixture of the most liquid consistency. Moreover, if such “colored water” is poured into the tank of a spray gun with a 4 mm nozzle, then during operation it will break it into very large drops, which will begin to form smudges on the surface. Based on this, before figuring out how to dilute paint for a spray gun at home, you should clearly determine what diameter the nozzle is installed on your tool.
Determination of viscosity
If you determine the consistency of paint “by eye”, without experience or special equipment, the result will be approximate. Of course, in any situation we can talk about increased fluidity of liquids, but it will not be possible to determine the exact indicator in this way.
Viscosity is determined using a device - a viscometer. The data that was obtained as a result of examining the device is indicated in seconds or in the DIN unit of measurement.
Correct determination of viscosity will allow you to perform the job efficiently and avoid subsequent additional staining
Dilution of the tool composition
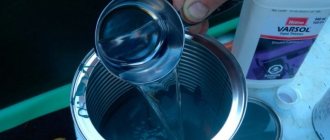
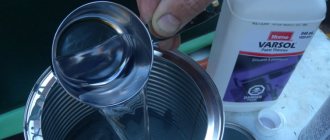
The polymer liquid that will be used for spray painting must be diluted to increase its fluidity. Any paint should first be passed through a filter, gauze or fine sieve.
Even the highest quality materials can change their original consistency due to improper storage and transportation conditions. Clots may form that prevent the liquid from flowing freely from the nozzle.
Using a viscometer (some companies provide paint with this device) will speed up the preparation of the solution. The viscosimeter is a cup with a volume of about 100 ml with a hole. When the solution is poured into it, the time for complete flow out is recorded in seconds.
Professional manufacturers mark their products and the acceptable time for use in the spray gun.
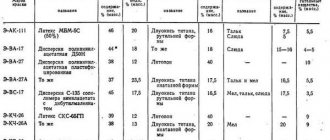
| Coverage type | Flow time |
| Varnish | 20-50 |
| Enamel | 25-40 |
| Primer | 30-45 |
| Oil paint | 25-40 |
If the time for complete flow of the paint and varnish composition is longer than that established by the standard, then it is diluted with the product indicated on the label. Wood stains and sealants are not diluted.
Measuring permissible viscosity
As already written above, it is possible to determine the viscosity level by using a device - a viscometer. But the difficulty is that it is difficult to reliably determine viscosity characteristics using technology, which means it is almost impossible to use them in workshops. That is why a different unit of measurement is used - conditional viscosity.
Attention! Conditional viscosity can be determined by measuring the time period during which the required volume of liquid flows through a hole with a certain diameter.
Technology of painting walls with a spray gun, applying coats, putty
Before any painting operations indoors, preparatory work should be carried out. These include:
- dismantling sockets, switches, carefully insulating them from possible moisture ingress;
- protection with masking tape, film and paper of surfaces that are not to be painted;
- ensuring ventilation and temperature conditions in the room.
Important! When considering whether it is better to paint, with a roller or a spray gun, it should be borne in mind that the latter type of tool allows you to complete the work quickly, bypassing the difficulties of painting in corners and other problem areas. In addition, with a minimum of care and attention, a paint torch can create high-quality, uniform coatings.
Painting walls
Painting walls with a spray gun can be done either directly on plaster or on wallpaper (including textured ones). The mechanics of work in both cases are not difficult.
- The working mixture is mixed in a large container. Wallpaper can be coated directly with water-based paint.
- For plastering work, pigment is squeezed into a container and white paint is poured. The mixture is thoroughly stirred until a homogeneous composition is formed. To select the viscosity, use water (for water-based paints) or a solvent recommended by the manufacturer.
- The paint sprayer is being assembled.
- The mixture is poured into a paint tank.
- It is recommended to check the consistency by trying to paint inconspicuous places. If necessary, the working mixture is drained and brought to optimal characteristics.
You should paint with a spray gun from the compressor, starting from the top. In this case, the nozzle line should be directed strictly perpendicular to the wall surface; the composition is sprayed from a distance of about 200 mm. The tool must be moved horizontally, avoiding inclined movements. In the area of frames and window openings, the nozzle axis can be tilted when moving from the center to the edges of the painted areas.
Applying putty and coat
Houses covered with fur coats not only look aesthetically pleasing. This decor is quite porous, retains heat, helping to save resources on heating and air conditioning.
Advice! To increase the application speed, you can use spray guns with a larger nozzle diameter. Such devices are capable of working with coarse and viscous solutions.
The operating procedure looks like this.
- The wall is being prepared. Cleaning, removal of weak areas of the coating, degreasing, and priming with deep-penetrating compounds are carried out.
- The nature of the surface is analyzed. If height differences exceed 5 mm, it is recommended to apply a rough coating. To do this, putty is sprayed onto the wall using a spray gun.
- The rough putty layer does not need to be smoothed if the height differences do not exceed 3 mm. Using a spray gun, this indicator is not difficult to achieve to ensure good adhesion of the fur coat layer.
The fur coat is applied in thin layers in several passes. If you want to get significant thermal insulation indicators, the thickness of the coating is made significant. To ensure the strength of the fur coat, more cement is added to the applied composition. After completion of the work and drying of the coating, you can further decorate the facade. To do this, the fur coat is dyed using water-based compositions.
How to use a viscometer
Step-by-step instruction:
- You need to fill the container full with paint, blocking the bottom hole of the device with your finger.
- Next, you will need to use a stopwatch, and at the same time remove your finger, thereby ensuring that the mixture flows out.
- As soon as the container is empty (drops are not taken into account), the stopwatch must be stopped and the time recorded on paper.
- The obtained numbers should be checked against the table provided at the time of sale of the viscometer as a kit, and the viscosity in DIN should be determined.
Important! The most popular models of viscometers are DIN 4 standard.
Using a viscometer allows you to determine the level of viscosity
What are the types of paint solvents: types, classification
To paint the surface, the worker needs to purchase a high-quality solvent. You must select it according to the following parameters.
Component composition
Any type of paint sold has an individual composition, which contains a certain percentage of solvent and coloring pigment. Based on this principle, classification is distinguished:
- low-fill;
- medium filled;
- highly filled.
In the first type, you cannot add a large amount of solvent. As for highly filled ones, it is permissible to mix them with a maximum of 30% of the solvent volume.
It is important to choose the right type of paint for each material.
Solvent type
The main parameter when choosing is polarity. Based on this criterion, two types of compositions can be distinguished:
- non-polar;
- polar.
It should be understood that the solvent may contain a mass of substances and therefore, relying on intuition, it is impossible to determine the polarity of the mass. It is also worth considering the fact that even well-known manufacturers do not always indicate on the packaging a complete list of substances included in the solvent base.
Temperature readings during dyeing
Before diluting paint for a spray gun, it is necessary to analyze the temperature conditions under which the work will be performed, and when it is planned to paint parts with the resulting material.
Regarding temperature conditions, experts recommend considering the following rules:
- Use quick solvents only if painting is planned at temperatures below 18 degrees.
- Choose normal compositions if the work is planned to be performed at a temperature of 20-25 degrees.
- Give preference to slow ones if the air temperature is more than 25 degrees.
Important! It is necessary to take into account that each pigment color has its own characteristics. For example, shiny shades, such as “metallic” or “pearl”, which are often used to paint a car, are recommended to be diluted with slow solvents.
The temperature regime must be taken into account when working with the coloring mass
How to thin paint
The most critical stage of the entire above guide. Requires increased precision, accuracy, and most importantly, regularity. For most varnishes and enamels, the percentage of infused thinner is 5-30% of the total volume, and for water-based paints it can even reach 50%. Therefore, in order to understand how to dilute paint for a spray gun correctly, it is necessary to determine its initial viscosity using the above-mentioned viscometer. If the consistency is too thick, reduce it by pouring in small portions of thinner, mixing thoroughly and re-measuring until the viscosity is optimal.
You can focus not only on the viscometer data, but also on the content of the composition (concentration) indicated on the packaging. Paint and varnish mixtures are low-filled, medium-filled and high-filled. For low-fill paints, 5% ± 3% is usually enough. Highly filled ones can be diluted up to 30%. Medium-filled compositions are bred within the limits between the two previous ones.
To indicate the concentration, some manufacturers indicate the following markings on the containers (values are indicated in increasing order: from liquid to viscous):
- L.S.
- HD
- H.S.
- MS
- UHS
- VHS
Having determined the viscosity, you can begin the mixing process. It is better to do this in a cylindrical container with smooth walls (like a regular can of paint). As a stirrer, you can use a regular sanded stick without burrs, or a metal ruler, whose edges are also recommended to be smoothed. To mix larger batches, you can use a drill with a special attachment in the form of a cross.
You can see more clearly how to thin the paint for a spray gun in the video below.
How to choose the right solvent: recommendations
If it is difficult to make a choice, then you should use the recommendations of experts and buy solvents that are suitable for a certain type of coloring material:
- To work with acrylic, you need to choose special solvents, R-12 or R-651.
- For alkyd - R-4, xylene, toluene.
- Nitroenamel - R-646 or a special solvent recommended by the manufacturer.
- Water emulsion - alcohol, ether or distilled water.
- You can dilute oil paint with drying oil and oil varnish.
Important! White spirit solvent is in great demand; it can be found in most hardware stores and hypermarkets.
It is recommended to choose a solvent recommended by the paint manufacturer
Using a spray gun
Painting with a water-based paint or any other paint is not a complicated process. Detailed instructions for operating and setting up the tool itself are usually included in the equipment passport.
Important! Please read it carefully before starting work. Try pre-charging the tool so that you thoroughly understand how it functions.
During the dyeing procedure itself, be sure to take into account the following rules that will help you avoid technological errors and overuse of the mixture:
- Prepare the surface to be painted thoroughly - seal cracks and holes, remove construction debris, traces of rust and dust, sand the base.
- Wipe the surface with a suitable composition:
- when using acrylic or latex paint - soap and water;
- when applying oil, use white spirit.
- Wipe with a clean cloth dampened with water and wait until the surface dries.
- Protect adjacent surfaces with film, and yourself with a respirator, gloves and protective clothing.
- When painting the ceiling, gradually move from one area to another. If a lot of paint is applied to one surface area, the solution will drip down or harden in the form of smudges.
- Direct the jet strictly perpendicular to the surface, in a circular motion.
- Before applying the next layer, make sure the previous one is dry. According to standards, the technical break should be at least 6-12 hours (the time depends on the composition of the paint).
__________________________________________________
What to do if the mixture is too liquid
In order to return the paint to the desired consistency, you should use one of the proposed methods:
- Dissolve a small amount of the coloring pigment that was previously used.
- Leave the liquid mass, with the lid open, to infuse for several hours. After 2-3 hours the composition will become noticeably thicker.
- Place the jar in the refrigerator or any other cool place, since a sharp drop in air temperature increases the viscosity of the dye.
- If white paint is used, then a small amount of gypsum or chalk can be poured into it, which helps increase the viscosity of the mass.
Important! If none of the methods gives the desired result, then you can take an electric spray gun with a hole of a smaller diameter and use it to apply several layers of the composition to the surface.
To work with acrylic, you need to properly prepare the mass.
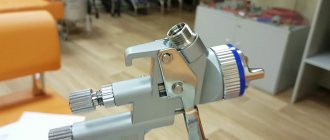
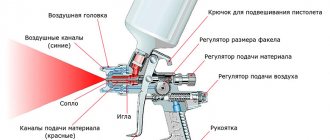
Settings
Take a look at the design of the spray gun - perhaps you will understand how it should work correctly. Well, if not, then read on to learn how to make the adjustment. Main parts of the spray gun:
- Paint supply regulator;
- Air supply regulator;
- Torch regulator;
- The handle itself;
- A nozzle in which a stainless steel needle and a double pneumatic diffuser are installed.
So, we are holding a spray gun with three regulators in our hands. How to set it up correctly for painting a car? First, pour the already filtered paint into the tank, where the viscosity is normal. Rust enamel primer for car painting? Now we find the surface on which we will test the spray gun.
A sheet of paper, preferably thick, is best suited for this.
Next, adjusting the spray gun for a car flows into adjusting the torch. The most important thing is to adjust the width of the torch, because it is what shapes the paint. If you are painting a small area of the car, then you need to set a small width - then the spraying will be more accurate.
If the surface is large, then you need to set up a wide torch - then the work on painting the car will go much faster. Important: if you reduce the size of the torch, you should reduce the air supply.
The image will help you determine which regulator is configured incorrectly.
The real adjustment begins with pressure, because the paint supply depends on this parameter. It may vary depending on the viscosity. So, we set ourselves a test material and begin impromptu painting. We make a couple of emissions and evaluate the work:
- If dense large spots remain and the paint sprays in drops, then you have set the level too low;
- If the torch looks like a figure eight, then the pressure is also not set correctly - too high;
- If the stain has a strange shape, resembling a banana or pear, then the spray gun, or rather its nozzle or nozzle, is clogged.
When the spray gun produces a rounded torch, it means you have configured all the parameters correctly. It is important that the spray gun delivers paint evenly, without smudges, sagging or large drops - these are also important factors that mean that it is configured correctly - you can paint the car. Based on these factors, you can determine the setting of the spray gun.
Special occasion or acrylic paint
The difficulty in working with acrylic paints is that it is necessary to dilute the mixture correctly, otherwise the composition will be hopelessly damaged.
When starting to work with acrylic, the dye must be mixed with a special hardener. The proportion must be observed. An error with the proportions specified by the manufacturer will result in the hardener having a bad effect on the performance of the coating.
Once a mass of high-quality viscosity is obtained, you can begin to work.
High-quality diluted coloring material fits perfectly onto the surface. To avoid mistakes during the work process, you need to know what paint can be used in a spray gun and how to choose the right solvent for it.
Device selection
The spray gun is chosen based on the principle of its operation. It can function mechanically or be driven by a compressor. The spray gun can also be electric. This type of equipment is very suitable for car painting. But paint should be applied to the car with an electric spray gun selectively - only on small shaped parts, and not on horizontal flat surfaces.
Diagram of the spray gun device
It is also indispensable when painting small parts in hard-to-reach places or fragments with an uneven decorated surface. Furniture elements, wood parts, interior surfaces of a car - all these are areas of application for an electric spray gun.
But this type of spray gun is not suitable for painting large horizontal or vertical surfaces, walls, ceilings, external elements of a car, flat large pieces of furniture.