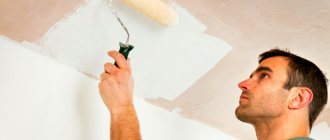
Advantages and features of using varnish
The varnish gives the canvas a spectacular appearance and enhances the protective functions of the wood. With the help of varnish, wood rotting is prevented, and the apartment or house becomes more comfortable.
To cover interior wooden doors, you can use several types of varnish. In this case, the canvas can be made of pine and other types of wood. Due to this technique, the shade inherent in the door leaf is emphasized. The covering material gives some door parts a rich and deep color.
Varnish - an affordable universal product for coating wood
To varnish wood, it is recommended to choose the right product. Impregnations protect wood from mold and rot. Protective agents do not allow the fabric to swell . They also protect the box from the sun and sudden temperature changes.
In some cases, instead of varnishing, you can paint the doors - this looks very stylish in modern interiors.
Before varnishing wooden doors, let’s get acquainted with the advantages of this finishing method:
- accessibility – the buyer is given the opportunity to buy varnish taking into account the price factor. At the same time, experts advise treating the canvas with a mixture that can improve the external and protective properties, extending the service life of the canvas;
- easy updating - anyone can paint the door, including those new to such work;
- versatility - the varnish is used for different surfaces;
- varnish helps to increase the fabric’s resistance to various negative influences, which include scratches, moisture, and mechanical damage.
Water-based varnishes are odorless.
All varnishes are classified into the following types based on their composition:
- oil based – they are based on oils that are well absorbed into the surface, changing its color. They are used as a solvent. Such compositions take a long time to dry. They have an unpleasant odor;
- aqueous - colorless and without a pungent odor, matte or glossy type. They dry out quickly. But stain is used first.
How to update the coverage?
To make the process easy, you need to prepare. All work is described below in stages.
Tools and materials
You will need:
- wood varnish;
- bioprotective primer;
- brush, foam roller or spray;
- varnish tray;
- dry rags;
- solvent;
- wood putty;
- putty knife;
- sandpaper with fine and coarse grains;
- belt or vibrating sanding machine;
- construction hairdryer
It is necessary to purchase varnish with a reserve. Professional craftsmen apply the composition in two layers, paying special attention to the ends. It is recommended to provide an additional 10–15% reserve for painting damaged areas of interior doors or as a replacement for accidentally spilled varnish.
Preparatory work
The appearance of the updated door depends on the quality of its preparation. The sequence is as follows:
- Grinding. Use fine grit sandpaper (number 90–160). Perform the procedure carefully, carefully, treating every centimeter of the door. If you don’t want to waste time on such a tedious process, then the surface is treated with a grinding machine. It will speed up the work and allow you to get a better result.
- Cleaning. Vacuum the treated surface to remove any remaining dust.
- Putty. Inspect the door leaf in bright light. If cracks or damage are noticed, they must be puttied. The putty must have an identical shade to the base material. Otherwise it will be visible through the varnish layer. After drying, sand the putty areas.
- Primer. The bioprotective composition will repel insects and prevent the appearance of fungus and mold. It will fill the pores in the wood and reduce the consumption of the base varnish. After priming, sand the surface well with coarse grit paper (180 units).
Important
Construction materials and paints and varnishes must be made on the same basis. Otherwise, the components will react with each other, which will then lead to cracking and delamination of the door leaf. It is better to take products from one manufacturer.
Step-by-step instruction
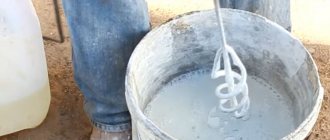
- Stir the varnish in a production container. Do it slowly so that no air bubbles get into the jar. Carelessness will lead to unpleasant consequences: bubbles will be very difficult to remove, especially on the door leaf.
- Pour a small amount of varnish into the paint tray. Apply the composition to the doors using even, sweeping movements. Paint hard-to-reach areas with a brush.
- Avoid breaks or delays, otherwise transitions between layers will be visible.
- Apply the second layer so that it is perpendicular to the first. If a third layer is needed, its direction must coincide with the first. Wait for each layer to dry completely.
- Don't forget about the brushes. Paint the paneled part, frame, and trim with a narrow brush. If smudges appear, sand the surface with coarse-grit sandpaper (number 180).
While the varnish layer is drying, it is necessary to store brushes and rollers in a plastic bag. This will prevent them from drying out quickly and sticking together. If there are fittings on the doors, they are removed before varnishing. Otherwise, the impregnation will not reach hidden areas, which will lead to the appearance of rot or bark beetles.
If the door is made of veneer, then the varnishing procedure is carried out with extreme caution. It is forbidden to use a grinder - it will damage the top layer. The steps are performed manually or the work is entrusted to craftsmen. It is recommended to carefully select the paint composition.
- New doors do not need to be sanded. All you have to do is pick a varnish and get to work. If there is minor damage, varnish the surface and rub with Polish.
- The faux veneer door is suitable for painting. However, the varnish will roll down the canvas. Therefore, priming is needed.
Advice
It is better to take acrylic varnish. Apply in two layers. Too dense a paint structure will be lost after varnishing the door.
Selection of varnish: how not to make a mistake in choosing
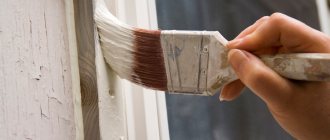
To update a door, you can use several types of coatings. Alkyd varnishes contain solvents that give the wood a yellow tone and resistance to moisture.
To improve drying ability, increasing moisture resistance and strength, hardeners are added to the mixture. The surface coated with this product dries within 24 hours.
Alkyd varnishes make wood moisture resistant
You can impregnate wood with acrylic varnishes, which are made from water. They are non-toxic and odorless. To increase strength, hardeners are added to their composition.
You can update a room decorated with wood using nitro varnishes. Their main advantage is quick drying. They are based on solvents. One of the disadvantages is increased toxicity, so nitro varnishes are rarely used.
Polyurethane coatings are characterized by increased strength . Due to polyurethane, the wood is given a dark shade, so the surface of the canvas is primed.
Arsenal of available coloring products
Among the paints available today that allow you to both paint a door while maintaining the texture and completely disguise it, the following are the most commonly used:
- Enamels with an opaque consistency.
- Oil paints.
- Tinted varnish.
- Clear nail polish.
- Oil impregnation.
- Stain.
In this case, paint for doors that have been in use for a long time and have been painted more than once must have one of the following bases:
- Alkyd.
- Acrylic.
Painting the canvas with an acrylic composition Source o-dveryah.ru
The first option has good moisture-repellent ability and is resistant to temperature changes and exposure to sunlight. Therefore, they are often used when updating door panels in baths, showers, saunas and other damp rooms. The second type of paint, on the contrary, is water-based and spreads well over the surface, is safer and can be used indoors with virtually no restrictions.
Advice! To paint an interior door with alkyd paint, you need to dry its surface well in advance. Otherwise, during the next period of operation, the paint will begin to swell, peel and fall off.
Materials and tools
Tools for varnishing a door
To carry out preparatory work followed by varnishing the surface with your own hands, you will need the following tools:
- roller or brush;
- rags;
- putty knife;
- wood putty;
- Grinder;
- sandpaper;
- construction hairdryer
How and with what to remove varnish for painting wooden doors?
To renew the varnish coating, you must first carry out preparation. To do this, remove the old paint layer using one of the following methods:
- Using sandpaper. For more convenient work, it is recommended to use a block with sandpaper stuffed on it. To completely remove the coating, it is necessary to start processing with coarse-grained paper, gradually approaching zero.
- Using a grinding machine. This option is much faster than the manual method. The tool carefully removes the old coating, leaving the surface clean and smooth.
- Solvent. Chemicals do not completely remove all layers, leaving marks on the wood. But this option is also used during coating removal.
Preparing the door
Before coating the door with paint and varnish, the door is sanded - roughness and unevenness are removed. The thicker the box, the longer the grinding process. One sanding option is to use a board (25x10 cm) wrapped in sandpaper. You can also do this job using a sander.
To eliminate surface defects, the wooden door is sanded
All defects are repaired with putty, the choice of which takes into account the color. After cleaning, the inner box is treated with impregnation - protection against mold and pests.
To improve the quality of varnish and reduce varnish consumption, the coating is primed with a roller or brush. Dust is removed from the canvas, and the coating itself is degreased with white spirit.
For subsequent painting, you will need to treat the door with a chemical composition. An important point is that the impregnation, primer and varnish have the same base. Otherwise, the coating will delaminate. After priming, sanding is carried out again. Then the canvas is primed.
How to treat a wooden door?
Wood has a big disadvantage - it absorbs moisture. An expanded sash cannot be closed or opened normally. To prevent a wooden door from swelling from dampness, before painting it must be treated with a protective impregnation and preparatory measures must be carried out.
- The process begins with removing the sash from its hinges and dismantling the protruding fittings. The canvas is laid on a horizontal surface, sanded and thoroughly cleaned from dust.
- When using paint, the clean surface of the wooden door is impregnated primer. The first layer is allowed to dry and the second treatment is performed.
- The panel door is painted with a roller, and the panel door with a brush. Depending on the structure of the material, 2 to 4 layers of enamel are applied.
- If stain is used instead of paint, the surface of the wooden door is not primed. The door leaf is simply sanded and cleaned of dust. The stain itself is a protective impregnation that penetrates deeply into the wood.
A wooden entrance door needs to be treated especially well, since outdoors the door is constantly exposed to moisture and temperature changes.
Applying varnish
To coat the door with varnish, you will need to dismantle it and install it in a horizontal position. With this action you can protect the coating from smudges as much as possible.
To apply varnish, the door is installed horizontally
To apply paint and varnish, use a regular synthetic brush or roller. The number of layers applied is 3-5. If the base coat was applied using horizontal brush strokes, then the second coat is applied in a vertical direction.
Varnish the door with a brush, applying the composition 3-5 times
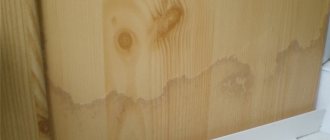
Why varnish woodwork?
Many, looking at a wooden door, are perplexed - why spoil the natural beauty with stains and varnishes? Yes, this is an argument - the texture of the wood is very beautiful even without any impregnation. But, firstly , over time, the same pine withers without treatment and the difference in texture, especially on glued door panels, begins to be very noticeable. This leads to the answer: why do they use stain - to even out the color scheme of the wood.
@stroirem.net
Secondly , deep impregnation stain, as a rule, is an antiseptic, and the likelihood of fungus appearing after treatment is significantly reduced.
And thirdly , with proper processing, the texture of wood can be very effectively emphasized with the help of stain.
As for the varnish, in addition to protection from moisture and ultraviolet radiation, it has good decorative properties. If you don’t want the door to shine after varnishing, like a cat’s eyes in the dark, then matte varnish will suit you.
Making an antique effect
Antique doors highlight the design solutions in the room. To update the interior of the house in this way, an “antique” wooden door is created. Several technologies are used for this:
- Brushing is a simple technique that is used by many craftsmen. The work is done with an iron brush, with which the top layer of wood is removed (until the annual rings appear). But this technique of giving the door an antique look requires a large amount of varnish;
When brushing, the top layer is removed with a wire brush. - patina - “patina” is a special paint that is often used to create the effect in question. The technology for applying the mixture consists of choosing the desired color and applying 1 main layer, which is subsequently covered with paints or varnishes, but of a lighter shade. If the surface is dry, fine-grained sandpaper is used to make it look antique. The bottom layer, which appears through the top, creates the effect of numerous paintings. “Natural scratches” can be seen on the canvas;
Patching gives the wood the effect of multiple paintings - aging with wax - to perform this technology, you will need to follow a certain sequence: applying wax - painting in a lighter tone. After complete drying, the paraffin is removed. A spatula is used for this. Then the base is sanded. Varnish or stain is applied. The door is treated with wax. It is this technology that allows you to create a “antique” appearance that is as close to the truth as possible.
If you have old doors, then it’s easier to update or restore them a little.
Acrylic-based compositions
Acrylic varnishes are one of the most common solutions today; they are applied very easily and quickly. In the factory container, these compositions look like a white liquid. When applied to the surface, the white composition takes on the appearance of a colorless varnish. Many modern types of acrylic varnishes are universal, that is, they can be used to treat external and internal surfaces.
These mixtures consist of an acrylate base, which is dissolved in water, so the solutions do not have an unpleasant odor. Acrylic varnishes create a reliable protective layer that withstands exposure to sunlight and high air humidity. These compositions do not have a very thick consistency, so they are used very sparingly. These mixtures can be tinted in different colors. The varnished surface can be washed using chemical detergents. Acrylic varnish compositions are used to protect furniture, wooden window doors, railings, and are rarely used to treat parquet and laminate flooring.
How to choose a color
Knowing how to paint a fiberboard door, you need to choose the right shade. The element can merge with the design or become a noticeable accent of the room. The tone of the structure should be harmoniously combined with wall decoration, decor and furniture.
If the interior is kept in warm colors, then it is better to paint the interior door made of hardboard in natural colors. The wood-imitation canvas looks natural and does not strain the eye. The brown glossy finish looks richer than its matte counterparts.
How to choose a shade Source poly-dveri.ua
The door to the bedroom should be a little darker or lighter than the wallpaper. Options made from pastel shades look organic. In the nursery, the design repeats the design of the room, but in more muted colors. Drawings that move from the wall to the canvas are appropriate.
If the home contains interior items, then the interior door is made using artificial aging technology. For patination, use dark stain or metallic paint. The result is secured with transparent varnish for reliability.
If the room is decorated in cold colors, then the door between the rooms should be plain. The black model will become a bright spot in modern designs. The white design is a universal solution that will fit into any interior with a light floor or frames.
Cool design Source supermart.com.ua
The interior door should be painted to match the decor of the room. The block can match the drapes on the windows or furniture upholstery. The canvas looks original if it matches the color of the carpet or floor covering (linoleum, board).
Homemade patina Source cavk.ru
What is the best varnish to coat acrylic paint on wood?
Acrylic-based varnish and paint are best combined with each other due to the similarity of compositions. For its production, substances are used that prevent the development of mold and mildew. The protective coating gives the surface water-repellent qualities.
You can choose an alternative option from polyurethane and some types of alkyd varnishes.
Modern acrylic paints are highly resistant to abrasion, stress and atmospheric conditions. Therefore, varnishing over paint is not always considered justified.
How to paint MDF doors?
To paint such doors, you can safely use compositions containing varnish and tone in one (Lakobeits, for example). This will help maintain the structure of the door, and at the same time it will have a pleasant appearance.
The consistency of Lakobeits is liquid, so it penetrates deeply into the pores of MDF, filling them and forming a uniform, thin and moisture-repellent layer.
Conveniently, the tone and varnish are mixed together, so the door does not need to be tinted first and then varnished.
Since this door has a specific panel pattern, and when painting with a roller or spray gun it is very difficult to achieve uniform varnish coverage, painting should only be done by a professional.
No special skills are required for painting with a brush. You just need to be careful and immediately remove small smudges.
It is quite easy to prepare MDV doors for painting. You just need to thoroughly wipe the doors with a damp sponge or cloth so that there are no unnecessary particles on the surface.
How to remove paint
When restoring doors and windows, or any other wood products, the first task is to remove the old paint. Scraping or sanding with a knife is an activity for those who are very patient. It takes a lot of time and the process moves very slowly. There are several methods for faster removal.
Warm up with a hairdryer
A new one costs about $25-30, but for one-time work it is unwise to buy it. Can be rented at a hardware store. The surfaces are cleaned of paint as follows: direct a stream of hot air onto the painted product, literally after a few seconds bubbles appear, which are removed with a spatula or scraper.
Restoring a wooden door begins with removing old paint or varnish
The temperature in the treated area is quite high, so wear gloves. And a little more about safety precautions: you need a well-ventilated room or outside.
One note: you should not set the temperature above 250oC. At high temperatures, wood loses most of its strength and then quickly collapses. So don't overheat it.
When removing paint with a construction hairdryer, the process goes faster than when processing with sandpaper, but still, it will take a fair amount of time.
Paint removers
There are more than enough different chemical products on the market to remove old paint. They are called "washes". They are sold in jars of various sizes and look like a gel - a slightly colored or completely transparent gelatinous mass.
When choosing, pay attention to what surfaces they are intended for processing. It is necessary to clean the wood - it should be present in the purpose “for wooden surfaces” or something similar.
Apply the paint remover with a brush, spreading it over the entire surface from which the paint needs to be removed. After some time (from 5 to 40 minutes) the paint will begin to rise. You also simply scrape it off with a spatula.
After treatment with a remover, simply remove the paint with a spatula
The smells when working with this product are also not the most pleasant, and you may even get a headache. So the room should also be ventilated. For people prone to allergies, it is better to work with a mask. There is one trick: cover the treated surface with plastic film. This can be either ordinary film (you can use old one - throw it away anyway) or food film, which is sold in rolls. But it’s easier with regular film: spread it out, tuck it in, and that’s it. The gel works better under the film - there are fewer “unremoved” areas left. In addition, the smell is not so strong.
When using paint remover, it must be removed from the surface before painting. First, wipe with a dry cloth, then with a damp cloth, then wash and allow the surface to dry. Only then do they begin further processing.
Folk way
This trick is from the arsenal of an old carpenter. Here you need a film in a roll, a spray bottle and acetone. Pour acetone into a spray bottle and spray the solvent out of it. Immediately roll out the film. It is necessary to roll it so that there is as little air under the film as possible. That is why food film is used - it does not allow air to pass through and has sufficient elasticity. After 15-20 minutes the paint comes off without any problems. It can also be removed using a spatula or scraper.
There are not only ready-made compositions, but also traditional methods for removing paint from wooden surfaces
But some carpenters claim that acetone and all other solvents destroy the structure of the wood. There is another method. It requires more time, but does not damage the wood. You will need a large plastic bag, larger in size than the door, or two, put on both sides. You will also need cotton non-fading rags and clean kerosene. Wrap the doors tightly with rags, pack them in a bag, pour 0.7-1 liters of kerosene into it, tie everything tightly, seal it and leave it for a day. Then you peel off the paint, but do not “expose” the entire surface at once, treat it in parts, otherwise the paint will harden again.
Why do you need to varnish wood flooring?
Applying a composition of this type to a wooden floor is required due to the whimsical nature of the material itself, which requires additional protection for full and long-term operation. In many ways, opening wood with varnish helps improve technical qualities and protect it from a number of negative influences:
- Water protection. Moisture seeps deep into the wood and over a period of time it evaporates, as a result of which the dimensions of the material partially change. In these cases, the wood begins to dry out, and in the opposite situations, it begins to swell. If there is varnish on the surface of the floor covering, there is no change in the level of humidity inside the material.
- The wood exposed by it increases the resistance of floorboards to mechanical damage, including abrasive loads.
- To remove dirt from the floor surface, you have to spend less effort, since the varnish prevents the absorption of significant amounts of dirt.
- When opened with this composition, it is possible to emphasize the natural pattern of the wood. The top layer will keep the flooring in its original condition and prevent it from wearing out.
- Natural wood is very often damaged by various insects and microorganisms. Varnish reduces this danger to a minimum.
Note! When you open a wooden floor with varnish, its level of strength increases and the likelihood of scratches on its surface is eliminated.