Setting the pressure when painting a car
Today, the most convenient and versatile tool for painting a car is a spray gun. With its help, you can paint the entire body, or you can work on individual plastic elements. The main parameter of the spray gun is air pressure, because it is what pushes the paint through the nozzle. The issue we will look at is pressure setting. We will look at the setup process, and also go through the classification of spray guns and compressors for the car.
Adjusting the pressure of the spray gun when painting a car
Setting the pressure when painting a car
Today, the most convenient and versatile tool for painting a car is a spray gun. With its help, you can paint the entire body, or you can work on individual plastic elements. The main parameter of the spray gun is air pressure, because it is what pushes the paint through the nozzle. The issue we will look at is pressure setting. We will look at the setup process, and also go through the classification of spray guns and compressors for the car.
Compressor selection
Since we are talking about pressure, we cannot ignore the issue of choosing a compressor, because what it will be depends on it. For example, a single-cylinder compressor with a 25-liter receiver, a power of 1.5 kW and a pressure of 8 atm. you only have enough to paint element by element. If you need to paint the entire car, then you need to take at least a 2-cylinder compressor. Also pay attention to the compressor drive. We recommend choosing a belt drive, as it has a number of advantages:
Another important parameter is the productivity of liters per minute. For example, spray guns of the HVLP system require a capacity of 360 l/min. Also pay attention to the cross-sectional size of the hose that you will take to the spray gun. The desired size is from 8 mm. You can watch other nuances in the video.
Spray gun nozzle diameter
The smaller the nozzle , the lower the air pressure required for spraying paintwork, but, naturally, the lower the productivity.
How to determine the amount of material that flows out of a spray gun nozzle of a certain diameter?
It is known that the amount of material flowing out of a nozzle with a diameter d (performance) at optimal pressure is proportional to d to the power of 2.36.
It turns out that, for example, from a nozzle with a diameter of 1.8 mm, 1.8 times more material should flow out at the same time than from a nozzle with a diameter of 1.4 mm.
What does an increase in nozzle diameter lead to at constant pressure?
An increase in the diameter of the nozzle at a constant pressure leads to a decrease in losses of coating materials due to the formation of fog.
For most applications the optimal nozzle diameter is:
- when applying stains 1.4 mm
- when applying primers and varnishes - 1.8 mm
- for water-based primers/varnishes for external use - 2.2.-2.5 mm.
Types of spray guns
Single cylinder compressor suitable for painting individual parts
The quality of painting results depends on what pressure was selected for a particular material. If the pressure is low, the enamel will not form a dense layer, which means that such paintwork will not last long. High pressure will cause a lot of leaks.
Today, according to spray technology, spray guns are divided into 3 groups:
Each spray gun model has a certain set of settings and technical characteristics. Therefore, when purchasing a new model of spray gun, be sure to read the instructions before starting painting.
The most important parameters are what pressure needs to be created at the inlet and what air flow rate the spray gun has!
We briefly went over the main types of spray guns. It is best to start working with an LVLP system spray gun. This will save on the compressor.
Popular spray gun manufacturers
Currently, the construction equipment market offers a considerable number of spray guns from various manufacturers of different categories.
Most popular devices:
- Wagner . Equipment of excellent quality for domestic use and for complex large-scale projects. Most of the units have Control Pro - an airless spray system, equipped with an innovative nozzle design. HEA technology increases service life.
- Bosch . The equipment is suitable for work of varying complexity by both amateurs and professionals. The devices spray any paintwork materials and are equipped with a paint supply function without additional adjustments, and are characterized by high quality coating.
- SPECIALIST. A wide range of electrical devices at an affordable price for home use.
- Patriot . The model range is represented by household spray guns with a very reasonable price.
- Ryobi . The excellent quality of products and the introduction of new developments were “to the liking” of private specialized (construction) teams.
- Sturm . Paint sprayers are notable for their low price, but they have proven themselves very well in everyday life.
- Caliber. Affordable and popular equipment from a Russian manufacturer. Quickly and efficiently copes with everyday tasks.
- Foxweld . Pneumatic spray guns are in demand in auto repair shops. Used for painting and priming cars.
- HUBERTH . Pneumatic tools of excellent quality are used for neat and precise work - for example, airbrushing.
- Bison MASTER. The equipment uses material economically and can work with viscous or water-based latex mixtures, as well as drying oil, stain or varnish.
- Energomash . For a very reasonable price, you can purchase a device for uniform, high-quality painting of surfaces. Used for materials with a viscosity of 50 Din, can work at an angle of 45°.
Make the right choice and the result of your efforts will please you very soon. Tags:Technique
Preparing the spray gun for work: setting the required pressure
HVLP spray gun
To successfully paint a car, you need to correctly set the paint gun regulators and prepare the materials:
Let's imagine that the car is ready for painting; the mixture itself is already in the spray gun can. First of all, we need to find the surface on which the tests will take place. A large piece of paper (preferably whatman paper) is suitable for this.
Now we make a couple of “shots” at the paper hung on the wall of the garage or box. It is important that the surface is level - the paint will most likely run off, and this is very important for determining the correct setting. If the paint runs off, you need to reduce its supply. Make sure the paint is applied evenly. After adjustment, the paint should lie smoothly and no smudges should appear after application.
Adjustment features
The science is simple, but everything comes with experience. We suggest getting this experience from our article:
Please note that the spray gun must cover the surface evenly - visually it seems that dust is flying out of the nozzle. We need to find that golden mean at which the torch will have a stretched shape. Make sure that the paint spreads evenly over the entire area of the torch print. If you have exactly this result, then the setup was done correctly.
But sometimes drivers who are going to paint their car themselves are faced with the problem that the spray gun is equipped with a tricky mechanism. Regulation options may be as follows:
Regardless of the regulator, you can always sort out the work. After all, now you know the criteria by which you can easily determine pressure. Focus on the torch, and then turn the regulator. It is unlikely that you will have a problem finding which way to turn to increase or decrease compression. The procedure is really simple, especially if you compare it with preparing a body or an individual part. If you have adjusted the pressure on the spray gun and the paint is diluted in the correct ratio, then consider that most of the work has already been done. All that remains is to be patient.
Selecting a spray gun
To get started, an LVLP system spray gun will be enough. To apply paint and varnish, the nozzle size should be 1.3 or 1.4 mm. For applying primer 1.7 mm. It is advisable to have 2 pistols. One for applying paint and lag, the other for primer. For the ground, an inexpensive pistol within 1000 rubles will be enough.
Source
Inlet Pressure Setting
The pressure at the inlet to the spray gun is a parameter standardized and recommended by the manufacturer. It is always indicated in the technical documentation for the spray gun.
Let’s immediately make a reservation that it is advisable to adjust the inlet pressure using a regulator with a pressure gauge connected directly to the handle of the spray gun. Because on the path of compressed air from the compressor to the spray gun, losses of up to 1 bar, and sometimes higher, are inevitable (this depends on the length of the air line, the number of “local” resistances, the condition of the filters, etc.). A regulator connected to the handle of the spray gun will allow you to adjust the pressure more accurately.
Setting the inlet pressure using a pressure gauge-regulator
The process of setting the inlet pressure itself is quite simple.
1. Open (unscrew) the air supply and flame size adjustment screws to the maximum values. Adjusting the paint supply does not play any role in this case.
2. Then press the gun trigger so that compressed air begins to flow. At this time, rotate the air supply adjustment screw on the pressure gauge to set the recommended inlet pressure.
We remind you that for conventional pistols this value is from 3 to 4 bar; for HVLP and LVLP system guns, depending on the model and manufacturer, this value can vary between 1.5-2.5 bar (mostly 2 bar).
Adjusting the inlet pressure using a pressure gauge-regulator connected to the gun handle. 1. Fully open the air supply. 2. Fully open the torch width regulator. 3. Press the trigger. 4. Set the recommended pressure on the pressure gauge.
3. After adjusting the inlet pressure, fully open the paint supply (3-4 turns of the regulator). After making sure that all adjusting screws are open to the maximum, and the viscosity of the paint or varnish is as specified, you can begin testing. But more about tests later.
If the gun is equipped with a built-in pressure gauge
Setting the inlet pressure is even easier on advanced models equipped with built-in digital pressure gauges.
SATAjet 4000 B RP Digital with integrated digital pressure gauge
If the gun is equipped with a built-in pressure gauge. 1. Fully open the torch regulator. 2. Press the trigger. 3. Set the recommended pressure by rotating the air supply regulator on the spray gun.
If the pressure gauge is without a regulator
If the pressure gauge is without a regulator. 1. Fully open the air supply. 2. Fully open the torch width regulator. 3. Press the trigger. 4. By rotating the adjusting screw on the compressor gearbox or filter group, set the recommended pressure.
If there is no pressure gauge at all. Least accurate method
If your gun is not equipped with any measuring instruments, you can very roughly and approximately set the pressure on the compressor gearbox or filter group pressure gauge.
When choosing pressure in this case, it is important to remember that the pressure drop in a serviceable and clean filter is 0.3-0.5 atm (and in a clogged one - much more!), and approximately 0.6 a for an air hose with an internal diameter of 9 mm and 10 m long
If there is no pressure gauge at all. Least accurate way! 1. Fully open the air supply. 2. Fully open the torch width regulator. 3. Press the trigger. 4. Set the pressure on the reducer so that for 10 m of hose (internal diameter 9 mm), the pressure on the reducer is 0.6 bar more than the recommended inlet pressure of the gun.
This is interesting: Areas of application and features of a low pressure spray gun
Types of spray guns
When working with a spray gun, it is necessary to take into account how its pressure should be adjusted for a particular type of painting.
There are three types of paint sprayers:
Reference! Please note that each spray gun model has its own set of adjustments. To ensure optimal supply pressure when painting a car, be sure to familiarize yourself with them before work.
There are three main types of control mechanisms that a spray gun typically has:
Technical features of the spray gun
The spray gun is designed in such a way that all important parameters of its operation can be adjusted.
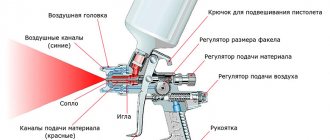
Spray gun design
The device consists of the following elements:
- a tank with filtration for paint and varnish composition (volume from 100 to 250 milliliters);
- nozzle adapted for grinding paint;
- starter supply controller;
- handles;
- spray pattern controller (round or flat layout is used);
- nozzles with a metal needle and a double pneumatic diffuser;
- air flow controller.
Types of spray guns according to international classification
The international classification of spray guns is more detailed. It identifies the following types of devices:
It should be noted that experts consider LVLP system paint sprayers to be the optimal type. Their main positive qualities:
Important! The car must be painted in 2-3 layers. The pressure should be 2-3 atmospheres, on average. Lower or higher values can spoil the final result of the painting work.
Working principle of a spray gun
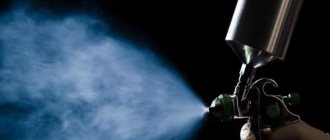
Almost all models of paint sprayers that are used to paint individual parts of a car or the entire body are based on the principle of pneumatic spraying. Simply put, paint or varnish is fed through a special channel in the spray gun and, under the influence of a stream of compressed air, is broken into small particles, then the material comes out of the tool nozzle at high speed.
Thus, at the exit from the air cap, a paint torch is formed from small particles of paint and varnish material, which quickly move towards the surface being treated. Once on the surface of the part, these particles settle on it, creating a uniform layer of paint or varnish.
Diagram and main components of the spray gun design
To properly configure the spray gun, you need to know what parts and assemblies this tool consists of and what is responsible for what during its operation.
The main components include:
When the painter presses the drain valve, the compressed air supply channel first opens, and with further pressing, the paint and varnish material begins to flow.
Regulators and their functionality
When setting up a spray gun, novice craftsmen need to understand what adjustment screws are there and what they are responsible for. Using the SATA paint sprayer as an example, we will show their functionality.
The essence of setting up a paint gun comes down to finding the optimal ratio of compressed air and paint. If everything is done correctly, the output should be a uniform spray of paint, which in turn will clearly distribute the material on the surface being treated.
Types of paint sprayers
The main parameter for the classification of paint guns is the operating pressure, which enters the tool from the compressor and which is released as a result at the air cap.
There are often three groups of equipment based on this characteristic: If we talk about quality and economic feasibility, then the last two types of devices should be considered for purchase. HVLP and LVLP spray guns operate at a pressure of 0.7 - 1.2 bar. While conventional equipment sprays the material under a pressure of 3 - 4 bar.
What is the advantage of HVLP and LVLP pistols? They have a significantly higher rate of paint transfer to the part. Under low pressure, the paint turns less into useless dust and is better transferred to the surface of the car body itself. For HVLP and LVLP type spray guns, this transfer rate is 65% - 70%. For conventional types it is only 30% – 45%. Based on this, you significantly save material, this is especially noticeable when applying expensive metallic or mother-of-pearl paints.
If you use SATA paint sprayers in your work, then this manufacturer makes special air caps with two pressure gauges to adjust the HVLP or LVLP type spray gun. Such an attachment can be purchased separately, but often a novice painter does not have it, so we will consider alternative calibration options.
Adjusting the inlet pressure
When buying a tool, pay attention to the fact that the manufacturer indicates the optimal air pressure at the inlet to the spray gun. This parameter can be found in the technical documentation.
Below, we will consider several options for selecting the required pressure based on various design features of the spray guns.
Option 1. Using a pressure gauge-regulator.
Based on the diagram, you will need to follow the following steps for better understanding.
Option 2. There is a built-in pressure gauge.
More expensive and “stuffed up” models of spray guns have a built-in digital pressure gauge, which makes setting up the spray gun for painting a car even easier, especially for beginners.
Here the technology is as follows:
Option 3. Pressure gauge without regulator.
Such cases also happen. Here the process will be as follows:
Option 4. If there is no pressure gauge at all.
This is the least accurate setting method. Without measuring sensors, it will be difficult for you to navigate the pressure entering the tool. Usually, in this case, specialists “by eye” set the parameters on the compressor or filter group.
Here you can take into account the approximate loss of indicators when passing through the air channel and filters. So, an air channel with a diameter of 9 mm and a length of about 10 m can experience losses of about 0.6 atmospheres, and in filters about 0.3 - 0.5 atmospheres. If the filters are clogged, the losses will be higher. Using this error, the required pressure on the compressor is set.
Option 5. If the spray gun has no name.
You can often find cases where inexperienced painters buy cheap Chinese spray guns that don’t even have technical documentation. You will be faced with the task of selecting the working air pressure for this tool, and here you will spend a lot of effort and nerves in order to at least slightly adjust the cheap version of the paint sprayer.
Adjusting the air supply during painting work
Having prepared the paintwork, pour the composition into the spray gun and begin to select the pressure for painting the car. Attach a piece of whatman paper to the wall and give it a few test sprays.
It is necessary to adjust the feed level until you can apply a thin, uniform layer of paint without smudges to the surface of whatman paper.
The pressure must be selected individually in each specific case. This depends on several factors: the type and brand of paint, its viscosity, the type and model of the spray gun, etc.
Because of all this, the easiest way to establish the rate required in your case is experimentally - during the gradual and smooth addition of compressed air and subsequent analysis of test stains.
For example, if the paint does not spray, but covers the cardboard in large or small drops, then you need to add air. When the torch on the surface has the shape of a figure eight, this indicates that the air supply is excessive, in other words, the pressure is too high. You can regulate the air supply in several ways:
- Using mechanisms located on the spray gun itself.
- Using a removable regulator, it is usually included with the device and is put on its handle during painting work.
- Selecting the compressed air supply by a mechanism on the receiver where the hose is connected to it.
Your main task when adjusting the air supply when painting a car is to find its optimal value, at which the spray torch will have a beautiful stretched shape, without inclusions or splashes.
It is necessary that the coloring composition is sprayed evenly over the area where the torch is printed. Only then can we say that the pressure has been selected correctly and you can start painting the car.
It is worth noting that high-quality paint sprayers, which make it much easier to regulate pressure and adjust the shape of the torch, are quite expensive. As a result, they are not available to all car owners. Therefore, the best solution for an amateur car painter is to purchase a middle-class spray gun that has an optimal quality-to-price ratio.
Setting up a spray gun for painting a car
Hello readers of the kuzov.info blog!
In this article we will look at the basics of setting up a spray gun for painting a car.
The meaning is similar to opening the lock of a safe with a certain combination: rotating the individual disks of the combination lock will not do anything, only if the entire combination matches completely, the door opens.
Most spray guns have 3 basic adjustments that can be used to set the spray gun to optimally spray any material. These are paint supply, air supply and torch shape adjustment.
How to set up a spray gun for painting a car?
The purpose of the settings is to achieve a “cloud” when spraying. This will indicate good air breakdown of the paint.
In general, you need to develop your own technique for setting up the spray gun. The point is that you need to start with the basic recommendations, and over time experiment and configure the spray gun in the way that is most convenient for you.
Air supply regulator
When this control is turned fully clockwise, the air supply is closed. You can experimentally adjust the air supply. Too much air supply can cause excessive pollination. Also, dry paintwork will be obtained.
Test Spray
Glue a piece of masking paper to the wall. You can do test sprays on it.
Set the required pressure on the spray gun using the regulator. You need to set the pressure while pressing the trigger. First, close the air supply completely, pull the trigger until the air is blown out, but not the paint. Next, set the desired pressure so that it does not change when air is blown out. Then you can release the trigger and your gun will be adjusted to the required pressure and air volume.
Now turn the torch width control to maximum, and then turn it down a little. After changing the torch, the pressure at the inlet to the gun changes slightly, so you need to adjust it.
Now turn the paint regulator all the way. Next, open it 2 full turns (4 half turns).
You can start a test spray
Hold the gun level in front of the paper to test spray, at a distance of 15-20 cm. Now pull the trigger fully and immediately release. The test spray should look like a "cigar" shape with full paint on the inside and smooth edges on the sides (see illustration).
What problems can occur during test spraying and what is the cause?
The center must be completely painted without streaks. If smudges occur, then perhaps the spray gun is too close to the surface, or the paint is sprayed for a long time during the test. If the distance and time of the test spray are normal, then the spray gun is adjusted to deliver too much paint. You need to slow down the feed a little.
It is necessary that the spray gun sprays as small droplets as possible while maintaining good coverage.
Too much air pressure when painting will cause the droplets to form too small and the paint will fly all over the place. Excessive pressure causes excess consumption of sprayed material. The paint that reaches the surface forms a dry coating that looks matte and faded. High pressure during spraying can cause the formation of a number 8 pattern. This pattern leaves streaks when painting.
If the pressure is too low, the droplets become large, which causes large shagreen patches when painting (the “orange peel” effect).
Settings
First, you should pour the paint and varnish mixture into the tank. Setup involves testing on a horizontal surface. It is recommended for these purposes to use a sheet of whatman paper fixed on the wall.
Adjusting the torch size
The setting consists of setting the appropriate flame width. When setting the width, it is recommended to start from the area of the surface being treated. If there is a narrow color transition or a minor area needs to be updated, a small torch width will be needed.
When completely painting the surface, it is advisable to set the maximum possible width of the torch. This will allow the paint to be applied evenly and will also ensure normal painting speed.
Note! The smaller the width of the torch, the less intense the air supply should be.
Setting the pressure level
Choosing the right pressure is quite difficult. The problem is that the selection of this parameter may vary depending on the circumstances. The optimal indicator depends on the model of the paint sprayer, as well as on the type and viscosity of the paint and varnish material. Therefore, to select the desired pressure level, you cannot do without a test surface on which several tests are made. In this case, before each sample, the air pressure increases.
After the first test, the surface is examined for the size and shape of the droplets, the relief of the coating, and the nature of the spraying in the upper and lower areas of the pattern. Based on the results of the study, we can come to certain conclusions:
- Stretched drops, large and compacted spots occur due to too little pressure.
- If a figure-eight stain has formed on whatman paper, the pressure needs to be reduced.
- If the pattern resembles a banana, crescent moon, or pear, the air cap, nozzle, or nozzle is most likely clogged.
During setup, you need to get a stretched shape of the torch. There should be no leaks or compactions. During setup, the optimal distance from the sprayer to the Whatman paper is 25-30 centimeters. When finishing the surface, you should follow the manufacturer's recommendations regarding the permissible distance. The head must be in a horizontal position during testing.
The air controller in different modifications of the spray gun can be built into the handle or removable. When working with a removable regulator, it is recommended to open it at the junction of the receiver and the hose. If the regulator is built-in, you can change the pressure only while the trigger is pressed, otherwise after pressing the trigger the pressure will drop sharply, and the device will break the paint poorly.
Setting up the spray gun torch
Setting the paint supply
When the torch size has been established and the appropriate pressure has been selected, begin adjusting the paint supply. For this purpose, the screw is tightened until it stops, and then released a couple of turns.
Note! You should not immediately set up a powerful feed, as this will lead to increased consumption of material, contamination of the spray booth and damage to the surface due to drips. It is much more rational to slowly add feed.
The adjusting screw limits the movement of the metal needle. With this device, the needle is unable to completely open the outlet for the paint material. Therefore, the spray gun operator has the opportunity to adapt to the operation of the device by opening the screw and adjusting the pressure applied to the trigger.