Published: 06/23/2012 Category: Construction Views: 10952
Pouring the subfloor
When people talk about floors, they usually mean flooring . But this is just the tip of the iceberg. Under parquet, tiles, laminate or carpet there is a multi-layer “pie” of the subfloor . Without a solid base, the finished floor has little chance of survival. Anything goes wrong, and the expensive flooring material will begin to warp, peel off, become covered with cracks, that is, gradually collapse.
The floor is like a suitcase with a double bottom: under the beautiful outer layer there is a base, or, as it is also called, a subfloor. The success of the final coating largely depends on the condition of this base. A slight curvature, bump or other defect in the subfloor will inevitably manifest itself on the front side. However, it is not enough just to level the base. You also need to make the subfloor “stand still,” that is, not peel off, crack, or break into pieces.
Let's face it, creating a level, strong, and stable subfloor is no easy task. Until recently, leveling the base was considered perhaps the most labor-intensive and time-consuming stage of repair. Fortunately, modern technology has changed the situation. Thanks to specialized building mixtures, the installation of subfloors has been significantly simplified. The quality of alignment has reached a previously unattainable level. Of course, it’s too early to write off cement-sand screeds. Their main advantage is the low cost of raw materials (usually sand concrete is used for traditional leveling). But if you think carefully, it turns out that the benefit is small, and taking into account all the disadvantages of a traditional cement-sand subfloor, it is even negligible.
Unlike conventional floor screeds , leveling layers made from building mixtures do not require steel reinforcement, do not shrink (that is, do not shrink when drying), do not crack, do not peel off, and, in addition, quickly set and harden. As for evenness, the current standard (deviation from the horizontal - no more than 2 mm per 2 linear meters) is observed unconditionally (provided the instructions are followed).
Types and properties of crushed stone
Depending on the origin, there are several types of crushed stone:
- The most popular is granite. It is characterized by high strength, frost resistance and a minimal amount of impurities.
- Limestone crushed stone is no less common. Its strength characteristics are lower than granite, but at the same time it can withstand temperature changes well. Such material often contains impurities.
This is what crushed limestone looks like.
In fact, limestone is the first building material that people began to actively use. Slabs with a high percentage of it were used in the construction of the Great Wall of China.
- Dolomite crushed stone is characterized by high hardness and frost resistance. Having a rough surface, it provides good adhesion to cement mortars.
- Slag crushed stone appears as a result of processing solidified waste slag, which is a by-product at metallurgical enterprises. It has a fairly wide range in terms of frost resistance and ability to withstand loads. These characteristics largely depend on the quality of the feedstock and the technology used in ore smelting.
This is what crushed slag looks like
In addition to its origin, crushed stone is characterized by a number of properties that must be taken into account when installing a floor screed. Thus, the shape of its grains is described by such a parameter as flakiness. A low indicator indicates their cuboid shape and, accordingly, the ability to fill volume and high quality material. The use of such material increases the cost of binding materials.
Another important indicator is water absorption. As moisture is absorbed, the mass of crushed stone increases and its strength decreases. High porosity has the same negative effect on the frost resistance and strength of the material. As a result, for installing a floor screed, it is optimal to use granite crushed stone of a fine or medium fraction with low flakiness. It can be replaced with a dolomite or limestone analogue without impurities.
Schemes of the rough screed device
Depending on the level at which the groundwater lies, as well as depending on the ground level and the position of the screed relative to the foundation, several types are distinguished.
Table. Types of arrangement of rough screed.
| Type of screed | Description |
| Screed below ground level | This method is used if it is planned to arrange food storage rooms or warehouses under the floor. In this case, the screed is located below the ground level, adjacent to the foundation. |
| Screed at ground level | Can be used both in industrial construction and in the construction of residential low-rise buildings. The screed is located at ground level and adjacent to the strip foundation. |
| Screed above ground level | In this case, the screed is mounted above the foundation level; it is most effective and advisable to use it in places where groundwater lies quite close to the surface, in areas where the risk of floods and streams is high. |
In general, there is no universal scheme for arranging a screed - depending on the design of the house, it can be carried out in any of the above options. However, it is important to accurately design the location and level of doorways before construction begins, so that you do not have to correct mistakes later.
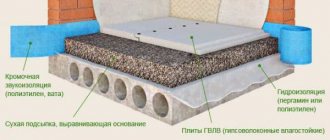
Three-layer screed
Scheme of floor screed on the ground
In order for the floor screed in a private house to be correct and meet all the requirements of SNiP, it is carried out in 8 stages. The result is a “pie” of the following layers:
- Prepared clay. This layer must be poured to create a barrier to groundwater.
- Sand pillow. In this case, you can use any sand, even unwashed.
- Crushed stone with fractions of 40-60 mm.
- Polyethylene film that prevents the solution from pouring onto the pillow. The material is laid without cutting it, like a sleeve, so in fact you get two layers of polyethylene.
- Rough screed, at least 80 mm thick. For the solution, a mixture is prepared from washed or quarry sand, crushed stone (fraction size 10-20 mm) and CP, grade no lower than 300. Reinforcement for this layer is not necessary, just add steel fiber to the solution.
- Waterproofing with roofing felt.
- Insulation. As thermal insulation for screeds in a private home, it is necessary to use only EPS (extruded polystyrene foam) with a thickness of at least 50 mm.
- Finish concreting. For the final pouring of the floor screed, a mixture is used, which includes exclusively river sand and concrete of a higher grade. Also, this layer must be reinforced.
Important! The order of the layers should not be changed, since if you pour sand on top of crushed stone, after a while it will begin to sink down, which will certainly lead to subsidence and destruction of the entire floor. The first three layers allow you to cut off the capillary rise of water
First, the clay takes the “brunt of the blow,” then the sand weakens the water rise and reduces the pressure, and the crushed stone does not allow rise at all. If you are interested in how to properly make a floor screed on the ground, then lay out each of these layers with a thickness of at least 100 mm. It is also necessary to take into account compaction, which is usually performed using homemade devices weighing up to 80 kg
The first three layers make it possible to cut off the capillary rise of water. First, the clay takes the “brunt of the blow,” then the sand weakens the water rise and reduces the pressure, and the crushed stone does not allow rise at all. If you are interested in how to properly make a floor screed on the ground, then lay out each of these layers with a thickness of at least 100 mm. It is also necessary to take into account compaction, which is usually performed using homemade devices weighing up to 80 kg.
If you make a floor screed for your home with your own hands following this sequence, then you can lay any “flooring” material on the resulting slab.
For more information about screed layers, watch the video:
Important! Another 50 mm must be added to the total height of the entire cake. However, before you make a floor screed with your own hands in a private house, you need to clarify the stages of creating the floor
However, before you make a floor screed with your own hands in a private house, it is necessary to clarify the stages of creating the floor.
Preparing the mixture
Do-it-yourself floor screeds in an apartment are laid on the floor slab - an almost finished base. Sand concrete of classes B10-B15 is most often used. It has a compressive strength of at least 160-200 kg/cm², is resistant to deformation, and durable.
For the DSP you will need:
- Cement grade not lower than M400. The activity of the binder quickly decreases, especially at high air humidity, so it should be stored in a dry room in a closed container for no more than 6 months.
- Washed river sand or quartz fraction up to 2 mm. Contamination with plant residues and clay makes the solution heterogeneous and increases shrinkage.
- The water is clean, without oils, petroleum products, alkalis or acids.
- Additives to improve plasticity, as well as obtain the required properties - hydrophobicity, frost resistance, resistance to fungi and others. It is recommended to use safe, factory-made reagents with guaranteed results.
The proportions of the components for the cement paste are 1 part cement, 3-4 parts sand, water consumption is determined based on the moisture content of the sand. The dough should not be too liquid. Fiber is added at a rate of at least 300 g per cubic meter or 3 g per bucket of solution.
When mixing, you must follow the order in which the materials are loaded into the concrete mixer. With the drum constantly rotating:
- Half of the water is poured in.
- A plasticizer is added.
- Cement is loaded.
- Sand is poured in.
- The remaining water is poured in.
Fiber is added at any stage. The solution is mixed for 2-3 minutes. For small volumes, manual preparation or using a construction mixer is used.
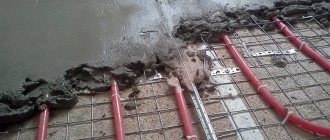
Filling and Alignment
Filling should be started from the far end of the room. The mixture is distributed over the surface between the beacons. Using the rule, the master levels the solution by moving the lath towards himself.
A “cold seam” is installed between the rooms. It is needed not only to take a break for rest, but also to reduce shrinkage deformations. To do this, the hardened joint of the concrete floor screed is cleaned of dust and cut with a stiff wire brush. You can destroy the cement film with hydrochloric, acetic or phosphoric acid and rinse with water. Then portions of fresh concrete are laid.
Materials for screed
What materials are best for making a rough screed? A concrete screed is used if it is necessary to make a solid foundation under long-term and heavy loads: for example, if a small forklift drives in a warehouse, if various vehicles regularly move in a garage, or in shopping pavilions there is a constant dense flow of people during the day. The volumetric weight of the concrete mixture reaches 2500 kg/m3, so the concrete screed can significantly load the floors.
In apartments, as a rule, cement-sand or gypsum screed is made, the difference between them is in the composition of the binder - cement or gypsum. It is impossible to say unequivocally that one material is better than another. The cement-sand mortar “matures” much longer and gains its final strength in 28 days. The gypsum solution hardens much faster, it sets in 3-4 hours, the screed will be ready for further work in 6-8 days.
This is a very important factor in favor of gypsum. In addition, gypsum screed does not shrink compared to cement-sand screed. This allows you to save on damper tapes, which are laid along the walls and compensate for the thermal expansion of the material.
However, do not forget that plaster absorbs moisture. It may be good for walls, when it takes in and releases moisture and controls the climate in the room, but this material is not suitable for screeding in damp rooms.
To improve the strength characteristics, special additives are added to the material:
- plasticizers for improved adhesion to the base;
- antifreeze additives;
- fiber fiber (steel wire fiber, polypropylene, basalt).
Preparation for laying a concrete screed on the ground
We make floors on the ground ourselves
Preparatory work is a mandatory stage in creating a concrete floor; it is they that take up the lion's share of time in the process of arranging the screed. But it’s impossible to do without them, unless, of course, you want to get a low-quality result.
Filter layer
The first stage is preparing the soil and filter layer
First of all, it is necessary to deal with the compaction of the earth in the base, which will help prevent its subsidence and, accordingly, possible cracking of the screed. Concrete floors on the ground are often installed in combination with a strip foundation at least 1-1.5 meters deep, filled with sand inside.
But this approach is not acceptable if the house is located on a clay plot. After all, clay retains moisture, therefore, if there is sand inside the foundation, stagnation of water will form and a real “pond” will appear under the building. That is why drainage is required in clayey areas.
The photo shows the process of excavating soil inside the strip foundation
The most optimal procedure in this case is the following:
- The clay extracted during the creation of the pit is filled with its lower part;
- Internal thermal insulation of the house and external insulation of the foundation are performed. These actions are aimed at leveling soil heaving even in the absence of heating in the building;
- gravel is poured onto the prepared soil and then thoroughly compacted. The quality of the compaction in this case is very important, since we are talking about preventing the formation of voids. It is carried out using special tamping mechanisms;
- sand is poured onto the gravel, which is also carefully compacted and smoothed.
The thickness of the filter layer depends on the characteristics of the soil; as a rule, sand and gravel beds are no thicker than 15-20 cm each.
Backfilling the sand layer
Tamping sand backfill
Prepared base
Waterproofing layer and rough screed
After filling the foundation, you can begin arranging the waterproofing of the future screed. The most popular materials for this purpose are polyvinyl chloride and bitumen-polymer membranes. If the moisture level for the house is within normal limits, then you can get by with a regular polyethylene film 250 microns thick, which is laid in two layers.
The edges of the waterproofing material should be slightly higher than the expected level of the finished concrete screed
Particular attention should be paid to laying waterproofing in the corners, since it is through them that moisture most often penetrates. If the material does not completely cover the perimeter of the room, then its elements are overlapped and fixed with tape
Pouring a layer of lean concrete
Pouring a layer of lean concrete
The optimal material for rough screed is “lean” concrete, to which crushed stone has been added. The resulting surface does not have to be perfectly flat, and no high demands are placed on it. It is quite enough if it does not have differences in height of more than 4 mm. In this case, its thickness should be about 4 cm.
Thermal insulation layer
Laying thermal insulation
Insulation of a concrete screed is an important stage, so a lot of attention is paid to the choice of thermal insulation material. He must have the following qualities:
- high strength;
- low thermal conductivity;
- fire resistance;
- ease of use.
Most often, preference is given to foam, polystyrene foam or a layer of mineral wool. The required thickness of the material is determined by the location of the house. For example, in central Russia, slabs 10 cm thick can be used for insulation, in less warm regions - up to 20 cm.
The laid thermal insulation material must be covered on top with a polyethylene film, which serves two purposes at once: it prevents the penetration of concrete mortar into the space between the insulation elements and provides a vapor barrier.
Adjustable floors
The classic subfloor is the installation of floors on joists . Purlins (logs) made of solid, first-class timber or thick boards (single frame system) are laid on the base base with a certain step. In large premises, a double frame system is installed, in which the logs in the perpendicular direction are tied with crossbars (lintels made of timber). The upper end of the bars is carefully planed. To level the logs, planks are usually placed under them, wedges are driven in, or pure quartz sand is added. Over time, such supports dry out or crumble, and the floor begins to sag and creak.
Construction of a subfloor on joists
Modern adjustable floors are free from such disadvantages. Similar systems are manufactured in the “Department of New Technologies”). Holes are drilled in the logs (standard bars two or three meters long) at a certain pitch. During installation, hollow plastic stand-up bolts are screwed into these holes, through which the height of the subfloor is adjusted. Steel dowels are placed inside the racks, which secure the logs to the base base. To increase the soundproofing ability of the floor, the space between the joists is filled with mineral wool slabs made of basalt or glass fiber. Sheets of plywood are screwed onto the top of the joists (in two layers, with the seams staggered). Then the finishing coat is applied.
Adjustable floors have excellent prospects . Such subfloors can be installed in the shortest possible time. Rigid steel fasteners maintain a stable position of the joists throughout their entire service life. The tree does not come into contact with the concrete base, due to which it is protected from moisture and rotting. The gaps promote natural ventilation of the entire structure. The adjustable floor system allows the base to be perfectly level. But widespread adoption of the technology is hampered by its rather high cost.
Types of concrete screeds
In order to understand how to properly fill the floor in an apartment with your own hands, you need to know about the types and methods of leveling the floor. Floor screed can be wet, dry, semi-dry. Let's look at each option in more detail.
Each room has its own suitable type of screed.
Wet
This method of floor leveling is most often chosen. You will need a concrete or cement-sand mortar, which is used to fill the surface of the base. The solution allows you to hide all unevenness and level differences. This is an ideal option to quickly and easily get a flat surface with virtually no additional steps.
Wet screed can be made using concrete and cement-sand mixture.
There are 4 types of wet screed:
- under waterproofing;
- on waterproofing;
- on thermal insulation;
- with self-leveling coating.
Dry
Thanks to a dry screed, you can quickly get a flat floor, since it does not require time to dry. There is no need to maintain a certain temperature to arrange it. Has excellent soundproofing properties.
Dry screed allows you to quickly create a level base for the finishing coat.
Suitable as a base for parquet, laminate, linoleum. Dry screeding can only be done in a dry room.
Semi-dry
An alternative method for pouring the floor in a room using the wet method. A distinctive feature of semi-dry screed is a small amount of water and a lot of sand in the composition. The floor will be ready faster, but it will not be as durable as with a wet screed.
Semi-dry screed is often used to level floors.
Self-leveling floor
This is a ready-made cement mixture with sand and polymer components. There are self-leveling floors, the mixture for which consists exclusively of polymer components. The main advantage of the coating is that it does not require leveling, as is the case with a wet screed.
Self-leveling flooring is easier and faster to complete than other screed options.
Installation of dry (floating) screed
Until now we have been talking about wet screeds , that is, leveling the base using building mixtures mixed with water. At the same time, there are also dry methods for constructing subfloors. If there is no water, there is no need to wait for the layer to be completely ready, to ensure a favorable setting and hardening regime. There is no need to worry whether the screed will “grow together” with the base and whether the ceiling will withstand the additional load.
The main component of the dry screed is a backfill made of calcined fine-grained expanded clay. Gypsum fiber panels are mounted on the loose layer. The dry screed also insulates the floor and protects against impact noise (though not for the owners of the apartment, but for their neighbors living on the ground floor). When installing it, first of all, a polyethylene film with a thickness of 100-120 microns is laid, which is attached to the wall with damper tape. Thus, a soundproof barrier is created. Dry expanded clay backfill also works to protect against impact noise and also retains heat inside the room.
With proper installation and operation, dry screed (complex systems OP-131 and OP-132 from Knauf) will last for many years without causing the slightest concern to the owners. Moreover, such a subfloor does not create a significant load on the floor. Dry screed can be laid on weak foundations. Installation takes a few hours (work can be carried out at low temperatures). Dry screed, unlike cement analogues, has good thermal insulation properties. The floor retains heat, making it pleasant and comfortable. Dry screed is often accused of causing hydrophobia. Of course, flooding is contraindicated for such a foundation, as is the case with many floor coverings and other finishing materials. However, a small amount of water will not harm him.
In this example, dry screed was carried out using the integrated prefabricated floor system OP-131 (technology) using floor elements consisting of gypsum fiber panels measuring 1.5 x 0.5 m with profiled edges. Thanks to the high technological readiness of the elements, floor assembly is reminiscent of a child's game of construction kit.
Installation of dry (floating) screed
1. Mark the level of the subfloor on the walls. Then a plastic film is laid on a clean and dry base. The rolls are laid with an overlap of 25 cm and placed on the walls to the height of the floor. Installation of dry screed. In our example, dry screed was performed using the complex prefabricated floor system OP-131 (technology) using floor elements that are gypsum fiber panels measuring 1.5 x 0 .5 m with profiled edges. Thanks to the high technological readiness of the elements, floor assembly is reminiscent of a child's game of construction kit.
2. Edge tape is attached to the walls along the perimeter of the room.
3. Expanded clay is poured onto the base. If the thickness of the screed exceeds 2 cm, then the dry backfill is compacted with a hand roller.
4. Place two guides along the walls and check the thickness of the layer.
5. Expanded clay backfill is leveled using guides and slats.
6. Gypsum fiber panels of the subfloor (“superfloor”) are prepared for installation.
7. The panels are laid, moving from the doorway to the window. For unplanned movement, “islands” are laid on the backfill. The panels are glued together with a special adhesive mastic.
8. Gypsum fiber panels are fastened with self-tapping screws.
9. Laying of the super floor is completed. For multiple sections, additional elements are prepared from the panels.
10. The joints of the subfloor panels are filled with putty.
Solution components
Cement is a powdery binder that can harden in water and in open air. In combination with coarse and fine aggregate, it ensures the strength and reliability of the structure being built.
Cement is obtained by grinding a mixture of clinker, gypsum and special additives in specified proportions. In turn, clinker is a product from the firing of limestone with clay and other components on which the properties and name of cement depend. Depending on the feedstock, the following types of hydraulic binders are distinguished:
- Portland cement:
- Portland slag cement;
- pozzolanic;
- lime;
- plugging;
- sulfate-resistant and others.
When forming a cement-sand mixture (CSM) in order to obtain concrete of a given strength, it is necessary to take into account the strength grade of Portland cement. The following table shows the strength indicators of the material according to the old and new systems:
| Class | Brand | Strength | |
| MPa | kg/cm 3 | ||
| At 22.5 | M300 | 22,5 | 300 |
| B 32.5 | M400 | 32,5 | 400 |
| B 42.5 | M500 | 42,5 | 500 |
| B 52.5 | M600 | 52,5 | 600 |
In addition, when choosing a material for preparing concrete with the required characteristics, other properties of cement are taken into account:
- The fineness of grinding directly affects the strength properties of the concrete mixture, especially at the beginning of hardening.
- Density affects the water-cement ratio, and therefore water consumption. To reduce it, while still achieving good workability of the mixture, plasticizing additives are used.
- Frost resistance is especially important when building in winter or in areas with year-round low outside temperatures.
- Crack resistance. This indicator is influenced by such a concept as the uniformity of volume expansion during hardening.
Depending on the components from which cement is made, the above qualities vary within fairly wide limits.
The concrete mixture, which, in addition to cement, includes sand, as well as crushed stone or gravel, is formed depending on the purpose of the composition. What proportions of cement, sand and crushed stone should be contained in it are determined in accordance with the recommendations of GOST 27006 - 86 (1989) “Concrete. Rules for the selection of compositions" and GOST 7473 - 94 "Concrete mixtures. Technical conditions".
For the concrete mixture, sand with a grain size of 1.2-3.5 mm is used
When choosing this component, pay attention to the purity of the material. In order for the prepared cement-sand mixture to be of high quality, the presence of silt and clay particles in the sand should not exceed 5%. You can check the suitability of sand for use using water
To do this, you need to pour a small amount of the test component into a container, add water and shake the composition. If the liquid is cloudy and contains suspended clay particles, then the sand is not suitable for preparing concrete
You can check the suitability of sand for use using water. To do this, you need to pour a small amount of the test component into a container, add water and shake the composition. If the liquid is cloudy and contains suspended clay particles, then the sand is not suitable for preparing concrete.
The concrete mixture used to pour the foundation includes crushed stone or gravel of medium fraction. The use of large grains will lead to loss of strength of the foundation for the construction of the building.
The production of high-quality concrete is possible using warm and clean water, without minor impurities (oils, paints).
When preparing a cement-sand mixture, you need to take into account that there are no absolutely pure components. In practice, it can be difficult to accurately calculate the proportion of sand and cement for the foundation, especially when pouring the foundation for individual construction.
Additionally, you need to take into account the fact that over time, foundation cement loses some of its properties. Over six months of storage, the material reduces its binding properties by a third. Accordingly, the grade characterizing the compressive strength is reduced.
Installation of beacons
Many designs and methods can be used as beacons. Let's look at three, the most practical in my opinion. The first design is a standard beacon profile laid on mortar islands. The second is made from a PP guide profile; it does not require drying of the solution and the screed can be poured immediately after installation. The third is the formation of a beacon from the solution itself, the method is relevant on very thin layers of 0-10mm.
Beacon profile
The most common beacon profiles, convenient for use in screeds, are 6 or 10 mm thick
For these purposes, it doesn’t matter at all whether they are aluminum or steel. 10mm beacons are more practical - they are more rigid and require fewer attachment points
In most cases, you can get by with this profile.
Installation consists of setting the control screws to the desired height of the screed minus 10 mm (-6 mm) after 60-70 cm. The screws prevent the profile from sliding below the specified level and significantly simplify installation, and also increases accuracy.
Regardless of the type of beacons, the lines where the profiles will pass are first marked. The distance between the beacons is taken to be slightly less than the length of the rule, so that at any point on the floor the rule lies on at least two profiles. Standard 3 m profiles can be extended in length if required. It is most convenient to use the 1.5 m rule, with a distance between beacons of 1-1.2 m.
When the beacon lines are marked, holes are drilled along the lines for dowels with self-tapping screws. The screws are screwed to the required height, taking into account the thickness of the profile. It is better to do the alignment of self-tapping screws using a laser level. In the absence of a laser, the outermost screws are placed on the line using any available means, a thread is pulled between them and the remaining screws are already aligned along the thread.
When all the screws are exposed, mortar cakes are placed on them and the beacon profile is recessed into the mortar until it touches the screws. The solution protruding above the profile is carefully removed. Installation is complete and pouring is done the next day.
There is an alternative to the “wet” installation of the beacon profile - installation on clips. The profile is installed on special plastic fasteners without fixing with mortar. The disadvantage of this installation is that the fasteners do not have the proper strength and need to be installed much more often, ideally every 30 cm. And yet, the beacons turn out to be “thin”.
First of all, self-tapping screws are installed, as in the “wet” version, only more often. When installing self-tapping screws, similar to the first option, you need to take into account the thickness of the profile itself, but now you also need to take into account the thickness of the plastic clip - 1-2 mm. Then the main parts of the fastener are put on the screws, the profile itself and the whole result is fixed by the second part of the clip.
Quick installation on PP profiles
The method is used when there is no time to wait for the beacons to set. The disadvantages include a minimum layer of 30 mm and the need to dismantle the profile after pouring, followed by sealing the seams. It should also be taken into account that the solution will be separated by beacons and the seams are a weak point. The method is not applicable in floating screeds.
The process of setting the screws is identical to that described above, with the difference that the caps are installed to the entire height of the screed being poured, without taking into account the thickness of the beacons. In addition, next to the exposed screws, one hole is drilled for the fixing screw. When the limiting screws are in place, the ceiling PP profile is laid on the caps, and the profile is secured on top with fixing screws. You can fill the screed immediately. The next day the profile is removed and the seams are sealed.
Lighthouses from solution
To be more precise, from tile adhesive or a thickly applied self-leveling floor, the usual mortar is too weak to abrasion. The material is selected based on the speed of setting and availability at hand. Mortar beacons are relevant for layers of 0-10 mm, when the beacon profile is too thick.
For the work you will need the same PP ceiling profiles. The algorithm of work is the same, with the difference that the profile is installed in the form of an inverted letter “P”. The solution is poured into the resulting gap between the profile and the base. After setting, the profiles are removed and poured.
Beacons for thick layers
When pouring expanded clay concrete into layers of more than 10 cm, the limiting screws are needed too long, the mortar cakes are huge. You can get out of this situation by using bricks, placing them in the places where the beacons are attached.
Since the bricks must be laid on the mortar, to save time on setting, self-tapping screws can be eliminated. However, without self-tapping screws, accuracy can deteriorate significantly; it all depends on the skill of the master.
A range of mixtures for screeds for any base.
When carrying out any repair work, the base of the floor must be pre-leveled and must have sufficient rigidity for long-term and safe operation
. In other words, before applying the final floor covering, it is necessary to apply a cement screed on the floor.
For leveling floors
You can use a simple cement mixture, but it is more advisable to use ready-made mixtures for screeds and floors. The main advantages of ready-made professional mixtures are their expected quality, predictable method of operation and declared characteristics of strength and ability or inability to undergo minimal deformation.
Thus, when using, for example, the M-150 mixture, we will not always obtain strength comparable, for example, with the Ceresit CN 175 floor mixture. In addition, the usual M-150 will shrink during the drying and hardening process, while the finished the mixture will not shrink like that.
Ready-made professional mixtures for leveling floors are divided into two groups:
- Mixtures for creating the so-called “dirty” screed
, which covers floor level issues and usually has a fairly noticeable thickness. Depending on the manufacturer and brand, such products allow you to make screeds with a thickness of 5 to 80 mm. The plasticizers and modifiers added to their composition make it possible to subject finished floors to high loads, as well as to install “warm floor” systems, where an important aggravating factor in operation is the constant change in operating temperature and the associated processes of expansion/contraction of both the screed materials themselves and the cables or wires located inside the screed. - Mixtures for the finishing layer
, as a rule, are thin-layer self-leveling and self-leveling mixtures, with the goal of creating a perfectly flat floor. Such mixtures usually do not have a large thickness (from 0.5 to 15 mm), have a more liquid consistency and harden quite quickly.
Also, professional floor mixtures differ in types:
- Floor mixtures that have adhesion to concrete bases
when the screed is poured over concrete or over concrete treated with rigid cement waterproofing. - “Floating” screeds are mixtures for floors, ready for use on a separating layer
, for example, on a layer of thermal insulation (here only extruded polystyrene foam), on a bitumen base (if the waterproofing is made using membranes or mastics), as well as on highly deformable and weak bases .
In any case, the use of ready-made mixtures for screeds and floor leveling will allow you to obtain the expected quality, declared service life, high resistance to deformation and cracking, which ultimately will lead to long and safe operation of the final floor covering (whether parquet, ceramic or clinker tiles or street clinker steps, etc.)
Rough screed, hydro- and thermal insulation
It is best to wait about 10-15 days before performing subsequent work, since this time is required for the crystallization of liquid glass.
After that:
- Pour sand in several layers (approximately 200 mm each) and thoroughly wet and compact each of them. In this case, it is advisable not to walk on the first layer.
- Lay out crushed stone (you can add expanded clay to it) and tamp it down as well.
- Lay polyethylene with a bend of 20-30 mm on the walls. At the same time, you should not walk on the film in boots with hard soles.
- Perform a rough screed. Before pouring it, prepare a “weak” concrete solution from CP, sand and crushed stone in a ratio of 1:3:4. It is also recommended to add steel fiber to it to obtain reinforcement. For 1 cubic meter of concrete you will need 1 kg of fiber.
- Wait 48 hours and “harden” the hardening concrete using liquid glass and water, in a ratio of 1:10, as well as cement, which must be practically rubbed into the slab in a thin layer.
- Treat the surface with liquid bitumen and lay roofing material with an allowance of 30-50 mm.
- Solder the joints of the roofing felt with a hair dryer.
- Take 30 mm thick EPS to create a thermal insulation layer and glue the joints with specialized tape. It is better to lay two layers of material at once.
Remember that the room loses up to 35% of heat through the floors, so special attention must be paid to the thermal insulation layer. In pursuit of savings, you will ultimately end up overpaying for heating your home.
Laying cement-sand screed
Laying lightweight cement-sand screed
1. Sand concrete is mixed with water, mixed with ceramic gravel and laid out over a grid.
2. The solution is leveled with a spatula.
3. The screed is aligned according to the beacons using the rule.
The cement-sand screed must have a thickness of at least 3 cm. Reinforcing mesh is used to strengthen the layer. When leveling with a thickness of 7 cm or more, the reinforcement may not cope with shrinkage deformations, and then cracks will appear in the screed (harbingers of delamination). Walking on a traditional cement-sand floor is allowed no earlier than a week after installation.
All this time, you need to take care of the screed: periodically moisten it, avoid drafts, maintain a certain temperature and humidity. The floor covering can only be laid after 28 days, when the cement has gained 70% strength and the screed has given up excess moisture.
Simple screed | Screed on the separating layer |
Screed on the thermal insulation layer | Screed on an insulating layer with heating |
If the base base (usually the surface of a reinforced concrete floor) is not in harmony with the geometry and the differences in height at different points exceed 2-3 cm, then coarse levelers are used. They are laid using the same technology as traditional cement-sand screeds. Beacons - special steel slats - are attached to the prepared base in 2 m increments. The dry mixture is mixed (diluted) with water in the proportion specified in the manufacturer's instructions (printed on the packaging). The solution is applied in portions and leveled using a spatula, trowel and rule. You can limit yourself to a thick screed if you plan to lay tiles in the room.
For delicate coatings, it is recommended to prepare the base in two stages: first the leveler, and then the self-leveling floor. Often it is necessary to bury utility pipes in the screed, which significantly increases the thickness of the subfloor. In such a situation, it is recommended to use mixtures for lightweight screeds. They contain crushed expanded clay or polystyrene foam granules. The thickness of the leveling layer can reach 30 cm. Lightweight screeds are three times lighter than cement subfloors.
Screed and rational planning of apartment renovation
To save time, money and avoid additional delays and costs due to alterations, the apartment owner must adhere to the following procedure:
- Invite a specialist to measure the height difference across the subfloor and determine the minimum screed level.
- Determine the redevelopment plan yourself, or order an interior design from a designer, providing him with data on the minimum screed level.
- Based on the redevelopment plan and the plan for laying communications along the floor, establish (independently or with a foreman) the type of leveling layer, its thickness and the sequence of screed installation in the general plan of work for the facility.
The order of installation of screeds in the apartment
You can level the floors before installing walls and interior partitions, or after. Each approach has its pros and cons.
Advantages of screeding in an open space without walls or partitions:
- Simplicity and accuracy of height markings - all beacons are set at the same level from the same position of the laser axle builder.
- Leveling across open space takes less time regardless of the method used.
- Using a semi-dry and dry method, screeding the entire apartment can be done in 1 day. Wet, too, if you order a ready-made solution delivered to the site by a concrete pump.
- It is economically feasible if frame-plasterboard or any other partitions are erected according to a frame scheme.
- It is easier and more accurate to mark doorways when constructing partitions using a ready-made screed (there will be no errors with the height).
Rice. 7. Screeding in open space allows the use of productive work methods.
Advantages of leveling after the construction of walls and partitions:
- There is no problem with the placement of materials, tools, equipment and household equipment during the screed work (rooms can be vacated one by one).
- If you use the dry or semi-dry method, it is permissible to install the screed anywhere on the repair schedule (the main thing is that this should be after the installation of communications covered by the floor, and before the installation of door blocks and floor coverings).
- It is economically feasible if walls and partitions are built from brick, foam concrete and other masonry materials.
Rice. 8. Semi-dry screed after the construction of partitions.
Minimum screed level and its approximate cost
Of course, it is better to entrust this work to a specialist. But this skill can be useful to anyone choosing an apartment to buy, as well as developers, realtors, and interior designers.
The minimum level of the future screed is the mark of the highest point of the concrete floor plus the MIN technological layer thickness. With rare exceptions, the minimum level will correspond to the actual elevation of the future screed.
Procedure:
- The axle builder (preferably with an evolutionary tripod - for simplicity and speed of work) is installed approximately in the center of the apartment. The height of the horizontal plane it marks is not important. The main thing is that it is recorded.
- According to the light markings, you need to walk through all the rooms with a marker and put marks on the walls (each wall must be marked with at least 2 marks).
- Then the axle builder is installed in one of the rooms approximately in the center, and its plane is aligned with the existing marks. All other piers are marked along the beam.
- We repeat the previous step in all other rooms of the apartment. A single horizontal plane (USP) is fixed at the object.
- We walk around the entire apartment with a tape measure, measuring the distance from the EGP to the subfloor. We record the readings near the corresponding marked points on the site plan.
- Where the distance is minimal is the highest point of the floor (conventionally called “subfloor zero”, “screed zero” or simply “zero”). All other marks, accordingly, must have a minus sign. Among them, one is the lowest. Its value will be needed to calculate the thickness of the leveling layer
- Let's add the technological thickness of the screed to zero MIN - and we get the minimum level of the screed. You can do precise interior design!
- Let's determine the approximate cost of floor leveling. To do this, add the height (from zero) of the minimum level of the screed to the value (modulo) of the lowest point of the ceiling, and divide the resulting amount in half - this is the average thickness of the screed in a new building and an old house. Now, knowing the thickness and area of the screed, you can receive commercial offers with a price from any contractor.
Waterproofing subfloors
The installation of subfloors in wet rooms (bathrooms, toilets, kitchens) begins with waterproofing. However, it happens that a waterproof barrier is created throughout the entire apartment. After all, neither bedrooms, nor living rooms, nor children's rooms with offices are insured against leaks of heating pipes.
Waterproofing of bathrooms with a coating elastic membrane
Various materials and technologies are used for internal waterproofing Floors and walls are coated, pasted over or treated with special penetrating compounds. Coating waterproofing can be bitumen-based (bitumen-polymer mastics) or cement-based (cement-polymer dry mixtures). In addition, products are produced that are entirely made from synthetic components (based on polyurethane, epoxy resin, etc.).
Waterproofing a bathroom in a wooden structure
For interior spaces, it is recommended to use polymer-cement coating waterproofing - rigid or elastic. Rigid mixtures include quick-setting cements, fillers and various active mineral and synthetic additives. Such materials are usually used in houses with established foundations. In addition, rigid waterproofing (“Stromix-barrier”, “Prospectors”; “Glims VodoZgor”, “Glims”) is indispensable when sealing leaks. New buildings are prone to movement, which causes cracks to form in walls and ceilings. In this case, it is safer to use elastic cement waterproofing.
Cement-based coating waterproofing is effective, environmentally friendly, easy to use, reliable and durable. To prepare the solution, you need to pour the dry mixture into water (the proportion is indicated on the package) and mix. The composition is applied with a spatula or brush (unlike hydroglass insulation, which requires a gas burner to apply). In this case, a dense and durable waterproof layer 3-4 mm thick is formed, capable of withstanding the pressure of water (specifically, “AquaShield” can withstand 6 atm). In addition, such a waterproof barrier adheres well to leveling screed and tile adhesive. The service life of cement waterproofing is practically unlimited. The main thing is to comply with technological requirements. The coating must be continuous, without breaks and cold seams (front joints of areas treated at different times). The waterproofing is applied to the walls to a height of 10-15 cm. If work is continued after a sufficiently long break, then the solution is applied with an overlap of 30 cm onto the already laid layer.
Pasting waterproofing technology involves the use of bitumen-containing roll materials. Hydroglass insulation is especially popular. However, to create a durable waterproof barrier, you should use products based on polymer-modified bitumen "Technoelast Alpha", "Luberit-Elast", "Izolast").
Penetrating waterproofing (“Penetron”, “Stromix”, “Starateli”) requires professional, if not masterly, execution. A special mixture (high-quality cement, sand, active additives) is mixed with water. When applying the solution to a concrete surface, the active components penetrate into the pores, capillaries and microcracks and interact with the chemical formations present in the concrete. The resulting microcrystals fill the smallest voids and crevices. Concrete becomes waterproof and even more durable. However, the use of penetrating waterproofing has its own specifics. The concrete base must be of high quality and well compacted. Microcrystals are not capable of healing defects larger than 0.3 mm.
Calculation rules
Let's consider a concrete screed for a room of 42 m2. A layer of fill (screed) with a thickness of 7 centimeters is required.
We multiply the thickness of the screed and the area of the room with each other. We find that for this room we need 2.94 m3 of solution. The ratio of cement to sand is 1:3. Then you will need 2.94 x 3/4 = 2.2 m3 of sand. 0.74 m3 of cement will be required.
Next, we proceed to calculating the ratios of the components:
For sand - 10 liters of sand is 14-16 kg. Therefore, we get 1 m3 of sand = 1400 - 1600 kg.
For crushed stone (gravel) 10l = 15-17kg. Then 1m3 of crushed stone = 1500 - 1700kg
For cement 10l = 13-14kg. Then 1 m3 of cement = 1300 - 1400 kg.
From our ratio it is clear that 2.2x sand will be required
Next, we move on to the volume of additives along with binding elements, as well as sand aggregate. In our example, we will give preference to sand, cement and crushed stone. After rounding everything looks like 1:3:5. The relative amount determined earlier helps determine the volume of sand. 1.75 * (3/9). We get 0.57 m3.
Finally, we calculate the volume of cement.
1.75 – 0.57 – 0.95 = 0.23 m3.
Units of measurement used to be volumetric, now we need mass units. Every 10 liters of mixture requires separate calculations. Accordingly, for cement, sand and crushed stone, the mass has the following indicators in kilograms: 15-17, 14-16, 13-14.
After translation, the mass fractions will look like this:
- For crushed stone: 1425 kilograms.
- For sand = 798.
- Cement: 299 kilograms.
This is an approximate example, but it will also benefit ordinary buyers. The main thing is to take into account in advance the possibility of reducing the volume of the screed when it takes on a finished form. The finished mass can yield approximately 0.59-0.71 cubic meters per 1 cubic meter of the total finishing area. It is necessary to purchase all relevant components with a certain reserve.
Concrete or CPS: which is better?
Sand from quartz rock in three parts is combined with cement in one part to prepare a CSP, or cement-sand screed. The amount of water reaches 45-55 percent of the total volume of the dry mixture. Thanks to this ratio, a material grade of 100-200 is obtained. For each resulting layer, the consumption is determined by the thickness, as well as the type of coating used.
To level the surface, a thickness of only 2 centimeters is sufficient. But it can increase up to 3 centimeters if, for example, it is necessary to add a plasticizer. DSP is an excellent solution when you need to fill small areas. Or when the entire surface remains flat. In other cases, it is recommended to give preference to concrete mass, which is more durable and reliable.
Concrete will not crack with a layer of 4 cm. The coating acquires thermal insulation characteristics if expanded clay concrete is added to it. Solutions with crushed stone have better adhesion. Therefore, the resistance to loads of different nature is better.
Read with this
- Floor screed thickness
- How long should a floor screed dry?
- Floor screed mortar
- Dry mixture for floor screed m300
- Installation of beacons for floor screed
- Leveling the floor according to beacons
- Density of wet sand: properties and melting point of river sand
- Technology for creating a screed on a wooden floor
- Do-it-yourself dry floor screed: let’s figure out how to do it right
- Step-by-step technology for pouring self-leveling floors
Features of preparing the solution
Concrete is mixed until it becomes a homogeneous mass.
How to make a central fiber cement board yourself? Let's look at an example of preparing a mixture for arranging a wet screed. As already mentioned, the recipe for preparing the composition is quite simple: cement - sand - water. The proportions will be as follows: 3 parts sand are mixed with one part cement. Approximately 50% of the total volume of the mixture is added to the mixed mixture. How to make a solution?
- First of all, mix cement and sand using a construction trowel;
- Add water to a separate container and introduce the prepared mixture into it;
- At the next stage, you will need a construction mixer, with which the solution can be brought to the desired consistency and homogeneity;
- If a plasticizer is needed to improve technical qualities, it is added in the proportion indicated by the manufacturer on the packaging;
- When a creamy consistency is achieved for the solution, it is poured onto the prepared base and leveled.