In this article on the website remontlegco.ru we will look at how to properly make a floor screed with your own hands in an apartment, you can watch a step-by-step video of pouring the screed, so if you follow all the instructions yourself, you can reduce the cost of the work performed in general.
Let's find out what a screed is - it is nothing more than a floor layer (base) on which the finishing floor covering is laid: laminate, linoleum, tiles, etc. The type and further operation of your floor covering will depend on the quality of the screed.
Related articles:
Pouring self-leveling floor with your own hands.
What is a screed layer
Let's start with this question, because the screed performs several functions. Firstly, the layer of screed mortar is intermediate, that is, it is located between the base of the floor and the finishing coating. Further:
- With its help, the floor base is leveled horizontally, and in some cases, pouring is done with a slope in the required direction. For example, in showers and washing baths towards the drain in the floor.
- The screed increases the strength and rigidity of the floor. This is especially important if the latter will be subjected to serious loads.
- Some screed mortars have thermal insulation properties, so we can assume that the screed increases the thermal insulation of the floor.
- If a “warm floor” heating system is installed inside the screed, then such a layer begins to work like a large radiator. That is, it collects heat and distributes it over the entire area of the floor base.
- Today, utilities are often laid in the screed layer: electrical cables, pipes for sewerage, cold and hot water supply, as well as heating.
- If the floors are thermally insulated, the screed serves as protection for the insulation from mechanical loads.
Warm floor under screed Source plitkahelp.com
In some rooms, for example, in garages, screed is the finishing coating. This is where it is laid in one layer. But more often it is a two-layer coating:
- This is the base of the layer , which performs both leveling and strengthening functions. This screed is called a rough screed, because in the future it will additionally have to be leveled with finishing materials: ceramic tiles, porcelain stoneware. It is made from concrete mortar made according to the classic recipe.
- Clean screed . With its help, the floor is made almost 100% flat. Such surfaces are prepared for finishing with laminate, linoleum, parquet or carpet. Here, so-called self-leveling mixtures are used, after application of which the floor base becomes perfectly level.
Self-leveling floor screed Source tirichiamo.it
Lighthouses from solution
It is believed that the screed for such beacons is of the highest quality. Just as in the previous case, the screws are set according to the water level, only the step between them can and should be made much larger: 1.6 - 1.7 m (30 - 40 cm less than the length of the rule). Horizontal platforms made of mortar at the level of the screws serve as reference points . They can be used in this capacity only the next day or later, when the sites become sufficiently hard.
Between these areas, continuous strips of mortar are applied and leveled using the rule, as they say, “rubbing the beacons.” (Rubing beacons is a completely professionally accepted term, and plasterers’ supporting platforms are called marks).
In the resulting strip, only those places that have traces of alignment are left as a rule; untouched places are cut off at an angle to the floor. Screeding along such beacons is done in the usual way. Since the screed is made between two frozen solid beacons, it is necessary to ensure the best possible connection between the liquid and solid solution. To do this, some craftsmen add 1:100 PVA glue , coat the contact areas with this solution and immediately make a screed.
If all stages, from markings and marks to the final screed, are done carefully and correctly, then the result is a surface that looks like the result of a machine.
Types of screeds
Before making floor screeds, you need to understand their varieties. And the separation is carried out whenever possible, the screeds are attached to the bottom layer. The latter is a reinforced concrete floor slab, wooden floors, and compacted soil. And more about the types:
- Tied tie. They differ from other varieties in that they are firmly attached to the lower base. This is usually how concrete is poured onto a concrete slab. Here the main role is played by the homogeneity of the two materials, plus their high adhesion relative to each other. In total, a flat base with high strength characteristics is obtained. Important - the bound variety is usually poured onto a dry surface, so it is more often used on the upper floors of buildings and structures.
- With a separating layer. The name itself suggests that a material separating them is placed between the base and the screed. Typically, roofing felt, polymer roll waterproofing materials or bitumen-based mastics are used for this. This type is used if the screed mortar is applied to the ground or wooden floor. If the substrate humidity is very high. Or a gypsum screed is laid on the concrete base. In any case, the screed layer will be a separate structure, so experts recommend reinforcing it first, and secondly pouring it with a thickness of at least 3 cm.
Screed on a waterproofing layer Source ko.decorexpro.com
- Floating floor. This is practically a continuation of the previous version, but in addition to the fact that a separating layer is laid between the two materials, the screed is additionally separated from the walls of the room. For this purpose, damper tape is often used. By the way, when installing heated floors, it is the floating type that is installed, because the temperature effect from the heating system either expands the poured layer or narrows it. Let us add that such a screed is made with a thickness of at least 5 mm and always includes a reinforcing frame.
- Dry. This variety has been used recently in Russia. Essentially, this is a layer of expanded clay that acts as thermal insulation, on which gypsum fiber sheets are laid. The latter are fastened together with an adhesive composition. The main advantage of such a screed is the quick construction process, plus there are no wet construction processes. And two requirements - the load on such a structure should not be large, it can only be laid in dry rooms.
Dry screed on expanded clay Source zen.yandex.ru
Another classification, which is based on a survey on how to pour a screed. There are also four positions:
- A continuous layer, poured using a wet method. This is a classic that uses a cement-based mortar. It is poured onto the prepared base and leveled, usually along the beacons. The biggest drawback of this method is that you have to wait 28 days after application for the concrete solution to gain its brand strength.
- Semi-dry method. What is needed for this type of floor screed. Everything is the same as in the classic recipe, only as much water is poured into the mixture as is necessary to mix the cement. This applied layer dries quickly - one day is enough. And you can load it in a week. The only negative is that you need the exact amount of water that is added to the dry mixture. This is not so easy to do.
Semi-dry screed in an apartment Source brestbelar.flagma.by
- Continuous from self-leveling mixtures. This technology is also “wet”. It has already been mentioned above. In essence, this is a finishing leveling layer no more than 2 cm thick. How to make a floor screed from self-leveling mixtures will be discussed below in a separate section.
- Dry technology. We will also talk about it.
And one more point that is included in the classification section. All screed mortars are divided into two types, which are based on two binding materials: cement and gypsum. There are other varieties, for example, bitumen or magnesium, but they are not used in residential construction.
Cement screeds have high strength, easily withstand the negative effects of water, and have a long service life. Cons - long drying process, during which they shrink.
Gypsum is not inferior to cement in strength and durability. When dry, they do not shrink, but they are afraid of water. But, as practice shows, both builders and home craftsmen give their preference to cement. They are easier to work with and have high strength, which is very important for floor structures.
Self-leveling gypsum screed Source feniks-arenda.ru
See also: Catalog of house projects made from aerated concrete blocks
Plaster beacon profile
From such guides you should take a profile with a height of 10 or 12 mm . Even new plaster laths in the store can show noticeable curvature. The evenness of beacon profiles made of thin galvanized steel all the more needs to be controlled by a rule during installation.
The first thing to do is, using a water level and a powder-coated cord, make horizontal marks around the perimeter of the room. You can limit yourself to risks above those places where the profile will rest against the wall (with a small gap). Markings must be made from the same point so that measurement errors do not add up. You can find an intelligent video made on this topic, but it is also clear that the measurements are taken from one reference horizontal plane.
First, the beacons from the profile are placed dry , starting from the wall with a notch. You can do this in any way convenient for you:
- Place, as shown in some videos on YouTube, solid objects of the required thickness, such as tile scraps.
- Make holes in the floor along the line of the beacon, insert dowels into them, align the screws to the required level and make patches of mortar with alabaster flush with the cap.
The first option only looks simpler and faster. First, you need to have a whole range of different linings. Secondly, the screws can be raised or lowered by any amount, but the plates are discrete. Finally, if wood was used as pads, it will have to be removed before installing the screed.
only 2 outer self-tapping screws can be leveled , and it is more convenient to align the middle ones along the cord; on the outer ones, place a match under the cord on the caps and tighten the middle screws with a gap of the same thickness. Plus, the guide profile may not be completely level, and if it has to be pressed against the lining and secured with plaster mortar, it may rise along with the last lining.
To prevent the beacon profile from dangling when installing the screed, it must be secured with slides of mortar, as in the video, but the use of gypsum should be avoided if possible and, when time permits, all work should be done only with the use of cement mortar. It will be stronger and not necessarily longer in the end.
The concrete floor in front of the screed must be clean and well primed . In the first option, the floor can be primed immediately, and in the second, after the dust from drilling holes has been removed. The junction of the wall and the floor must be taped with waterproofing tape; polyurethane-based waterproofing mastic can handle this even more reliably. For better adhesion of the screed to a smooth concrete floor, it should be covered with concrete contact.
Using ready-made beacons, making an even screed is no longer difficult, or rather, all that remains is purely physical work. You just need to take into account some circumstances:
- Do not allow excess water in the solution: if the solution made according to the instructions on the package turns out to be thick, this means that it is simply poorly mixed. A powerful low-speed drill is well suited for this. Excess water leads to a decrease in the strength of the screed and its cracking.
- You need to help the solution settle . To do this, you can lay it out in a layer above the beacons, and move the shovel or trowel parallel to the screed back and forth. The smoother is needed here not for leveling, but as a replacement for the vibrator. Air bubbles that begin to come out of the solution prove the correctness of such actions. If this is not done, then later small holes in the screed from escaping air will be noticeable. Such flaws, of course, are not catastrophic, but the strength of the screed will be lower than possible.
- The final alignment is done by forward movement of the rule. It needs to be moved mainly across the beacons (left - right) and at the same time along (slightly towards you), and the movement towards you must be strictly in one direction, otherwise you will get small transverse grooves. There should be a small mound of solution along the entire length in front of the rule. There is no need to try to level the screed with just one longitudinal movement of the rule - it will leave a surface with noticeable pits behind it.
Do not allow the finished screed to dry out quickly. Deep priming of the floor is necessary, in particular, to prevent water from leaving the screed too quickly. It is necessary to protect it from direct sunlight and drafts. For the first few days, you should spray the screed with water and cover it with film. However, not all of these rules are followed.
Screed construction technology
So, having understood the concept of what a screed layer is, and also having examined its varieties, we move directly to the question of how to make a floor screed with your own hands. The whole process is divided into four main stages:
- Preparing the base.
- Installation of beacons.
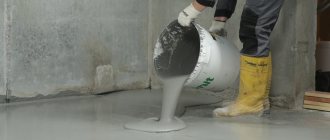
- Preparation of the solution.
- Filling the screed.
Preparing the base
The complexity of the preparatory process depends on what kind of foundation needs to be prepared. For example, soil:
- soil is removed;
- a layer of coarse sand is poured in, which is leveled and compacted;
- the thickness of the compacted sand is 30 cm minimum, if the layer is thick, then compaction is carried out in thin layers separately;
- coarse crushed stone with a minimum thickness of 10 cm is poured in, which is also leveled and compacted.
If the base is a reinforced concrete floor slab, then:
- The gaps between the slabs are sealed with repair mortars: cement-sand;
- after drying, it is necessary to clean the concrete floor;
- Next, a deep penetration primer is applied, which will not only increase the adhesive properties of the base, but also strengthen its outer layer;
- the primer must be applied in two layers: the first must dry before applying the second;
- if necessary, the floor is covered with waterproofing material.
Sealing seams and cracks Source it.decorexpro.com
If the floor is wooden. This is a rare situation, because it is easier and cheaper to level wooden floors with plywood, chipboard or OSB. But if the need arises, then:
- wooden floors are repaired: bonding, sealing cracks, attaching loose floorboards to joists, etc.;
- a waterproofing roll material is spread over the wooden base;
- waterproofing strips are laid overlapping each other with an offset of at least 15 cm, the ends of the material are placed on the walls to a height of 10 cm;
- Sometimes double waterproofing is required, in which strips of material are laid perpendicular to each other.
Sometimes there are situations when there is already an old screed on the floor. Experts advise that regardless of its quality condition, it is better to dismantle the old screed layer.
Coating a wooden floor with polymer film Source ro.decorexpro.com
Installation of beacons
Before pouring the floor screed, the dowels are placed. For a garage, the use of beacons is not necessary, but for residential premises where finishing will be applied, this is a necessary step. The thing is that deviations of the floor plane from the horizon in the amount of 3 mm per 1 m of length are not noticeable within the same room. And this is the norm. But on the scale of a whole house, this can grow into several centimeters, which is no longer acceptable.
That is, if you are faced with the task of how to properly make a floor screed in a private house or apartment, then you need to fill it taking into account the evenness not only in each room separately, but taking into account the evenness of the entire area of the house. It is clear that if the floors in all rooms are leveled.
How to correctly set the basic floor level Source tehnikaportal.ru
See also: Catalog of companies that specialize in finishing works and materials
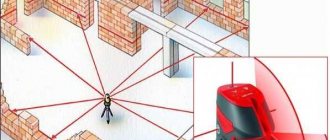
How to do it exactly right. To do this, you will need a laser level, also known as a plane builder, which today has ceased to be a luxury. It is installed on a tripod so that the laser beam hits all or most of the rooms. At the required level, notes are made on the walls with a marker and marked with a laser. Then the device is brought into each room, where it is placed according to the already applied marks. A perimeter of rays is formed on the walls along which the screed will have to be poured. To avoid using the laser level later, the applied beams are used to mark lines on the walls, which are called basic lines.
Now, as for the lighthouses. There are a huge number of applications of this technology, the end result of which is always one hundred percent. In this article we will consider one of the simplest options.
To do this, you will have to purchase a PM-10 brand beacon profile, which is used for applying plaster, but is also successfully used for pouring screed. The lighthouse is made of galvanized steel and has a durable structure.
Galvanized profile PM-10 Source vektorsnabrb.ru
How to install beacons:
- The first thing you need to know is that leveling the screed mortar is done according to the rule. Therefore, the beacons are placed at a distance of the length of the leveling tool. But more often this distance is 1 m. It is important here that the rule applies to at least two beacon profiles.
- The beacons are fastened using gypsum or cement mortar, which is distributed in rows at the place where the beacons are installed. Gypsum hardens quickly, but inside the screed layer it will act as a foreign material, which will reduce the strength of the screed material being poured. Cement will take a couple of days to dry, but it's better than plaster.
- The profile is laid on heaps of cement mortar and leveled by recessing into them to the level of the applied perimeter of the base lines. First, one end of the profile is set in this way, then along the entire length on the slides. In this case, a construction corner and a laser level are used.
Installation and display of beacons Source betontransstroy.ru
In fact, this method of placing beacons has several subtle points that affect the quality of the final result.
Semi-dry screed with fiber fiber
Sometimes a semi-dry floor screed in an apartment, but it has a more complex technology. Let's look at the option using fiber fibers: the main difference is that the composition is not liquid, but semi-dry, which needs to be compacted.
Fiber fiber is used instead of reinforcing mesh, the use of which has its drawbacks. During operation, the mesh rusts, peels off, cracks, etc. The use of polypropylene fiber when constructing screeds eliminates almost all the disadvantages that were noted when using steel reinforcement.
How to install a heated water floor with your own hands - a detailed description of the work.
For a photo of the renovation of a Khrushchev apartment with your own hands, see this article. Recommendations and step-by-step instructions from experienced craftsmen.
Polypropylene fiber gives the screed resistance to temperature changes, does not delaminate for a long time , does not wear out, and will not show damage or cracks . Semi-dry screed with fiber can be floating, tied or untied .
Advantages of semi-dry screed using fiber:
- cracks practically do not form;
- thanks to the plasticity of the fiber, the work is greatly facilitated;
- fiber is practically not subject to fire;
- this mixture is frost-resistant;
- the positive qualities of fiber are preserved for a long period of operation;
- After 12 hours you can walk on this screed.
Preparing the mixture with fiber
To prepare the mixture we will need fiberglass, Portland cement and clean sifted sand. Substances that retain moisture and prevent rapid hardening can be added to the mixture. Thanks to this, you can work with the mixture for several hours.
Observe all proportions when preparing the mixture. Excess cement will cause cracks, and too little will make the screed brittle. Typically, one part cement and 3 parts sand are used. Moreover, components are taken not by weight, but by volume. This screed will not collapse for a long time.
Sequence and features of installation:
- The layer of such screed should be up to 40 mm.
- Clean the surface thoroughly before pouring the floor screed.
- The consistency of the mixture should resemble wet sand.
- To achieve precise horizontal surfaces, use beacons.
- Apply the mixture in an even layer and level it 1 cm above the beacons, as the screed will shrink.
- Compact the leveled screed with a roller.
Video description
Therefore, we recommend watching a video that shows the technology for installing beacons:
Screed reinforcement
How necessary is a reinforced frame, because this structure inside the screed layer does not increase its load-bearing capacity. The main task of the frame is to increase the tensile strength of the screed. That is, so that it does not crack during operation. The only option when reinforcement is not required is if a fastening type is used to level the floor base.
In all other cases, the reinforced frame is a necessary element of the screed. Namely:
- if the latter is installed on heated floors;
- if floating screeds form;
- if the concrete solution is poured over the ground;
- if the thickness of the poured layer exceeds 5 cm;
- if heavy objects are installed in the room.
As for the reinforcing frame itself, it is a mesh made of wire or reinforcement. The latter are used in rooms where heavy loads will be applied to the floor. For example, in garages.
Today, nets are a huge assortment. For ties, products made from 2.5-6 mm wire, grade VR-1, are used. The meshes can have square or rectangular cells with side sizes of 50-200 mm.
Attention! The thicker the wire and the smaller the cell size, the greater the load the reinforced frame will withstand. It is recommended to choose meshes with notches on the wires.
Mesh for reinforced frame screed Source kayabaparts.ru
Materials for screeds and technologies for their use
Let's move on to the most interesting part - how and with what can you make a screed in an apartment? Let's consider all the solutions, describing along the way the properties of the materials and the technology for their installation.
Self-leveling mixtures
One of the modern solutions is the use of self-leveling mixtures. They are sold in bags of 20-30 kg. They can have a cement or gypsum base - each option has its own characteristics, advantages and disadvantages.
Self-leveling floor mixture
This type of screed is used mainly in small rooms or when you need to quickly make a small layer.
The main advantage of such a floor is the speed of its construction. Depending on the type of material and layer thickness, the floor can be walked on after 2-10 hours. The coating is very durable, does not generate dust, and has high adhesion to various adhesives. The layer thickness varies from 5 mm to 5 cm.
Self-leveling solutions create a smooth plane under the influence of gravitational forces
Such a floor spreads when poured on its own, under the influence of gravity. Ideally, he takes the horizontal level himself, and the floor turns out perfectly flat, but this does not always happen, and it depends on a number of factors:
- Firstly, the base must be well-primed so that the water from the mixture does not drain away too quickly.
- Secondly, when the layer is not thick enough to provide the desired spreadability, and gravity resists the viscosity of the mixture.
- The third reason is the most common - there is simply not enough mixture for the area to be treated. To the eye, it seems that it has already filled everything, but in fact you just poured over the old floor.
To prevent this from happening, installation must be done according to beacons.
Don't know how beacons are installed? Read about this in the article “Beacons for leveling the floor.” We tell you how to determine the floor level, prepare it for installing beacons, what types of beacon mounting exist and what is their difference, and how to install it.
It is also worth noting the high material consumption and higher material costs when compared by coating thickness. However, the advantages listed above cover this fact.
The bathroom floor is filled with self-leveling mixture
Now let's look at how such a screed is made. To work we will need the following set of tools and materials:
- The mixture itself.
- Electric kneading tool and attachment (perforator, mixer, drill).
- Several containers, the volume of each of which will be enough to dilute a whole bag.
- Tripod beacons.
- Fiberglass for reinforcement (not used by all craftsmen).
- Needle roller and spatula.
- Damper tape.
- Soil is a better concrete contact and a tool for applying it.
- Shoes with spikes for walking on already poured floors.
Table 1. Filling instructions
| Steps, photo | Description |
Step 1 – cleaning the floor | We start with cleaning the room. First of all, use a hammer and spatula to knock off pieces of frozen putty and other debris from the surface of the concrete. We clean everything with a broom. Next, we take a construction vacuum cleaner and do some general cleaning. Advice! The better you clean the base, the stronger the self-leveling floor will be. |
Step 2 – priming the floor | We need to reduce the absorbency of the base as much as possible so that the bulk mixture does not quickly lose moisture and dry out. It is better to make two layers of soil. |
Step 3 - installation of damper tape | A damper tape around the perimeter of the room is needed in order to create a technological gap for the screed to accommodate thermal expansion. If the walls and you are plastered, then the easiest way to nail this element is with a stapler. |
Step 4 – Fiberglass Flooring | If you decide to make your floor strong, spread this fiberglass over its entire surface - it will reinforce the screed. |
Step 5 – installation of beacons | Next we install beacons. Their number is not regulated, but there are recommendations. First, we place them at the lowest points of the floor, and one at the highest. To do this, you should first measure the perimeter of the room with a laser or bubble level. Secondly, we place intermediate tripods so that the desired level can be transferred from a high point to a low one. Then the beacons are adjusted - the central rod is leveled so that its lower end shows us where we will pour the floor. Advice! If you haven’t found a tripod, then use regular dowel screws instead - screw them in according to the same principle, immediately determining the height, that is, the top point of the dowel should correspond to the floor level. |
Step 6 – diluting and pouring the mixture | At the next stage, we begin to stir the mixture and pour it onto the floor. This must be done continuously so that the already poured concrete does not have time to set. |
Step 7 - Rolling | The poured floor must be stretched using a needle roller and a spatula. This also helps to get rid of air bubbles that form in the mixture during kneading. We pour the floor and roll it out in this manner until it reaches the level of each beacon. |
Expert opinion
Afanasyev E.V.
Chief editor of the pol-exp.com project Engineer.
Pouring should begin from the lowest point, gradually moving to the highest. This way the floor is guaranteed not to set until the work is completed. At the same time, do not try to fill more than 20-30 square meters at once. If the room is larger, then divide it into sections using a metal profile PN 50*40 for drywall.
Wet screed
The classic version of the screed is wet. Among other competitors, it is the most inexpensive, therefore it is widespread in mass construction. For an apartment, it is not the best option, since it requires a minimum of 2 cm of thickness, which is not feasible in some situations. “But when renovating a private house, wet screed is the optimal solution.”
Advice! When we talk about the minimum layer, we mean starting from the highest point in the room. In other places this value will be even higher.
Wet floor screed
The main advantage of this solution is the leveling of significant floor differences at minimal cost. The main disadvantages are the length of time, high labor intensity, and difficulties with mixing.
There are several types of liquid screeds:
1. Concrete - a common classic. Made from cement, water and fillers. The latter are usually sand, crushed stone, and gravel. Such a screed is best suited for creating a floor base, since, despite all the advantages that were mentioned earlier and its strength, it is unlikely to make the coating even. Plus, the surface of such a floor is usually very dusty. Due to the presence of coarse filler, an appropriate layer thickness is required.
Floor screed with concrete
2. Cement-sand mortar. It reminds many of the first option, but there is no large filler in it. It turns out that this floor is cheaper, it is less durable, but it is better leveled and can be made in a thinner layer.
Screed made of cement and sand
3. Lightweight concrete screed. The filler changes again - instead of crushed stone and gravel, it can be expanded clay, polystyrene, etc. Such a screed will also not be very strong, but it will be very warm.
Attention! Lightweight concrete is not made together with heated floors, as they will prevent heat from penetrating into the room.
Lightweight concrete
4. Polymer-cement screed - it is done on top of the subfloor in order to level it (the finishing layer is no more than 15 mm thick). It consists of Portland cement, quartz sand and polymer additives. This composition gives the screed high strength and low shrinkage.
Polymer cement screed
Table 2. Installation of wet screed
| Steps, photo | Description |
Step 1 – waterproofing layer | The first step is to prepare the floor surface - cleaning, priming, etc. We have already described these steps in detail earlier, so we will not repeat them again. If you plan to make a fairly thick layer of screed, then instead of all this, the floor can be covered with thick plastic film. You will receive excellent protection from water, plus during pouring the concrete will not lose cement laitance, which will have a positive effect on its strength. A damper tape is also attached around the perimeter of the room. Advice! You can dispense with this element for thin layers, but it’s still better not to do this - the material costs mere pennies, and it’s not difficult to attach. |
Step 2 - reinforcement | If the screed is thick, then be sure to lay a steel mesh on the floor. This stage can be swapped with the next one if you want to raise the fittings above the floor. |
Step 3 – Installation of beacons | Next we install metal or plastic beacons. You can purchase a profile like the one in the photo above, or use rectangular pipes for this - they are easier to align and do not bend when pulling the mixture. More attention needs to be devoted to this stage, since the beacons should form a single, flat plane. They are the ones who determine the evenness of the entire floor. Beacons are displayed in different ways. The most common method is to lay them on gypsum or mortar bosses and then wall them. |
Step 4 – mixing the concrete | We determine the brand of concrete (usually M200) and mix it strictly according to the recipe. If your volumes are large, then use a concrete mixer, as doing this manually is very difficult. |
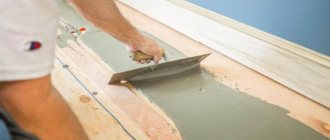
Step 5 – alignment and trimming | At the next stage, the concrete mixture is dumped onto the floor and distributed evenly. For this they use a rule that moves along the beacons as if on rails. In this case, the movements are made of a vibration type, that is, from side to side, while simultaneously pulling forward. The rule does not tilt so that there is no deflection. |
After completing the work, the floor is left to dry. You can start finishing it no earlier than 20 days from now. Walking is allowed the next day.
We have described only the general procedure. In some situations, the screed can be laid on a heat insulator or combined with a finishing self-leveling coating.
We talked about all the advantages and disadvantages, types, composition and process of pouring self-leveling floors in the article “Technology for pouring self-leveling floors.” Detailed step-by-step process instructions, useful videos and expert advice are included.
Wet screed: diagram
Semi-dry screed
Also a fairly common type of screed. The technology of its construction involves the use of the same cement with sand, but in a different ratio. The material contains a small amount of moisture, so the floor dries much faster.
The operating speed is also very high. There is only one drawback - the coating is not very durable.
The master makes a semi-dry screed
The workflow will be practically no different from what was described before, so let's note only the main points so as not to repeat ourselves.
- The beacons used are removable - they are immediately removed, and the furrows are sealed.
- The material is initially very dense, so you can move on it using special shoes with a wide support area.
- The surface of the screed can be immediately rubbed using a special machine.
Grouting the new floor
Dry screed
This technology was developed by everyone. It is called a screed conventionally, since the process of constructing such a coating is somewhat reminiscent of working with concrete.
Dry screed - a modern solution
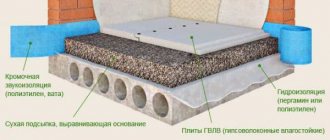
The structure of such a floor is as follows:
- Dry backfill - with its help, leveling occurs.
- Gypsum panels are a finishing coating that provides rigidity. The panels have locks along the edges, which allows them to be connected into one.
Dry screed can be classified depending on its purpose. The following types are distinguished:
- Alpha – settles on flat surfaces.
- Beta - also done on a flat floor, but on top of a heat-insulating porous fiber material.
- Vega – floor on dry backfill.
- Gamma - installation of the floor on a combined substrate.
What is a dry floor screed?
Table 3. Installation of dry screed
| Photos, steps | Description |
Step 1 – placing beacons | Rectangular metal pipes are used as beacons here. They are placed like this: 1. A strip is made of dry backfill along the entire length of the room. 2. The ridge of the strip is trimmed with a spatula. 3. The pipe is laid. 4. A rule is placed on top of the edge, which must be aligned with the beam of the laser level. The beacon is sunk by striking the hammer according to the rule. If there is no laser level, use a bubble level. |
Step 2 - stretching the floor | Next, filler is poured into the voids between the beacons, which is usually stretched along the beacons. This is easy to do, since the backfill is mobile and has a small mass. |
Step 3 - laying sheets | Then gypsum sheets are placed on top. Their seams are coated with “liquid nails” glue. After installation, the seams are additionally reinforced with self-tapping screws. The material is cut with a jigsaw to fit walls and various obstacles. |
Step 4 – sealing the seams | The joints should be primed and then sealed with gypsum mixture so that there are no uneven spots on the floor. This step is not required for every type of slab. |
Next, another layer of material is laid. In this case, it is necessary to ensure that the seams are displaced by at least 20 cm.
Video description
The video shows an alternative way to raise the reinforced frame above the base floor:
Fiber concrete
This building material is often used today to form screeds. It is laid without constructing a reinforcing frame, because elements have already been added inside it, which provide strength, impact resistance, and cracking resistance. This is a regular screed mixture containing fibers from different materials. Eg:
steel fiber is pieces of wire with a diameter of 0.2-1.2 m and a length of up to 6 cm;
- fiberglass;
- basalt;
- polypropylene.
Preparation of the solution
The next stage on the topic of how to make a floor screed with your own hands in a private house or apartment is mixing the screed mortar. Until recently, it was made from individual ingredients, which were also purchased separately. Today everything has been simplified, that is, you can purchase a ready-made dry mixture, dilute it with water to a homogeneous consistency and start pouring. The whole process is described on the packaging.
Self-preparation is sometimes also used if it is necessary to pour a thick concrete screed over the ground. For this, a classic mixture recipe is used, which includes:
- 1 part cement M500;
- 2 parts sand;
- 3 parts crushed stone;
- 0.5 parts water.
Do not mix the solution with shovels. This is no longer modern, and the quality of such a solution may not meet the requirements. The best option is mixing in a concrete mixer with the addition of plasticizers, which increase the strength of the solution by 20-40% and frost resistance by 50%.
Concrete screed device
The composition of the concrete screed includes river sand and cement.
Thanks to modern technologies, it is possible to add other material that can affect the quality of the mixture. For example, expanded clay makes the screed light. Various plasticizers and additives are also used to help speed up or slow down the drying process. Tool for screeding and material required for work:
- water or laser level;
- rule;
- ruler level;
- Master OK;
- ruler;
- knife;
- putty knife;
- construction mixer for mixing mortar;
- screwdrivers, self-tapping screws;
- aluminum profile for drywall;
- cement composition.
Remove old finishing material down to the concrete base or floor slabs. Clean and prime the surface thoroughly.
Use a level to mark the perimeter of the room. Start from the corners. Make as many intermediate marks and measurements as possible to achieve a horizontal floor in the room.
Place beacons, which will be aluminum profiles or other materials. Secure them with cement.
To level the floor, you can use plywood, placing it under the profile. You can also use self-tapping screws with plastic plugs, which can be easily adjusted in height by twisting or unscrewing.
Preparation of the composition
You can buy a ready-made mixture and dilute it with water according to the manufacturer's instructions.
If you cook it yourself, follow all proportions. As a rule, for every part of cement, 3 parts of sand and water are required. Its quantity varies, the main thing is that the consistency is similar to liquid sour cream. Prepare the mixture per meter of pouring so that it does not dry out. How to properly fill a floor screed and make the floor perfect ?
Fill the solution up to the tops of the beacons. Start with the smallest area of the room.
Level with the rule and fill. If the height difference is large, then you should use expanded clay. It will help lighten the weight of the screed and save on cement.
Moisten the drying so that cracks do not form on it. It can be covered with polyethylene film.
The time for final drying and acquisition of strength of the screed is 28-30 days.
Dry screed technology
Briefly about how to properly make a dry screed:
- Damper tape is installed along the walls.
- A layer of expanded clay is poured. It is leveled and compacted.
- Special gypsum fiber boards are laid. They are two-layer with special grooves along the edges, which serve as elements of the locking connection.
- The planes of the locking connection are treated with an adhesive composition, which acts as a fastener.
- The main task of the work manufacturer is to install the slabs in a horizontal plane, for which each element being laid must be checked for horizontal position. For this, a regular building level is used.
Today this technology is often used, but instead of GVL, our domestic craftsmen give their preference to OSB boards, moisture-resistant plywood or chipboard, as well as thin asbestos-cement boards.