Self-leveling floors are valued for their quality and high wear resistance. This is a durable coating that can really not only make the floor smooth, but also beautiful. But in order for such floors to last for many years and look truly presentable, it is important to fill them correctly. In this case, one of the important aspects of the pouring process is the correct preparation of the base. It’s interesting that you can make a self-leveling floor on a wooden base, and not just on a solid concrete one. What installation features are important to consider in this case?
Self-leveling floor on a wooden base
Types and features of self-leveling bases
Self-leveling floors are made from special polymer mixtures, which, when hardened, can become a strong, neat and even base if installed correctly. The mixtures used to create them may contain cement, gypsum, various fillers, as well as a number of modifying additives that give the floors certain properties - for example, strength, ability to resist impacts, speed of mixture hardening, etc.
What is self-leveling floor
They are valued for the following advantages:
- high level of wear resistance;
- large selection of colors;
- environmental friendliness;
- excellent moisture-proofing properties;
- antistatic;
- durability;
- seamless – floors of this type can be poured throughout the entire apartment without a single joint;
- resistance to a number of mechanical influences, as well as to the effects of almost all existing chemicals.
Self-leveling floors have many advantages
Self-leveling floors must be poured onto a properly prepared base. And many doubt whether they can be installed on top of wooden floors. It turns out that it is possible. It is only important to properly prepare such a foundation. It is also important to choose the right type of mixture for filling.
Types of self-leveling floors
Table. Types of mixtures for filling.
| Mixture type | Characteristic |
| Epoxy | This mixture makes good floors that are completely resistant to water. They are usually installed in rooms where the humidity level is high. This floor can be poured onto a wooden base. |
| Polyurethane | One of the most durable floors with respect to severe long-term impacts. Excellent for installation in high-traffic areas. |
| Methyl methacrylate | This mixture is intended for creating foundations in rooms without heating. Perfect for those where there is no heating in winter. |
| Epoxy-urethane | Durable floors that are highly resistant to a wide range of influences. An alternative option to polyurethane flooring. |
Self-leveling polymer floor
On a note! Compositions for filling floors can be either two-component or one-component. In the first case, you can create floors with a beautiful pattern, and mixtures of the second type are used to create a base for other materials such as tiles, stone, etc.
Mixtures for self-leveling floors
Prices for self-leveling floors "Starateli"
self-leveling floors prospectors
Preparing a wooden base for filling with self-leveling mixture
Before starting work, you should make sure that wooden floors do not have rotten, loose floorboards and are firmly attached to the base (joists, rough screed). If defective areas are found, they should be repaired - rotten fragments should be replaced, sagging and creaking floorboards should be screwed tightly.
Next, the operating procedure is as follows:
- Dismantle the baseboards (if this was not done during repair work to eliminate defects in the wooden floor).
- Cycle the entire floor surface. Removing the top wood layer helps to detect cracks and other surface imperfections. In addition, the level of the finished floor after pouring will rise to the height of the mixture layer, and removing the top layer will reduce the final height of the floor and help avoid a large difference with the floor of the adjacent room.
- After cleaning the scraped surface from debris and dust, it is treated with a primer to protect the wood from fungus, rot, etc.
- After the primer has dried, carefully inspect the surface for cracks and gaps. Detected defects are marked with a marker.
- The marked areas are puttied, not excluding the smallest cracks. Wood-look self-leveling flooring has great plasticity and mobility, so the smallest crack can become a place for the mixture to leak out, thereby forming a small dent on the hardening flat surface.
- Next, the floor is treated with a primer for better adhesion of the self-leveling floor to the wooden base. It is better to apply the primer in two layers, adding corundum filings to the second layer. You can also use special factory soils containing coarse sand filler.
Note: instead of a primer with an adhesive filler, a reinforcing mesh is sometimes used. In this case, it must be glued to the surface with appropriate glue, carefully ensuring a tight fit to the plane without ridges or wrinkles.
- The last stage is to apply damper tape around the perimeter. It will prevent the floor from cracking as it expands due to temperature changes.
Some builders believe that primers for different purposes (wood and concrete) may be incompatible when applied to each other due to their chemical composition. However, to eliminate the possibility of their mutual antagonism, it is enough to simply first test them for compatibility on a limited area of the floor.
Important: all work with moisture-containing compositions is carried out one at a time, each subsequent action is performed only after the previous layer of the mixture or solution has completely dried (more details: “Drying time for a self-leveling floor is the optimal solution”).
Choosing a mixture for filling
Usually, on each package with a mixture for making a self-leveling base, its purpose is indicated. That is, for example, some are suitable for creating floors on a concrete base, while others can be used on a wooden base. Most often, mixtures containing gypsum and cement are excellent for these purposes.
Self-leveling floors "Starateli"
Important! Do not confuse mixtures for filling the floor with compositions intended for leveling the surface. Such compositions are poured in a thin layer of just a few millimeters. To fill a floor on a wooden base, the thickness of the poured layer should be greater.
To choose the right mixture for pouring a wooden floor, it is important to carefully study the instructions.
Self-leveling floor on wooden floor
How to choose a self-leveling floor
Self-leveling mixtures are compositions of cement or gypsum binder, mineral fillers and modifying polymer additives that improve the basic characteristics of the composition (hardening speed, bending strength, compression, etc.).
Manufacturers usually indicate on the label that the mixtures are intended for leveling and repairing mineral-type substrates. These are cement-sand, anhydrite and other types of screeds, concrete slabs, underlying layers of crushed stone, slag, sand, bulk and natural soils (compacted).
How can you find out which compositions can be used on chipboard and OSB boards, wood and plywood? To do this, just look at the instructions. In the description of cement and cement-gypsum self-leveling floors, these categories must be indicated among the bases.
For wooden and sheet surfaces, the compositions are applied in a layer of 3 to 7 cm. Do not confuse with thin-layer gypsum and gypsum-cement levelers, the layer thickness of which does not exceed 0.2-3 cm.
Since wood and its derivatives (plywood, fiberboard, chipboard, OSB, HDF) have a high coefficient of seasonal changes in linear dimensions, manufacturers strongly recommend the use of separating layers (geotextile, PE film) plus a damper around the perimeter. Simply put, create a “floating” type floor.
How to choose the right multicomponent mixture? See the composition. According to the established rule, in complex formulations the component that is in greater quantity is indicated first. For example, a cement-gypsum self-leveling floor contains more than 50% Portland cement and less than 30% gypsum. Although professionals consider purely cement compositions to be the best option. The fact is that their strength is much higher than that of their analogues; accordingly, it is possible to make a more durable and reliable self-leveling floor on a wooden base.
So, is it possible to level a base made of boards, chipboard, OSB using ready-made compounds? The answer is yes, but with some caveats:
- When choosing a mixture, carefully read the instructions, in particular the sections “Composition” and “Types of bases”.
- Create a floating floor using plastic film and damper tape. As a last resort, carefully treat the base with waterproofing compounds (locking primers, impregnators, mastics).
What will you need?
To make a self-leveling floor yourself, you may need certain tools. The list of things to buy or rent includes:
- the mixture itself;
- wide spatula equipped with a long handle;
- a construction mixer or a regular drill with a special attachment;
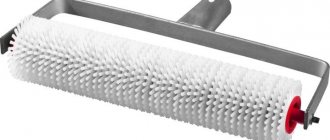
- a needle roller, which is used to remove air bubbles from the poured mixture;
Needle roller
- construction level of any type - necessary to evaluate the final result;
- damper tape;
- means for grinding (sanding machine, sandpaper, etc.);
- waterproofing materials (at least thick polyethylene film);
- construction vacuum cleaner;
Construction vacuum cleaner
- hammer, nails, nail puller;
- a sealing mixture that can be used to eliminate gaps between floor boards or sheets of plywood. Can be replaced with putty.
Calculator for calculating dry mortar for self-leveling floors
Go to calculations
Important! When working with liquid mixtures, it is best to wear clothes that you don’t mind. You should also buy special paint shoes, in which you can walk on the flooded floor while leveling it. Paint shoes are special shoes equipped with needle soles. Having walked through the freshly poured mixture in these “slippers”, you don’t have to worry about it spoiling.
Paintshoes
Waterproofing requirements
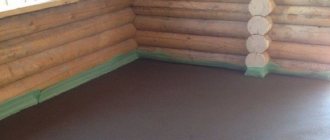
Waterproofing is required to protect wood from harmful effects. You can choose film, roofing felt and other means that are intended for this purpose. Both rolled types of waterproofing materials and coating types are suitable. In any case, it will be necessary to install a waterproofing layer with a position of 10 centimeters on the wall; the walls will be covered with special construction tape.
Waterproofing is required to protect wood from harmful effects.
Requirements for the rough foundation
Self-leveling floors are created on a base that does not have cracks and crevices that allow the mixture to leak. If such cracks occur, the consumption of building materials will increase significantly, which will increase repair costs. In addition, there is a high risk that the base will turn out to be of poor quality. That is why it is important to carefully prepare for flooring work.
So, first of all, you need to carefully inspect the wooden base to determine the extent of the work and find out whether the floor needs repairing. It is important to evaluate whether there are cracks and drying out, whether the boards are holding well, and whether they are suitable for further use. Poorly adhering boards must be secured with nails.
First, the wooden floor is inspected
Attention! Wooden boards affected by mold or mildew must be replaced. They will not last long, and they have a negative impact on human health. There cannot be such boards at the base of the floor.
If wooden floors are in more or less decent condition, then it is quite possible to use them for pouring a self-leveling base. Repairs are easier and cheaper to do yourself. By the way, there is no point in repairing a parquet floor that is in poor condition. The easiest way is to completely dismantle it.
Wood floor repair
On a note! When performing work on pouring the foundation, builders recommend focusing on the normative document SP 29.13330.2011 (updated edition of SNiP 2.03.13-88; click on the link to open the PDF file in a new window).
SP 29.13330.2011
Pouring technology
The method of pouring floors in a private house or apartment using leveling compounds is practically no different from working with a cement-sand mixture, only self-leveling floors dry out faster.
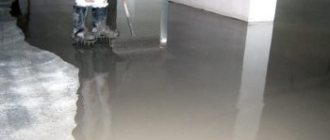
You need to start from a place that is located lowest in level. The material is poured from the container into the space between the beacons and leveled with a rule, passing it along the beacons. After this, you need to roll the area with a needle roller. Process all stripes in this manner.
When the material begins to set, it is necessary to remove the beacons from it. The resulting grooves should be filled with the same solution and leveled taking into account the finished surface, which will serve as a level. It is recommended to begin further finishing no earlier than a week later.
Self-leveling self-leveling floors are quicker and easier to install than cement-sand screed
Preparing for pouring
Proper preparation of the base is the key to ensuring that the self-leveling floor will be beautiful and last a long time. First of all, it needs to be repaired if the base needs repairing. That is, old boards are replaced with new ones, all loose elements are fixed. Next, it is important to seal all sorts of cracks to prevent leakage of the potting mixture. A sealant is perfect for these purposes, and you can also use putty. The main thing is not to miss a single crack.
Wooden floors need to be properly prepared
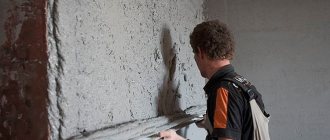
Grease stains, if any, are best removed with a solvent - they can prevent good adhesion of the mixture to the base. All paint is also removed. It can be removed using a special remover or sanding.
Advice! To maximize adhesion to the substrate, it is recommended to sand the floors using a sander. It is recommended to rent professional equipment - it is more reliable and will also significantly speed up the work due to its high level of productivity. Using a sander will also remove small irregularities and bumps.
Floor sanding
Floors ready for pouring should not creak, wobble or have other defects. In some cases, it is generally recommended to lay a base of plywood sheets on top. The thickness of the sheets must be at least 14 mm. You can also add chalk chips between sheets of plywood to prevent squeaking in the future. By the way, the baseboards must be removed before pouring the mixture, and the nails or screws must be recessed into the floor surface.
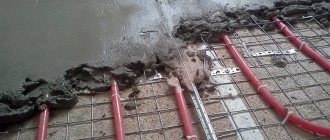
In some cases, you can pour a self-leveling floor directly onto a wooden base, but experts strongly recommend not to neglect the creation of a cement screed. This will allow you to achieve the best effect.
Cement screed recommended by experts
Preparing the floor for pouring the self-leveling mixture also includes thoroughly cleaning it of debris and creating waterproofing. You can use plastic film, but liquid mixtures to create a waterproof layer are also a good option. Any waterproofing material should extend approximately 10-12 cm onto the walls.
It is recommended to glue damper tape along the walls, and in the case of preliminary production of the screed, this is mandatory. The thickness of the damper tape or isolon, cut into narrow strips and used for the same purpose, should be 1-2 mm. The damper tape is necessary to protect the screed and bulk mixture from possible cracking and deformation in the event of thermal expansion.
Damper tape
Preparing tools
To ensure uninterrupted operation, prepare all the tools and purchase consumables in advance. Depending on the specific conditions, the following devices may be needed:
- container for mixing the solution;
- container for measuring water;
- drill with mixer attachment;
- wide spatula for leveling;
- a spiked roller to remove air bubbles;
- angle grinder or hand grater (scraper);
- fine-grained sandpaper (180-600 units) with a grater for fastening;
- construction vacuum cleaner;
- polyethylene film or a specialized mixture for waterproofing;
- laser or water level;
- individual protection means;
- damper tape;
- beacons-benchmarks for filling (if the base is uneven or the terrain is complex).
You also need to purchase a sufficient amount of self-leveling mixture from a trusted manufacturer, which is suitable for pouring onto a wooden base (this is indicated on the packaging). Such mixtures contain fibers that enhance adhesion to wood.
Also for work, you will definitely need paint shoes - soles with spikes that are attached to shoes and are intended for walking on flooded areas for the purpose of leveling and topping them up.
To prepare the base, additional tools and tools are often needed:
- hammer;
- nail puller;
- sealant for sealing joints and cracks;
- wooden wedges;
- priming;
- brushes;
- rollers.
Installation of a self-leveling floor on a wooden base
Let's look at how the process of creating a self-leveling base on a wooden floor occurs.
Step 1. The floors are carefully prepared taking into account the recommendations given in the section above. Next, you need to coat the base with a special primer. To do this, use a brush or roller. It is important to apply the primer so that the boards are completely covered with it.
Primer preparation
Primer application
Step 2. Damper tape is glued along the wall. It can be purchased on an adhesive base, or attached with double-sided tape. The tape is pasted along the perimeter of the entire room.
Damper tape is glued around the perimeter
The process of gluing tape
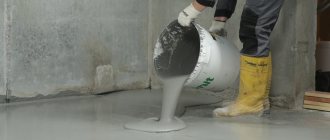
Step 3. After this, the mixture is kneaded. It must be done strictly according to the instructions given on the package. The mixture is mixed until smooth using a construction mixer or drill with a special attachment. The composition hardens quickly, so it cannot be prepared in advance - only immediately before pouring.
Adding water
Mixture preparation process
Mixing components
Step 4. Then the mixture is left alone for 3 minutes and again actively mixed with a construction mixer.
Re-stirring
Step 5. You can start pouring the mixture. It just pours out onto the base. It is recommended to start pouring from the far corner of the room. The mixture is very fluid and can be spread quite easily over the base.
Filling starts from the far corner
Step 6. Spread the mixture over the base using a notched trowel or squeegee. The mixture will partially reach the desired level of evenness on its own due to its fluidity and the laws of physics.
Distribution of the mixture by floor
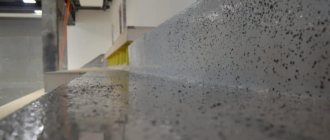
Step 7. After the mixture has been poured over the entire base, it is rolled with a needle roller. This procedure is performed in order to remove any air bubbles from the mixture that may have entered it during the mixing and pouring process. You can move around the poured mixture only with paint shoes.
The mixture is rolled with a needle roller
Step 8. After this, wait the recommended time for the mixture to dry. Typically, self-leveling floors dry fairly quickly. The drying time will depend on the thickness of the layer, but in any case the approximate time should be indicated on the packaging.
The self-leveling floor dries quickly enough
Video - Self-leveling floors on plywood
Expert advice
In any residential premises, it is recommended to use self-leveling mixtures only based on polymer resins. In rooms where high humidity is constantly present, it is necessary to use an epoxy type of self-leveling flooring, while in the rest of the house a polyurethane floor is used.
The technology is intended to be poured on a concrete base, but installation on a wooden surface is also allowed. At the same time, the labor intensity of the work increases, since it is imperative to carry out high-quality preparation of the base with a two-layer primer. The adhesion strength of the coating to the base wood depends on this.
If you need a screed...
In some cases, before pouring the self-leveling floor, it is necessary to install a cement screed. In fact, this will be pouring not onto the self-leveling floor, but onto the screed, but, nevertheless, sometimes it is necessary. Yes, and experts still recommend pre-fabricating it. How to make a screed on wooden floors? Let's consider one of the options.
Step 1. To begin, the wooden floors are prepared in the same way as described above. It can also be covered with plywood.
First, the wooden floor needs to be prepared
Step 2. Next, the base is coated with mastic or roll waterproofing material can be used.
Base waterproofing
Step 3. After this, a layer of high-density polystyrene foam is laid. Damper tape is also glued around the perimeter of the wall.
Insulation laid
Step 4. Next, all seams between individual polystyrene foam elements are sealed with polyurethane foam. After drying, its remnants and protruding elements are cut off.
The seams are covered with polyurethane foam
Step 5. Then a layer of reinforcing mesh is installed. The individual canvases are laid overlapping each other in approximately 1-2 squares and connected to each other using clamps. It is important to place small bars under the mesh bars, which will lift it above the base - this is necessary so that after pouring the screed, the mesh will be inside the concrete layer, and not under it. Also, if necessary, if the room is large, beacons are installed along which the screed layer will be leveled. Beacons must be installed at the same level. Metal slats mounted on small cement islands can be used as beacons.
Laying reinforcing mesh
Step 6. After this, the cement mixture for the screed is prepared. You can make it yourself, or you can buy a ready-made one in a store, designed for pouring screed. The mixture is poured onto the base, after which it is leveled along the beacons using the rule. It is important to achieve an even horizontal line. When the screed has set a little, the beacons are removed, and the voids formed after this are filled with a cement mixture. The screed takes 28 days to dry. It cannot be used at this time. But in a few days it will be possible to move along it, but with caution.
Cement mixture poured
Self-leveling flooring on a wooden base is a reality, not a myth. This option is quite possible if the base was prepared correctly and no mistakes were made when pouring the floors.
Preparatory work
Self-leveling floors can be laid on a wooden floor only if the base is properly prepared. The duration of use of the coating, its appearance and performance indicators depend on this stage.
- The first thing you need to do is sanding. For this, it is better to use special equipment, but if it is not possible to rent it, you can limit yourself to a grinder and a grinding wheel. After the operation, you need to additionally sand the boards.
Before pouring, the top layer of the wooden base must be cleaned - Remove all baseboards and fill the cracks near the walls with wooden blocks. Next, you should sand along all the joints of the boards, clean all the chips and remove dust and debris. Then you need to thoroughly treat the floors with a special degreasing powder.
- Cover walls, stairs and other structural elements with damper tape. Most of these products have an adhesive backing, so it is enough to remove the protective coating and press the material to the surface. The tape should be slightly wider than the planned layer of self-leveling floor.
The damper tape provides clearance to compensate for thermal expansion of the screed - Install beacons. To do this, first beat off the zero mark, then at a distance of 30–50 cm from it, install the first beacon on screws or mortar. After this, the remaining beacons are installed at intervals of 1 m. These products are required to level the coating.
Immediately before starting work, you need to check the air temperature and humidity level. The required parameters are indicated by the manufacturer on the packaging. Compliance with these requirements is the key to successful completion of work.
Pros and cons of self-leveling floors in an apartment
Self-leveling flooring has the following advantages:
- ideal leveling of the floor surface, which makes it possible to subsequently finish with any floor coverings;
- simplicity and speed of pouring - the mixture quickly spreads and levels out;
- long service life - if the filling technology is followed, the floor will last for many years;
- versatility - a wide range of thicknesses allows you to use this technology in almost any room and create the required floor level;
- minimal temperature expansion allows its use in any climatic conditions;
- aesthetic appearance - when using polymer floors, you can create unique designs in your room;
- moisture resistance and chemical inertness - absolutely not afraid of direct exposure to water and chemical reagents;
- non-flammable and non-toxic material;
- It is not susceptible to the formation of fungus and mold and does not require special cleaning methods; it is easy to use.
However, self-leveling floors have not only strengths, but also weaknesses, which must be taken into account when choosing a flooring material:
- cold covering – to create the most comfortable conditions in the room, you will need to use an additional “warm floor” system;
- careful adherence to installation technology is required - even small errors can have negative consequences that will lead to dismantling and re-filling;
- complexity of dismantling - if you still need to replace the self-leveling floor, it will be extremely difficult to dismantle it without damaging the main screed;
- Filling a large area requires special tools and equipment.
If, nevertheless, the choice was made in favor of a self-leveling floor, then in order to reduce negative factors to a minimum it is necessary to study the technology of preparing the base and pouring it.
What to consider when choosing a self-leveling mixture
Be especially careful when choosing a mixture, because with a wide selection, it is unlikely that you will find an option that would be suitable in all cases. Therefore, when choosing a polymer coating, first consider a number of important factors:
- Type of room in which self-leveling flooring is installed.
- Temperature and humidity indicators.
- Is chemical and mechanical impact expected on the polymer coating?
- How much time is allocated for floor installation?
- The quality of the rough foundation and the degree of its damage.
- The aesthetic side of the issue is what you want the future self-leveling floor to look like in a wooden house.
- Antistatic level.
- Required level of anti-slip.
In addition, it is worth paying attention to the manufacturer. Both domestic and foreign companies offer polymer mixtures on the Russian market; each of them has its own secret manufacturing technologies, and the price of the products directly depends on this. The more expensive components in a mixture, the higher its price.
The most popular brands:
- MIXTURE "VETONIT".
VETRONIT
- MIXTURE “HORIZONT”.
- "BERGAUF" MIXTURE.
BERGAUF
Attention! The Bergauf polymer mixture has high thermal insulation and sound insulation properties, which makes it popular if you want to cover a wooden base with a self-leveling floor.
- MIXTURE "IVSIL". These products are characterized by a high level of polymerization.
IVSIL
There are many more popular brands, we have listed only a few of them. Keep in mind that not all brands have the same installation technology, so before you start installing the floor covering, carefully read the instructions on the packaging.