Knowing how to cover the floor in a bathhouse, you can significantly increase the service life of the coating. In addition, with the help of this simple action, the interior of the room is transformed beyond recognition.
However, it should be borne in mind that the positive effect of the procedure will be achieved only with a certain procedure. If the conditions are not met, you can only aggravate the situation and, instead of protecting the wood, on the contrary, reduce its service life, which will lead to damage to the entire structure.
What are the reasons for making a concrete floor?
Understanding this issue in more detail, the known flooring options in a bath room can be divided into three main groups:
- adobe;
- wooden;
- concrete.
The first option has been used since ancient times. The clay layer was compacted tightly, turning into an excellent seal for absorbing moisture. A drain was installed in such a floor, discharging used water outside the structure. For free movement on such a floor, a flooring of boards was provided, which, after washing, should be taken out into the air, giving it the opportunity to be thoroughly ventilated and dry.
It should be noted that such designs are often used in our time for any type of floor. Today, modern building materials are so high quality and convenient that clay floors are almost never used.
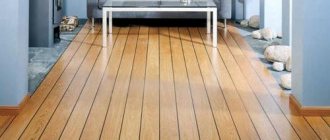
A wooden floor in a bathhouse is an excellent and quite convenient solution. And if the wood is also laid, which is not afraid of the effects of water, that’s absolutely good. This group of floors is easy to install on your own, retains heat well, and allows you to arrange water drainage without any problems. But it’s not for nothing that they say that “water wears away stones.” At the same time, we should not forget that any tree provides a convenient habitat not only for microorganisms, but also for insects and rodents.
Many owners try to protect a wooden floor using special antiseptic impregnating compounds, but at the same time they worsen the natural environmental friendliness of the material. No matter what you do, you will not be able to create 100% protection for a wooden floor from the effects of the aquatic environment, and dampness after a certain time will “launch” its rotting processes that decompose wood materials.
And even if you used certain types of wood that are highly resistant to water, over time, sharp and not entirely pleasant odors will still appear that can cause a lot of discomfort.
Installing a concrete floor in a bathhouse is the most optimal solution to the problem. There is probably no point in talking about its strength indicators. If the base is prepared correctly and the floor in the bathhouse is poured with concrete at a high quality level, there is no reason to worry - the operational period will be very long. Many owners feel that concrete floors are quite cold. But if you provide for the installation of a thermal insulation layer (there are many ways to solve this issue), then the problem will be solved once and for all. Yes, and it is possible to build a heating system into such a floor without much difficulty, which will be turned on as soon as necessary.
In a word, insulating a concrete floor in a bathhouse is a completely doable task (for more details: “Insulating the floor in a bathhouse with your own hands - what insulation to choose and how to install it”). The versatility of a floor made of concrete material also lies in the fact that if you don’t want to walk on a bare surface, you can lay tiles or porcelain stoneware on it, or install fixed or removable wood flooring. There are many finishing methods, and you won’t have to think long about how to cover the concrete floor in a bathhouse.
Types of impregnations
Generally speaking, on the building materials market you can find four types of water-repellent impregnations for wood.
- Dry or concentrated (to be diluted with water)
- Organic;
- Mixed;
- Oil (or oil-based);
Manor
Senezh
Neomid
Water-based impregnations are more suitable for treating the dressing room. Organic compounds are quite effective in protecting wood. They are distinguished by their ability to create a durable protective film. Mixed impregnations usually also contain fire retardant reagents.
Oil based products usually contain wax or paraffin. By the way, judging by the reviews of many bathhouse owners, specialized floor oil from a “foreign” manufacturer is very effective...
Design of a water drainage system
The main difference between concrete floors in any bathhouse is the mandatory need to drain large volumes of water. Here, the necessary slope should be provided for, and the system itself should be arranged correctly.
One of the simple solutions, used only on sandy soils, characterized by an increased ability to absorb moisture, is an ordinary pit. It is dug immediately below the washing compartment, where the water is collected in one pipe and discharged downwards. The optimal dimensions for such a pit are taken to be 50 by 100 cm. Its entire volume is filled with coarse crushed stone, broken bricks, sand and other fillers that can freely pass water through its mass. To prevent a not-so-pleasant odor from entering the bathhouse from the pit, it is recommended to provide for the possibility of ventilation through vents that are specially left in the basement of the facility.
A more correct and convenient solution would be to move such a hole away from the foundation. And if the soil on the site is clayey, this is the only option. With this solution, a small pit remains under the washing compartment, from which the collected water will flow through a system of drain pipes into a drain or pit. If there is a septic tank on your site, then the pipes for draining water from the bathhouse can be cut directly into it. You just need to consider installing a water seal to prevent unpleasant odors from entering the bathhouse.
When constructing a waste pit, a small hole is dug and its walls are cemented. Ultimately, the size of the pit should be about 30 by 50 cm. A tube is built into the wall, through which water independently enters the drainage system. It is recommended to cover the top of the pit with a metal grill, and leave ventilation points in the base for constant ventilation.
These arrangement methods are used when the floor surface is above the level of the soil layer. And if the concrete floor screed in the bathhouse is placed directly on the ground surface, you must first decide how and where the water will be drained. This method is considered universal and is used even in bathhouses installed on pile supports.
Tile covering
The technology for installing tiles in a Russian bathhouse is practically no different from tiling in other types of premises.
Tile floors are the optimal solution for tiling the rough base in a Russian bathhouse. This material has all the necessary physical and mechanical properties that provide the coating with a long service life:
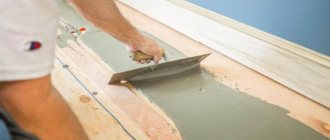
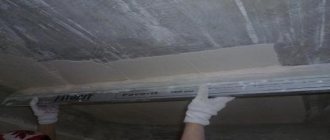
Floor screed device using beacons
- non-hygroscopic;
- resistance to temperature fluctuations;
- resistance to rotting;
- wear resistance.
The technology for installing tiles in a Russian bathhouse is practically no different from tiling in other types of premises. The only thing that should be taken into account when laying tiles is the quality of the adhesive composition. The material must stoically withstand large temperature fluctuations, so it is desirable that it have the following characteristics:
- high adhesion to concrete surfaces;
- good heat and moisture resistance;
- elasticity and wear resistance.
When choosing a high-quality adhesive material for installing tiles yourself, it is advisable to purchase one that contains plasticizers. Synthetic additives improve heat resistance and adhesion.
Concreting the floor on the ground base
This option is convenient if the entire structure is located on a continuous strip foundation. All work is carried out in certain stages:
- In the space of the poured foundation, the top layer of soil is removed over the entire area to a depth of up to half a meter.
- A gravel cushion is poured to a height of fifteen centimeters and carefully compacted. Already at this moment it is necessary to foresee in which direction the water will be drained and arrange a slight inclined angle.
- Now you can fill the remaining space with concrete mass. If desired, this can be done in layers, between which an insulating layer is placed. If you take a photo, such a floor in cross-section will look like a layer cake.
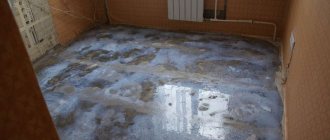
Bathroom floor waterproofing technology
The most important thing in installing waterproofing is how moisture will be removed from the room:
1. A solid surface that does not allow moisture to pass through, with an installed water drain.
2. Floor with leaking elements, created from sanded boards, in which there are holes and drainage is installed below. But this option is suitable exclusively for using a bathhouse in the summer.
One layer
Let us examine in more detail the option when the floor is concreted in one layer:
- a sand layer, the thickness of which is from thirty to fifty centimeters, is additionally poured onto the gravel cushion and compacted;
- the second step is waterproofing the concrete floor in the bathhouse. For this purpose, roofing felt material is used, which is laid in several layers, with obligatory overlaps and coating of the connecting areas with a mastic composition;
- To avoid cold penetrating through concrete, it is necessary to take care of insulation. Simple slag from the boiler room, expanded clay, and felt material impregnated with tar are useful here. They also use mineralized wool in dense slabs; they don’t even forget about expanded polystyrene, the use of which is considered a rather controversial issue. The heat-insulating layer is arranged taking into account climatic conditions. Its main task is to prevent the cold from penetrating from the soil into the bathhouse. One condition must be observed - the layer of insulating material should protrude slightly upward relative to the beginning of the walls - this will make it possible to eliminate cold bridges at the points where the walls meet the floor. For mineral wool, it is necessary to lay plastic film on top, gluing the joints with tape;
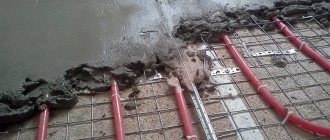
- we arrange a reinforcing base using metal rods half a centimeter in diameter;
- Before pouring concrete, we install beacons and guides in such a way as to maintain the slope in the desired direction. To simplify the work, it is recommended to provide a drain hole in one of the corners of the room;
- It is necessary to pour a concrete screed at least three centimeters thick. The solution is prepared from cement and sand, taken in a ratio of 1 to 3. By the way, today's construction market sells ready-made dry mixtures that are excellent for use in conditions of high humidity. They are practical, easier to pour and dry faster, and have micro-reinforcement with special fiber fiber.
By pouring a high-quality screed, you can be sure that it will last for a long period. All that remains is to decide how to treat the concrete floor in the bathhouse. Some finish its surface with a facing material, many leave the concrete in its natural form, laying it on top of a lattice made of wooden material (pro
Waterproofing concrete floor
In the sections of the bathhouse with the highest level of humidity - the steam room and the wash room - a concrete floor is often made with a porcelain stoneware finish; it is more reliable than ordinary floor tiles. On top of such a covering, you can lay several wooden gratings, making a collapsible flooring, which is periodically taken out of the bathhouse for drying. Concrete screed can be destroyed by moisture, so a layer of waterproofing is required between it and the finishing coating.
Waterproofing begins after the screed has dried.
When arranging it, a slope is formed towards the drain, but there should be no depressions or bumps on the surface, and it must be thoroughly cleaned of dirt. The technology for screeding with a slope is the same as when leveling the floor on an open balcony. To reliably protect the screed in a bathhouse, it is recommended to combine coating waterproofing with lining waterproofing.
- First, mastic is applied in 2-3 layers, and if the first layer is spread in the longitudinal direction, then the second layer is spread in the transverse direction. Rolled material is glued on top of the mastic - PVC film, membrane, roofing felt
You can also limit yourself to applying bitumen, bitumen-polymer mastic, or use penetrating waterproofing, which seals the pores of concrete.
Instead of expensive concrete or polymer-cement penetrating waterproofing, you can apply liquid glass. It has excellent adhesion to concrete, fills all cracks well and is completely waterproof after hardening. The main disadvantage of this composition is its fragility; usually after 5 years the silicate mass is destroyed.
If a concrete floor is insulated with high-density mineral wool or extruded polystyrene foam, it is advisable to protect the insulation on both sides. A water vapor barrier membrane is laid on top of the rough screed.
Before finishing the screed, the insulation is covered with rolled waterproofing. It is advisable to reinforce the screed in order to reduce the load on the insulation, so the film or membrane must be dense enough so that it is not damaged by the reinforcing mesh.
In two layers
Arranging a concrete floor in two layers involves a slightly different sequence of work:
- the first layer of concrete is poured over a gravel-sand bed. In this case, coarse crushed stone is added to the solution. Such a screed is placed along fixed beacons and given time for complete hardening (more details: “Filling the floor in a bathhouse - how to do it yourself”);
- on top, as in the first case, waterproofing material is laid;
- Now insulation is being installed, for which it is recommended to use perlite sand in this type of floor. This material has high thermal insulating qualities. A not very thick layer (three to four centimeters) can be a good protection against the cold. It is laid on top of the waterproofing coating, leveled, and allowed to harden (about a week);
- Now, as usual, reinforcement is being carried out, beacons are being installed, and screed is being poured. Do not forget about observing the inclined direction;
- Having completely hardened, the floor will be ready for further finishing.
Experts say that sand, which is porous and light, perfectly retains the cold. But it has one drawback - high dustiness. It is difficult to work with it even in light winds - it is necessary to ensure that the space is protected from wind influences.
For ease of use and to create a high-quality thermal insulation layer, the sand is slightly cemented and fiberglass is added to increase its strength. But if the thermal insulation layer is planned to be covered with a finishing concrete screed. This micro-reinforcement may not be performed. A very important condition is the observance of proportional relationships and the sequence of work during kneading.
The simplest way is considered to be:
- Twenty liters of perlite are placed in a concrete mixer, ten liters of water are added, and everything is mixed.
- Five liters of dry cement are poured onto the resulting mass.
- Having obtained a homogeneous mass, add ten liters of perlite and a couple of water.
- Mix until the mixture becomes flowable.
- We arrange a technological break for ten minutes.
- We continue to knead until the mortar mass becomes plastic, removing excess moisture.
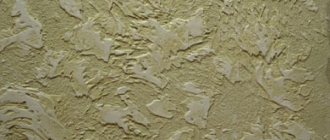
Why is it necessary to treat concrete?
Impregnation has a strengthening effect on a new concrete floor, but it can also be used to treat an old floor with some defects to restore its original appearance and properties.
Speaking in more detail about its effect on concrete, we can highlight the following:
- Impregnation will increase the wear resistance: the floor will better withstand temperature changes, moisture, and mechanical stress, such as impacts;
- The concrete floor constantly crumbles, creating dust. Impregnation will help get rid of this problem by binding small particles of concrete;
- The treatment will also significantly increase the service life of a new or slightly worn floor;
- An untreated concrete floor will need repair, so treating it is also a money saver.
Ventilated floors
A concrete floor with joists in a bathhouse is an excellent solution if there is a need to raise it above ground level. Just keep in mind that the logs must be strong enough. This method will create the opportunity for excellent ventilation of the underground space through special windows left in the base. This method is often used when baths, due to the peculiarities of the soil composition, are installed on supports in the form of piles.
The sequence of actions is as follows:
- a beam is prepared under the logs, the cross-section of which is 10 by 20 cm. Its installation is carried out in steps of half a meter to make it more convenient to use insulating cotton mats;
- if the area of the room is large, then supporting brick columns are placed under the logs;
- a 5 by 15 block is attached to the lower edges of each joist, creating shelves;
- The rough plank floor is laid on them. Do not forget that all wooden elements must be pre-treated with antiseptic compounds;
- Before installing the subfloor, drainage pipes are laid;
- it’s the turn of the waterproofing material;
- now - an insulating layer. Mineral wool, expanded clay, and expanded polystyrene material are used;
- install a mesh for reinforcement, beacons with the required slope;
- the solution is poured.
It is possible to install a concrete floor in a bathhouse with your own hands. But in all cases it is necessary to remember one important condition. To avoid the occurrence of dampness, the level of all floor layers is determined so that it ultimately does not exceed the upper edge of the plinth part (the casing).
General information about floors in rooms with high humidity
You can build a bathhouse using a variety of materials, but wood is most often used. Due to increased humidity and the influence of steam, the tree quickly begins to rot and is exposed to other negative factors.
If the insulation is done correctly, then such problems will not arise and the structure will last much longer. Any materials will be damaged even after a single contact with water. Therefore, it is important to take the following steps:
waterproof the floor and foundation;
install a vapor barrier and waterproofing to prevent condensation;
It is worth making protection for the roof or attic.
You should also make a small slope in the area of the floor towards the drainage system so that the water flows into the sewer and does not stagnate in the room. To install the drain, it is better to use polymers or other stainless materials. There should be no metal surfaces under your feet, as they get very hot or cold. It is better to drain away from the place where water procedures are taken.
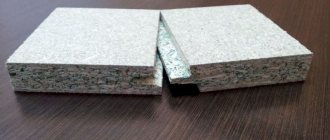
Design features of a non-leaking floor
Two floorings should be provided - rough and finishing, and in the second (upper) it is important not to allow even the slightest cracks, and it should be cut around the perimeter taking into account 2 mm gaps. The tongue and groove boards are fixed with nails, providing hidden fasteners.
You need to lay it from the far wall of the room, parallel to the location of the covering elements. At the lowest point, it is necessary to provide a technological hole for connecting the outlet pipe or a tray (but along the entire length) to collect water.