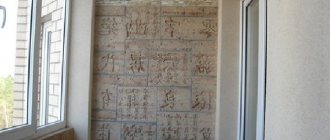
Decorative plaster is a popular material that is often used to decorate walls both indoors and outdoors. The textured type is distinguished by its attractive appearance, the presence of patterns and protuberances. To carry out finishing work at a high level, you need to carefully study the rules for applying plaster and prepare the necessary tools.
The finished result may have texture of varying degrees of severity.
What is textured plaster and what is it used for?
First of all, textured materials mean plaster, which allows you to create relief walls. The relief is formed using special tools directly during finishing. A person has the opportunity to choose plaster for finishing not only by color, but also by texture parameters.
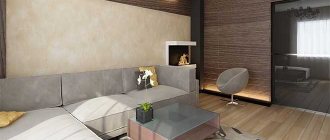
If desired, you can carry out textured plastering of a private house
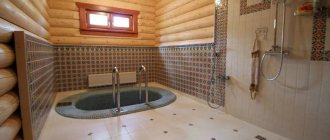
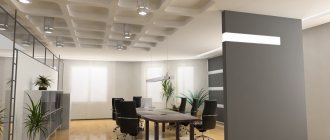
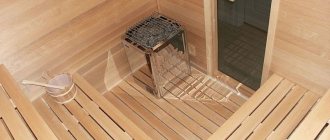
The material is used for decorating facades, indoor interiors and bathrooms.
Important! To get a good result in the end, you need to carefully study the nuances of the specific type of plaster that you plan to use.
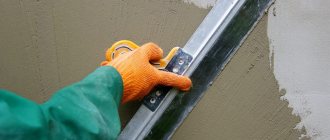
Using special compounds for wall finishing
You can use various fillers for the textured plaster solution, which will help you create the desired pattern.
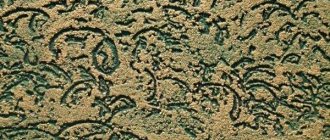
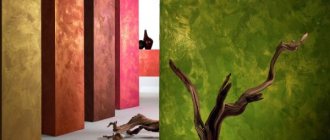
The presence of special additives in the plaster composition contributes to the creation of extraordinary and attractive coatings. For example, imitation sand or marble is obtained by interspersing small stone and other fractions. This type of plaster is very popular, which creates an imitation of rocky terrain. Each manufacturer and seller of plaster offers its customers catalogs with available texture options, so you can easily choose the most interesting and favorite solution. For example, for a “bark beetle” surface, the finishing material contains granite chips or polymer granules. This type of plaster is initially applied using a trowel over the entire surface, after which it is given a little time to set.
Next, you need to go over the entire surface of the wall with a grater. It pulls crumbs and granules through the solution, creating specific grooves. You can use a more popular option, when the grater is carried out strictly horizontally or vertically. In this case, the grooves will be parallel. In addition, the grater can be guided along the trajectory of large circles, which will allow you to achieve a more original and interesting design.
In addition, not just hard, but also soft granules filled with paint can be used. The application methods do not differ from those described earlier, only the granules are crushed, as a result of which the plaster is painted in a variety of colors.
Thinner solutions allow you to get an interesting smudge effect, while thicker ones are suitable for creating a high pattern. But you need to remember that the deeper the textured pattern, the faster and in greater quantities dust will collect on it.
Standard ready-made solutions of textured plaster are white. In the future, it can be painted and hidden with varnish or special colored pigments can be used. In order to choose the desired shade, it is best to contact specialized companies or representative offices of finishing material manufacturers. They will do this taking into account the change in shade as the plaster dries.
Having at your disposal plaster of the desired color or even several different colors, you can create more interesting and original compositions.
Advantages and disadvantages
Among the advantages are:
- attractive appearance;
- integral structure;
- environmental friendliness;
- durability.
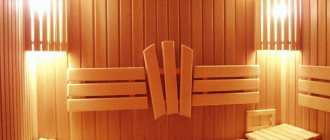
Certain types of building materials are vapor-tight, so they can be used for finishing bathrooms.
The disadvantage is the high cost and time-consuming work required. Before applying the material, it is necessary to level and properly prime the walls.
More information about the pros and cons in the video:
Varieties
Plaster is classified by appearance and composition. Depending on the type of finishing used, the nuances during work and the final result depend.
By appearance and resulting effects
Different types of textured building materials allow you to achieve different effects. Among the most popular are coatings with the following effect:
- marble;
- bark beetle;
- fur coats;
- stone cladding;
- brickwork;
- fabrics.
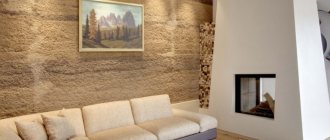
Textured materials with a bark beetle effect are considered a fairly popular option for premises.
The effect is determined by the main component, as well as modifiers that are contained in the plaster.
By application
The purpose of a building material determines its type. The following types of textured plasters are distinguished by application:
- façade;
- internal;
- universal.
Universal options are suitable for finishing both indoors and outdoors. Any facade material has increased resistance to temperature changes and adverse effects.
By filler size
The size of the filler is a parameter on which the texture expression depends. In stores you can buy:
- coarse-grained;
- medium grain;
- fine-grained;
- fine-grained options.
Coarse-grained options are used exclusively for finishing the facade.
The filler is quartz sand, crumbs, clays and stone flour. For interior work, fine- and fine-grained building materials (fraction up to 1 mm) are usually used.
Mineral
Plaster mixtures based on clay, gypsum or cement belong to the mineral group. Among their advantages are low cost, environmental friendliness, resistance to low temperatures, and durability. The color of mineral plaster varies from gray to white.
Silicate
Facade plaster, which is a subtype of mineral mixture. The difference between silicate is the use of liquid glass, which accelerates hardening.
The finished result after hardening
Silicate is used only for finishing facades and technical rooms, as it is quite toxic.
Silicone
Silicone acts as a binding component, which can significantly increase the elasticity, durability and strength of building materials. Silicone plaster is considered the most expensive and advanced in terms of characteristics. Suitable for finishing interiors and facades.
Acrylic
Acrylic mixtures are best for creating a textured look in bathrooms. They are resistant to moisture and can be easily painted with various dyes. They have a shorter service life than their mineral counterparts, but are also more expensive. Because of this, the material is used in a highly specialized manner.
Advantages of decorative putty plaster
The most important advantage is the low cost in comparison with products from world brands, the long service life of the coating without loss of aesthetic and practical qualities. Decor made from simple putty has other advantages:
- obtaining an original texture with elegant relief, which allows you to create a unique interior design;
- The putty mixture adheres well to any surface;
- putty is not able to absorb odors, and also provides heat and sound insulation;
- there are no harmful compounds, which makes the material environmentally friendly and safe;
- The material has high plasticity, making it easy to apply to surfaces and convenient for repair work.
The range of construction stores today is very wide. There are compositions that allow the addition of colors for the desired shade.
The material is highly plastic, so it is convenient to work with.
Tools for work
To apply plaster to walls with a textured effect, you need to prepare the following tool:
- trowel;
- roller;
- putty knife;
- sponge;
- scotch;
- containers for mixing mixtures;
- brush.
Things can be purchased at almost any hardware store.
All necessary tools and containers must be prepared in advance. Some products will only be needed at the preparatory stage of work.
Textured paint or textured plaster.
Many people, when choosing between paint and textured putty, often make the wrong decision. But you should understand that textured plaster made by yourself or a purchased mixture is in any case a more reliable material. FS tolerates steam, water, drought well, it can be used both indoors and outdoors.
The same cannot be said about textured paint. It remains a very thin material, and with severe mechanical damage or collision with vapors, it may begin to peel off or crack. The effect of such material is very small and short-lived.
Also, many are tormented by the question: “Textured plaster or liquid wallpaper?” It is worth choosing based on the purpose of the material. Liquid wallpaper is a superficial material; it is significantly inferior to the solidity and strength of plaster.
But, at the same time, liquid wallpaper is mostly easy to apply. If your walls are level and do not require additional work, then you can safely use “liquid wallpaper” as a mixture for decorating the room. Also, textured plaster is used on the ceiling and walls in any room, and liquid wallpaper is recommended to be applied only to a vertical surface. The appearance is also different. Liquid wallpaper usually lies on the walls, creating a relief. Applying textured plaster with your own hands has many combinations; you can create your own unique style.
Stamps are often used to decorate the surface. They are made using special rollers that already have a convex stencil on them. Such a roller is dipped into construction paint, which has the opposite color to the plaster, and rubbed over the wall with very light movements.
When using such a tool, it is necessary to constantly clean it so that the stencil does not stand out. Today in construction stores you can find rollers with a cleaning pad. This device allows the paint to stick to the roller, it is absorbed into the pad, and the roller distributes the paint perfectly.
Today there is a large selection of stencils. These can be ornaments, garden elements, flowers, animals. Decorative cladding is exactly the finishing material with which you can safely experiment.
Surface preparation
Preparing the wall includes cleaning it, eliminating minor imperfections and priming. Before carrying out any work, it is necessary to thoroughly clean the surface of old decorative material. If the wall is very crooked, it will need to be leveled. Chips and cracks are eliminated by grouting.
Important! Plaster itself can eliminate some wall defects, so during preparation it is necessary to eliminate only the most visible defects.
Required tools and materials
For finishing work you will need:
- textured plaster;
- trowel;
- rubber and metal spatulas of different sizes;
- grater;
- rule;
- plumb and level;
- masking tape or tape, plastic film;
- brushes, rollers and paint;
- various tools for adding texture to plaster.
For the preparatory stage you need the following:
- primer;
- paint brush;
- sandpaper or sander;
- putty and spatula.
Preparing walls for finishing requires special tools
Construction material consumption
Consumption depends on a number of factors. Firstly, the consumption is affected by the skill of the plasterer. Secondly, the quality of the prepared base. Thirdly, the type of building material used. The average consumption of textured mixtures for decorating walls is 0.9-1.1 kg/m2.
The lowest consumption is recorded when using Venetian plaster
Based on the flow rate parameter, you can calculate the approximate costs of carrying out work inside a specific room.
Economical option - putty plaster
Of course, all materials for “fur coat” plaster are expensive. Conventional putty, which can act as a base, will be much cheaper. It is very easy to give such a coating a decorative effect, but before you make textured plaster yourself, you should prepare:
- Venetian relief spatula;
- simple spatula;
- sandpaper;
- primer (preferably quartz);
- the putty itself (preferably two – starting and finishing);
- pearlescent paint (for example, silver).
Sequence of work:
- The putty is prepared according to the instructions on the package. If two types of dry mixtures are taken, they are mixed with each other in equal proportions, water is added and mixed thoroughly. The consistency of the solution should resemble sour cream (neither liquid nor thick).
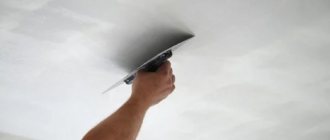
- Apply the finished mixture to the base with a regular spatula in an even layer.
- Using a relief spatula, the surface is treated, creating a decorative “fur coat” effect. Movements can be arbitrary and chaotic.
- After 3-4 hours, the most protruding places of the hardened putty are removed with a simple spatula.
- Sand the entire surface with sandpaper, then apply a primer.
- The final stage is painting in the chosen color. Roll the color over the surface with a roller, without pressing, the tool should only paint over the protruding relief.
The right attitude contributes to success, even when doing the job economically.
How to apply textured materials
The steps to apply the mixture to the wall can be done independently. There are many techniques for doing the job. Depending on the type of tool used, the method of decorating the walls may vary slightly.
Roller
There are different types of rollers. Some allow you to simultaneously apply grout to the wall and create a pattern, while others are only suitable for creating a textured look. As a rule, work proceeds according to the following algorithm
- Using a spatula, apply the mixture to the wall.
- The solution spreads evenly.
- A textured surface is created using a roller.
Appearance of a textured roller
To prevent plaster from sticking to the roller, it needs to be slightly moistened with water.
Stamps stencils
Using stencils, you can create an imitation of various coatings, for example, masonry or some kind of pattern. Working with a stencil is carried out as follows:
- The stencil is applied to the wall.
- The mixture is placed on top of it.
- The material is distributed evenly, the template is removed and all actions are repeated again.
Result of using the stencil
The stencil must be removed before the solution has completely hardened.
Trowel
Using a trowel, you can apply and spread the mixture along the wall. This tool is considered universal.
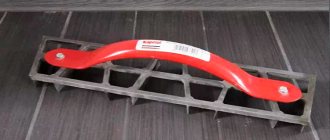
When working with plaster, a special trowel is used
By spreading the solution in different directions, it is possible to create unique and attractive patterns on the wall.
The Venetian technique of two-color application
The trowel can be used to decorate the wall with a Venetian type of material in different colors. The two-tone technique involves using different colors of plaster and mixing them directly on the wall. Due to this, it is possible to obtain a textured marble effect.
Versailles reception
Another method of applying the solution, in which a trowel is actively used, is the Versailles technique. The peculiarity of this method lies in the preparation. First, you should treat the wall with quartz soil 2-3 mm thick. Only after this is the plaster applied. Textured marks are formed by meandering movements of the trowel in different directions.
Using improvised means
You can get a textured look using available tools, including:
- sponges;
- plastic bags;
- lumps of tissue;
- brushes.
Even with a simple brush you can create spectacular stripes.
After distributing the solution, a sponge or any other product is applied to the wall, leaving a textured imprint.
price
At the center of the Oikos decor you will find façade, Venetian, structural, real plaster. Colors for walls and ceilings. Liquid background. Frescoes and wallpaper.
Technology of using materials in St. Petersburg and the region.
Prices for Italian plaster can be found from our craftsmen. With us you will find a cheap version of premium textured liner.
Antico Ferro (Antico Ferro)
Antico Ferro is characterized by safety for health and minimal impact on humans. The special composition gives the wall the effect of an iron surface, and the use of special application methods is complemented by the improvement of this brand.
Aureum (Aureum)
The name of this brand comes from the Latin word “Aurum”, which means gold.
The main material of Aureum is limestone, to which shrimps of different shades are added. It is used in two thin layers and creates unique gilded surface effects that can be used to decorate a variety of spaces.
It has little impact on the environment.
Biamax (Biamax)
BIAMAX Oikos (Biamax) is a textured acrylic paint.
Due to high vapor permeability, it is recommended to use in rooms with high humidity.
In addition, decorative paints with golden glossy effects have increased strength and wear resistance. As with all our products, Biamax color has virtually no impact on people or the environment.
Coccio Antico (Cocio Antico)
A type of Venetian mixture with a marble surface effect.
The composition includes natural ingredients that create the influence of antiquity. Material properties: vapor permeability, moisture resistance.
Coccio Cemento (Cocio Cemento)
Venetian plaster Coccio Cemento - for filling rooms, creating a marble effect.
Properties: limestone material is practically odorless and is easy to apply to the surface.
Decorsile Firenze
A textured blend of Italy.
The composition includes tiny particles of quartz. The small grain size (no more than 0.3 mm) and various application methods allow you to produce the effects of an orange peel, a cloud or an old worn surface.
It is characterized by high resistance to moisture and mechanical strength, making it excellent for the bathroom.
Duca di Venezia
Despite the reference to Venice in this name, this type of mixture does not create the normal effect of a marble surface with lines. Duca de Venezia is a wonderful solid material without a sample, which is used with the same success as "selected" materials.
The wide range of soothing colors makes this plaster design an elegant design choice.
Encanto (Incanto)
Color on water that changes colors and shades at different exposure angles.
This is due to the smallest inclusions of chromium compounds, which reflect incident rays at different angles. Its unique decorative color properties allow it to be used to create modern styles and surface treatments for the "old days".
Fondo Murales (Fondo Murales)
Acrylic-based auxiliary color.
Due to its excellent breathing properties, it is used as a first coat for the application of other finished materials. Because of its vapor permeability and increased power, the color is a good option for surface preparation and protection against mold and bacteria and for bathroom use.
Go to list of articles
Decoration
After the plaster has dried, final decoration is carried out. A varnish can be applied, which will give the coating a special look and protect it from adverse effects, as well as painting.
The varnish is applied with a brush or roller
Paint and varnish mixtures must be completely compatible with plaster. You need to purchase them along with other building materials in advance.
Painting plastered relief walls
If no dye was added at the stage of diluting the mixture, then you can change the color of the wall after plastering. Brushes are used to distribute the paint. An important point is to completely paint the surface. Particular attention should be paid to places with textured recesses.
Bas-reliefs
If the interior is created in a classic monotonous style, then bas-reliefs can be used for decoration.
If you have the skills of an artist, you can form beautiful integral patterns directly on the wall
Complex casts can be purchased ready-made. Simple patterns can be formed from gypsum plaster using stencils.
Preparing walls for decorative plaster
To work with plaster you will need a certain tool:
- plaster trowel and trowel;
- several spatulas of various sizes, as well as an angled spatula;
- level, rule and plumb line;
- grater.
To prepare walls for decorative plaster, it is necessary to remove old wallpaper, whitewash, as well as falling off pieces of old plaster (if any). The surface to be treated must be thoroughly cleaned of dust, primed and dried.
If there are remains of old plaster on the wall, all cavities and cracks must be filled with new mortar. Most types of textured plaster require a level base, so at this stage the wall is leveled. If decorative plaster is applied to a new unfinished wall, then plastering is carried out along the beacons.
After the rough layer of plaster has dried, the wall is primed again. Priming is carried out approximately one day before applying the decorative layer. This stage is mandatory, as it strengthens the wall by filling small cracks with a primer mixture, and also provides protection against the appearance of fungus and the formation of dampness. The walls need to be primed in several layers with breaks to allow the primer to be completely absorbed.
How to make a textured mixture with your own hands
To save money, you can create a mixture with your own hands from simple plaster. The procedure does not require special skills and does not take much time. The finished result will be slightly inferior to the decorative analogue, but at the same time it will cost 4-5 times less.
With PVA glue
6 kg of dry putty must be added to 2 liters of water. You will need to pour 200 ml of PVC glue on top.
Capacity
Next, you will need to mix the mixture thoroughly, let it sit for 20 minutes and proceed to work.
With primer
Instead of PVC, you can use a primer. To prepare the solution, you will need to add 200 g of primer or special grout for joints per 6 kg of putty.
With plaster
To give the plaster plasticity, gypsum can be added to it in a ratio of 4 to 1. This allows you to obtain a high-quality mixture, which can later be used to create textured patterns on the wall.
With baby
To increase the texture of a conventional putty mixture, it is recommended to add stone chips with a fraction of up to 0.7 mm. Crumbs can be added to a PVC or gypsum based solution.
Creating a textured surface without special material
It is clear that textured putty is not cheap and it is beyond the means of most people. Well, if we decide to bring beauty to our own home, we will always find a way out.
In this case, the solution is ridiculously simple - do-it-yourself textured plaster from ordinary putty. So, if a certain section of the wall needs to be treated with this method, then it is covered with masking tape.
If the wall is all over, then, accordingly, masking tape will not be useful. The putty is usually applied with a spatula, spreading evenly over the surface.
The layer of this plaster should be no thicker than 10 mm. The layer should set a little, only in this case do they start decorating.
Popular manufacturers
Among the most popular manufacturers of ready-made decorative mixtures are:
- BILIX;
- San Marco;
- VGT;
- Knauf;
- ALPINA;
- Optimist.
The Optimist company is a domestic manufacturer
Important! Foreign companies, as a rule, provide higher quality material, but it is more expensive than domestic analogues.