Floor screeding is carried out in order to obtain a flat surface, which will serve as the basis for laying decorative material. The solution is poured onto various types of bases, but concrete slabs are most common. Floor screeding as a process requires accuracy and consistency of actions. The durability of the created structure depends on the work carried out correctly; any shortcomings will lead to the fact that the final result will be of poor quality, and the service life of the coating will be minimal.
Do you need a screed?
First of all, you need to decide why you need a screed. Indeed, this layer is not always necessary; it is not done in cases where there is an alternative. For example, wooden flooring, which provides a level base for laying the final decorative layer.
But there are situations when it is advisable to do the floor screed yourself. Firstly, it is necessary in new buildings that have concrete slab floors. Secondly, when dismantling an old structure, when literally everything is removed down to the very foundation. Thirdly, the finishing floor screed is arranged over the existing coating in order to obtain ideal evenness.
Various variations of ties
The floor screed in an apartment can be different. First of all, there are options based on the manufacturing method:
- Dry variety. This is the simplest method. To create a flat surface, a dry mixture of materials is poured, and sheets of plasterboard or plywood are installed on top. It often happens that it is impossible to completely correct existing defects, then a finishing layer of liquid solution is used.
Dry floor screed - Wet variety. This variation is a composition that is most often made based on cement or gypsum, as well as a mixture of them. To achieve the required consistency, the products are diluted with water to a liquid state. The material is applied to the prepared base and leveled. To provide additional rigidity, a reinforcing layer is added. Wet screed with reinforcement
- Semi-dry variety. It is a mixture with a minimum amount of water, which is required only to impart the necessary characteristics to the cement.
Leveling the floor using the semi-dry method
It is advisable to decide in advance what kind of floor screed is needed in a particular situation.
Screed in an apartment can be done with a different number of layers:
- Single layer coating. The solution is applied immediately to the required thickness. This option has a significant drawback: if the drying regime is not followed correctly, there is a high probability of cracks appearing.
- Multilayer. It consists of two interconnected surfaces: rough and finishing. The first coating is necessary to correct significant deficiencies and ensure optimal rigidity, therefore it has a thickness of 2 cm. The second - finishing, creates a smooth layer, its thickness ranges from 3 to 15 mm.
Multilayer screed device
Thus, if necessary, it is possible to select the optimal option for obtaining a surface that will serve as an ideal basis for further work.
All varieties allow you to do the floor screed yourself.
Stages of work execution
A high-quality result largely depends not only on skill, but also on the sequence of work.
Pouring in the apartment is carried out in several stages.
- The surface is being prepared.
- Priming is being carried out.
- Waterproofing.
- If necessary, a heat insulator is installed.
- The horizontal level is determined.
- A solution is prepared - concrete, cement-sand or based on a dry mixture.
- A screed is being made.
- Wait for the surface to dry.
Materials used
Do-it-yourself floor screeding is done using various materials. Often, to give the composition additional properties, auxiliary substances are added to the mixture.
- Cement. A popular option that has a lot of positive qualities. In particular, this solution is excellent for rooms with high humidity. But there are also disadvantages, such as strong shrinkage and the possibility of cracking. To eliminate potential problems, fiber fiber is added to the composition.
Cement mortar with fiber fiber - Gypsum. A screed based on this material is plastic and quite easy to install. Unlike cement mortars, it does not shrink, and drying does not take much time. This composition is excellent for pouring heated floors.
- Self-leveling mixtures. They allow you to quickly obtain a flat surface with a thickness of 3 to 30 mm. The material is used to create the finishing coating.
Self-leveling mortar
It must be taken into account that identical materials should be used for pouring rough and finishing floor screeds in an apartment.
DIY floor filling technology
Installation of beacons for leveling the screed.
The work is carried out in the following sequence:
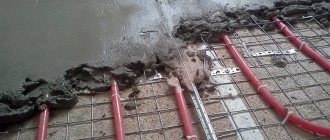
- Installation of beacons. First, holes are made on the floor, dowels are inserted into them, and screws are screwed in. They are aligned to the zero level. Triangular cross-section tracks are laid out of cement mortar using self-tapping screws 2 mm above their heads. A perforated profile is laid on top of the route and forcefully pressed against the hardware. The guides must dry for at least a day.
- Preparation and pouring of the solution. The optimal option is the proportion of water, cement, sand and small crushed stone in the ratio 1:1:3:3. Mixing is done manually with a shovel in a pallet; for large volumes it is better to rent a concrete mixer. The solution is poured between the guides, distributed evenly, and then leveled using the rule. This is done until the last section is ready.
- Leveling the surface. This is done after 3-4 hours, when it has already hardened sufficiently, but still remains loose. The procedure is usually carried out using a grinder with a diamond wheel or a rented device - a helicopter.
It will take from 10 to 28 days for the screed to completely harden, depending on the temperature and humidity. It then needs to be treated with impregnation, after which the coating can be used to apply the finish.
Required Tools
How to make a floor screed in an apartment? Many craftsmen and construction companies claim that work should only be performed with professional skills and special equipment. This position is justified, but only for large industrial facilities where it is necessary to use complex and large-sized equipment. To level the floor in an apartment or house you will need a minimum of tools and skills. The main thing is to follow the process technology.
So, you will need the following materials for the screed:
- Large container for mixing the solution. If the work is carried out over large areas, then it is worth considering the option of renting a concrete mixer.
- Level. The best choice is a laser tool.
- Rule.
- Set of spatulas.
- Drill with mixer attachment.
- Auxiliary elements: meter, pencil, cord.
Tools and materials required for floor screed installation
Instructions for making your own screed
Do-it-yourself floor screed involves a number of actions that are performed in strict sequence.
On a note! On leveling mixtures, the manufacturer often includes instructions for correct mixing of the composition; great attention must be paid to strict adherence to all proportions.
Surface preparation
All construction debris and dirt are removed, cracks are opened and impregnated with a primer. They are completely covered with putty solution, paying special attention to the junction of the floor and walls. The entire surface is covered with two layers of deep-penetrating soil, and damper tape is glued around the perimeter. This is a mandatory procedure when making a screed; the tape provides the required gap and protects against leaks. Finally, a layer of roll or liquid waterproofing is laid.
Step-by-step surface preparation
Any shortcomings that are not corrected will become a significant problem in the future.
Calculation of the base difference level
At this stage, the level difference is determined, which will allow you to select the thickness of the poured layer and the most suitable material.
Using a level, the highest points of the flooring are determined and marked on the walls. A cord is pulled along them, the most noticeable recesses are measured and a measurement diagram is drawn up. Lines are drawn along the perimeter. If the differences are small - within 2 cm, then the work can be carried out using mixtures with a self-leveling effect. But this indicator is extremely rare and only on previously coated surfaces. When working with concrete floor slabs, it is necessary to perform a rough screed, which allows you to create a layer with heat and sound insulation properties.
VIDEO:
Installation of beacons
Beacons are installed in order to quickly level the area, preventing deviations. Many people consider this procedure to be very complicated, but if the preliminary calculation was done correctly, the event will take no more than an hour.
Principle of operation:
- Metal profiles are used. It is advisable to check them in advance for possible deformations.
- For floor screed, beacons are installed at a slightly shorter distance than the length of the rule, and 15 cm from the wall. Lines are drawn at specified intervals.
- Fixation is carried out using a gypsum or cement mixture; the second option will require longer setting time.
- The parts are placed on the floor surface according to the marks and aligned to the required thickness of the applied layer.
All elements must be in the same plane; a level is used for checking.
Checking the levelness of the installation of beacons using a building level
On a note! If the length of the tool is not enough, then a rule comes to the rescue, which is placed between two elements, and a level is installed on top.
Reinforcement
A rough floor screed with a thickness of more than 4–5 cm requires mandatory reinforcement, this helps improve the quality characteristics of the coating. The work is carried out using a special mesh, which is laid at some distance from the base; linings from scrap materials are used to create a gap.
Floor screed reinforcement
It should be noted that the finished floor also sometimes needs to be reinforced with mesh. For this purpose, fiberglass products are used, which are fixed to the surface itself.
Preparation of the solution
It is impossible to do a high-quality screeding of the floor in an apartment with your own hands if you prepare the mixture for pouring incorrectly. The simplest option is considered to be one based on cement, sand and water. In this case, the standard proportion of 1:3 is observed, water is added gradually until a paste-like consistency is obtained. If a ready-made mixture is used, then all actions are performed according to the instructions.
General procedure for preparing the solution:
- Dry ingredients are poured into a container and mixed, and water is gradually poured in. Kneading is continued until a mass is obtained without lumps and dry inclusions.
- There should be no lack or excess of water; the mixture should be viscous, but not liquid.
- When preparing the solution yourself, it is advisable to provide for the addition of plasticizers, which significantly enhance the properties of the substance.
To improve the characteristics of a homemade screed, a plasticizer is used.
The composition has a limited period of use, which is no more than 30–40 minutes.
Filling the screed
After preparing the mixture, the floor screed begins, which is divided into two stages: creating a rough and finishing floor covering.
Rough surface
It is for this process that the prepared solution is used. The actions take place as follows:
- The composition begins to be poured from the wall located away from the doorway.
- The mixture is placed in the spaces between the beacons and quickly distributed using the rule. The tool should be applied with pressure, shaking a little.
- Sequentially fill all gaps.
- After the solution has set, the beacons are removed. Deformed areas are covered with the prepared composition.
- The resulting coating is left until completely dry.
Beacon screed device
Finish surface
For work, you should choose self-leveling mixtures, which are applied in a layer of 3 to 30 mm, although some varieties may have a greater thickness. When installing such a floor, the technology almost completely repeats the previous one. So, special beacons-benchmarks are installed on the surface. Preparation of the composition is carried out according to the instructions. Due to the fact that it turns out to be more liquid, it is poured and quickly distributed using a spatula. The correct position of the solution is formed with a needle roller.
Pouring self-leveling mixture
After three days, you can begin installing the decorative material on a well-leveled surface.
VIDEO:
We determine the floor level and set up beacon slats
Armed with the level rule, we determine how level the floor is. We mark the level of the future floor on all walls. We remove plaster on plastered walls 0.25 cm above this level.
It is most convenient to do this when the room has already been cleaned and the floor surface is clean. The floor level is determined in order to set the highest point of the surface and fill the floor correctly.
This is done by following the instructions.
- One meter is measured up the wall from the door threshold and a mark is placed.
- A line is drawn along the perimeter of the room. Its parallelism is checked by level.
- Another parallel is drawn one meter down from the control.
- To make it easier to navigate, nails are driven into the corners of the room on the bottom line and a construction cord is pulled.
Markings on the wall help guide you when placing beacons. They are wooden slats or metal profiles that are laid on the edge. The distance between them should not be greater than the length of the rule that will be used to level the mixture.
Self-leveling floor on beacons - photo
There is no need to rush into setting the slats. The quality of the fill largely depends on this. At the end of the work, they can be removed if desired, and the space that remains after them is filled with the same filling solution.
The use of beacon technology simplifies the process and guarantees a flat surface after screeding. Even if work is carried out on a small area, it is advisable to strengthen the minimum number of beacons.
Beacon for flooring
Beacons - tripods for self-leveling floors are a professional tool
Installation of beacons