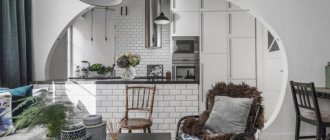
In recent years, arches between the kitchen and the room have become fashionable. It is stylish, beautiful and functional: an arched opening allows you to make the room visually more spacious, adds light and air.
Many design solutions allow you to choose the right arch for any interior. In addition, the arch is easy to install yourself - a significant bonus for those who want to do the repairs themselves.
How to design an arch in the kitchen: highlights
When deciding to decorate a kitchen without a door, you need to remember that the arch must fit perfectly with the main design. Otherwise, it may seem ridiculous and spoil the impression of the design.
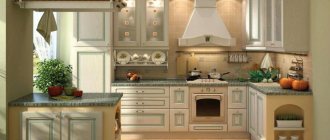
Much depends on the style of the room: for a classic kitchen it is better to choose wooden or plasterboard models with stucco.
At the same time, for a modern kitchen in a loft or high-tech style, we recommend using plastic, stone or painted drywall.
Before choosing an arch for the kitchen, we recommend that you familiarize yourself with the general recommendations:
- If you are placing an arch between the kitchen and living room, make sure that the kitchen area has a powerful enough hood. Otherwise, the smells of cooking food will pass unhindered into the room.
- For small rooms it is better to limit yourself to a semi-arch with a minimum of decorative elements.
- A decorative arch looks good in high rooms - if the ceilings are below three meters, it is still better to stick with a regular door.
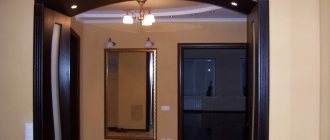
- If you are placing an arch between the kitchen and the hallway, think carefully about the lighting. Often, different types of lighting fixtures are chosen for a narrow corridor and kitchen.
- Make sure that the rooms connected by the arch are made in the same style - otherwise the overall look may look ridiculous.
Selection rules
A few practical tips will help you make the right choice of arch for a specific interior that has certain parameters.
- The more expensive, the better quality - this statement is not always true. Luxurious finishes will quickly lose their luster in conditions of high humidity and constant temperature changes. Practicality - first of all, the material must be reliable.
- Proper arch care is the secret to its longevity. The more parts and decorative details there are in the arch design, the harder it is to clean them of grease and dust. The closer to the stove, the smoother the surface should be chosen. In addition, you should never neglect the protective coating.
- The design of the arch and the interior should be in harmony with each other. In a modern interior, pretentious classics are inappropriate, as are wooden products. But for a large dining room with a round table, they are quite suitable.
- When combining two rooms, you need to combine their styles and choose the right arch itself. To maximize space saving, a design that includes a mezzanine is suitable - shelves or niches above the arch, hidden from prying eyes.
- For a studio apartment, you should not choose bulky structures. A kitchen-living room with a small arch that effectively divides the space into functional zones will look best.
For a narrow corridor, low and small models are preferable, but large structures will enjoy a modern interior, high ceilings and spacious rooms.
Why are arches needed?
In addition to purely aesthetic properties, arches are often placed because of their functional features:
- In a small kitchen, the arch serves as an additional source of light;
- In small kitchens, where every square centimeter is valuable, a decorative arch allows you to save precious space;
- The arch prevents air from stagnating and allows you to quickly ventilate the kitchen;
- In a studio apartment, an arch is a great way to zone a room without remodeling it;
- Modern arches look very stylish, serving as a decorative element;
- Even a typical layout using an arch looks unusual.
However, we should not forget about the disadvantages of arches: they allow odors and noise to pass through, and require maintaining perfect order in the kitchen area. Because of these shortcomings, opponents of arches argue that it is more convenient to install a regular door.
Stonework for the kitchen
Stone can also be used for finishing. Natural plaster stone is perfect for this purpose, as well as special compositions with decorative stone chips.
Using stone, you can very advantageously design the side pillars for a trapezoidal arch or perform finishing to form a rounded structure.
What is better - a door or an arch?
It is impossible to answer this question unequivocally. We recommend that you familiarize yourself with the detailed table to draw your own conclusions.
| Arch | Door | |
| Ventilation | The arch prevents air from stagnating in the kitchen, but it does not prevent odors from spreading throughout the apartment. | A tight door requires a good exhaust hood, but helps to completely avoid odors in other rooms. |
| Noise insulation | It does not control noise, so it is not suitable for apartments with children. | A quality door can significantly reduce noise levels. |
| Ergonomics | The arched opening does not take up space. | The door frame takes up to 20 centimeters of usable space. |
| Operating restrictions | Not allowed in kitchens with gas stoves. | There are no restrictions. |
| Visual properties | Makes the room appear larger and taller. | Depends on the model. |
Important! To install the arch, be sure to completely remove the entire doorway. This means that you will face lengthy and “dirty” repair work.
As you can see, it is impossible to give a clear answer. It all depends on your preferences. Therefore, we advise you to carefully consider the moment of installing the arch and, if you decide that the pros outweigh the cons, move on to the next section.
Alternative ways to design an arch
Stone and brick are expensive building materials. If you have a limited budget, it is quite possible to decorate the arch in more affordable ways.
Panels and overlays
The most common way of decoration is with finishing panels and overlays made of MDF or polyurethane. They can imitate the texture of any building material, but most often it is wood of rare and expensive species, suitable for any type of interior.
Finishing the arch with MDF panels
The installation of such decorative elements is simple and does not require high professional skills; they are attached with glue and special nails with a tiny head. The work begins with framing the inner surfaces of the arch; after this operation is completed, the outer linings are installed - this is no more difficult than installing a door frame.
Stucco molding
Decorative stucco is used mainly in the design of arches for antique kitchens. To attach it, glue of the “liquid nails” type is used, but in some cases, just as in the previous case, you can use nails without heads.
Arch with stucco in the interior of the kitchen
Wallpaper
The simplest and most cost-effective option for decorating an arch is to cover its surfaces with wallpaper. The range of this finishing material is very large, and you can choose an imitation of any texture; In addition, you can use wallpaper for painting. The only rule is that before you start gluing, you need to use a small sample to check whether the resulting result matches your plans. Let's see how to make an arch decorated with wallpaper in the kitchen.
The procedure differs from the design with panels and stucco. When working with wallpaper, first of all, the outer sides of the arch are pasted over, and a small (2-3 cm) supply of wallpaper is left along their contour. After the wallpaper glue has dried, this stock is tucked inward, onto the slopes of the arch, and is also glued. And lastly, prepared sheets of wallpaper are glued to these gateways and slopes of the arch.
This design is done quickly and simply, but has its drawbacks, the main of which are the low mechanical strength of the wallpaper and its rapid abrasion.
Types of arches
An important aspect of the choice is the shape of the arch to the kitchen. It can either visually make the room more spacious or narrow it, ruining the entire design idea. Therefore, we recommend studying the popular types of arches so as not to make mistakes when designing.
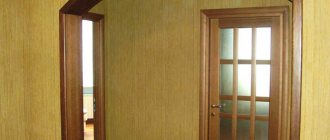
The most popular type is the classic Romanesque, also known as the semicircular arch. Thanks to its soft curve, it fits perfectly into the design of small spaces, for example, a kitchen combined with a corridor.
Another advantage is the ability to install the arch directly on the doorway, without dismantling it.
Wide Romanesque arches are ideal for studio apartments and spacious kitchens combined with living rooms.
A bow (English) arch with sharp corners at the base of the arch is more often used for wide openings. Its slightly irregular shape serves as an additional decorative element and looks great in large kitchens. See the photo for examples of such arches.
The semi-ellipse shape is a real find for those who want to place a small arch. It visually makes the opening wider and the room larger. Such arches are good to place in Khrushchev-era apartment buildings - the kitchen will seem much more spacious.
But a trapezoidal arch will not look good in a small kitchen - it needs space. A complex shape looks great in spacious rooms, but it visually narrows small ones. Therefore, they are more often used in private homes.
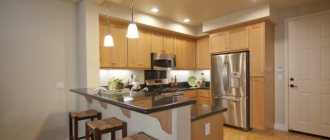
Rectangular arches are perfect for kitchens in Khrushchev-era apartments - they look great in any size, and due to the simplicity of their shape, they do not hide the space.
We recommend choosing arches not only based on personal preferences, but also taking into account the configuration of the room.
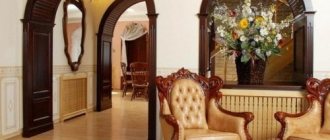
Interior arches and their functions
Designers offer a variety of stylistic solutions and shapes, which will allow you to choose an arch for any interior. In the kitchen, such structures are installed if the exit leads to the living room or corridor. If the kitchen is located near the nursery or bedroom, then the arched system is not installed. It will interfere with a peaceful rest.
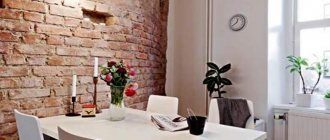
Great idea that separates the living room and kitchen
But if you need to show the room in all its glory, then an arch will be the optimal solution . Additionally, you can equip a powerful hood to prevent odors from spreading. It is better to place it at the exit from the kitchen, which will allow you to calmly take out the trash and bring in shopping bags.
Arched structures are ideal for dividing areas into zones, suitable for studios or large rooms with numerous areas. You can also divide the dining room with a corridor or hall. Some people prefer to separate the work area and the dining area. In this case, the structure can replace the partition.
Option for a plasterboard arch
How to decorate an arch in the kitchen
However, the correct form is not everything. Much depends on how you design the arched opening. What to make an arch from, how and what to decorate it with - these issues are best resolved at the design project stage. Let's look at the most popular materials for decorating kitchen arches.
Most often, modern designers use drywall . An inexpensive material that can take on any shape and color - an ideal solution for decorating interior arches. It is quite easy to install and lasts up to fifteen years.
One of the disadvantages of drywall is its low strength. However, visual properties and low price compensate for this disadvantage.
Less commonly, arches made of stone or wood . Such designs are much more expensive and require special knowledge and experience. They look impressive, but they are not suitable for every apartment - it is unlikely that masonry or an arch to the kitchen with bricks will look good in a small Khrushchev-era building.
Another fashionable material is plastic . It will cost more than drywall, but is much stronger and easier to maintain. Plastic arches are now used even in classic designs - the correct coloring allows them to be disguised as any material.
Plastic
Inexpensive and simple, bright and unusual. But there are some dubious nuances. For example, such structures are sold already assembled, with certain dimensions and shapes.
It is sometimes simply impossible to fit them into a specific room, as well as to apply your imagination and creativity to their design. Creating comfort with plastic arches is also difficult. On the other hand, they are easy to care for, they have a long service life, and plastic does not react to high air humidity.
How to close the arch?
Even if you decide to combine a room or corridor with a kitchen using an arch, you may need to temporarily close it. In this case, you have several options.
The most popular are regular curtains. Choose the type that suits your interior. However, curtains are not very practical - the fabric absorbs odors and therefore requires constant washing.
Plastic or wooden blinds, vertical or horizontal, are more functional. Depending on their shape, they can visually make the room taller or wider, and when folded they are almost invisible.
An alternative option is roller or Roman blinds, which fold into a small compact roller and, if necessary, unfold.
A fashionable technique is glazing the arch. Sliding glass panels, if necessary, act as a door, closing the arch.
Advice! Such panels are suitable if you want to install an arch in a kitchen with a gas stove. Nominally they can be considered a door.
DIY arch installation
To carry out the installation yourself, you must have construction skills. If you have never held a screwdriver and hammer in your hands, then it is best to seek help from professionals who will carry out the installation quickly and competently. It is better not to take on work with wood, stone, brick without experience. You can handle drywall, MDF and chipboard yourself.
It is important to prepare the necessary set of tools
First, take care of the necessary tools and materials:
- saw (a grinder may be useful);
- screwdriver;
- drill, hammer drill;
- level;
- plumb line;
- roulette;
- liquid Nails;
- self-tapping screws;
- corners.
Preparing aluminum guides
The aluminum profile is attached with dowel nails to the base. First of all, attach the arc (the sides will need to be trimmed), then - the guides on the sides. Between them it is necessary to install stiffeners at a distance of 15-20 centimeters from each other.
Everything installed must be checked for level, taking into account the strength of the material and the walls themselves.
Bend plasterboard sheet
The arc for the arch is made according to a template. It is applied to a sheet of drywall and then carefully cut out. To bend the sheet, you need to make a cut and bend along this line.
Plasterboard sheet is bent by breaking
How to install an arch in the kitchen with your own hands (video)
To better understand the process of installing an arch with your own hands, we suggest watching a video lesson with a detailed description of all stages.
Installation plan for a classic arch between the kitchen and the living room
- It is necessary to install the frame and secure it with dowels. The frame parts are fastened with self-tapping screws. To strengthen the arc, use a rack profile. The frame is installed at a distance from the edge of the opening - this place will be taken by the covering sheet.
- The arch casing is mounted from plasterboard. All parts are fastened with self-tapping screws; they can first be placed on “liquid nails”.
- The screws must be screwed in at a distance of ten centimeters from each other, recessing the caps flush.
How to close the arch?
This could be plasterboard, chipboard, plywood, MDF - that is, the material from which the entire structure was assembled.
How to make an arch yourself
One of the advantages of arched openings is the ability to install the arch yourself, without resorting to the services of a specialist. We offer you step-by-step instructions that clearly explain how to make an arch instead of a door.
Important! If you are doing this for the first time, it is better to start working with plasterboard arches. Stone, wood and plastic are much more difficult to install.
First, decide on the form. If you are not confident in your abilities, choose a standard semicircular or rectangular arch.
You will need:
- Screwdriver;
- Screwdriver;
- Hammer;
- Hacksaw for metal;
- Jigsaw;
- Wooden ruler;
- Pencil;
- Engineering compass.
In addition, it is necessary to purchase materials in advance:
- Plasterboard sheets are 12.5 millimeters thick. They will go to the frame of the arch;
- A strip of arched plasterboard sheet for the end of the arch;
- Metal profiles;
- Self-tapping screws and dowels;
- Primer and putty;
- Finishing putty and, if necessary, paint.
Once you are sure you have everything you need, get to work. First, dismantle the old door and frame. If you want to widen the opening, do it with a wall saw.
Important! The thickness of the walls must be at least 20 centimeters! Otherwise, the extension is not allowed.
- Proceed to fasten the arched frame. To do this, use a metal knife to divide the profile into three parts in the following ratio: 1 part should be equal to the width of the opening, two parts should be equal to the height of the planned arch.
- We fix the longest profile at the highest point of the niche, the rest - along the walls. We install the frame on the other side of the arch in the same way.
- Mount the profiles with an indentation equal to the thickness of the plasterboard sheet. The fastening step is 10-12 centimeters.
- Make a template of your arch on whatman paper. Use an engineer's compass for rounded shapes. Cut out the template, then cut the drywall according to it.
- Important: Make sure that all parts are symmetrical, otherwise the arch will turn out uneven.
- Use a jigsaw or hacksaw to cut drywall.
- Proceed directly to installation. Using self-tapping screws, install the elements of your future arch, regularly checking whether they are symmetrical in level. If at any moment you notice an error, straighten the arch.
- Make the base for the end from the profiles. Measure the required length (taking into account the bend!), and then cut the sides of the profile at intervals of 2-5 centimeters, depending on the desired level of bend.
- Carefully cut the end strip to the required dimensions. Fasten it to the profiles, gradually giving the desired bend.
- Your arch is almost ready! All you need to do is level it and putty it. If you wish, you can paint or decorate the arch at your discretion.
Set of materials and tools
For high-quality work, you need to prepare special tools:
- screwdriver;
- roulette;
- pencil;
- gloves and safety glasses;
- scissors for cutting metal structures;
- set of rollers;
- spatulas;
- hammer;
- putty;
- drywall.
Thanks to this composition, the creation process will not be difficult.
Kitchen planner program in 3D with dimensions and arrangement of furniture- Kitchen 6 sq. m. - 100 photos of impeccable design
- Kitchen 7 sq. m. - ideal layout, zoning +80 design photos
Installation of a structure made of wet gypsum plasterboard
Creating the arch shape requires bending the drywall. If you moisten it a little with water before installation, the material will more easily succumb to deformation, taking on the desired shape. The builders called this installation method wet. This method for a structure with a radius of 300-500 mm requires the use of gypsum board with a thickness of 6-9 mm. In an arched structure with a radius of more than 1 m, gypsum boards with a thickness of 12 mm are used. Armed with the tool, proceed to the main installation phase:
- According to the desired dimensions of the future structure, markings are applied to the partition and excess sections of the wall are removed along it;
- Two strips are cut out of a large sheet of plasterboard using a knife. They will be needed to cover the inside of the arch (sides);
- According to the methods discussed above, markings are applied to the plasterboard and two identical front parts of the arch are cut out;
Tip: using a template, you can save material and time and at the same time apply more accurate markings.
- The profile is used to make the basis of the entire structure. Cuts are made in the sides using metal scissors, and the profile is carefully bent to the desired shape. Curved transitions should be smooth;
- A concrete or brick wall in the opening is drilled for plastic dowels and a profile frame is attached. The frame can be screwed onto the opening of a wooden wall with self-tapping screws;
- The front elements of the arch are attached to the frame. Then the strips prepared from plasterboard are slightly moistened and, carefully bending them, sew up the sides of the structure.
Classic Slavic style
The most common type of arch is a rectangular arch with rounded corners. Used when transitioning from the kitchen to the dining room or living room. It adds elegance to the design of the room. If necessary, it can be easily complemented with decorative details and shelves.
Note!
Kitchen in minimalist style: new designs for minimalist kitchens. Choice of colors, furniture and additional decor + 120 photosKitchen in the Art Deco style - TOP-190 photos of kitchen interiors in the Art Deco style + DIY stylish furnishing ideas
Kitchen in the loft style: TOP-180 photos of kitchen design in the loft style, design features of the style with examples of interiors
Conclusion
- The arch in the kitchen must be carefully thought out, presenting the result.
- The two most famous forms of acry partitions are semi-arch and rectangular.
- The easiest way to make an arch from plasterboard sheets is in two ways: wet bending and longitudinal cuts. The choice of method is chosen depending on the amount of bending.
- Abundances of decor, acidic colors and tacky decorations will look heavy, and this should be avoided in a small apartment.
- Both doors and arches have advantages and disadvantages, so you need to take into account your desires and home environment.
Decor options for arched structures
Modern arches not only allow you to significantly expand the kitchen space, but can also be used as storage areas. On the side racks you can always arrange small shelves, racks, hooks on which small items, keys, and souvenirs will be stored.
The second interesting option for decorating interior arches is the installation of additional lamps. Most often, spot modular lamps or LED strips play this role. This type of lighting is often used to advantageously accentuate the kitchen area, dining table, and small bar counter.
The arch itself can be used as an additional decor if you install an original metal wicker lattice inside. These can also be ready-made plastic inserts or ornaments carved from wood.