In what cases are interior doors not required?
Not every opening in a house can be left without a door.
The open passage of a bathroom or pantry will look ridiculous. The kitchen, bedroom and office are considered a secluded area, but for these rooms there is an exception to the rules. To organize intimacy, openings are decorated with curtains, sliding screens and other similar devices. As a result, a visual illusion of separation of rooms is created, while the space remains without a dead zone. Open passages emphasize the integrity of the living space. All openings are made of the same shape and decorated with material similar in structure to create a single ensemble.
The door leaf is removed when creating an opening between the kitchen and living room or when one of these rooms is connected to the hallway. However, it is advisable to provide visual separation at least with curtains.
If a gas stove is installed in the kitchen, for safety reasons the room will have to be fenced off with at least a sliding system.
Free passage is arranged when combining a hall or kitchen with a balcony. The process involves the simultaneous removal of the door and window frames. If an office or small bedroom is set up on the balcony, the rooms are separated by curtains or a screen.
When we are not talking about partitioning off a kitchen with a gas stove, the passage is often decorated with shelves. Climbing flowers, figurines and other elements are placed on decorative shelves.
Getting rid of the door doesn't just open up the space. Air circulates freely through open passages. Even in a small apartment it becomes fresher in summer.
When creating an opening, doors are not required in the following cases:
- A modern solution when performing redevelopment is an interior portal, which allows you to maintain the rectangular shape of the opening. Without a door, the passage becomes freer, and the decoration from massive decorative elements adds aesthetics.
- Arched passages are popular. In an apartment with high ceilings, they give preference to the classics, arranging the opening in a semicircular configuration. For a building with low ceilings, it is advisable to visually raise the walls with an elliptical arch.
- The door block is abandoned by owners who like passages of the wrong configuration. When designing, asymmetrical arches, triangles, and trapezoids are in demand. A rectangular portal looks beautiful, the corners of which are rounded at different radii. The only drawback is the limited passage size. It will not be possible to create an opening if its width is less than 80 cm.
Doors are abandoned when the passage is decorated with a bar counter, stained glass elements, and mosaic fragments. Often such techniques are appropriate for studio apartments.
Advantages and disadvantages
If you compare a beautifully designed open doorway with a door block, you will be able to identify a number of advantages:
- The integrity of the space of the combined rooms is created. The apartment becomes free, bright, while maintaining the functionality of each zone. The kitchen remains a kitchen, the living room remains a living room.
- When framing the doorway, materials that do not require complex maintenance are used. The absence of a sash eliminates loosening of the frame and the formation of a dead zone.
- Without a door leaf, the opening can be given an original configuration, allowing you to emphasize the interior style of the entire room.
- Decorating an interior portal with even the most expensive materials will be more economical than installing a high-quality door block.
The disadvantage of an open passage is that it cannot be used for the bathroom, toilet and storage room. With any type of design, a passage without a door is not able to provide intimacy for a specific purpose area.
Free ventilation through open openings will bring great inconvenience when combining the kitchen with living rooms. Smells from cooking, along with fat vapors, will spread throughout the apartment.
Forms
You can design the opening while maintaining the original configuration or modify the passage. Often the shape of the structure depends on the materials used for finishing. The skill of the master plays an important role.
Of all the types of doorways, the simplest option is the classic rectangular shape. An inexperienced person can assemble such a structure. To create an opening, remove the entire door block along with the frame. The ends of the walls along the contour are finished with decorative cladding. If it is difficult to dismantle the hatch, you can remove only one flap. Cover the remaining frame elements with MDF or plastic. The disadvantage of this method is the narrowing of the doorway due to the remaining elements of the frame.
In the case of arched openings, the choice of forms is huge:
- The semicircular is considered a classic . The transition is suitable when combining any rooms. If the apartment has low ceilings, it is better to abandon the semicircular arch or widen the passage.
- Trapezoidal arches are easier to manufacture, suitable for apartments with low ceilings, and are often installed when combining a kitchen with a living space. However, designers rarely use the trapezoid due to its association with the shape of ritual accessories.
- Fans of unusual configurations prefer triangular arches. The design has many subtypes, more suitable for spacious rooms with high ceilings.
asymmetrically doorways . The structure is easier to make from plasterboard. For decoration, LED lighting is used, niches, shelves and other decorative elements are arranged. Asymmetrical designs make it possible to hide large defects in the passage and the interior partition itself.
Arrangement of the arch
The arch transforms the interior. But you can arrange such a structure yourself only if you have some experience. There are arches that are standard in size. They are ready to install and only require careful installation.
The easiest way to make arches is made of plasterboard. The work is carried out as follows:
- A frame is installed on both sides. It is fixed on the vertical and upper horizontal posts. In the first case, it can have a size almost equal to the end of the rounding.
- GCR parts are fixed to the frame. Arcs are cut out on them in advance using ready-made stencils.
- Additional lathing is performed in the plane of the resulting structure. It is necessary to secure an arched element made of plasterboard.
- The final finishing is performed using putty. Various materials are suitable for decorative cladding.
You can use more noble materials to make an arch, but this will require more skill.
How to beautifully wallpaper a door?
the old door is covered with wallpaper after renovation.
The main thing is to follow the wallpapering technology.
- First, prepare the door leaf for renovation. The technique was presented in the first section of the article.
- Decide on the color and texture of the wallpaper.
- Apply special wallpaper glue to the surface of the door and attach a paper decorative element.
- Level the result with a dry cloth.
- Trim any overhanging edges with a utility knife.
- Wait until the wallpaper on the door is completely dry.
If desired, add decor:
- molding
- design features, for example, small shells and cut nets, glued on top and covered with paint
In addition to regular wallpapers, the following are popular:
- photo wallpaper depicting three-dimensional objects/paintings
- decoupage
- self-adhesive tapes
How to design an opening without a door?
A properly decorated door portal without a door will not look alien or unthought-out.
Curtains
An opening decorated with a beautifully draped curtain will become a real decoration of the interior with a corresponding design.
Finishing with platbands and additions
Extensions made of plastic, wood or MDF in combination with flat, three-dimensional, rounded or other shaped trims allow you to simply and tastefully decorate the doorway.
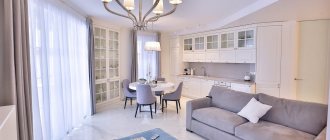
The photo shows a doorway without a door, finished with wooden trim and extensions in the interior of a kitchen-dining room in the Provence style.
Baguette
The decorative molding strip gives the passage a new sound, due to which it fits even more organically into the surrounding space.
PVC panels
To the question: “how to decorate a doorway?” The first ones that come to mind are plastic panels. Affordable cost, a variety of textures and colors, as well as the flexibility of the material allows you to design an opening of any shape. Simple and easy installation can be done independently without the involvement of specialists.
Ready-made kits for arched openings without a plastic door are available for sale. The set consists of 4 long trims designed for fastening to the vertical parts of the opening, between which 2 additional strips are inserted, and 2 short horizontal trims and 1 additional strip for decorating the upper part of the opening.
Open arched openings decorated with plastic panels fit harmoniously into any interior. For example, plastic imitation of metal or stone will fit perfectly into modern high-tech or techno styles, and panels with small flowers in a pastel tone are a stylish addition to Provence.
Wallpaper
An analogue of plaster is the finishing of interior openings with liquid wallpaper, which is also applied to the surface with a spatula and is suitable for creating various patterns. Liquid wallpaper differs from plaster in its softer texture and visual lightness. For fans of interior decoration with wallpaper, decorating an opening without doors with vinyl or non-woven wallpaper is suitable, which can be either an extension of the wall or a bright border to the entrance to the room. The photo below shows options for decorating door portals with wallpaper.
Plaster
High-quality, durable finishing of interior openings made of plaster is distinguished by visual depth and tangible texture. The level of porosity and shade allow the plaster to imitate natural stone, marble, textiles (silk, velvet, etc.). The structure of the material, combined with certain skills and a specialized tool, allows you to create various patterns and effects on the surface of a portal without doors.
Plaster is a universal finishing material that will fit perfectly into any interior. Depending on the color and texture, a plastered opening can be either a harmonious continuation of the interior or a bright accent within it.
Decorative corners
This edging has high practical and aesthetic value. It not only adds a more harmonious appearance to the opening, but also protects against damage and hides some surface imperfections.
The photo shows a loft-style bedroom and a trapezoidal door passage framed in the form of decorative corners.
Decorative rock
Natural stone creates a luxurious, cozy atmosphere in rooms designed in loft, minimalism, ethnic, country, chalet, and Mediterranean styles. To decorate an open opening with such material, a certain skill and experience are required, with the help of which the possibility of installing a fairly heavy material is assessed. Therefore, it is recommended to invite a specialist who will not only assess the risks and the possibility of such finishing, but also will not spoil the expensive material.
A budget alternative to natural stone is artificial. The light weight of the bricks allows you to independently design the doorway even on plasterboard walls. You can see how to decorate the opening between rooms with decorative stone in the video below. It also shows how to give artificial stone a natural look by applying acrylic varnish, which also protects the finish of an opening without a door from small particles of dust and dirt getting into the pores.
Advantages of artificial stone
The practicality and aesthetics of artificial stone cannot be underestimated
How to decorate a doorway with stone? Let's talk about artificial material - it is accessible to everyone and affordable. This material is often chosen for finishing because it is easy to use in construction work. Artificial stone has standard shapes; manufacturers willingly make many different shapes. These products have different textures and colors; you can find an option that will imitate natural rock, brickwork or other surface.
Let's consider the arguments in favor of using artificial stone to decorate doorways - both in residential and public spaces:
- The material is neutral and does not affect the microclimate in the room. Must be accompanied by a quality certificate (hygienic);
- Much easier when compared with natural materials;
- In terms of fire safety, it shows excellent results, however, combustion is not excluded;
- It is stable in a humid environment, suitable, for example, for decorating a bathroom or sauna;
- The best examples of artificial material are not inferior in strength to natural ones;
- During production, natural pigments are added; they are integrated into the structure of the material at the production stage, so that the color of your artificial stone will remain unchanged under any conditions;
- They produce artificial stone with smooth edges, the products differ in standard thickness. That is, using all this in finishing is easy and convenient;
- Even if a person does not have construction experience, he can decorate walls or doorways with artificial stone - thanks to its lightness. There is no need to equalize the thickness of the layer of stone attached to the wall, and the rows of fastening can be leveled without any problems with a regular level;
- A damaged surface can always be restored or restored.
Rules for finishing using decorative stone
Covering doorways with decorative stone must be done in accordance with generally accepted architectural rules. Only when they are followed will the finished finish have the correct proportions.
More details about these rules:
- The doorway must be finished with stone evenly - this applies to the entire surface of the wall. Places near the opening or in its lower part may be slightly more massive. The upper part of the decor is not made more massive than the bottom. An example in everyday life is a mountain. Its base is wide and its top is thin. On a plane, this rule also works great;
- The laying of stones is carried out taking into account the curvature of the edge of the doorway. It is necessary to strictly monitor the tile seams or their relief pattern - the products are positioned symmetrically relative to each other. The finished project will ultimately look natural;
- The decor of your door opening will look complete if the wall decoration is symmetrical on both sides: especially if there is no door frame in the opening;
- Wood products go well with stone, especially if it matches the style. The rough surface of stones, for example, can be combined with the texture of wood (if it is rough). Polished wooden panels, in turn, look impressive together with the smooth surface of the stone.
The work cannot be done without special tools
Tools and materials
When finishing a doorway with stone, you should have the necessary tools at hand:
- Brush to remove old paint;
- File, liquid nails, hacksaw for metal;
- Sprayer or airbrush (to do final tinting);
- The artificial stone itself, acrylic primer, concrete contact;
- Plumb and building level, tinting paste.
Sequence of finishing work
It is important to strictly follow the sequence when finishing the doorway
Now let’s take a step-by-step look at how to decorate a doorway with artificial stone.
- The site where we will work has already been chosen. Most likely, you have prepared this place in advance for upcoming procedures. That is, there is no old paint there, the surface is leveled and primed. If any of this is missed, preparation will need to be done. The old layer of wallpaper or paint is removed with a brush; synthetic paste is perfect for leveling the surface. Skirting boards must be removed from the floor, platbands must be removed from doors (if any);
- It is necessary to make markings on the wall - exactly how the surface will be covered with a decorative layer. We remember that there may be a little more stone on the bottom and a little less on top. The selected area of the wall is primed with a brush or roller (it is better to consult the store about the substance for this procedure). When the composition has dried, carefully read the instructions for your primer.
Concrete contact, for example, is excellent for processing. We are talking about an adhesive, modern material that contains particles of mineral chips. Thanks to its presence, grip improves significantly.
You can’t do this without special solutions
Concrete contact is used to improve adhesion - not only during plastering work, but also when laying tiles and other work.
- Stone tiles should be laid out on a horizontal, flat surface - this is necessary to select the ideal color combination. If necessary, the edges are trimmed. It is best to lay out horizontally in front of you what you plan to see in the end on the doorway;
- The tiles are usually fixed from the corner - always from the bottom. Since all the plinths have been removed from the floor, even the place where there might have been a plinth before is being laid out with stone. In the future, this element will return to its original place - it is more advisable to put it in its entirety rather than in parts;
- Using a level, determine the horizon; in this case, you need to retreat 30-40 mm from the floor. The flat edge of the stone is attached to the wall - liquid nails, tile adhesive or another composition suitable for such purposes help with this. If necessary, parts are cut off from the stone; it can also be broken - if this is necessary to realize your creative idea. To erase sharp corners, the edges of the stone must be polished. If the material is laid out along the vertical edge of the door, the stone is applied flush to the border of the casing. The place where the stone and wooden frame are located is leveled very carefully.
It is better to abandon the combination of MDF trim (or other synthetic-based materials) and stone. This material looks very bad with artificial wood (even when it itself is not natural).
Hiding wiring above a doorway is quite possible
- When facing with decorative stone, the corners of the walls are made in a special way. They choose a “butt-to-butt” type connection, where everything is done at an angle. The connection is made to a wooden base. Often they also choose to join the end-edge tiles - that is, one side of the corner is attached to the edge of the tile of the other corner. Watch about this below in the thematic video on how to trim a doorway.
- When the work is completed, the glue is given time to dry. Afterwards you can start decorating the stone. A composition is made that can be sprayed onto the surface of the material - this way it will look more natural. This composition is made from a special tinting paste, which is darker than the main color of the tile. There is also acrylic varnish and water. Particular attention should be paid to the periphery of the wall that was framed with stone;
- The final stage associated with finishing a doorway with this material is that plinths are attached to the floor, and trims are installed around the doorway.
Clinker tiles
Clinker is a ceramic tile of an elongated rectangular shape, which is laid out in a “running pattern” like brickwork. When decorating a doorway, the protruding edges of the tiles in every second row are not sawed off, creating the effect of a torn edge. Clinker is made not only in the form of horizontal tiles, but also in corner elements, which allow you to design corners without preparatory work on cutting and fitting. The palette of shades allows you to choose tiles to suit almost any interior.
Mosaic
Due to its charming appearance, mosaic significantly transforms any environment. This artistic decor is unique, practical and unsurpassed in style, which provides the opportunity to create an original design.
Stucco molding
Molded polyurethane or plaster decor on the door slopes, with a combination of graceful lines and light forms with deep relief, gives the portal airy luxury and adds a certain aristocracy to the interior.
Moldings
It is a fairly popular type of final finishing, characterized by simplicity, accessibility and at the same time originality, contributing to the formation of an authentic environment.
The photo shows a door portal without doors, decorated with white moldings in the kitchen.
Which stone to choose
Two types of decorative stones are used for cladding: natural and artificial.
In the construction market, such finishing materials are presented in a wide range. Therefore, many are interested in how to choose the right quality stone for finishing external entrance openings at an affordable price.
When purchasing artificial stone, first of all, you need to pay attention to the fact that all elements have the same size, texture, color scheme and look like natural material. In order for the coating to look as natural as possible after finishing, it is necessary to choose a material that combines more than two shades of the same color
The presence of paint stains, growths, pieces of filler, other traces of the production process, as well as cavities with a diameter of more than 5 mm on the artificial finishing material is unacceptable.
For high-quality adhesion to the surfaces of the bases intended for finishing, the reverse side of the facing material must have grooves or roughness. This way, part of the adhesive composition will get inside the material and better hold it on the surface to be finished.
The end sides of artificial stones must be smooth so that after installation, smooth, invisible seams are formed. In this case, chips along the edges of the tiles should not exceed 4 mm. If finishing the front door with artificial stone involves the formation of visible seams, then chips are allowed up to 6 mm.
It is also important to pay attention to ensuring that the filling is uniform, i.e. without large particles. Otherwise, the unnaturalness of the material will be immediately noticeable, and the tile will be less durable
It is better to immediately abandon facing materials that do not have additional protection from negative influences.
Otherwise, the unnaturalness of the material will be immediately noticeable, and the tile will be less durable. It is better to immediately abandon facing materials that do not have additional protection from negative influences.
Step-by-step instructions for each type of finish
You can do the installation of all the previously listed materials yourself. To do this you will need some tools and basic construction skills. Finishing doorways without doors with plastic can be made from ready-made sandwich panels or PVC. The first product is cut in width and height, leveled, secured with spacers, and then mounted on polyurethane foam.
To install PVC, you need to create a frame from a profile. For these purposes, you can use aluminum drywall guides. A frame is made along the perimeter of the passage, then the front of the opening is finished. The plastic is fixed with self-tapping screws, and the corners are covered with special PVC corners, which are attached with glue.
Extras are set according to the following algorithm:
- Take accurate measurements of the opening using a square or ruler.
- The boards are cut with a jigsaw or saw. It is advisable to do this with a power tool using high engine speeds. This will avoid chipping.
- At the fastening points, secret holes are made for the head of self-tapping screws and guides. It is necessary to hold the drill strictly perpendicular to the floor so that the recesses are even. The holes must match the length of the screws.
- Vertical extensions are installed first, then horizontal. There should be no gaps between the boards.
- Fixation is carried out using polyurethane foam. To prevent the boards from bending, spacers are installed.
- After a day, excess foam is removed and the trim is installed.
This way you can improve not only the passage without a partition, but also with a door.
To finish with tiles, you need to follow these steps:
- clean and plaster the walls;
- prepare glue or liquid nails;
- apply glue with a spatula or comb to the back side of the tile, spread it over the surface and remove excess;
- Press the material tightly against the wall and press down with force for several seconds.
Stone finishing is carried out in the same way as tiles.
For plastering, cement-sand mortar is used. Cement must be of a grade not lower than M 300. For 1 part of it, take 3 parts of sand and mix with water. You need to achieve the consistency of thick cream. After removing all protruding elements from the wall surface, the plaster is applied with a wide spatula. Evenness is checked using a building level or rule. The corners are formed with metal corners.
The use of drywall is a solution for an arched opening. First, a rigid frame of aluminum profile is made around the perimeter of the passage. UW and CW guides are used. Then the drywall is cut out and fixed with special screws. Upon completion of installation of the material in the opening, all joints are sealed with sickle tape or covered with putty. The surface is primed.
Plasterboard finishing
This material is loved by many craftsmen, and it is readily used in construction and repair work. It is universal and easy to use, and therefore can also be used for finishing slopes. This option is also called dry plaster.
Plasterboard finishing
The main advantages of using drywall are increasing the speed of work and simplifying it. If necessary, drywall will perfectly hide all the shortcomings. In general, the work on using it to design slopes looks like this:
- The surface is primed after cleaning it of debris;
- a metal frame is formed from the profile;
- moisture-resistant wall plasterboard is cut into pieces of the required sizes and fixed to the frame, forming a box;
- after installing the sheets, the cracks and the sheets themselves are puttyed (it will not be possible to glue anything onto untreated sheets of drywall or cover them with some kind of decorative composition);
- when the putty dries, you can decorate the doorway.
Installation of plasterboard elements
Pros and cons of free passage between rooms
The design solution in which the block is dismantled has its advantages:
- Adjacent rooms are combined into a single space. The common room becomes visually lighter and more spacious, but at the same time each of them retains its functional purpose.
- There is a large selection of ways to design a doorway - all materials look decorative and do not require complex care. With their help, you can focus on the chosen interior style.
- If we talk about cost, then decorating an opening, for example, with panels made of valuable wood species will be cheaper than installing a new door made of high-quality material.
- High-quality ventilation of all areas of the apartment.
Among the disadvantages of this solution, they note the lack of privacy of the premises, the possibility of a draft, and when combined with a kitchen, discomfort due to noise and odors is possible.
Basic information about door installation and design
In general, finishing the front door includes three stages:
- threshold design;
- finishing of slopes;
- installation of platbands and additions.
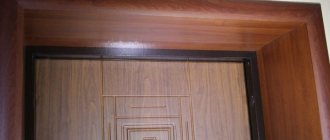
Types of door trim
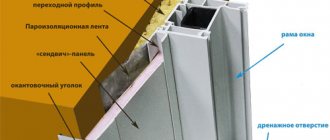
All this work is carried out after the installation of the door leaf itself. As for the threshold, it must be strong enough and resistant to various types of loads. It is usually made of wood, metal, concrete. These types of materials are much more stable than the now so common PVC and can last for many years until the next door replacement.
As for platbands and extensions, they are usually used to achieve neatness in the design of the doorway. Thus, they help to hide imperfections and irregularities when the physical parameters of the wall and the very door frame that is being installed do not match. Without them, the door will look crooked and sloppy. Quite often, these elements are made from MDF, and then you don’t have to think about leveling the slopes themselves with putty. The voids between the extensions and the wall are simply filled with polyurethane foam.
Accessories for interior doors
The slopes are finished after the door is installed. This can be done in various ways:
- sheathing;
- finishing;
- plastering.
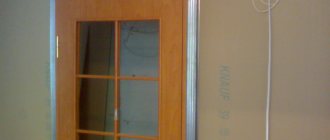
Finishing the entrance door slopes
The last option is considered the best, as it allows you to achieve ideal evenness of the end of the wall and seal the doorway. Also, if you use your imagination, you can create an interesting unique design. And excess dust will not accumulate on top of the finishing materials.
Arch instead of the usual “rectangle”
Arched openings have become popular a long time ago and are still actively used by many designers. Doorways of this shape are a very good solution for use in small spaces. They help to visually make the space more spacious. And correctly selected proportions of the width and height of the arch can “raise” a low ceiling. Arches can be of standard shapes or the most unpredictable.
Very often, such an element is key in the interior, and the entire decoration depends on it. You can purchase ready-made arched portals from a variety of materials, or you can make an arch yourself. Often, the frame of the desired shape is mounted from metal profiles and covered with plasterboard.
Instead of profiles, you can use wooden planks of sufficient thickness. A layer of plaster is applied on top of it, and then decorative finishing is performed. Very often, arches can be found as a connecting element between a room and a loggia. They can have built-in shelves, lighting, niches for placing decorative items or a fragment of a bar counter.
It can also be used as a dressing table or a place to place indoor plants. The advantage of designing a doorway in the form of an arch is that it can fit into almost any interior style. It is enough just to choose the appropriate shape and finishing material.
Methods of finishing from the inside
Interior finishing of the canvas is a more complex procedure. The fact is that the decorative look here must be harmonious; it must be correctly integrated into the existing or created interior
It is important to remember about the protective function - it seems that from the inside it would be unnecessary, but it is not. The threats are not decreasing: children love to lean against the door when going outside, and pets will not mind testing the strength of the new coating
There are a number of requirements for finishing:
- The coating must have good noise absorption. That is, noise should not penetrate not only from the outside, but also from the inside: all conversations of household members should remain secret.
- Goes well with other interior items. Designers advise decorating the front door inside the apartment so that it has a connection with the interior structures. This is not a fundamental concept, the main thing is to show your taste and imagination.
- The cost of materials must be affordable. The solution is considered quite strange, which will lead to the fact that the price of the fabric used for cladding will be more than a new entrance door that has an excellent decorative cladding.
So, the interior decoration of door panels can be done using the following options.
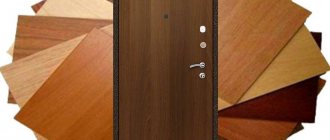
Chipboard sheets up to 6 – 8 mm thick
This is the most budget-friendly solution that helps give the surface a completely different look.
It is important to consider that this product is afraid of excess moisture, so all edges are treated with sealants. Many people mistakenly believe that laminated chipboard has a small decorative range
In fact, there are many varieties, varying in color and texture, that perfectly imitate even natural wood.
Visually, laminated chipboard is not much different from MDF, but it is not advisable to install these panels outside, since their stability leaves much to be desired
MDF overlays
This is a more interesting type of panel, the use of which has one important defect - joints. The overlays are made to fit standard blades, which allows you to carry out work very quickly, even after installing the structure in the opening. This option has a wide choice, which allows you to choose the necessary solution.
MDF overlays have unique stability and excellent aesthetic properties, which is why this material is widely used in the luxury sector
Leather or its substitutes
Using natural materials is a serious financial investment. It is much more effective to choose artificial substitutes that have an identical appearance.
There is an erroneous stereotype that leatherette and similar materials are bad. This situation is explained by the fact that for a long time the market was dominated by products that were of low quality. Currently, the situation has changed a lot, the choice of such materials is very wide, and the quality is excellent. Of course, if you do not choose frankly cheap varieties produced by unknown manufacturers.
"Soviet-style" dermantine is no longer used on doors, genuine leather is very expensive, the best option is eco-leather - it looks great, stretches well and lasts a long time
In principle, to veneer the canvas from the inside with your own hands, you can use any panel products. Thus, there are surfaces that were even lined with plastic parts. This option is more suitable for office premises where there is no need for excessive attractiveness.
Interesting design options
When planning a room, many people wonder how to beautifully decorate a doorway? The stylish and practical design of a doorless passage built into a storage area that occupies the entire wall area from floor to ceiling is gaining increasing popularity. Depending on the preferences of the owners, the storage area is designed as a large shelf for books, figurines, photographs and other pleasant little things. In the bedroom, a wall with shelves can replace a full-fledged wardrobe for clothes.
A small doorway, for example, between the dining room and kitchen, living room and loggia, is interestingly complemented by windows on the sides, through which additional sunlight penetrates, giving the room lightness and weightlessness. Side windows are replaced with built-in niches with lighting, shelves, narrow cabinets, decorative elements made of metal or plastic, onto which photo frames, paintings, and climbing plants are attached.
For lovers of nature and natural styles, an interesting design solution would be a living green frame or a moss wall around an open portal. The built-in drip irrigation and fertilization system gives owners of this decoration the opportunity to admire natural greenery for many years without any effort.
Dimensions of open doorways
The interior style depends not only on the materials used to decorate the open doorway, but also on its shape and size. For example, a wide opening, almost the entire length of the wall, unites two rooms, creating the illusion of a free, light and airy space. At the same time, depending on the design of the opening, the combined space may look solid or have a conditional demarcation.
A rectangular opening up to the ceiling allows you to visually raise a low ceiling, stretching out the room. In addition, such a height of the opening draws attention to itself and sets a certain landmark for the interior.
A semicircular or domed arched opening softens the space, tuning it into relaxation and comfort. The Roman arch looks great both in the opening of a thin wall, and as a small vestibule or corridor with a ceiling that continues the contours of the passage. The semicircular shape of the arch of an opening without a door is considered the most popular among owners of apartments and houses.
A Thai arched opening, consisting of a right angle on one side and a circle on the other, allows you to create a unique interior. The large hall is interestingly played out by arranging two Thai openings, located at rectangular angles to each other and separated by a small partition. This design looks like a large semicircle divided in half.
An original, unique interior is created using a shaped open opening. Volumetric patterns and curls in the form of a frozen wave, asymmetry, contrasting finishing materials and the addition of lighting to the portal, shelves, niches or columns will become a stylish accent and reference point for the entire interior.
DIY cladding
Let's look at finishing a doorway using MDF panels as an example. There are two ways to cover slopes with MDF panels
with glue or using lathing.
Cladding using glue consists of the following steps:
- If the base is a “bare” brick or concrete surface, it is finished with plywood or MDF, which is secured to the wall with dowels
. - Next, the panels are marked and cut to size.
- The back side is lubricated with “liquid nails” glue, which is applied in a zigzag strip
. The material is applied to the base, and after 5–10 minutes the surface is tapped with a rubber hammer.
Fastening the panels to the sheathing, although characteristically different from the previous process,
but it’s also not complicated:
- A frame made of wooden slats or a metal profile is mounted
in the opening , fixing them to the surface with dowels. - Starting guides are secured
at the top and bottom of the frame with self-tapping screws . Fragments of cladding cut to size are inserted into them and secured to the frame using the same self-tapping screws. - Upon completion of the installation of the panels, casing is installed
.
Watch a video lesson about decorating a doorway:
It is clear from everything that finishing the opening is a full-fledged and, moreover, responsible procedure for decorating a living space.
With the right approach, this element will become a quality addition to the interior of any style.
The standard solution for arranging an opening between rooms is to install a door block, which usually completely fills the opening. But this does not always happen - often the doors turn out to be much narrower than the thickness of the walls, and in such situations you have to resort to some tricks, which will be discussed in this article, in which, together with the website, we will deal with the question of how, and most importantly, what Is the doorway being finished?
Finishing the doorway photo
When can you refuse an interior door?
Not every doorway can be dismantled. The location of the bathroom and pantry is not even discussed. Home office and library spaces also require privacy and silence, as do the bedroom and children's room. As a last resort, to create an atmosphere of privacy, you can use fabric curtains or screens, which will successfully decorate the opening the rest of the time. This will save free space and create an optical effect of dividing rooms.
Note! With the help of open passages, you can successfully emphasize the unity of the living space. Therefore, the same shape and structurally similar material are chosen for the openings.
Most often, a doorway without a door is found between a kitchen with a living room, a kitchen with an entrance hall and a living room with an entrance hall. However, for the kitchen it is necessary to leave at least a glass partition, screen or fabric curtain. This will allow you to quickly isolate it from the adjacent room.
Restrictions apply to kitchens with gas equipment - here a door or partition must be present.
The door and window units are completely dismantled when combining the balcony with the kitchen or living room. Use curtains or a screen to separate.
One of the advantages of freeing the doorway from the canvas is better air circulation in the rooms.
Making a doorway without a door is possible in the following situations:
- When the opening between rooms retains its shape. The passage visually expands, and due to the massive decor it looks more aesthetically pleasing.
- When it is necessary to create an arched opening. The shape of the arch is chosen depending on the style of the room and the height of the ceilings.
- When there is a desire to create a passage of a complex asymmetrical shape, triangular or trapezoidal configuration. The restriction only applies to openings whose width is less than 80 cm.
- When a bar counter, a stained glass window or a mosaic canvas is installed in the passage between the kitchen and the living room.
Photo
Note! How to update a table with your own hands - instructions and master class for beginners (80 photos)
Let's discuss this article together:
Click to cancel reply.
Using MDF panels
You can decorate your portal beautifully and inexpensively using MDF panels. From the outside you will need to use platbands. The only thing that needs to be taken into account is the vulnerability of the material to moisture. Under such conditions, the slabs swell and deform. Therefore, it is better not to use MDF to finish the passage between the kitchen and living room or kitchen and dining room. An exception may be rooms with well-functioning forced exhaust.
To cover the portal with MDF tiles, you will need to build a wooden slatted frame. Then the panels are cut into fragments of the required length and width and fixed with special metal clips. The planks are fastened to each other using a tongue-and-groove locking connection.
If the panels are not equipped with a groove and tongue, then they are fixed using a special adhesive solution using a frameless method. In this case, the base must be perfectly level. To disguise the joints, a decorative strip is used, and casing is installed along the edges.
Using polyurethane stucco molding
Polyurethane stucco molding replaced gypsum - heavy and fragile. It is used to decorate openings in interiors decorated in Venetian or other classical style with sufficient area and height of the room. This stucco molding is highly durable, lightweight and can be painted in colors other than white.
The surface for attaching polyurethane stucco molding must be clean, level and durable. To do this, it is first leveled and primed. To install parts, use special glue. When the parts are dry, the joints between them are treated with putty and sanded using fine-grained sandpaper. The stucco molding can be left snow-white or gilded and patina applied to it.
The advantages of polyurethane cladding include the following:
- Low weight, which allows you to mount this decor on weak foundations, such as drywall.
- The ability to adjust the shape of the product due to its plasticity - polyurethane can be cut and sanded.
- The material is not afraid of moisture and temperature changes, so it can be used in the kitchen.
- Polyurethane has a long service life, the decor does not crack or crumble.
- The range of decorative elements is varied and is represented by false columns, moldings, pilasters, rosettes and other elements.
- The stucco molding is easy to install using adhesive, so you can do all the work yourself.
How to finish slopes with plaster?
Practice has shown that plastering is the most durable finish. It is preserved and remains attractive for many years. To do this job, you must have:
- level,
- sandpaper,
- sand,
- cement,
- putty,
- primer,
- special beacons,
- Master OK,
- masking tape.
In order not to stain surrounding objects, before work they are covered with plastic film and masking tape is used. Then the guide beacons are installed. To prevent them from falling, they are placed against the wall and secured with cement mortar.
The process of plastering slopes
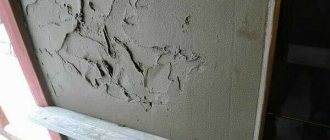
Sometimes there may be a hole in the wall. It needs to be covered with cement mixture.
To prevent the appearance of fungus, the wall must first be coated with a primer.
To obtain a cement mortar, take four parts sand and one part cement. The mixture is stirred until a homogeneous mass is obtained. Before applying plaster, potholes are covered with cement.
Then the first layer is laid. After the wall has dried, a reinforcing mesh is installed. Slope alignment is carried out according to the lighthouse rules.
After the plaster has dried, the walls are puttied again. When the putty has hardened so that the surface is smooth, it is processed with zero-grade sandpaper. Then the resulting surface can be painted or covered with wallpaper.
How to use an unnecessary opening
Sometimes, as a result of redevelopment, an unnecessary opening is created in the room. The easiest way to hide it is to cover it with furniture or cover it with drywall. If the interior style allows, then you can hang a large panel or carpet, or perform decorative drapery.
However, there are more functional solutions. You can cover one side with plasterboard, then you will get a niche. It can be used for different purposes:
- As a rack, install shelves inside - wooden for books or glass for dishes and souvenirs.
- As a decorative space for a painting, statue, decorative fountain or other art object.
- For a boudoir, just hang a mirror and a cantilever shelf for cosmetics.
- In the nursery you can organize a rack for storing toys and books, and in the kitchen - dishes.
- If the opening is large, then you can install a headboard in it - this will save free space.
In the niche, depending on its size, a storage area is also organized, a work desk is installed, or a mini-pantry is located. Another option is a light panel.