A balcony or loggia is considered an extension of the apartment. They are often used for storing various things and drying laundry. But, carrying out some work will allow you to turn the balcony into a full-fledged living space. An integral process in landscaping a balcony is finishing. With the help of such works you can create a cozy place where it will be pleasant to relax or just drink tea. Let's look at how to make the interior decoration of a balcony yourself.
Preparation for repair
At the preparatory stage, a project for carrying out construction and repair work is drawn up and its budget is calculated. The sequence of work is determined, the need for heating the balcony and the choice of heat source, calculation of the required amount of materials for insulation and exterior finishing of the balcony.
The preparatory part of the repair work is carried out in several stages:
- cleaning the surface from dirt and dismantling old coatings - paint, cladding;
It is imperative to get rid of mold! - checking concrete floor and ceiling surfaces for voids, crumbling areas, and cleaning these areas. Additional reinforcement of the balcony slab may be needed;
- repair or construction of a parapet. If it is necessary to construct a parapet and additional partitions, remember that the balcony should not be overloaded. For these purposes, durable and lightweight building materials, such as foam blocks, should be used.
Irregularities, cavities and cracks must be repaired using cement-sand mortar; - Leveling the floor is the final stage of preparatory work.
Stage 1. Preparation
We inspect and repair the foundation
Before decorating the inside of the balcony with your own hands, you must check the condition of all supporting structures. The reason here is quite obvious: in old-built houses, balcony ceilings and fences are very often subject to intense wear and tear and are in poor condition, so reconstruction, which is usually accompanied by an increase in load, may not be able to withstand.
The critical point here will be the glazing: frames with sashes and double-glazed windows weigh a lot, therefore, before installing translucent structures, you need to carefully study the condition of the balcony base.
Such defects in the balcony slab must be eliminated
When reconstructing my loggia, I acted like this:
- At the first stage, I dismantled the old frames installed on the parapet and prepared an opening for glazing with metal-plastic structures.
- Next, I removed the plank flooring - the boards still began to rot and sag under minimal load.
- I removed the remaining wallpaper from the side walls and removed the peeling putty.
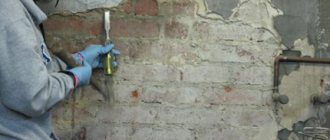
- I checked the bottom floor slab for cracks by gently tapping it with a hammer. I removed the chipping fragments of concrete, since it would be almost impossible to fix them.
Sometimes to repair the base you have to make formwork, which then needs to be filled with concrete
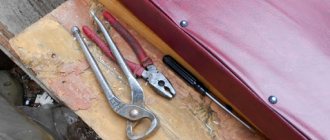
- I cleaned the discovered cracks with a vacuum cleaner, expanded them with a grinder and filled them with cement-adhesive mortar. I did the same with the joints of the walls and floor from the inside of the balcony: I had to pick out the remains of the mortar that was used for sealing from the cracks .
In my case, the concrete slab of the lower floor was in fairly good condition, but this is not always the case. So, in addition to the operations described above, the instructions for performing preparatory work must necessarily include an inspection of the edge of the balcony slab. If necessary, repair of the end is carried out using cement mortar with additional fastening with a steel angle.
After completing this work, it is worth taking a break to polymerize the repair composition. However, if there were relatively few cracks and crevices, then waterproofing can be done in just one or two days.
We carry out waterproofing
Waterproofing load-bearing structures, from my point of view, is part of the mandatory measures. The thing is that the interior decoration of the balcony can be greatly affected by increased humidity levels. In addition, the risk of precipitation entering through open windows cannot be excluded, therefore it is necessary to protect at least the bottom plate from water.
To protect against moisture, various compounds are applied to concrete
Three methods can be used to perform waterproofing work:
| Waterproofing technology | Short description |
| Pasting | This technique is one of the most common. To protect the base from moisture, a layer of waterproof material is laid on it, which acts as a barrier to liquid. For waterproofing the following are used:
|
| Painting room | Unlike the pasting method, when painting waterproofing, a liquid composition is applied to the areas to be finished, the basis of which is most often bitumen mastic. Products of this type have good adhesion to the concrete base; in addition, after polymerization they form a continuous waterproof film. |
| Impregnating | Waterproofing impregnations for concrete can also be used to protect against moisture. When applying the material to the balcony ceiling, the active components penetrate into the thickness of the pores, where they polymerize. As a result, the top layer of the concrete slab becomes practically airtight, which significantly reduces the risk of leaks even if the floor of the loggia is filled with a continuous layer of water. The downside of the technology is the high price of consumables. |
The use of roll materials in waterproofing works
To waterproof balcony bases, I usually use painting technology, but I have also worked with penetrating compounds, and it seems to me that they deserve only good reviews.
In any case, we must not forget that when waterproofing, not only the floor of the balcony is treated, but also the lower part of the walls and fences - to a height of approximately 10-15 cm above the ceiling.
Selecting quality glazing
Repairing a balcony or loggia begins with the selection and installation of glazing. Glazing can be “cold” or “warm”:
- cold glazing - These are aluminum or polyvinyl chloride structures filled with single glass. This design will protect the balcony from wind, dust and precipitation, but will not be able to retain heat, and will freeze in the cold season;
- warm glazing – these are structures made of PVC profile, warm aluminum (system with a thermal bridge) or wood, filled with double-glazed windows. Warm glazing will make the balcony comfortable to use at any time of the year. If the renovation of a balcony is carried out with the aim of combining it with a living space, then for glazing it is necessary to use structures with an installation width of at least 70 mm filled with energy-saving double-glazed windows 40 mm thick.
Such enclosing structures have a high coefficient of resistance to heat transfer and are used for glazing residential premises.
If the balcony is to be insulated and part of the balcony frame falls under the lining, then special additional profiles are used that increase the opaque part of the structure. You need to choose the type of glazing based on the functional purpose of the balcony after repair work.
Using drywall
Plasterboard finishing is often carried out in cases where a balcony or loggia is used as an extension of the living space. With its help you can easily level the walls.
For cladding it is better to use moisture-resistant plasterboard. It can be distinguished by its green surface. You can easily glue wallpaper or attach ceramic tiles to such panels.
Finishing a balcony with plasterboard is done as follows:
1. First of all, a frame is constructed from an aluminum profile.
Frame for installation of drywall
2. When the frame is ready, begin laying the thermal insulation material. A vapor barrier film is mounted on top of the insulation.
Wall insulation
3. Fasten whole slabs of drywall, and then pieces. The material is fixed with special self-tapping screws.
Drywall installation
4. At the final stage, the finished balcony is treated with primer solutions, puttied and sanded. After this, they begin finishing the balcony.
The finished result
On video: secrets of installing drywall.
Laying lags
The floor on the balcony is characterized by the presence of a large number of irregularities, potholes and cracks. In addition, it has a slope towards the street to remove precipitation. If there are large uneven surfaces, leveling the floor with a cement screed means significantly increasing the weight of the balcony. In addition, you will have to wait until the screed is completely dry to continue the repair. As an alternative, you can consider using joists made of light and natural wood for leveling.
To do this, you will need planed wooden blocks with a cross section of 50x50 mm, anchor dowels, and spacer plastic wedges.
Read about how to properly lay joists here.
Since wood is susceptible to rotting in a humid environment, it must first be treated with an antiseptic or impregnation and dried thoroughly.
In order to minimize the ingress of moisture onto the wood, the floor surface is waterproofed before installation. For these purposes, a waterproofing film is used.
There are other proven methods. Bitumen-based mastic or roofing felt are excellent moisture insulators. Mastic is sold ready-made or diluted with a solvent.
Installation of the final finishing coating
If you have chosen coverings in the form of wooden lining, plastic panels, siding or drywall, installation will not be difficult. In order to understand how to sheathe the inside of a balcony with your own hands, just look at the completed sheathing.
They begin installing the elements from the corner of the loggia and fasten the first part strictly according to the level. Next, all further elements are inserted into it and secured with screws.
If plaster is chosen for finishing, lathing is not needed, but the walls must be carefully leveled using putty, allow the coating to dry, and smooth out any irregularities. Then treat them with a primer and leave until completely dry.
And only after making sure that the walls are level, start applying decorative plaster. The coating can be applied in one or several layers, after allowing the previous layer to dry.
The ceiling is finished in the same way, depending on the selected material.
Lathing walls and ceilings under panels
The lathing serves as a frame onto which the interior finishing elements are attached. For its manufacture, dry high-quality timber is used. The thickness of the timber for the sheathing depends on the parameters of the insulation.
Planed pine bars 20 by 40
The timber and all other wooden materials used for finishing are coated with an antiseptic. Work on the installation of the sheathing begins with markings. The timber is cut into identical elements and fixed to the walls with dowels in accordance with the markings.
Features of decorating loggias and balconies
Despite the external similarity of loggias and balconies, these building elements have different designs and operating modes. Let's look at the difference between a loggia and a balcony:
- balcony - the workspace is created by a slab cantilevered into the mass of the load-bearing wall, the heat loss is huge, it makes no sense to insulate the parapet, side walls - with a thin layer of mineral wool, expanded polystyrene, the money will be wasted, with an increase in the layer of heat insulation, organizing heating, the user will receive a “warm matchbox” , the budget will not be spent rationally;
Structural differences between a balcony and a loggia
- loggia - the slab rests on the side walls running along all floors, it is much easier to insulate the room, but it is forbidden to connect water heating from the central heating system, the owner in such a situation is subject to a serious fine;
Simple definition of balcony and loggia
Floors are usually raised by laying joists onto which a laminate, floorboard or plywood base is attached, decorated with vinyl tiles, linoleum, or cork. Screeds for porcelain stoneware, linoleum, self-leveling floors on balconies are not recommended, as they unnecessarily load the slab and reduce its service life, although they are often offered by repair companies.
Option for finishing the balcony floor with laminate
When decorating vertical surfaces, the most popular option is to decorate the balcony yourself with clapboard or any other long materials - MDF panels, PVC, block house, siding. Less commonly used are artificial stone and gypsum fiber board sheets for painting. The ceiling is leveled with putty or sheathed with the specified cladding.
Option for decorating loggia walls with several claddings
At the design stage, before purchasing decorative materials, it should be taken into account that some of them emit harmful substances, unpleasant odors, and increase in size when heated. Therefore, it is better to separate vinyl panels, flexible stone, PVC siding from the parapet, side walls with foil rolled materials (reflective layer outward).
Installation of foil-isolon under the cladding of balcony walls
Related article:
Insulating a loggia with your own hands: step-by-step photo instructions. In a separate publication you can learn about the secrets of proper insulation of a balcony.
Lighting and socket connections
If it is planned to supply electricity to the balcony, then simultaneously with the installation of the sheathing, an electrical cable and other communications are laid, and places for installing sockets and switches are selected. It is necessary to determine in advance the number of lighting fixtures. The electricity supply system will depend on the amount of power consumed. Possible voltage source options:
- electrical panel;
- junction box;
- the outlet closest to the loggia.
The simplest option: output the power cable from the nearest outlet.
To prevent undesirable consequences, electrical wires must be insulated in special metal hoses.
The main stages of covering a balcony
So, how to decorate a balcony? Basic steps:
1. It is necessary to clean the surface of the walls from debris and objects that may interfere with the cladding process. If there are obvious defects on the walls, namely cracks and chips, then it is better to eliminate them. Depending on the size of the defect, putties or cement-based mixtures are used.
2. Before installing the sheathing on the walls, you need to make markings. This will greatly simplify the work of installing the guides. When drawing lines you should use a level. It will also be needed when checking the quality of the frame installation. The guides should create a plane, which will allow you to make high-quality cladding for a balcony or loggia.
Related article: Decorating a balcony: creating an additional room
3. When covering the structure, do not forget about installing heat and vapor barrier materials. This will significantly reduce heat loss in the room. Foam plastic or thermal insulation is widely used as insulation. Using the latter allows you to save internal space.
4. Before attaching the finishing material, it is necessary to run electrical cables to lighting fixtures and sockets, if they are needed.
5. At the final stage, the finishing material is installed. To fix it, you need to use the appropriate fasteners. This will create not only a reliable, but also an aesthetically pleasing coating.
A balcony made using this technology is often used to create a recreation area. If you wish, you can make your own office. There are many photos on the Internet that show that such rooms act as an effective extension of the kitchen or bedroom.
Insulation of walls, ceilings and floors
After installing the sheathing, you can proceed directly to insulating the walls and ceiling. The wall adjacent to the apartment and the ceiling do not require insulation if the neighbors above have insulated floors. The following materials are used to insulate balconies:
- mineral wool has high heat-insulating properties, but is hygroscopic and requires the use of waterproofing;
- Styrofoam has good heat-insulating properties, light weight. This is the cheapest insulation option;
- penoplex – moisture-resistant and durable material, is the optimal solution for insulating balconies and loggias.
Penoplex is usually chosen for walls and floors, and it is convenient to insulate the ceiling with light polystyrene foam. The insulation material is attached to the sheathing cells using glue or polyurethane foam. If mineral wool is chosen as insulation, it is used together with a vapor barrier film, since accumulated moisture worsens the thermal insulation properties of the material.
Penofol - reflective vapor and thermal insulation
Recently, new foil materials have been gaining popularity, which combine the functions of insulation and moisture insulation.
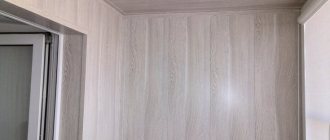
Plastic sheathing
Plastic panels are a budget option for finishing a balcony. They do not need careful care. There is a wide range of such finishing materials on the market, which allows each owner to choose the most suitable option for himself. The use of plastic panels makes it easy to level the walls without carrying out complex work.
To decorate the inside of the balcony, panels 10 cm wide are used. However, their thickness must be at least 1 cm.
When using plastic panels, you need to be aware that they can become deformed at high or low temperatures. Therefore, the fastening must be non-rigid, which will prevent the destruction of the material.
The work includes the following steps:
1. First of all, the sheathing is made from wooden blocks.
We build the sheathing
2. Before starting the sheathing, it is necessary to insulate the walls. Mineral wool, polystyrene foam, isolon or ordinary polystyrene are used as thermal insulation materials.
We insulate the walls
3. Plastic panels are mounted on top of the sheathing. Nails, glue or dowels are used as fastening elements. The panels are connected to each other by grooves. Every half meter you need to strengthen the sheathing with nails. This will give it strength and reliability.
Related article: Creating a stylish balcony design from clapboard: wall decoration and design options
Installation of plastic panels
The most convenient option is to mount PVC panels using a mounting profile. Slats are attached along the perimeter of the balcony. In this case, the panels will fit into the grooves and snap onto the rail itself. The use of such a profile will significantly reduce the time of cladding. Under such a coating, electrical cables can be laid unhindered.
In the video: the technology of covering a balcony with plastic panels.
Warm floor
If you plan to heat the balcony, then “warm floor” is one of the options for the heat source. “Warm floors” are divided into:
- aquatic. The use of a water floor allows you to save energy and useful area of the balcony. The disadvantages include difficulty in installation and difficulty in adjusting the heating temperature;
- electric. They allow you to easily regulate the temperature, have uniform heating over the entire area and an affordable price. The disadvantages of such a system are high charges for electricity consumption and the presence of an electromagnetic field in the heating zone.
Electric underfloor heating cable system
Installation of an electric “warm floor” with cable heating is carried out in the following sequence:
- a layer of thermal insulation is laid on the screed - mineral wool, penofol or expanded polystyrene;
- installation of a metal reinforcing mesh to which the cable will be attached;
- attaching the heating cable to the grid;
- installation of a temperature controller;
- concreting the area with a cement composition;
- laying tiles or linoleum.
Instead of cable heating, an infrared “warm floor” system can be used, which does not require pouring a screed. The system uses film heaters.
An infrared heated floor can be covered with linoleum or laminate. Warm floors have gained particular popularity for heating balconies due to their easy installation in limited space.
Types of balcony finishing
It all depends on the goals you are pursuing. If you just want to refine the appearance and not touch the inside.
Or, on the contrary, you don’t care how the loggia looks from the outside, and it’s important for you to make a mini room in which it will be comfortable to be.And of course, no one forbids combining both options, but the approaches to the process itself will be somewhat different.
Selecting materials for finishing walls, floors and ceilings
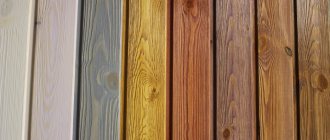
Various materials are used for wall decoration: PVC or MDF panels, plasterboard, OSB with further painting or wallpapering, and wooden lining. Decorating the walls with wooden clapboard is the best option, which has practically no disadvantages.
The natural material has a beautiful appearance, is durable and environmentally friendly, and is easy to install. Installation of the lining begins from any corner of the balcony, and the first board is attached strictly according to the level.
Installation is simple - each subsequent panel is inserted into the groove of the previous one. The lining is secured to the sheathing with nails, self-tapping screws or clamps.
Floor finishing options are also quite varied: ceramic tiles, floorboards, linoleum or laminate. It all depends on personal preference and the financial component.
To finish the ceiling, wooden lining, PVC panels, tension or suspension systems and classic whitewash are used.
Finishing the ceiling with PVC panels is budget-friendly, practical, durable and easy to install. Ceiling panels can be simply white, colored, or imitate natural materials: wood, stone, marble. The panels also vary in width from 10 cm to 500 cm. Knowing the area of the balcony, choosing the right amount of material will not be difficult.
When starting to install the ceiling covering, you need to make sure that it will not interfere with the tearing off of the window sash. Each part is inserted with its protrusion into a groove on the previous panel and fits tightly with it. The sheathing elements are fastened to the sheathing frame using screws, nails or staples.
Installation of PVC panels with self-tapping screws
Adjacent parts need to be joined quite tightly to avoid the appearance of cracks.
Step-by-step instructions for finishing a balcony with a block house with your own hands
What is the main advantage of such material as a block house? It imitates rounded timber, and its performance characteristics will pleasantly surprise you. Translated from English, Block house means frame-panel buildings, most often used in Finland and Canada. What explains such popularity of this material? Because it looks like a real rounded log. That is why this material has such a name, because it allows you to create an unusual interior and exterior of the room.
The sequence of step-by-step finishing of a balcony with this material:
- We remove clutter from the balcony. You will need to not only throw out old things, but also dismantle the previous decoration, if any.
- Are you planning to make a living room on the balcony? You'll have to do a vapor barrier. We take glassine (polyethylene), cover the sheets, making an overlap of 10–15 cm. Roll out a roll of film, securing the material with aluminum tape under the ceiling on the top of the walls. Was the film torn during installation? We seal the resulting gap with tape. With its help we seal the joints.
- Now we install a vertical wooden frame. For this purpose, we prepare dry bars with a cross-section of 5 by 5 cm. The strength of the structure and long service life are determined by whether it is impregnated with a fire-resistant and antiseptic agent. We place the wood blocks, leaving a distance of 60–70 cm between them. Depending on whether the wall is brick or wood, the frame can be secured using nails, dowels or screws.
- Once the frame is secured, we begin to provide thermal insulation. We lay the heat-insulating material between the parts of the wooden frame on the surface of the wall and firmly fix it. To ensure good thermal insulation, we use tile rather than roll material.
- We proceed to the next stage - finishing the surface with a block house. We attach the slats either vertically or horizontally, as you prefer.
- We place the slats with the tenons facing up to prevent moisture from accumulating in the grooves. Then we attach them to the sheathing using self-tapping screws, clamps, staples or nails. Do you prefer self-tapping screws? Then, upon completion of installation, we hide their heads behind wooden plugs, gluing them to PVA. One beam will require 2 self-tapping screws. We fix one at the groove, the second next to the tongue.
- The final step is to attach the linings to the external and internal corners. You can purchase them at specialized retail outlets, in the department where materials for block house cladding are sold.
Slope finishing
To finish slopes, plastering, plasterboard sheets and plastic panels are used:
- plaster - traditional finishing method. But with the advent of new finishing materials, the method is losing its popularity. The plastering process is very labor-intensive, requires additional painting of the slopes, and does not provide the necessary heat and sound insulation. The advantages include the low cost of finishing and the possibility of repainting to give a fresh look;
- drywall - a popular type of finishing due to ease of installation, low cost of material and the ability to complete finishing in a short time. Disadvantages include insufficient moisture resistance and the need for additional finishing - putty and painting;
- PVC panels – an ideal type of finishing if the window and balcony door are also made of polyvinyl chloride. The homogeneous surface of translucent structures and slopes looks aesthetically pleasing.
In addition, installation of PVC panels is quick and easy. This type of finishing does not require additional processing and allows you to choose different colors. PVC panels are durable, UV resistant and easy to clean. If you decorate the entire balcony with PVC panels, then the surfaces of the slopes and walls will look like a single whole.
Instructions for DIY interior step-by-step finishing of a balcony with wooden clapboard
Only using wood as a finishing material can you create an environmentally friendly, prestigious and respectable balcony. If you like natural materials, then feel free to choose wood for your balcony renovation.
It doesn’t matter how glazed your balcony is, in any case you will need to insulate the space from moisture and sudden temperature changes. How to achieve this? You can use wooden or plastic lining, depending on your taste. Either way, follow the recommendations below.
If you are looking for a material for finishing a balcony that will suit metal-plastic windows and create an atmosphere of comfort, then lining is exactly what you need.
The long service life of wooden lining is another significant advantage. The fact is that during the production of this finishing material it is impregnated with a special composition that preserves the wood.
Elegance and style are the best descriptions of a clapboard balcony. However, this material has a number of advantages:
- Step-by-step finishing of a balcony with wooden clapboard will go quickly, and the result will please you. The uneven surface of the balcony will be hidden under the lining;
- environmental friendliness of the material used;
- limitless flight of fancy in balcony design;
- increased heat and sound insulation;
- a natural microclimate is created in the balcony space: if the air humidity changes, the lining easily absorbs and evaporates moisture;
- The panels are attached to each other using the tongue and groove technology. This means that installation will be easy and the cost of work will be reduced. Since the joints are invisible, visually the coating appears solid. In addition, such a finish will not allow dirty air, dust, etc. to pass through.
Step-by-step finishing of the balcony with clapboard means that you will need to create a special design in advance. Lathing is required when laying a frame made of wooden bars (metal profiles). This design is located perpendicular to the wooden panels. If the installation will be carried out horizontally, then lay out the frame vertically. Due to this frame, the walls are insulated. To create it, you will need bars 60 by 60 mm, fixed in increments of 0.5 meters. Using insulation, we fill the space between them; mineral wool slabs or mats are suitable.
How is wood paneling installed? To do this, use grooves and ridges (when available) or the joint-to-joint method.
It is better to choose chrome screws with a semicircular head for fastening; nails are also suitable. Of course, the hats will be visible from the front side. To make it look nice, attach the nails at the same distance. Is there a tongue and groove? Then the nails will not be visible.
Wooden cladding should be varnished. If wooden elements are attached externally, then a special oil varnish is used to protect them.
We glaze the balcony with our own hands
Developers initially did not glaze the balconies in their houses, leaving an open area. Due to unfavorable weather conditions and the desire to store some things there or create a recreation area, people began to order a glazing service.
A glazed and insulated balcony becomes a full-fledged part of the living space, because it is as comfortable to be in as in an apartment. Rocking chairs, cabinets and bedside tables, small sports complexes, flowers, etc. are installed here.
You can glaze a balcony yourself if you have basic knowledge in the field of construction. There are 3 types of installed double-glazed windows:
- Wooden frames - they are of high quality and durability, completely different from their old counterparts. These double-glazed windows perform the function of sound insulation and thermal insulation, and also look stylish on balconies. The design also has disadvantages - moisture can get into the sliding frames, and a large accumulation of it has an adverse effect on the wood. Also, during winter periods, when the temperature outside the window is sub-zero, drops can freeze and prevent the windows from opening.
- Metal-plastic frames are one of the most popular options for double-glazed windows. Average service life is 40 years or more. In addition, the material is not exposed to moisture or cold, is equipped with drainage systems and is made from high-quality raw materials.
- Frameless windows - this glazing option has appeared recently. The developers thought that massive frames take away some of the glass, and less sunlight penetrates into the apartment. Then frameless double-glazed windows were invented, which are not inferior in quality to their frame counterparts, and look harmonious on the balcony. However, in such a room it will be quite cold, a little warmer than outside, so it can only be considered residential in warm weather.
There are 2 main types of glazing:
- Cold is a more economical method, because... Single-glazed windows and lightweight frames are used in the installation. During the cold season it will be really cold here, so the balcony can only be used for storing things that are not afraid of frost.
- Warm - in this case, full-fledged frames and double-glazed windows are installed, taking into account all the requirements that do not let the cold in and do not let the heat out.
Getting rid of possible condensation:
- provide controlled ventilation;
- install double glazed windows and high-quality frames;
- provide moisture insulation of the floor covering;
Preparing the balcony for glazing:
- The metal parapet is insulated before installing the frames;
- All measures for finishing the balcony are carried out after the installation of double-glazed windows;
- The brick parapet is leveled with cement mortar;
- Dismantle the top of the old fence if it is not horizontal.
Installation of wooden frames:
- The lower beam of the wooden box is installed at the level of the railing, and the upper beam at the ceiling level. The connecting points are fastened with brackets to the wall.
- Lathing is installed for further finishing.
- Treated and, if necessary, pre-painted frames are installed.
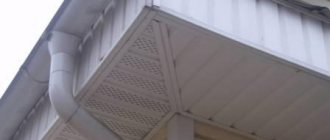
- Canopies are installed outside the balcony to protect against moisture.
Wooden frames
Installation of plastic frames:
- Support posts are installed from wooden beams.
- The support posts are attached to the ceilings and parapet using self-tapping screws.
- Double-glazed windows are removed from the frames before installation.
- The doors are removed using pliers.
- A support profile is fixed at the bottom of the frame.
- The double-glazed windows should include anchor plates; they are installed in the grooves of the frame.
- The frames are installed in the openings and fixed using self-tapping screws and anchors.
- Double-glazed windows and sashes are attached in place.
- After this, the window sill is installed and the grooves are sealed with foam.
In order to prevent moisture from appearing on the balcony and retain heat, it is necessary to seal all cracks with sealant.
Plastic frames
Exterior finishing
Everything is a little simpler here; the materials themselves are selected based on design preferences and budget capabilities. You can decorate the balcony with panels with your own hands, the loggia can even be expanded by removing the outer wall, although this can not always be done legally.
It is also necessary to clearly understand whether the loggia will be warm or simply insulated. These are fundamentally different approaches, because simply making a space warmer is not a difficult task, but insulating it in such a way that even in winter you can stand barefoot on the loggia is no longer an easy task.Such insulation is not always possible to implement using legal methods without disturbing the structural features of the house.