With the help of a ceiling plinth, you can easily mask almost all the unevenness and roughness in the work at the junction of the walls and the ceiling covering. To do this, you need to know how to properly install skirting boards. Border, cornice, fillet or baguette - these are all names and types of ceiling plinths. The material used in its manufacture is polyurethane, polystyrene foam or polystyrene foam. Installing a ceiling plinth will help give the interior a finished look. Let's take a closer look at how the installation of ceiling plinths should take place.
Standard length and width of the plinth and its calculation
It is difficult to imagine modern renovations without the use of skirting boards.
Floor and ceiling shaped profiles not only cover joints and hide minor defects, but also complement the interior, giving it a finished look and neatness. And if previously there were 2-3 standard models on sale, today it is already very difficult to choose the right floor and ceiling plinth from all the variety. The sizes, shapes, and color palette are so diverse that you need to know at least the basic parameters.
In the article we will talk about the typical sizes of floor and ceiling planks, how wide a plinth can be, what is the length of the strips, and how to calculate the amount of plinth.
Ceilings
0 votes
+
Vote for!
—
Vote against!
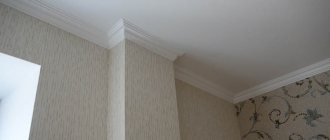
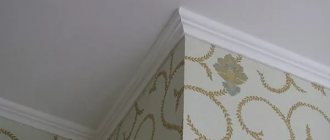
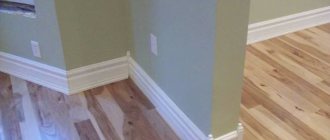
The joint between the wall and the ceiling is most often finished using a ceiling plinth. The main function of this interior element is decorative. There are many options for ceiling skirting boards made of foam, polyurethane, and plastic. Let's look at how to choose ceiling plinths to match the wallpaper and how to properly trim the wallpaper near the ceiling plinth below.
Table of contents:
- Ceiling plinth - functional purpose
- Types of ceiling plinths for wallpaper
- How to choose ceiling plinths for wallpaper
- How to glue ceiling plinth to wallpaper: technology and features
- Installing ceiling plinth using putty
Ceiling plinth - functional purpose
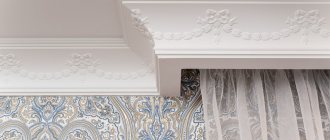
Ceiling plinths were common back in the tsarist era. At that time, they had amazingly beautiful shapes and were quite large in size. European builders were invited to produce such skirting boards. Installing ceiling plinths has the following advantages:
- first of all, with the help of a plinth it is possible to hide communication elements on the ceiling, this could be a cable from a TV or telephone, electrical wiring;
- quite often, in the process of applying putty or gluing wallpaper, defects form in the corners, to hide which the ceiling plinth is used;
- with the help of a plinth it is possible to create a line between the ceiling and walls, visually increasing or decreasing the space of the room.
Wallpaper without a ceiling plinth looks ugly and the room looks unfinished. Therefore, in any case, it is recommended to install even the smallest plinth in thickness.
Types of ceiling plinths for wallpaper
There are many options for ceiling plinths; we suggest that you familiarize yourself with their classification in relation to the materials from which they are made. Let's look at the main types of skirting boards for the ceiling:
1. Foam baseboard.
This option is distinguished primarily by its economical use. foam baseboard is perhaps the cheapest option. In addition, the installation of such a plinth is particularly easy, since a stationery knife is enough to cut the material.
However, such skirting boards have disadvantages:
- low level of fire safety - polystyrene foam is flammable and highly resistant to ignition, so there is a danger of installing it in places where electrical wiring passes;
- low level of mechanical strength - foam plastic products are easy to damage, they are unstable to mechanical stress, therefore such skirting boards are used exclusively in the upper part of the walls, to form their junction with the ceiling.
2. Expanded polystyrene baseboard.
This material has a higher level of hardness than foam products. Among the advantages of polystyrene foam baguettes, we note:
- high level of fire safety - products do not tend to ignite and practically do not support fire;
- high level of strength - this material has a certain strength, so this plinth is not afraid of mechanical damage.
If we compare the price range of skirting boards made of foam plastic and expanded polystyrene, the latter are a little more expensive, however, this difference is not too significant.
3. Wooden baguettes.
When considering wood as a material for making skirting boards, you should determine its characteristics:
- wooden products are distinguished by elitism and aristocracy, a room decorated with such baguettes is distinguished by pomp and chic, especially if the baseboards are made of wood in the form of beech, oak, mahogany;
- the cost of wood products is quite high and is at the highest level compared to other types of skirting boards, however, the more carvings on the wood, the higher the cost of the product;
- processing wooden baseboards requires special equipment, since the process of adjusting the corners involves the use of a file, in addition, to putty the joints of wooden baseboards, you will need a special putty mixture;
- one of the advantages of using wood is its high level of environmental safety; in addition, wooden skirting boards go well with almost any interior, since wood always looks natural;
- However, wooden surfaces are susceptible to moisture and are prone to warping and rotting, so they need careful treatment before installation on the surface.
In addition, when choosing a ceiling plinth, you should pay special attention to the method of fastening the material. To install foam or polystyrene baseboards, simply glue them to the wall using universal glue or putty. In addition, since the material is light in weight, after installing the baseboard it does not require additional holding.
To install a wooden plinth, you should use a hammer drill and special fasteners. Which fix the baguette every 50 cm.
Considering the wallpaper under the ceiling plinth, you should select its width. The minimum value of skirting boards is about one centimeter, and the maximum is more than twenty centimeters.
We suggest that you familiarize yourself with the basic recommendations for choosing a plinth in relation to its width:
- if it is necessary to visually smooth out the corners, we recommend paying attention to a wide version of the plinth, in this case the appearance of the room becomes a little semicircular, in relation to the psychological aspect, being in a room with rounded corners is calming;
- if there are small defects on the wall or ceiling, with the help of a wide plinth it is possible to get rid of them, especially if there are small differences in height, which are most often visible in corner areas;
- if the room has a suspended ceiling, then to hide defects in its installation you will also need to install a wide plinth;
- however, keep in mind the fact that installing a plinth that is too wide makes the room lower and smaller, so when arranging a small room, it is better to choose small-width plinths;
- installing a wide baseboard in a room with low ceilings makes the room visually lower and cramped.
How to choose ceiling plinths for wallpaper
When choosing a ceiling plinth, you should first of all focus on the color of the product. We invite you to familiarize yourself with the recommendations that will help you choose the color of the baseboard in any room:
- if the ceiling is painted white, then the best option would be to install a white baseboard; in this case, you can visually enlarge the room a little, so for a room with low ceilings and a small area, it is best to choose a white baseboard and ceiling;
- if you need to reduce the area of the ceiling, then you can choose a plinth matched to the color of the walls;
- It is advisable to choose a baseboard that matches the main colors of the room, and there should not be more than three of them in the room.
Particularly impressive is the installation of a dark baseboard in a room with light walls and ceiling, thus managing to divide the space. However, such a plinth must be combined with some other objects in the interior, for example, furniture.
Another criterion for choosing a plinth for the ceiling is its shape. When choosing a plinth, you should compare it with the interior of the room. If the room has a sufficient number of bright elements, then the baseboard should be simple. Otherwise, it is better to give preference to skirting boards with a pattern or pattern.
In the Baroque style, skirting boards should have a complex shape, while classic implies simpler shapes. At the same time, a simple plinth is suitable for almost any interior. Therefore, if you are confused when choosing a plinth, give preference to simple shapes. In this case, the plinth will merge with the wall or ceiling and will not attract unnecessary attention.
How to glue ceiling plinth to wallpaper: technology and features
After selecting the ceiling plinth, the installation process follows. When answering the question of whether wallpaper or ceiling plinth comes first, one should proceed from the characteristics of the room. If you glue the ceiling plinth to the wallpaper, then in this case it is enough to use glue or putty. Please note that installing a plinth using glue is only possible if it is made of plastic or polyurethane foam.
This method of installing plinths is simple and quick, so it is widely used when performing finishing work.
If you plan to glue the ceiling plinth first, and then the wallpaper, then in this case you will need to be patient. Installation of skirting boards in this way is carried out exclusively by professionals who have experience in wallpapering and installing skirting boards. In this case, first, all the cracks in the baseboard are sealed, and then the wallpaper is glued.
In order to install the ceiling plinth you will need:
- glue having a polymer base;
- glue installation moment;
- putty, which is mixed with an adhesive base.
It is preferable to use materials when installing the plinth that are recommended by the manufacturer in the instructions for the plinth. In this case, it will be possible to achieve maximum adhesion of the baseboard to the surface of the ceiling and wall.
During the work process you will need:
- stationery knife;
- hacksaws;
- spatula;
- roulette;
- brushes;
- pencils;
- adhesive composition;
- paints;
- sandpaper;
- sealant with a colorless base.
The following is the procedure for determining the number of skirting boards to install in the room. To do this, it is enough to determine the perimeter of the ceiling and, in relation to it, determine the number of baseboards. Purchase material in reserve so that if damaged, you can replace the damaged area.
Preparation for installing skirting boards consists of the following:
- take a piece of paper and a pen, draw the ceiling to a certain scale;
- First, install on the project the installation locations for whole plinths, then place the cut plinths;
- choose the side for laying the plinth, keep in mind that one side of the profile is always wider, while the other side is wider.
The wide side is used to hide defects from wallpapering, if any.
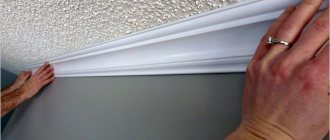
Instructions for installing skirting boards:
1. Trim the corner sections of the skirting boards in accordance with the markings. To do this, use a special tool in the form of a miter box. A plinth is installed in it, and the work is carried out with a hacksaw or a stationery knife. Cut the baseboard in relation to the angle marked earlier.
2. Please note that special attention should be paid to cutting the plinth at an angle, since for protruding corners and for indoor corners, plinths are cut in different ways.
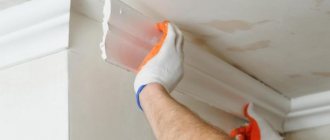
3. Glue is applied to two longitudinal recesses of the plinth. Please note that it should not extend beyond the surface of the outer edges. If there is glue on the outside of the baseboard, prepare a dry rag to remove it.
4. Install the plinth on the wall and hold it for a certain time specified in the instructions for it. Press the baseboard lightly as there is a risk of damaging it.
5. Glue all other parts of the plinth in the same way. To seal the cracks, use a sealant matched to the color of the baseboard.
6. After the sealant has dried, the baseboard is painted in the desired color.
7. To avoid staining the wallpaper with paint, the baseboards are painted before wallpapering. Otherwise, all work should be carried out with extreme caution.
Installing ceiling plinth using putty
Instructions for installing the plinth with your own hands before wallpapering:
1. A special building level and a pencil will help you make markings for installing the plinth.
2. The finishing putty is mixed in accordance with the instructions from the manufacturer. After this, the installation sites of the plinth are covered with a putty mixture.
3. Next comes the process of priming the walls and installing the baseboard. This way, it will be possible to increase the adhesion between the baseboards and the wall.
4. Using a spatula, putty is applied to the wall surface. Next, the plinth is pressed tightly against the wall and held there for several seconds.
5. Using a second spatula, remove excess putty mixture, if any.
6. Putty is also used to coat the cracks between the baseboard and the wall.
7. After the finishing solution has dried, use it to lubricate all the cracks and joints of two baseboards.
8. Next comes painting the baseboards in the desired color.
Instructions for installing the baseboard after wallpapering:
1. To perform the work, use a special white silicone-based adhesive or sealant.
2. On the back side of the plinth, an adhesive solution is applied in the form of a continuous strip.
3. The plinth is pressed tightly against the wall and held for several minutes.
4. If gaps have formed between the wall and the baseboard, then sealant is used to seal them.
5. After the glue has dried, the baseboard is painted using water-based paint of the desired color.
Tip: To avoid staining the wallpaper during the work process, apply masking tape to its surface.
Wallpapering ceiling plinths video:
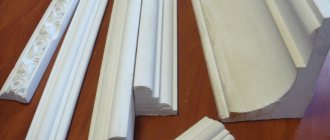
Typical sizes
Before drawing a design project for a room, and at least imagining in your mind how the baseboard will look in the interior, you just need to know what standard dimensions for the width and height of the profile are on sale.
High plinth combined from different materials
Plastic and MDF laminated
The most popular in modern budget renovations are plastic floor skirting boards; they can be considered universal, since thanks to the huge selection of sizes, colors and textures, moldings can be matched to almost any floor covering. Most often, MDF profiles are used for laminate flooring, and plastic ones are used for bathtubs, as they are not afraid of moisture.
The standard length of PVC plinth is 2.5 m. But in the cross section, the profile dimensions have undergone a major transformation. The width of the floor plinth along the lower leg is from 15 to 23 mm. The height of the bar can reach 150 mm. In standard apartments with a ceiling of 2.7 m, plastic floor plinths are most often installed, the dimensions of which range from 55 to 65 mm in height and 23 mm in width; as a rule, these are planks with a built-in cable channel.
The most popular sizes of plastic skirting boards for floors
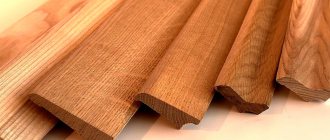
Wooden and veneered models
Wooden models are an unchanging tradition and always a refined look for the interior. And it should be noted that the woodworking industry is trying to keep up with the times, and is no longer limited to the manufacture of fillets with a triangle in cross-section. Today, the market offers a large selection of wide and narrow shaped wooden profiles, the standard lengths of which are 210, 230, 250 and 300 cm. The height and width of the wooden planks is determined by the average size of a typical home. Wide wooden models according to European standards are also produced. The materials and shape largely depend on the manufacturer, but consumer demand coupled with competition sets the standard dimensions for the height and width of the slats.
Wooden plinth, sizes and shape of typical models
Polyurethane, foam, polystyrene
Skirting boards made from modern foam polymer materials have the widest range of shapes, decor and width of the strips. The only thing that can be said with certainty is that with different widths the length of the whip is 2 m.
Attention: As a rule, skirting boards made of polyurethane, foam plastic and polystyrene are used to decorate the joints between the ceiling and the wall, but the polyurethane profile, due to its chemical and physical characteristics, is also in demand for finishing the joints between the floor and the wall.
The narrowest plinth of these materials has a cross-section of 15*10 mm; this model is used if it is necessary to close the joint so that the profile is almost invisible in the interior. More often, for modern renovations, the width and height of the plinth are selected based on the dimensions of the room. The table shows the popular standard sizes of ceiling plinths:
| Room height, m | 3,0 | 2,7 | 2,5 |
| Area, m2 | Width of ceiling plinth, mm | ||
| 25 | 180 and above | Up to 150 | 80 |
| 20 | 150 | 120 | 50-80 |
| 16 | 150 | 100 | 40-60 |
| 12 | 120 | 60-80 | 30-50 |
As for the polyurethane floor plinth, its height and width are identical to their wooden and plastic counterparts, but if necessary, you can increase the size using decorative molding.
Width and height of ceiling fillets made of polystyrene and polyurethane
Other options
In addition to those described above, profiles made of specific materials are now in demand for finishing. So for tiles, the best option is a ceramic plinth; the width of such a border can vary from 2.5 to 10 cm. For plastic countertops, it is advisable to use a PVC profile with a width of 3.0 cm. For stone work surfaces, the standard plinth height is 3.0-5.0 cm, although if necessary it can be cast or cut to any size.
Preparatory work
Ceiling markings
If you already know where you will install the ceiling border, then you need to decide whether there are any unevenness or roughness on the ceiling. You should also not glue the structure where there are curvatures at the junction of the ceiling and wall, because the products may subsequently break. It is best to glue structures of the same length, because it will look much more beautiful than if the ceiling plinths are of different lengths.
Required materials and tools
When installing the ceiling plinth, you will need the following tools:
- a utility knife or a hacksaw may also work
- pencil
- roulette
- rubber spatula
- miter box
- mounting gun
- putty container
Necessary materials:
- directly the ceiling plinths themselves
- putty
- corner mount
- mounting strip
- water-based paint
- assembly adhesive
- acrylic sealant
How to choose a ceiling plinth: types and sizes of fillets
Ceiling plinth completes the design of the ceiling, decorates the room, emphasizes style and helps hide minor imperfections. This decorative element also has many other names: molding, fillet, baguette, frieze, interior cornice. In addition, there is a huge variety of different models on sale. In this article we will tell you how to choose the right ceiling plinth, taking into account the characteristics of the room. Let's look at what fillets are made of, the advantages and disadvantages of each material, as well as the available options for width and texture.
How to choose a surface texture
Depending on the type of surface, ceiling plinths are:
- smooth;
- with grooves and protrusions, for example, in the form of a ladder;
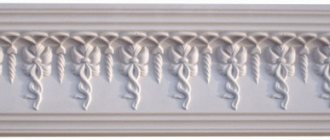
- with complex reliefs, stucco or carved (more often found among wood, plaster and their imitations).
The shape of the plinth is selected depending on the size and style of the room. For low rooms with a modern design, the simplest ones are suitable. Such models are universal and easier to clean, as they do not collect dust and dirt. This quality is especially useful for kitchen baseboards.
For large halls and living rooms, decorated in palace styles, lush and massive moldings with curls and decorations are suitable. Gilding or patina is appropriate.
The remaining options fall between these extremes.
Attention! With elaborate shapes, it is difficult to fit fillets in the corners. For such cases, special curved elements are often produced.
What materials are ceiling plinths made from?
Let's take a closer look at the most popular options. Some of them are modern developments, others relate to traditional, familiar materials.
Styrofoam
This option is popular in budget renovations. Foam plinth is made from polystyrene by stamping.
The following advantages are noted:
- low cost (one of the cheapest materials on the market);
- low weight, facilitating repairs: easy to deliver and install alone (foam plinth is a leader in this indicator);
- many design options - suitable for different styles and sizes of rooms;
- the ability to paint in any color;
- During installation there is no need for specialized tools; it is easy to cut with a stationery knife.
But there are also disadvantages:
- turns yellow over time, it is better to paint;
- fragile, easy to accidentally scratch or push through;
- burn, fire hazard;
- Not all compounds can be glued - many corrode the foam;
- do not tolerate moisture, cannot be used in the bathroom or kitchen without painting;
- it is impossible to get a clear picture;
- You have to trim the uneven edges before installation.
Polystyrene
This material is similar to the previous one, but thanks to other production methods it is stronger. There are the following types of polystyrene ceiling plinths:
- injection;
- extruded;
- laminated.
Skirting material: which is better?
Choosing the baseboard material is another difficult task.
Design hacks
- Plastic skirting boards almost make designers nervous, but they are loved by ordinary people for their low price.
- MDF is a more stylish and less budget solution. Pros: Lots of design options and relative durability. Disadvantages - it requires perfectly smooth walls, and mechanical stress causes noticeable scratches and chips.
- Solid baseboards are an environmentally friendly option, but not the most budget-friendly. In addition, natural wood requires appropriate care. But it never loses its relevance.
- Polyurethane options are the most varied, sophisticated design, but, alas, they are not very practical (they get dirty and retain dents from mechanical stress).
- Metal skirting boards are fashionable, wear-resistant, but expensive and will not fit into every interior style.
Sonya Bjelica, designer (SBstudio):
We must not forget that the type of skirting board must be tied to the style in the interior, not only to the type of floor. Aluminum skirting boards suit modern design very well. They are easy to install and very stylish.
ACV interiors
Instagram @ultrawood.ru
Standard plank sizes
Typical size of wooden edging decor
The standard is a wooden plinth, the dimensions of which are 40 * 22 * 2500 mm. It is usually used in low, small rooms when performing budget renovations. For spacious apartments, you can choose a slightly higher decor from 60 mm. The width of the baseboard for non-standard flooring varies from 15 to 25 mm.
A very convenient flat wooden edging decor is also available in terms of saving space. The width of its base is usually 16 mm, and the height can vary from 80 mm to 120 mm. There is also a 300 mm high plinth on sale.
Tip: For very small rooms it is best to use a narrow version from 30 mm to 35 mm. If the store does not have such a model, you can order it from the workshop.
The most commonly used wooden floor skirting boards. Standard dimensions - 22*40 mm
Standard size of PVC planks
Plastic edging decor does not have such a variety of sizes as wooden ones. However, this type of plank can be either standard or non-standard. Plastic floor plinth, the dimensions of which are 51*21*2500 mm, is used most often and is considered standard. Typically this option comes with a cable channel.
Planks with a height of 5 cm to 6.5 cm are also very common. The length of PVC skirting boards is sometimes 2000 mm.
Standard PVC plinth. Its dimensions are 21*51 mm
Dimensions of ceramic planks
Ceramic baseboards for a bathroom or kitchen, as well as countertop strips made of natural or artificial stone, usually have the same length as the tiles or stone tiles themselves. The height of a ceramic skirting board can be different and depends on the specific type of tile.
The size of the ceramic strips matches the size of the tile itself
Polyurethane option
Since polyurethane floor decor can have a wide variety of designs, there are no standard sizes. The width of the planks ranges from 10mm to 3 cm. The standard length is 2500 mm. As for flat planks, in interiors you can most often see decor with a height of 70 mm-150 mm. The width of the polyurethane ceiling plinth is usually the same.
Note: The standard length of the ceiling fillet is 2 m. But if you wish, you can also find options 2600-2700mm. This type of plinth is faster to install.
Polyurethane strips can have a variety of sizes
Dimensions of foam fillets
Ceiling foam and polystyrene foam baguette can also have a variety of sizes. The length of the standard version is 2 m. The smallest baguette can have a height of only 15 millimeters. Wide ceiling plinths (up to 130 mm) are also available. The thickness of such planks is usually 15-85 mm. For a large room, you can also purchase a thick 100 mm baguette.
Foam ceiling plinth, the dimensions of which (width and thickness) can be very different, has a standard length of 2 m
Application area
wide baseboard design with pattern
Before you buy a ceiling plinth, think not only about its materials, patterns and colors, but also how it will be used. Designers give several recommendations in this regard:
- PVC moldings are best combined with suspended ceilings or used with plastic panels. Such products may contain special holes for ease of installation;
- Foam products are used where materials such as plasterboard, plywood, etc. are used. They can be easily painted or puttied, setting the tone and texture. They can not only be glued, but also mounted using plaster;
- If you can find elements of plastic or plaster in the interior of the room, then a plastic plinth for the ceiling is perfect for it. They are easy to attach, the main thing is to choose the appropriate glue or putty option.
- Polyurethane ceiling plinths are used everywhere due to their high levels of flexibility and hardness. Because of this, they are often used in unusual architecture with many curves;
- Gypsum ceiling plinths go well with classic interiors. They can be used to decorate not only the ceiling, but also to pay attention to individual areas: window openings, doors, creating niches, aprons, etc. Such products are placed on a putty solution.
- Wooden fillets must be secured with glue and fasteners. They are great for rooms where there are other wooden elements.
Calculation of planks
How to calculate the consumption of slats? In order to find out the required number, you should measure the room around the perimeter. To the resulting figure we add another 2 m for reserve. Since the usual dimensions of a plastic floor plinth are 2.5 m, in this case we divide the final result by 2.5. The standard length of a ceiling fillet is 2 m. Therefore, when calculating the required number of planks, we divide the perimeter of the room by 2.
To perform a more accurate calculation of the material, it is worth drawing a room plan
For a wall with one doorway, you will have to buy two end elements. Calculating how many connecting elements are needed is also easy. For a wall 2.5 m long, a connector is not needed. For a 5 m wall you will need 1 and so on.
Recommendations from design experts
wide plinth with a three-dimensional pattern for classic interiors
Among the latest recommendations, I would like to highlight a few simple rules that will help you avoid mistakes when choosing a suitable ceiling plinth for ceiling lighting for rooms with different interiors:
- if the interior is overloaded and has many decorative elements, then you should choose the simplest baseboard options so as not to draw attention;
- antique patterns and wide plinth sizes will look best in interiors with a hint of antiquity, the scope of Rococo, Baroque or Renaissance;
- For a strictly, simple space, it is better to choose wooden baseboards. They look good in rooms with English restraint. They are often used in offices, libraries or purely masculine interiors;
- wide and voluminous fillets are ideal only for spacious rooms with good ceiling height. Small options in such spaces will simply disappear visually;
- wide fillets can also be used to hide repair defects: fasteners, large spaces at joints, torn and uneven edges;
- The highlight of the space in panel houses can be moldings in areas with height differences. They will perfectly hide unevenness and make the room original and beautiful;
- built-in lighting and joints of suspended ceilings can become more harmonious when installed in a room due to the properties of the baseboards and their additional characteristics;
- “The effect of a real sky above your head” can be created if you make the walls, ceiling and baseboard in the same color in a small room (for example, a nursery or an office).
Ceiling plinth: sizes, colors, types
In most cases, ceilings after cosmetic or major renovation of a room are framed with baseboards. This not only allows you to decoratively separate this plane of the room from the rest, but also emphasizes its individuality and a certain style of the room. And correctly selected baguettes add volume to the space.
From this article you will learn about the varieties of these products, how to choose a ceiling plinth to complete your interior design, and our gallery will demonstrate examples of successful room decoration using baguettes.
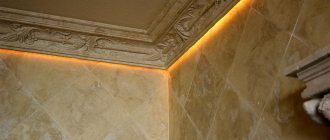
Choosing decoration and print for the ceiling plinth under the LED strip
ceiling plinth with lighting
Smooth curves and interesting weaves make a simple plinth an original and stylish decoration for the room. They are often used:
- Stucco molding. Such decoration came to us from antiquity; it is respectable and sophisticated. Stucco molding fits perfectly with classics and aristocracy.
- Supplements Otherwise they are also called inserts. They can be monochromatic, but voluminous, or specified in color (silver and gray, gold and white, etc.). The inserts should match the walls or interior of the room.
- Patterns and ornaments. This solution makes the surface of the skirting boards very elegant and graceful. The patterns make the combination of fillets and space look unified.
- Zigzag or ladder. The simplicity of the volume fits perfectly into the space and helps achieve the desired dynamics in the interior.
ceiling plinth for the ceiling with hidden LED lighting
These elements of the ceiling plinth for lighting make the space of the room more harmonious and original. Thanks to patterns, it is possible to add a special zest to the space and create a spectacular mood.
Types of ceiling plinths
The main criterion by which the classification of ceiling moldings is carried out is the material of their manufacture. These products can be:
- from foam plastic;
- polystyrene foam;
- semi-urethane;
- from PVC (polyvinyl chloride);
- plaster;
- wooden.
Each of these types has certain technical characteristics and creates different ways to decorate the surface.
Foam ceiling plinth
If you want to carry out repairs at minimal cost, then pay attention to foam products. The material is affordable, can be easily cut to the required size, and comes in various configurations (can imitate stucco). But its main disadvantages are flammability and low strength.
Most often, this plinth is used for finishing suspended structures mounted from plasterboard, as well as various false ceilings. It is installed during the process of starting to putty the room (using the same solution).
Foam ceiling plinth lends itself perfectly to painting
Polystyrene baguette
Polystyrene or extruded polystyrene foam is an analogue of polystyrene foam, only this material is more durable and does not ignite. The cost is slightly higher than polystyrene foam, but belongs to the average price category.
Ceiling plinth made of polystyrene can be used on both plaster and plastic finishes. Expanded polystyrene baguettes are attached to special glue or gypsum mortar (depending on the surface finishing material).
Decorating the premises with polystyrene foam ceiling plinths
Products made of polyurethane
Those who cannot afford expensive plaster molding can replace it with polyurethane (PPU) baguettes. These products are very flexible, capable of taking on various shapes, framing figured ceilings and columns.
Most often, polyurethane ceiling plinth is used to decorate plastic surfaces, as well as PVC lining. It is attached using special glue.
Polyurethane foam products are ideal for decorating semicircular surfaces
PVC ceiling plinth
Plastic products (polyvinyl chloride) for ceiling decoration are most often used along with homogeneous PVC lining. The plastic ceiling plinth not only serves as decoration, but also serves as a profile into which the lining is inserted.
Plastic ceiling plinth, photo
These baguettes are very flexible, and the variety of colors allows you to match them to any type of ceiling decoration. They also contain decorative elements - gilding, holographic inserts.
PVC ceiling plinth with gold edging around the edges and a hologram
Gypsum fillets
Products made from gypsum are traditionally characteristic of the classic style of interior design. Gypsum moldings have been used for room decoration for a long time and today they are used to frame figured moldings, as an artistic element in the overall decorative composition. Ceiling plinths made of gypsum can be of different sizes, have different patterns, and you can paint them yourself. They are attached using putty or alabaster.
Among the advantages of gypsum products are their environmental friendliness, high quality, individuality, and durability. Disadvantages include significant weight, fragility, and high cost.
Exquisite bronzed gypsum ceiling plinth in the interior
Wood products for ceiling decoration
Wooden ceiling also belongs to the classic decorative elements. It is mainly used for framing floors, but for ceilings such a fillet is appropriate only when there are other wooden elements in the room.
Wood in the interior is a sign of aristocracy. This eco-friendly material is strong and durable. Disadvantages of wooden skirting boards: difficulty in processing, susceptibility to rotting, mold, drying out. There may also be bugs in the tree.
Advice: before installing wooden fillets, they should be pre-treated with an antiseptic and coated with a protective varnish. This will extend their service life.
According to the price category, wood products can be divided into two groups: expensive ones made from valuable species (oak, cherry), and an economical option (made from pine, spruce). Wooden ceiling plinths are attached using screws, as well as metal and wooden nails.
A wooden ceiling plinth will be appropriate in a classic design style along with other wood elements
Cutting the baseboard
In order for the products to be perfectly evenly joined at the corners, it is necessary to very accurately and extremely carefully cut the corners of the product. A miter box is useful for precise cutting. A miter box is a carpentry device designed for cutting material at an angle of 45°. Rule: before adjusting the length of the plank, you must first trim the corner.
There is a high probability that ceiling plinths, which are installed independently, will have an asymmetrical shape, i.e. one side will be longer than the other. And therefore, the long side of the structure should be mounted on the wall, and the short side on the ceiling. This is the technology that will provide the best results.
When all the corners in the room are even, this process happens much faster. You should trim the cornices using a sharp knife and a miter box.
What to do if the room has not very right angles? This is where a pencil comes in handy, not a miter box. You will need to attach the ceiling plinth to the wall, the installation of which is planned, and draw a line with a special pencil along the sides to the very corner, you will get 2 straight stripes. After this, you need to attach the structure to the adjacent wall and draw 2 additional lines.
To begin with, you should mark these points on the walls and ceiling, and then, applying the products, transfer the points to it.
There is no need to complicate your work by calculating the angles; it will be enough to just buy corner fasteners for the cornice. The edges of the product must be inserted into it without precise cutting. It is best to trim at the outer corners, leaving a few millimeters in reserve. Those corners that are too noticeable need to be puttied with acrylic sealant, and only then touched up.
How to glue ceiling plinth to wallpaper: development and features
After selecting the ceiling plinth, the installation process begins. When answering the question of what wallpaper or ceiling plinth comes first, proceed from the highlights of the room. If you glue the ceiling plinth to the wallpaper, then under such conditions it is sufficient to use glue or putty. Please note that installing the baseboard with glue is only possible in this case, when it is made of plastic or polyurethane foam.
This method of installing skirting boards is simple and quick to perform, which is why it is widely used when performing repairs.
If you plan to glue the ceiling plinth first, and then the wallpaper, then in this case you will need to be patient. Installation of skirting boards in this way is carried out only by specialists who have experience in wallpapering and installing skirting boards. Under such criteria, first, all the cracks in the baseboard are sealed, and then the wallpaper is glued.
To install the ceiling plinth you will need:
- Glue having a polymer base;
- Glue moment of installation;
- Putty, which is mixed on an adhesive base.
It is better to use materials during installation of the plinth that are recommended by the manufacturer in the instructions for the plinth. Under such criteria, it will be possible to achieve enormous adhesion of the baseboard to the surface of the ceiling and wall.
During the work process you will need:
- Stationery knife;
- Hacksaws;
- Spatula;
- Roulettes;
- Brush;
- Pencils;
- Adhesive composition;
- Paint;
- Sandpaper;
- Sealant with a dull base.
Later, the procedure for determining the number of skirting boards to be installed in the room will be carried out. To do this, it is enough to find out the perimeter of the ceiling and, in relation to it, find out the number of baseboards. Receive the material with supplies so that if damaged, you can replace the warped area.
Preparation for installation of skirting boards is as follows:
- Take a cardboard sheet and a pen, draw the ceiling to a certain scale;
- First, establish on the project the installation locations for whole skirting boards, and then place the cut skirting boards;
- Choose the side for laying the plinth, keep in mind that one side of the profile is always wider than the other.
The wide side is used to hide imperfections from wallpapering, if any.
Note on installing skirting boards:
1. Trim the corner sections of the skirting boards in accordance with the markings. To do this, use a special tool in the form of a miter box. A plinth is installed in it, and the work is carried out with a hacksaw or a stationery knife. Cut the baseboard in relation to the angle marked earlier.
2. Please note that special attention should be paid to cutting the plinth at an angle, since for protruding corners and for corners in rooms, plinths are cut in different ways.
3. Glue is applied to two longitudinal hollows of the plinth. Please note that it should not extend beyond the surface of the outer edges. If there is glue on the outside of the baseboard, prepare a dry rag to remove it.
4. Install the plinth on the wall and hold it for a certain time indicated in the annotation to it. Press the baseboard lightly as there is a risk of damaging it.
5. Glue all other parts of the plinth in the same way. To seal cracks, use a sealant matched to the color of the baseboard.
6. After the sealant has dried, the baseboard is painted in the desired color.
7. To avoid staining the wallpaper with paint, the baseboards are painted before wallpapering. Otherwise, carry out all work with extreme caution.