Floor skirting boards are supplied in various modifications and sizes, can have special grooves for cables, can be pre-painted in basic colors or specially unpainted for special design solutions. The most common materials for making skirting boards are the following:
- High strength polymer
- MDF
- LDF
- wood
Each material has characteristic properties and differences in price range. Modern designers are increasingly choosing wooden floor plinths, which are considered more environmentally friendly and look luxurious in any room. MDF and LDF are board materials made from pressing natural wood fibers and shavings. They are considered cheaper, but have a beautiful aesthetic appearance and high technological characteristics.
Material characteristics
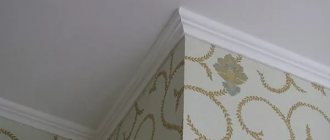
From the name of this building composition it is already obvious that its direct purpose is to seal gaps and cracks between any building structures. In our case, these structures are sections of ceiling fillets. It is especially important to seal the joints at the corners - this is where cracks and unsightly gaps can most often form. After treatment with sealant, the overall appearance of the ceiling finish becomes complete, and the whole job looks neat. In addition, the sealant ensures the surface treated with it is impermeable and protects against moisture getting under the baseboard. This material can be used with skirting boards made of any materials: wood, plastic, PVC, polystyrene foam, polyurethane.
Making the right choice of acrylic sealant
The manufacturer offers several types of sealant, for example, for windows, doors, or universal, and the consumer cannot always determine which one is right for him. The difference between them is small, but there are still some differences:
- for materials that have minimal adhesion to sealants, for example, PVC or polycarbonate, it is necessary to purchase special compounds or additionally use a primer as a binder;
- In an aggressive environment, only fungicides dry. This sealant cannot be used in the kitchen and other places where there is contact with food;
- Aquariums are sealed using a product that is resistant to aggressive environments, but at the same time safe for fish and other organisms;
- cracks in stoves, fireplaces and other structures with elevated operating temperatures are sealed with a sealant that is resistant to heating up to +300°C. Some compositions can withstand heating up to +1500°C and are considered fireproof;
- Even if it is written on the packaging that the product is moisture resistant, it is not recommended for use for sealing windows from the outside.
When purchasing any of the materials, you need to inquire about the quality certificate and carefully study the instructions on the packaging. The manufacturer usually indicates the purpose of the sealant, how long it takes to dry and other characteristics.
Sealant as an alternative to glue
As a rule, skirting boards are attached using construction adhesive or a material called final putty. Sealant is usually used as a finishing material in the final installation of fillets on the ceiling. However, sealant can do the entire job.
First, let's say a few words about preparing for work. To carefully glue the plinth, you need to clearly join it at the corners, for which you need to correctly make cuts at the ends of the corner sections. In principle, there are ready-made corners, but they are most often designed for standard 90-degree angles.
In short, for the correct cut you need to measure the angle of convergence of the walls, divide the resulting value in half and cut the baseboard at this half angle. You can use different tools depending on the density of the material - from a stationery knife to a grinder. For more precise work, they also use a special tool for cutting at an angle - a miter box.
Before you start gluing the baseboard with sealant, you must also make sure that the surface of the walls and ceiling is leveled, primed and completely processed so that there are no uneven spots, gaps or crumbling areas.
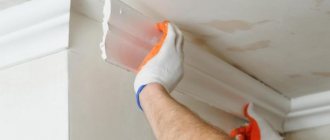
The place where the baguette will be directly attached must be moistened with water: this will prevent the sealant from drying out too quickly. Then apply a small amount of the composition to the fillet. It can be applied only to the part that is directly glued to the wall, but if the ceiling is not suspended, the sealant can be applied to both sides. After this, you need to press the plinth tightly against the wall and fix its position. The sealant will set very quickly on both surfaces, so you won’t have to stand for a long time with your hands raised under the ceiling. Residues crawling out from under the fillet must be cleaned with a spatula, and at the joints, on the contrary, everything should be treated with sealant again.
Bonding procedure
Before starting work, it is important to choose a high-quality adhesive composition. It is liquid nails that are considered universal; in their absence, replacement with glue 88 is allowed. It can also glue most known materials, while being moisture resistant. Among liquid nails, you should choose such as “Tytan”, “Moment Montazh”, “Antia”, “Dragon”, “Crass”, “Master Klein” in cylinders. “ProfiMaster” has also proven itself well, sold in 1-3 kg jars.
In order to glue the baseboard to the floor and wall, you will need a number of tools:
- roulette;
- nozzle-gun for liquid nails in a cylinder;
- hacksaw;
- hammer;
- rubber spatula;
- knife.
To make the task of inserting fillets in corners easier, you can purchase a miter box, but this is not necessary. It can be replaced with a self-made template, according to which markings are applied. There are self-adhesive fillets, they are even easier to install and the process takes a minimum of time.
Is it possible to replace the baseboard without damaging the wallpaper? Yes, it is possible to attach it between the floor and the wall without harming the wall decoration. If you plan to re-glue the wallpaper in the near future, it is better to hold off on attaching the baseboard. Otherwise, you will have to tear it off, which can damage it irrevocably (this is especially true for wooden products).
To prepare, you should completely clean the area where the wall and floor meet, remove dust and other contaminants. Skirting boards are measured and marked according to the length of the walls. It is imperative to take into account protrusions and corners, otherwise there will be big problems during the installation process.
Wooden skirting boards
Nowadays, wooden products are used much less frequently than plastic ones. It is desirable that the material be the same as the floor - natural skirting boards look ideal on parquet flooring made of the same type of wood. If desired, you can lay them on boards, laminate, or linoleum. After purchasing glue and tools, you should cut the baseboard correctly. A hacksaw is suitable for this purpose. This is done immediately after measuring the length of the walls of the room.
Skirting boards are cut into strips of the required size. When cutting external or internal corner joints, this must be done at an angle of 45 degrees. First, they cut it off from the first piece, then join it to the adjacent one. Holding it with your hand, cut out the edge so that when a corner is formed, no gap appears.
Next you can start fixing:
- take one piece, turn it towards you with the side that will be in contact with the wall and floor;
- apply glue drop by drop at a distance of 3-5 cm from each other, this applies to elements that are small in width;
- wider ones are coated with the adhesive composition in waves, without tearing, this will make adhesion quite reliable;
- if indicated in the instructions, you need to wait a certain time for the glue to “weather”, but this is not always required; more often, liquid nails allow you to immediately lay the product against the surface;
- Direct gluing should begin from any corner, preferably from the side of the largest wall;
- you need to glue it to the wall carefully, it is advisable to do it exactly right away, especially in height - otherwise there will be glue stains on the wallpaper;
- press the plinth, hold it for a few seconds (as indicated by the manufacturer), this will speed up the fixation;
- usually after 10-15 minutes it sits tightly, the composition dries out;
- then repeat the installation for the remaining parts around the perimeter.
We recommend: Specifics of working with TechnoNIKOL 500 Professional foam adhesive for expanded polystyrene
It happens that a little glue gets on the front side of wooden products. Liquid nails are difficult to clean after hardening, so they must be removed immediately with a wet cloth. It is also possible to scrape off the composition with a rubber or other hard spatula. Using the same tool, take glue at the end of the work and fill the joints with it.
Plastic skirting boards
It is necessary to glue plastic skirting boards much more often; they are popular decorative elements in apartments and houses. The products are very functional; in most of them you can hide a cable or even bundles of wires. There are these types of skirting boards:
- universal – for laminate, wood, tile, linoleum;
- under the carpet (they have an L-shape, they press the covering tightly, preventing it from rolling).
Plastic skirting boards come in different hardnesses. Made from foamed PVC, they are not very durable and break quickly. Even less reliable are hollow ones made of the same material. Products made from semi-rigid PVC are more flexible; they are sold in the form of tape in a roll.
Any type of skirting boards must be fastened using the same technology. It is somewhat different from the installation of wooden elements. Before gluing, you must carefully measure the length by placing the skirting boards on the floor and mark them. This is done taking into account the decorative fastening elements (joints), which must be immediately installed on the baseboard. The same is done with the corners - they are immediately placed on the bar.
You can attach plastic parts to the floor like this:
- glue is dripped onto very thin, narrow pieces every 10 cm;
- if the length of the plinth is short, gaps of 4 cm are sufficient, if there are protrusions or complex transitions - 1-2 cm;
- glue is applied to wide or thick ones in waves;
- joints and corners must be coated - under mechanical stress they come off first;
- when the plinth is made up of two parts and a latch, only the main part is treated with glue.
It is important that the wall and floor at the gluing site are clean; dirt impairs the quality of adhesion. Start work from the corner and continue until the entire room is covered. Finally, wipe the baseboard with a wet sponge to remove all traces of adhesive.
Self-adhesive skirting board
This type of plinth has appeared on the construction products market recently, but has already gained popularity. It is intended for beginners in the renovation business, for those who want to save time on arranging the floor. Even smooth walls are not needed for its installation; it can be mounted along moderate “waves” of the surface. This type of finish looks best with linoleum and laminate.
The distinctive qualities of self-adhesive plinth are:
- base material – aluminum or polyvinyl chloride;
- can be used in offices, apartments, houses, it is better to use in large premises;
- installation is very simple;
- all kinds of colors, there are materials for different types of wood, natural stone;
- the cost is low, repairs will be budget-friendly.
Thanks to bending, the plinth can be glued in any place, even hard-to-reach places. Its individual parts are attached using conventional connecting elements. Some manufacturers produce products that require additional fastening with masking tape. Others have a protected adhesive strip on the back. You need to glue them exactly right away; separating them from the wall is problematic.
The operating procedure is as follows:
- clean the surface well, remove dust, dirt, if necessary, degrease with alcohol;
- make marks for the locations of the skirting boards;
- remove protection from a small area;
- press against the wall, smooth it with your hand, immediately adjusting the position relative to the floor and wall;
- continue installation, gradually tearing off the protective tape, pressing the strip;
- upon completion of work, cut the material;
- Some skirting boards do not even require corner joints; they bend easily.
We recommend: What is temporary adhesive, where and how is it used?
After covering the room with such a skirting board, you can wash the floor in the usual way. There is a durable protective film on the surface of the product. The service life of the products is long; in case of partial detachment, problem areas can be glued with liquid nails.
Advantages of working with acrylic sealant
When gluing and final processing of the baseboard using acrylic sealant, the reliability of the work increases several times. The material is attached to the ceiling and wall very firmly, and thanks to the properties of the sealant it becomes even more resistant to moisture, acids and salts, and temperature changes. Skirting boards treated with sealant will not deform or deteriorate in the bathroom or in extreme heat.
Due to its elasticity, acrylic sealant allows the seams to move slightly without forming cracks or voids.
White sealant can always be painted or applied by mixing it with a dye of the desired shade.
Additional Information:
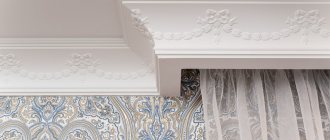
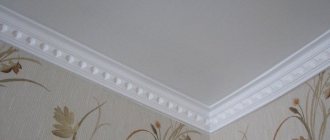
Using a ceiling plinth (fillet, baguette, molding, ceiling cornice) you can hide small surface irregularities and visually differentiate the wall and ceiling. Those who want to carry out the installation themselves have questions - how to glue the ceiling plinth, what kind of glue to choose, can it be glued to all surfaces? Here we will look in detail at all the features of fillets and the intricacies of working with them.
To start gluing the baseboard correctly, you need to prepare the tools and choose the installation method. It depends on two components:
- the material from which the plinth is made;
- surface, but which will be installed.
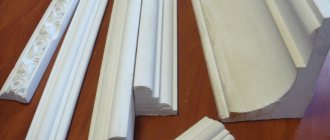
When buying a fillet, check with the seller what material it is made of. Currently the following types of ceiling plinths are produced:
- plastic;
- from expanded polystyrene;
- from foam plastic;
- wooden;
- gypsum;
- polyurethane.
If pasting will take place over wallpaper, give preference to lightweight materials. If the room has a complex architectural shape, with curved walls, it is better to purchase polyurethane moldings - they are flexible and will easily follow the geometry of the walls.
Types of acrylic sealants
There are 3 types of acrylic, which determine their scope.
Non-moisture resistant acrylic sealant
Sealants of this class are used for interior work in rooms with a minimum level of humidity. This includes glue for ceiling plinths, as well as compositions for application to wood, plasterboard, concrete, and brick. It is impossible to increase the humidity indoors until the composition has completely dried.
Moisture-resistant acrylic sealant
It is better to use a waterproof composition in the kitchen or bathroom, where the humidity level is high. Substances containing glue are more resistant to temperature changes and moisture, which ensures good adhesion to the surface. Waterproof acrylic has excellent adhesion to wood, ceramics, foam concrete, and the surface can be smooth or porous. Despite the fact that the sealant is waterproof, it should only be applied to a dry surface and preferably indoors.
Frost-resistant acrylic sealant
The composition for outdoor use is resistant to aggressive environments and low temperatures. Frost-resistant sealant is more elastic than analogues for interior work. The optimal operating temperature range is from -20°C to +70°C. Under such conditions, the exterior composition will maintain the integrity of the seams after numerous freezing and thawing cycles. Frost-resistant sealant is well suited for sealing seams between logs of wooden buildings. The glue included in the composition adheres well to the wood, forming a hermetic joint.
Acrylic sealant, color difference
The appearance of the product can be transparent, white or colored. For plumbing fixtures, white is considered the traditional color, as it matches most products, for example, sinks, bathtubs, toilets, etc. The transparent option is considered classic due to its extensive use. The colorless seam is not visible on any colored surface, which makes it possible to seal cracks in any materials without limitation. If you want to highlight a joint or select a shade to match a certain color of an object, use a color composition. The most popular sealants are those that imitate the color of wood. For example, cherry or oak shades are popular for sealing seams between logs.
Choosing the installation method and glue
Fixation can be done with self-tapping screws or using various adhesives. Nowadays the following are used for baguette installation:
- acrylic putty;
- acrylic liquid nails;
- neopropylene liquid nails;
- silicone sealant;
- liquid plastic;
- glue for polyurethane;
- PVA based adhesive mixture.
The most common ones now are moldings made of polystyrene foam and polystyrene foam. They are light, compact and inexpensive. Due to their low weight, they are attached using glue, without additional mechanical fixation. How to glue foam ceiling plinths? It is best to do this with acrylic putty, an adhesive mixture with PVA or silicone sealant (for wallpaper). Liquid nails can cause deformation of the foam, so their use is not recommended.
Plastic moldings can be “planted” on any liquid nails if they are glued on top of wallpaper, or on putty if the decorative finish of the wall is plaster. PVC skirting boards can be fixed using liquid plastic.
Heavy polyurethane moldings are attached using a special glue for polyurethane or universal glue. Small skirting boards can also be attached to liquid nails.
Gypsum baguettes are attached with an alabaster-based adhesive solution with the addition of PVA glue. Massive and heavy elements must be additionally fixed with self-tapping screws.
Wooden ceiling cornices are most often used if the wall decor also contains wood or its imitation. Installation of wooden moldings is carried out to wooden blocks (triangular in diameter). Small skirting boards made of light or very light wood (pine, alder, fir, cedar) are sometimes glued to liquid nails. But in this case, when the humidity in the room changes, the wooden elements may “lead”. Attaching it to wooden blocks located every half meter prevents this from happening.
Methods of fastening skirting boards
The main purpose of a floor plinth is to hide the gaps between the wall and the floor covering. The room takes on a finished look. There are the following fastening methods:
- Screws or nails.
- Anchor or clip connections.
- Use of adhesives.
- Using self-adhesive tapes.
Of the methods listed, the fastest and least labor-intensive method is the use of high-quality glue or “liquid nails.” This allows you to securely fix the structure without damaging it. This method is especially justified when working with wood, since careless use of screws or nails can lead to cracking of the wood.
Important! There is a condition for successfully gluing the baseboard. The adjacent wall must be perfectly aligned. If this condition is not met, the fixation will be very weak, and the plinth will soon fall off.
Preparing the tools
Having figured out the installation method, we move on to preparing the tools.
Before you start gluing the ceiling plinth, prepare the following tools.
- For cutting: a construction knife for polystyrene foam or polyurethane, a hacksaw for metal or a fine-toothed hacksaw for plaster, a hacksaw for wood for a wooden ceiling cornice.
- For marking: level, pencil, ruler, tape measure.
- For cutting skirting boards at an angle: miter box.
- For installation: glue brush, putty spatula, screwdriver, drill, dowels and self-tapping screws for heavy moldings.
How to glue a cornice onto putty: step-by-step instructions
- Mark the border of the plinth on the ceiling using a level and a pencil.
- Take measurements along the perimeter of the room (each side is recorded separately).
- Calculate how many whole strips go on one wall and how long the piece needs to be added.
- Make markings on the baseboard and cut pieces to the required length.
- Place the prepared elements on the floor around the perimeter of the room, and if everything fits, proceed with installation.
- Mix the putty according to the instructions.
- Apply a thin layer of putty to the places where the cornice will be attached.
- Apply putty (thickly) to the back of the fillet.
- Moisten the putty areas on the ceiling and wall with primer.
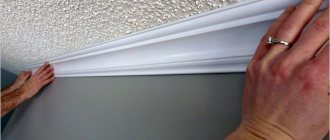
- Press the prepared plinth against the wall, and remove the putty that protrudes beyond its borders with a spatula. You need to start from the corner, and apply the next piece to the one already glued.
- If gaps have formed, fill them with putty.
- After the putty solution has dried, it is necessary to cover the joints and crevices with the same solution.
- The skirting board can be painted after it has completely dried.
After wetting with the primer, subsequent actions must be carried out quickly so that the surface does not dry out.
Gluing process
Gluing the cornice There are two methods of gluing the baseboard to the ceiling.
- A faster option: the cornice is glued after finishing the walls and ceiling with glue.
- Before finishing the walls: the stucco molding is attached to putty or acrylic sealant after leveling and priming the walls. This option is better because the cornice will fit most tightly to the wall, and during the next repair there will be no need to tear it off.
Glue mounting
- We begin the installation with measurements. Usually, gluing fillets (as professional builders call plinths) starts from the corner of the room.
- The first part needs to be cut from the corner of the room using a miter box and a hacksaw. The angle of the cut should be exactly 45° and have a slight slope towards the front or back side (read more about how to cut an even angle).
How to cut skirting boards for corners To create an external corner, the top edge should protrude above the bottom, and vice versa for an internal corner. The joining of two cornices along the length occurs at right angles without additional trimming.
For more information on joining the corners of the plinth using a miter box, watch the video.
- Apply glue evenly to all adjacent surfaces of the baseboard, except the joints. Press the baseboard into the corner and hold it for a minute, but do not press too hard.
- Glue the next corner piece and move further in a straight line. Remove any glue stains with a soft cloth.
- Seal the cracks with sealant.
For easier connection of corners, you can use corner pieces made of the same material as the cornice.
Pasting on putty or sealant
The process is almost the same, but you additionally need to prime and level the surface.
- Treat the gluing area with a primer.
- Dilute the putty and use a small spatula to apply a thin layer of it to the back side of the cornice.
- Remove excess putty and seal the cracks. Also caulk all joints.
- After the putty has dried, seal the cracks again.
Gluing the cornice with acrylic sealant is much simpler, but requires additional investment. For a room of 20 m², two packages of sealant will be enough. You will also need a mounting gun. The gluing is done in the same way as for putty. The cracks are sealed with sealant with wet hands.
After gluing is completed, the stucco molding can be painted with water-based paint with the addition of a color to match the color of your interior.
Take the time to protect adjacent surfaces with masking tape when painting. To highlight the relief, paint the protruding parts in a contrasting color. Read also: Day-night curtains: criteria for the right choice
How to glue ceiling plinths in corners?
The easiest way is to buy internal corners along with the molding. They are sold 4 per pack, so it's convenient for a standard room. If the room has not only internal, but also external corners, then you need to purchase external corners as well. The corners are glued in the same way as a straight strip of cornice.
Sometimes it is impossible to select the corners of the desired pattern; is it possible to glue the molding in this case? If you have a miter box, then cutting the cornice at the desired angle is not difficult. To do this, a strip of cornice is placed in a miter box and a cut is made at an angle of 45º. It must be taken into account that for internal corners the cut goes from the back to the front part, that is, after the cut, the back part should be longer. And for external corners, on the contrary, from the front to the back.
Features of wallpapering
It is preferable to glue any cornice not to wallpaper. On wallpaper (on top) only installation using self-tapping screws or gluing of lightweight foam or polystyrene baseboards is allowed. If the wall is already decorated with wallpaper, but polyurethane or gypsum ceiling moldings still need to be “planted” with glue or putty, then you need to cut a strip of wallpaper at the top, slightly narrower than the width of the baseboard (the shelf adjacent to the wall). Then pasting is carried out in the usual way.
A lightweight foam plinth can be glued on top of wallpaper, but in this case the answer to the question of what glue to use to glue the ceiling plinth will be different. Here it is better to use white silicone sealant, PVA-based glue or polyurethane glue.
The gluing technology is simple.
- Apply glue to the wrong side in a continuous strip.
- Press the baseboard into the corner between the wall and the ceiling and hold it in this position for 1 minute.
- If there are cracks or gaps, cover them with silicone.
- Apply sealant to the side (where the strips meet) and glue the next part of the baseboard.
To protect the wallpaper from getting glue or sealant, cover the strip near the baseboard with masking tape before work.
The difference between acrylic sealant and silicone
When choosing an acrylic sealant, it is often compared with other analogues. For clarity, let's try to find differences with silicone:
- In terms of popularity, silicone sealant outperforms its friend, but is significantly inferior in cost. In addition, acrylic can be painted after drying, but silicone cannot;
- Silicone has better moisture resistance, and the acrylic product contains antifungal additives that prevent black mold from developing on the seams;
- acrylic dry joint can be updated. This option will not work with silicone;
- The aesthetics of acrylic seams is higher. Even a clear silicone joint produces a visible white stripe;
- Any beginner can work with the acrylic composition, since the defect is easily washed off with water or cut off dry with a knife. The silicone first has to be cut off, and then the remaining traces have to be washed off for a long time with solvents and various removers.
When using acrylic, you must remember that, like other materials, it has its own areas of application.
How to glue ceiling plinth to a stretch ceiling?
In fact, the plinth does not stick to the suspended ceiling. Its fixation is carried out only to the wall, but at the same time the molding successfully closes the gap formed between the ceiling and the wall after installing the film. In principle, the entire process of gluing skirting boards in this case is almost no different from fixing it under normal conditions.
The differences are as follows.
- Since the plinth is attached only to the wall, and not to the wall + ceiling, the contact area is much smaller. This means that the glue must be chosen carefully, and if possible, secure the fillet with self-tapping screws.
- If it is not possible to secure the elements mechanically, you need to increase adhesion to the wall; for this it is better to choose a plinth with a wide vertical side.
- In order not to accidentally damage the stretch ceiling, it must be covered with cling film before work. It adheres well to the ceiling film, and after work it can be easily pulled out from under the cornice.
Pros and cons of acrylic sealant
It is possible to fully appreciate the advantages and disadvantages of acrylic only with its correct use.
pros
- the cost of acrylic products is approximately 1.5 times less than other analogues;
- The choice of types of sealant is not so large, but acrylic is universal. There won't be any problems with him. While the glue dries, it can be easily adjusted, and excess protrusions can be washed off with warm water. If time has passed and the unnecessary composition has frozen, it is cut off with a sharp knife. Moreover, there are no stains left at the cut sites that require treatment with solvents;
- All components of the sealant are dissolved in a water base that does not contain toxins. The absence of flammable and toxic substances determines its fire safety and makes it possible to work without protective equipment;
- a high adhesion rate allows the composition to stick to highly porous surfaces. If time has passed and the seam has hardened incorrectly, it can be restored and then painted;
- Despite the fact that the glue adheres tightly to the surface, acrylic tends to allow steam to pass through. Thus, condensation does not accumulate between the window joints;
- A high-quality acrylic layer does not crumble under UV rays, which is often observed with many analogues. Throughout the entire service life there is no manifestation of yellowness.
Cons of acrylic sealant
Like any other material, acrylic sealant has its drawbacks. It is not water-friendly due to its aqueous composition, which quickly dissolves when placed in a humid environment. It is always written on the packaging that exposing acrylic to moisture is prohibited, but next to it there may be the designation “moisture resistant”. This means that after a certain time has passed, the sealant will harden in a dry environment and only then can it come into contact with moisture. If we talk about constant exposure to water, then no matter how long this happens, the properties of acrylic will deteriorate.
From the disadvantages discussed, we can conclude that acrylic is not the best choice for showers, bathtubs and other wet objects. Use in an aquarium is generally not advisable, since the joint will leak after a short time.
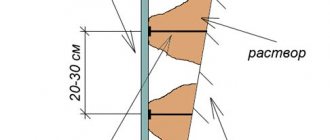
Fastening wooden ceiling plinths
A special feature of the installation of such baguettes is the preliminary fastening of the mounting angles (bars). These are “rough” parts with a triangular cross-section.
The step-by-step installation of wooden ceiling plinths is as follows.
- Calculate the required number of rough corners. When calculating, keep in mind that they should be located every half meter.
- Fix them in the corner between the ceiling and the wall.
- Mark the bottom border of the baguette along the entire perimeter of the room.
- Calculate the number of whole strips and sections.
- Mark and cut pieces of baseboard.
- Make corner cuts using a miter box and process (fit) the edges with a file.
- Screw the molding with screws to the bars or nail it, carefully adjusting the adjacent elements.
It is better to use screws for installation. In this case, if necessary, it will be possible to make adjustments without losing the appearance.
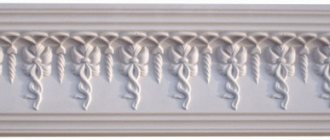
Wide skirting boards with a complex pattern are suitable for high rooms; if the ceiling is low, it is better to give preference to laconic options - narrow and not overloaded with details.
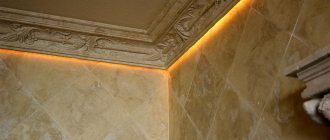
If the ceiling is high, you can glue the baguette to the wall 20 centimeters below the ceiling. In this case, you can mount lighting above it.
When buying a plinth, immediately ask about the possibility of purchasing additional elements - external and internal corners. Their purchase will greatly facilitate the installation of moldings.
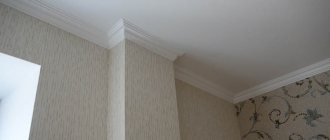
It is difficult to imagine the design of an apartment without a ceiling plinth; it is called a fillet. It allows you to hide all the irregularities and gives the apartment renovation a finished look. Let's figure out how to properly glue the ceiling plinth.
Getting ready to glue the ceiling plinth
1. Tools for gluing ceiling plinth
- Assembly knife
- Hacksaw
- Miter box
- Putty knife
- Brush
- Ruler
- Pencil
- Sandpaper
2. Materials for gluing:
- Polymer-based glue or instant-installation glue. It is better to use glue recommended by the manufacturer.
- Putty mixed with PVA
- Dye
- Colorless sealant
3. Calculation of the length of the ceiling plinth
The ceiling plinth is made of polystyrene foam and polystyrene foam; this is a material that does not change in length; it does not compress or expand when the temperature changes. So no allowances. With a standard ceiling height of 2.75 meters, a 45 mm wide plinth looks better. Of course, the width depends on many factors and is not limited by anything.
To calculate the number of fillets, measure the perimeter of the room in meters and divide it by 2 (the standard fillet length is 2 meters). In total, you will need to buy fillets = the integer obtained by dividing the perimeter of the room + 1.
Example. A room measuring 4.5x5 m - its perimeter is (4.5 + 5) * 2 = 19 meters. We divide this perimeter by 2 - 19/2 = 8.5. That is, you need to buy 8 + 1 = 9 fillets.
Choosing adhesive for ceiling plinths
Before buying glue, you need to know exactly what type of wall you need to attach the baseboard to and the material from which it is made. The price and its characteristics will depend on the glue. Some compounds only glue, while others also level
This is important for walls that have significant unevenness, differences
Polymer adhesives
It is based on PVC and vinyl polymers, which have additional viscosity and a high degree of adhesion to wallpapered or plastered surfaces.
You can glue large skirting boards and massive decorative structures. Polymer adhesives can harden instantly or gradually. They work with them wearing a respirator. All polymer-based products have an unpleasant odor and toxic fumes.
Titanium
Used for gluing wooden, plastic, cork, gypsum structures, MDF, polystyrene foam baguettes. You can glue laminate, parquet, other floor coverings, elements made of leather, ceramics, and rubber.
Titanium is used at any humidity and ambient temperature. The composition is resistant to fading in the sun, has an elastic seam, does not flake or crumble. You can glue the plinth to the ceiling in a children's room, since its composition, after hardening, is harmless to humans.
After the seam has completely hardened, the plastic plinth cannot be torn off from the surface. The final coupling period is one day.
Moment
The brand is used by professionals. Usually they buy “Moment Montage Express Decor”.
The advantage is the high quality of the seam. Moment glue can be used for gluing joints and attaching decorative elements.
The glue contains a very toxic component - ethyl cyanoacrylate, which causes an allergic reaction upon contact with skin. Work with glue in a respirator and gloves. Severe consequences are caused by contact with the eyes. Without prompt assistance, the victim risks losing his sight. “Moment” has high consumption and a high price, which precludes its use over the entire surface of the plinth. It is mainly used for gluing corner joints.
Eco-naset
The composition is similar to “Titanium”, so it is better for them to glue polyurethane baguettes, polystyrene tiles, ceramics, plaster, cork, wood. Reliably adheres to brick, concrete, gypsum, plasterboard and putty surfaces.
Advantages:
- low price;
- transparency;
- absolute safety for humans.
Polyvinyl acetate adhesives
Do not contain harmful components, no pungent odor. Suitable for working in rooms with children. This type includes PVA glue and its water- and polyvinyl acetate-based analogues. Unlike polymer compounds, polyvinyl acetate ones have poor gluing quality.
The disadvantages include high consumption, since you need to apply a fairly thick layer to the surface.
Liquid Nails
It is effective to glue foam ceiling skirting boards with liquid nails, since the product does not damage the texture of the material and has high adhesive ability.
Putty
Working with acrylic putty is difficult, but it helps when baguettes are attached to uneven walls. It covers cracks, crevices, and uneven surfaces and visually improves joints. The material sticks well in the corner of the ceiling, does not peel off, and does not stand out against the general background. Acrylic putty is safe, odorless, and does not emit toxic fumes. You can work in conditions of high humidity and low temperatures.
Silicone sealants
It is justified to use when there are large joints that require additional sealing of the seam. Sealants have a dense consistency, they are elastic, and after drying they form a strong white seam that is resistant to moisture and dirt. They are produced on the basis of silicone rubber, plasticizers, vulcanizers and surface adhesion enhancers.
When gluing in the hallway, it is better to use two types of sealant:
- treat the back side of the plinth with cheaper transparent one;
- Seal the joints with white.
Homemade glue
You need to take one part of PVA, pour it into a jar with 4 parts of dry putty and dilute with water to a concentration of thick sour cream. Stir the mixture well so that no lumps remain. Leave the finished mixture for 15 minutes, then mix and use completely within two hours.
The homemade paste is applied to the curb from the reverse side, then pressed against the wall and held for several minutes. Excess glue that has leaked outside the baguette must be removed before it hardens.
Methods for installing ceiling plinths
The advantages of this method are that after gluing the plinth, it allows you to putty all the gaps that arise between the wall and the plinth. In addition, you will not have to tear off the ceiling skirting boards when you subsequently wallpaper.
This method is good because after gluing the wallpaper you don’t have to level it under the baseboard; in this case, the baseboard will cover all the flaws in wallpapering. However, if the walls are not level, it will be extremely difficult to seal the gaps between the baseboard and the wall. In addition, when re-gluing the wallpaper, the baseboards will have to be torn off.
How to glue ceiling plinths
It is better to start installing ceiling plinths from the corners. It is better to buy the corners ready-made in the store, otherwise you will have to cut them out using a miter box.
You need to buy a miter box such that the internal size of the miter box is larger than the width of the plinth. In this case, the miter box should have molds for cutting at an angle of 45% and 90%.
To cut corners, the plinth must be placed in the miter box in the same way as it will be mounted on the wall. In this case, the plinth is pressed tightly against the walls of the miter box and sawed off with a hacksaw.
After gluing all the corners, the straight sections are glued. In this case, it is desirable that there are straight factory ends at the connection points.
This method is used when gluing skirting boards to wallpaper. After wallpapering the room, the ceiling plinth is secured with Moment Installation glue or any white acrylic sealant. Gluing the baseboard with acrylic sealant or special glue is easier than with putty.
If the glue or sealant is not purchased in a special tube that allows you to squeeze out the adhesive through a special dispenser, you will need a mounting gun. The inner edges of the skirting boards are coated with skirting board glue and pressed simultaneously against the wallpaper and the ceiling. The gaps between the wall and the baseboard are sealed with sealant.
If, when pressing the plinth, excess glue appears on the surface of the plinth, remove it with a soft, dry cloth without waiting for it to dry. When pressing the baseboard, do not use excessive pressure - polystyrene material is soft and can leave dents in it from your fingers.
When gluing the baseboards, be sure to use clean hands or wear clean gloves. Dirty fingerprints remain very well on snow-white baseboards; they are difficult to remove later.
In this article we will talk about the choice of adhesive solutions for decorative products made of PVC, polyurethane, polystyrene and other plastics designed to decorate our home and give it individuality.
Installation is carried out using adhesive solutions, of which there are currently a great variety. Let's try to consider the various options and make the right choice.
Below are comparative characteristics of various compositions.
If the images are too small, in order to read the instructions for a specific glue, click on the image.
Types of fillets
Fillet is the second name for a plinth, received for the presence of a groove on the outside of the part. Among the most common materials used in the production of fillets are:
- foam products;
- polyurethane products;
- wooden baseboards;
- PVC profiles.
Polyurethane
Polyurethane skirting boards differ from others due to:
- The density of the material, thanks to which polyurethane products are strong and durable.
- Beauty. Decorative elements on polyurethane are more clearly visible than on other materials.
- A large selection of colors and styles, significantly expanding the model range.
- Possibility of installing hidden suspension.
We recommend: Advantages and characteristics of Vetonit tile adhesives
Foam
A material that, despite its low cost, has a decent set of positive characteristics:
- low weight of products;
- ease of installation.
Flaws:
- fragile;
- afraid of high temperatures;
- does not interact well with some types of glue.
PVC profile
Affordable and high-quality material, noted by both professional finishers and ordinary people. Pros:
- heat resistance;
- does not collapse under the influence of ultraviolet radiation;
- easy to process and install;
- not afraid of exposure to water.
Minuses:
- not suitable for installation on curved walls;
- When exposed to high temperatures for a long time, it begins to deform.
Wooden
This material is gradually falling out of use, being replaced by cheaper and more practical counterparts. Despite this, wood skirting boards have many advantages:
- service life is not inferior to most alternative materials;
- wood products are the most environmentally friendly;
- beauty;
- can be painted.
Flaws:
- difficult to install;
- are expensive;
- Wooden skirting boards require special care.
Construction adhesive “liquid nails”
Liquid Nails, Makroflex, Moment Installation Express Decor. Can be selected for almost all types of skirting boards. There are water-soluble (acrylic) and non-water-soluble. For curved surfaces it is better to use non-water-soluble reinforced compounds.
Pros:
ease of applying the solution pointwise using a mounting gun; Additional fixation may only be required for highly deformable parts.
Minuses:
If the glue comes out somewhere on the fillet, it is impossible to remove it without leaving a stain. Only painting will help. Therefore, when purchasing, pay attention to the color (white).