Fasteners for beacons are necessary for their reliable fixation during finishing work in residential and technical premises when leveling walls. The use of special devices for fastening beacon profiles provides certain advantages. The construction of the plane and subsequent finishing measures when plastering premises are greatly facilitated.
Please note that teams of professional builders actively use this element in their work. The cost of the beacons is more than compensated by reducing the time of the plastering process and improving the quality of the resulting surface.
Installing profiles does not require any special skills. The initial installation will just take a little longer than for those who perform this procedure regularly. The main thing is to understand the installation principle and decide how to perform the installation. By placing the element on 2-3 walls, the further process will be streamlined and will not take more than 3 minutes, taking into account:
- Installation.
- Fixation.
- And adjustment.
On a note.
The structures are not useful if the surface to be plastered does not need leveling.
The process of plastering walls.
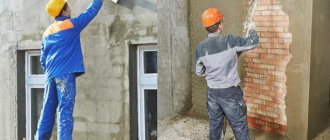
In cases of a large layer of plaster, which reaches about 15 mm, it is necessary to divide all the work into 2 stages. First you need to apply the solution to the surface and level it so that it does not touch the beacons. The distance between them should be approximately 10 mm. After the initial layer of plaster has completely dried, you can proceed to further stages of work. It is necessary to apply the solution with a reserve, then it needs to be leveled with a rule that will come into contact with the beacon profile. The rule needs to be directed from the bottom to the very top, sometimes it needs to be swung in different directions. You cannot tear it off the surface. This can lead to an uneven surface in the future. When the main part of the mortar has dried, you can begin to level the angles between the floor and ceiling in relation to the wall. This leveling takes place using a trowel, with which you can easily work in hard-to-reach places, such as corners. Only after the entire surface of the wall has completely dried can the beacons be removed. Defects that may remain after removal need to be leveled with a small amount of solution. If you plan to lay tiles on the wall in the future, these small defects can be left, or the profile itself can remain on the surface; it will not interfere with the laying of the tiles.
Installation of beacons for plastering walls in different ways
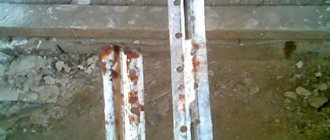
When installing, the main thing is to securely fix the beacon profiles to the wall. To reliably, quickly and accurately install the beacon on the wall, use ready-made or home-made fasteners, for example, eared ears, clips. Often the installation of beacons for plastering walls is done using mortar.
To prevent the solution on which the profiles were installed from serving as an accelerator for the crystallization of the plaster composition applied during plastering, the flashings are coated with a primer after installing the beacons.
Installation on plaster mortar or tile adhesive
Let's look at how beacons are placed, when they are installed and fixed using a plaster mixture.
If you install the profile directly on the screw caps, it may rotate during the fixation process, deviating from the correct position. Therefore, piles of plaster composition protruding above the caps are laid around the hardware with a spatula. Round or rectangular “bedside tables” are formed from the slides; the top is cut off along an auxiliary vertical plane at the height of the caps. On such hardened bedside tables, it is much easier to place beacons under the plaster and secure them with plaster mixture or tile adhesive.
After installing the plaster beacons on the marks, fix the position of the profiles between them. Pieces of cut drywall can be useful here, from which you can make a mark of the required height by gluing the pieces with a solution or adhesive mass. If the beacon profiles are located close to the surface of the base, it is enough to place a mortar mixture under them in the right places.
Installation of beacons without mortar
Since our task is the reliable installation of beacons with protection against displacement during the plastering process, we need quick, strong fastening of the profiles to the self-tapping screws. For this purpose, several types of fasteners have been invented.
You can install beacons on hardware using:
- clips;
- creamers;
- eared;
- cleverness;
- homemade brackets made from straightened and cut beacon profiles.
The advantage of such fastening is the speed of installation, the absence of the need to wait for the plaster mixture to harden. In other words, it is enough to install the beacon profile and secure it with the fixing parts on the screws, and almost immediately after installation you can begin plastering. Beacon profiles installed on the walls will no longer move.
The disadvantage of such fastening compared to fastening to a plaster mixture is that it requires the installation of additional hardware, as well as the purchase of clamps.
Lighthouses from solution
You can make your own beacons for leveling walls using a plaster composition, for example, gypsum or cement. Such paths, made from the same plaster composition that will be used for subsequent plastering, do not need to be removed.
The easiest and fastest method is suggested by Andrey Shaiter.
To make guides from mortar, only a rule, a spatula and a trowel are used. The axes of the beacons are first marked on the wall, the zero point is found using a laser device, an auxiliary plane is set, and marks are made on the rule. Before starting work, prepare a viscous elastic solution.
Step-by-step production of a mortar beacon using the Scheiter method:
- the rule is installed on the edge (fixed in this position on the scaffolding);
- use a trowel to apply a solution to the upper edge of the rule;
- apply the correct bar with the solution to the wall, pressing until the line on the rule and the laser beam are aligned;
- using a rectangular trowel, adjust the angle of contact between the rule strip and the wall (to achieve the formation of a perpendicular);
- use a spatula to remove excess mortar from both sides of the instrument;
- using cotton threads, cut off the edge of the rule from the created mortar path, remove the rule;
- Allow the solution to dry for a day, after which they lightly pass along the top of the beacon with a block of sandpaper.
This method creates mortar paths 2 cm wide. Made from gypsum, they dry out within a day and become suitable for plastering. During manufacturing, it is recommended to rest the lower end (heel) of the tool’s strip on a wooden wedge to avoid displacement of the strip when cutting with a thread.
Another method of making mortar guides and controlling their vertical level is somewhat more complicated.
- The rule bar is attached to the pre-installed screws to the wall (perpendicularly, on the edge).
- The gap between the plank and the wall is filled with mortar (without gaps).
- Use a spatula to remove excess plaster longitudinally from both sides.
- Gently tapping, shift the rule along the axis of the beacon, and then remove it from the formed path.
Beacons for walls, what they are
Before attaching the beacons, you should decide on the material of manufacture. Today, plastic or metal structures are most often installed, securing them with dowels and self-tapping screws. Less often, but still, the device of beacons made of solution is used. Plastic fasteners are cheaper and lighter. However, they bend a lot, which often affects the evenness of the working surface. Deformation interferes with work.
Installation of profiles made of metal is a more reliable method. Installing cremmers for installing metal beacons is a simpler and more reliable option. The construction market offers products in the shape of the letter “L” or “T”. The first profile option is within 2.7-6.0 meters. The thickness of the second profile is 6-10 mm, width 18-20 mm.
note!
For work at home, experts recommend a “T” shaped profile.
Installation of “L” profiles can be used:
- Short designs for residential premises.
- Long profiles for industrial needs.
At home, installation of string beacons can be used. If you intend to remove the structure after applying the mixture, it is best to install No. 6.
How to install beacons?
Installation of beacons can occur using several technologies. There are many video master classes that explain how to install profiles. They often contradict themselves. Installation of beacons can be done in several stages.
From the very beginning, you need to carefully examine the surface of the walls along a vertical plane, using a level. It is necessary to mark the most noticeable deviations from the norm with a marker on the wall. Then, using a level, you should examine the wall along a horizontal plane. It is better to remove the most noticeable bulges (cut them off with a hammer drill).
Then you need to remove the markings for beacons
You need to start from the corners: it is important to move about 30 cm away from them (the minimum tolerance is 25 cm). Next, you need to make marks that are approximately 160 cm apart from each other, so that the rule can reach from one lighthouse to another
You cannot divide the wall into unequal parts. For example, if during marking approximately 2 meters of surface remains, it is better to set the profile at the 1 m mark.
After this, it is necessary to remove all dust and other contaminants from the wall, and then treat it with a deep penetration primer. These manipulations will help maintain the integrity of the wall, protecting it from fungus and mold. After waiting for the wall to dry completely, you should take a metal profile, attach it to the pre-designated line and screw a self-tapping screw into the upper part of the lighthouse. Then you need to attach a plumb line to the head of the screw, which will help you navigate the places where you need to make holes for other screws.
Only after obtaining an ideal result can you remove the plumb line. The same work must be done with other beacons.
It is important to secure the beacons with plaster in several places so that part of them is inside the layer of plaster. Then you should leave the structure for several hours so that it can dry
It is imperative to check the dryness of the plaster on the lighthouses, otherwise the integrity of the structure may be compromised. After this, you can begin plastering the wall.
Upon completion of these manipulations, you can leave the lighthouse profiles only if you subsequently plan to lay the wall with ceramic tiles. In all other cases, the beacons should be removed. Wallpaper or paint will not be able to hide the presence of beacons in the wall. Therefore, after completing the plastering process, it is better to dismantle the profiles. It is necessary to remove all the screws, remove the beacons from the walls, then seal the holes with plaster.
Option 3: rubbed plaster beacons
If there are minor irregularities on the walls that need to be covered with a layer of plaster, builders refuse to work with galvanized iron lighthouse profiles. Craftsmen prefer to install so-called rubbed plaster beacons. Manipulations require certain professional skills, the work time increases, but the result can please those who carry out construction or repairs themselves.
If you need to build intermediate elements, two identical tools are attached to the walls, acting as the basis for creating a polished beacon
Materials and tools
Having chosen this technology, you should find out how to properly carry out the installation, what tools and materials will be required when the use of this method is justified. First of all, you will have to take care of having the necessary tools. The master will need:
- plumb line;
- rule;
- spatula;
- screwdriver;
- self-tapping screws;
- screwdriver;
- construction water level.
The prepared solution does not have a high level of strength, and the created structure will not be durable. It's better to prepare:
- Gypsum plaster (Rotband).
- Cold water.
When choosing a material intended to create a structure, it is important to remember that the dry mixture must contain gypsum. It is not allowed to use cement-sand mixture in the work.
The working process
The prepared, cleaned, primed wall is marked by marking on the surface the points into which self-tapping bolts will be screwed. It is to them that a plumb line is attached to determine the vertical line. It should be done at a distance of 5 cm on both sides of each inner corner.
You need to carefully select the rule used to create the rubbed beacon. Its size should not be 2-3 cm less than the height of the wall. The tool is fixed vertically using self-tapping screws, having previously drilled 3-5 holes in it, located at an equal distance. Further:
- Use a level to mark the vertical.
- Fix the rule strictly along the red line, retreating 5 cm from the corner.
- Prepare a composition based on a gypsum mixture, mixing the ingredients well.
- Fill the gap between the wide edge of the tool and the inner corner with the prepared solution.
- After smoothing the edges, wait until the solution hardens, remove the screws and carefully remove the profile.
A water or laser level will help you check the correctness and accuracy of the actions performed. The main advantage of this method is that there is no need to remove the landmark before applying the plaster mixture to level the walls.
It is almost impossible to make any surface level without installing beacons. Knowledge and ability to carry out high-quality and accurate markings, determine the zero and working planes, install galvanized iron profiles or create plaster beacons will help you achieve success in achieving your goal.
Before you start work, you should carefully study all the positive and negative qualities of a particular design, choose the one that will save money and avoid additional time costs.
Preparing surfaces for leveling
The main methods of leveling and determining the curvature of a surface have already been described above, but preparation must be carried out before starting work.
The importance of preparatory work can hardly be overestimated - preparation has such a strong impact on the quality of the entire finishing complex. Work on leveling the walls begins with the removal of decorative finishing (wallpaper, cladding, layers of paint or whitewash). The freed surface is examined visually and using a simple instrument.
Detection of defects in the plaster layer.
Removing old coating
Having identified the nature of the deviations, they begin the initial correction. If the plaster coating is strong and has no defects, then excessively large protrusions or protrusions are cut down. If there are many defects and the coating is considered unsuitable, it is removed to the base.
Wall structures can be made of brick, monolithic or prefabricated reinforced concrete, wood, or made of stone or cellular concrete blocks. The type of wall material determines part of the preparatory work that increases adhesion strength. For example, stone or brick masonry requires jointing (0.5-1.0 cm deepening), concrete surfaces require notching to ensure strong adhesion of the mortar to smooth concrete.
Notching
Wooden surfaces are filled with shingles or wire mesh is attached. Measures to increase adhesion cannot be neglected, since plastering creates a coating that has a large dead weight.
Preparatory measures also include cleaning the base from stains of various kinds. Oil stains must be degreased. Rot, fungus, and mold are scraped out, washed and treated with an antibiotic agent.
Removing stains
Efflorescence, rust, and soot are removed in different ways. To prevent new rust from appearing, all unnecessary metal parts are removed from the wall, and the remaining ones are insulated, for example, with oil paint. To prevent efflorescence, high-quality waterproofing of walls is done.
During internal work, hidden wiring is de-energized. At the same time, sockets and switches are often replaced, that is, old covers are removed, the ends of the wires are insulated, and the boxes are sealed with masking tape while plastering. After all finishing work is completed, new electrical appliances are installed.
Cracks, chips and other defects in the foundation are repaired. The surface of the base is cleaned of dust. Apply a primer that matches both the wall material and the plaster mortar. Preparatory work also includes reinforcement and installation of beacons. The base must not only be cleaned, but also dried.
Sealing cracks
Preparatory work step by step:
- removal of old coating;
- cleaning the base;
- repair of defects;
- applying a primer;
- drying;
- reinforcement;
- installation of beacons.
Installation of beacons
After the primer has dried, you can install beacon strips. In most catalogs of building materials they can also be found as a beacon profile “PM 23x6”. “23” is the width of the base, “6” is the height of the lighthouse in mm. If you are plastering large protrusions, the beacon can be taken at 10 mm. The standard slats are 3 m high.
The beacon is installed in a vertical position. The rail is attached to the wall on alabaster, placing construction plaster at several vertical points for one lighthouse.
The placement of beacon slats begins with attaching two slats to the wall at opposite ends of one wall. For this:
- Mix a small amount of gypsum with water;
- We apply the mixture to the wall at several vertical points in the place where the beacon is supposed to be attached;
- We immediately attach the beacon to the alabaster.
The evenness of the beacons, their verticality and horizontality should be checked using a building level.
These works are carried out at a pace, but not in a hurry. If you do plastering yourself, without much experience in finishing work, you need to be especially careful.
So, you have secured two beacons at opposite ends of the wall. The attachment points from each other should be at a distance of no more than 50 cm. If you are installing the profile not on a brick, but, say, on a plasterboard, you can attach it using ordinary self-tapping screws, slightly pressing them so that the beacon does not bend. Between the two installed beacons, two parallel threads are stretched, at the top and bottom.
The remaining center beacons must be installed as follows: the top of each profile after installation should lightly touch the thread you pulled. The distance between the profiles is determined based on the parameters of the plastering tool that you are going to use. If you work as a rule with a length of 2 meters, then between the beacons there should be a space of 180 cm wide.
This completes the process of preparing for plastering.
Materials and tools
Before placing beacons, you need to ensure that you have the necessary materials and tools.
Materials:
- Beacon guide profiles. On sale you can find plastic and metal profiles made of thin sheet steel (galvanized and non-galvanized). As a last resort, you can use wooden slats, as they did half a century ago. Beacons made of plastic are cheaper, but no master can guarantee the quality of work with them - they can bend at any moment and all the work will have to be redone. Metal profiles are more expensive, but not so much that they need to be abandoned. If you need to save money, you can buy non-galvanized guides and then remove them. Metal beacons have a T or L profile, length 2.5 m or 3 m, height 6 mm and 10 mm;
- Clips (Kremmer or Ushastik devices) for attaching beacons or an adhesive mixture based on gypsum (Rotband putty);
- Dowels;
- Self-tapping screws with a diameter of 6 mm for an 8 mm drill. The length depends on the curvature of the wall. You can use a dowel-nail 8*140 mm.
Tools and accessories:
- Stepladder (goats, strong table), for convenient work, above 1.5 m;
- A hammer drill with a drill with a diameter of 8 mm, corresponding to the type of wall (for concrete, wood, aerated concrete);
- Factory plumb line or made by yourself;
- Grinder, for bringing the lighthouse profiles to size;
- Screwdriver;
- Roulette;
- Construction square;
- Marker (chalk or construction pencil);
- Level, also known as spirit level (laser level);
- Fishing line (any thin and strong twine).
How to check the evenness of a leveled surface with a laser level
To check the evenness of the created plane, you need to place the laser level on a flat surface. After that, turn it on in the “vertical axis” mode. After this, the level is placed to the wall at 45 0. The laser will show the evenness of the surface. If there are errors, the beam will deviate.
Plastering a wall is an important stage in repair work and construction. After all, the appearance of the room depends on the flat surface. Irregularities in the wall after plastering are difficult to hide with putty or a finishing coat. Therefore, the plasterer’s work must be precise and correctly structured. To create a single plane, beacon profiles are used. Depending on the professionalism, various methods of attaching beacons to the wall are used. But all methods come down to one thing - evenness. Constant checking of the level and the rules will make the walls smooth, ready for subsequent finishing.
A little about the choice of material
Various types of plaster solutions are used to level the walls. Each of them has its own characteristics that must be taken into account when choosing it.
| Type of plaster | Main components | Advantages | Flaws |
| Plaster | Gypsum and lime | Economical consumption, easy application Retains heat well Used on a variety of substrates Convenient for painting | Softness Low resistance to damage High moisture absorption capacity |
| Cement and cement-lime | Cement, lime, sand | Effective when decorating rooms with high humidity High resistance to mechanical damage Most effective under tiles and wallpaper | In dry rooms they quickly crack and crumble. Responsive to temperature changes Low resistance to damage |
| Clay | Clay, sand | Environmentally friendly, rarely used High breathability Creates a healthy indoor climate Resistant to fungi and mold Does not cause allergic reactions | Very heavy Absorbs and retains odors, including unpleasant ones |
Each leveling mixture has its own characteristics
Preparatory work for leveling walls
Before you start leveling the walls along the beacons using plaster, the working surface must be prepared.
First, wallpaper, tiles, paint and any other decorative coating are removed. If the walls are plastered, it is best to completely remove the old layer. In cases where it is not planned to remove all the plaster, it is necessary to identify and clean loose and swollen areas. After this, you need to clean the wall from dust and construction debris; for this you can use a broom or vacuum cleaner.
If the wall is severely damaged, there are deep depressions or, conversely, bumps in it, it is necessary to carry out rough leveling. To do this, you will need plaster to cover all the recesses, and a hammer to knock down the convex areas. Before applying a layer of plaster to the wall, the area is treated with a primer.
After rough leveling, the wall should be cleaned of dust again and then completely covered with a layer of primer. This is done in order to ensure better adhesion of the plaster to the wall surface and protect it from moisture.
Preparatory work for installing beacons
Floor screed guides should be installed on the prepared surface. The performance characteristics and service life of the screed being performed depend on the correct execution of work to prepare the room for installation of guides. The strength of the poured base and its appearance are also determined by the quality of preparation of the floor surface.
Beacons for floor screed
Sequencing:
- Remove skirting boards around the perimeter of the room.
- Clean the old base from the worn coating.
- Eliminate oil traces, greasy stains, and dirt on the surface.
- Clean the base with a vacuum cleaner.
- Sand protruding areas and local irregularities.
- Seal deep cracks and cavities with the repair mixture.
- Cover the surface with primer using a roller.
- Place the waterproofing material on the dry base.
The most important task is to draw the “zero” line
All subsequent work will only gain some meaning if the zero level is very accurately determined, corresponding to both the horizontal and the required thickness of the future screed.
To work, you will need a water or laser level (the second, of course, is preferable - it will greatly facilitate the process).
Water level
You can, of course, use a building level, but in this case it must be quite long (1.5 - 2 m), very precisely calibrated, and the worker himself must have an excellent eye, since an error with this method is most likely.
Building traditional level
So, on the wall of the room, in the corner, which, according to a preliminary visual estimate, is located higher than the others, a mark is placed. Its height from the floor can be arbitrary, but it is better to choose, firstly, a multiple value, and secondly, such that it is more convenient to work - for example, 1.5 m.
Punching a reference horizontal line
- With the help of the mentioned devices and tools, the level of this mark is transferred along all the walls, in order to connect the resulting marks with a solid straight line around the perimeter of the room. If everything is done correctly, then the line should close at one point, without the slightest difference in height. This reference line can be useful later not only for pouring the screed, but also for carrying out some other finishing work.
- The distance from the reference line to the floor surface is carefully measured every 0.5 m. The obtained values are recorded on paper or simply on the wall surface (if possible). Now, by simply comparing the results, the highest point of the floor along the perimeter of the room is determined - this is the place where the obtained value is the smallest.
In the example, there is a clear excess of 50 mm
- If you have already decided on the minimum thickness of the future screed, then you can proceed to beating the so-called zero level. At the highest point, mark the required height from the existing base. Let, for example, it be 30 mm - this is the minimum thickness a concrete screed should have to ensure its strength and solidity.
- Next, you can do two things. So, you can apply the method already described above and draw a zero line along the floor surface in the same way. This is not entirely convenient at such a height. Therefore, you can do it easier - measure the distance between the marked mark and the reference horizontal line. Then transfer this value strictly vertically at several points on the walls, so that the distance between the marks allows you to draw a line using an existing ruler. The resulting line, completely outlining the perimeter of the room, will be the zero level.
- It’s too early to limit ourselves to this. In construction practice, it is rare, but still there are times when the floor level in the center of the room is slightly higher than near the walls. This is easy to check - you need to stretch the cord between opposite walls along the zero mark, and check the distance between it and the floor in the center of the room. This check is done in several places. If the distance between the cord and the surface is less than the required minimum thickness of the screed, then you will have to move the zero level up slightly - to the height required to ensure the required thickness.
If everything is normal, the zero-level tapping can be considered complete.
How to place beacons under plaster walls without a laser level
Beacons under plaster can be installed without a laser level using the following marking methods:
- standard markup;
- using the "spider" method.
The verticality of the elements is checked with a building level, ruler or plumb line.
Common markings when plastering walls
Beacons for plaster are installed using the standard method using nylon thread and a building level.
The work is carried out in compliance with the following stages:
- Markings are made with a distance of 10 cm from the corner of the room, and 15-20 cm from the ceilings. Self-tapping screws are installed at the marked points, protruding 3-5 cm above the surface
- A plumb line is tied to the screw, 2 new points are marked along the thread, into which the screws are screwed.
- When installing self-tapping screws step by step, the height of the element caps is checked. The surfaces of the screws must be placed in a single plane.
- The threads are pulled horizontally and vertically onto the self-tapping screws.
- The result should be a vertical plane.
Marking using the "spider" method
Before installing beacons for plastering walls, you can mark using the “spider” method using 4 stretched threads. The technique allows you to accurately calculate the thickness of the plaster coating and reduce the consumption of finishing material.
Marking stages:
- Taking into account a distance of 5-15 cm from the corners of the ceiling or wall, points for drilling holes for dowels are marked.
- Place 2 self-tapping screws into the prepared holes, protruding 5 cm from the surface.
- A nylon thread is tied to the screws.
- The accuracy of the marking is checked with a plumb line.
- After fixing the horizontal threads along the surface, the curvature, the maximum protruding point, is determined.
- Then the plaster coating layer is calculated.
- Intermediate beacon profiles are placed along the main beacons and extended threads.
Fastening beacons
Aligning the walls with beacons requires their correct installation; the final result will depend on this. Therefore, compliance with all stages and extreme composure will be required to avoid rework.
Fixing a metal profile-rail
Such strips can be installed in two ways, which are selected based on the specific situation.
Using dowels
Performed according to the following scheme:
- Marking is being done. The lines are drawn strictly vertically in increments of 80 to 100 cm. It must be taken into account that the first part will be located at a distance of 20 cm from the wall. To achieve the required evenness, a plumb line is used.
- Holes are drilled exactly along the lines. They are placed in increments of 30 centimeters. The minimum depth should be 8 millimeters.
- The dowels are driven in. If they are not there, then you can use a proven method - chopiki.
- A self-tapping screw is screwed into the dowel, having previously placed a “eared” fixing the slats on it.
- First, two profiles located at the edges of the wall are attached and aligned. A cord is stretched between them, along which the remaining elements are placed.
This option allows you to cladding walls along beacons with your own hands by adjusting the thickness of the plaster layer.
Application of gypsum mixture
How to set beacons using a solution? To do this, you will need a mixture of gypsum, cement and sand, metal slats, a level and a long, even lath. Installation technology: marking is carried out, as in the previous version, the required amount of solution is mixed, the mixture is applied pointwise along the entire length of the line and beacons are immediately installed. Each exhibited element is checked for level. Final fixation is achieved by laying another layer of mortar.
The process seems simple, but requires some experience.
Installation of beacons made of cement and plaster
This process will require more time. Fixation occurs according to the following algorithm:
- 30 cm are retreated from the ceiling, the same distance is measured from the wall. A nail is driven into the resulting point or a self-tapping screw is screwed in.
- A plumb line is lowered to the floor. Another screw is screwed in at a height of 20 cm from the floor.
- The procedure is repeated on the other side.
- A cord is pulled between the screws so that it does not come into contact with the surface. Several more screws are installed along the rope line.
- A solution is applied to each screw, a rule is placed between the top and bottom, and the space under it is filled with the mixture. This is done with all elements.
That is, you get even tubercles of plaster that will play the role of beacons.
How to place beacons on a wall under plaster
Such devices are necessary for leveling walls with unevenness, chips, and cracks. Before installation, the method of attaching the beacons, the type of profiles, and the frequency of placement of elements are selected. Before installing the beacons on the wall for plastering, the distance between the guides is determined.
The placement of beacons is carried out in accordance with the size of the surfaces being processed and the length of the rule. When applying the rule with dimensions up to 1.5 m, the pitch of the beacon strip is up to 1.3 m. The smallest gap in small areas for plastering is 0.8 m. The extreme guides can be placed from the internal corners at a distance of 10-30 cm. From window or When installing doorways, the beacon is placed at intervals of 0.1-0.15 m.
Installation of plaster beacons for leveling bases is carried out in compliance with the following steps:
- surfaces are marked for leveling;
- landmarks for the outer beacons are placed;
- with a slight indentation from the leveled base using threads and cords, a vertical plane is created, accuracy is checked with a plumb line and level;
- calculations of deviations on the plane are carried out;
- distortions on the plane are corrected;
- intermediate profiles are installed;
- The mortar part for installing beacons is primed.
Leveling the wall surface
Depending on the type of binder material, it is customary to divide dry mixtures into:
- gypsum;
- cement.
The former are more suitable for residential premises due to the environmentally friendly surface obtained as a result and the property of maintaining a microclimate favorable for the residential area. Cement mixtures are more applicable in wet areas: kitchen, bathroom.
We prepare the plaster mixture in a bucket (capacity volume is about 12 liters) using a drill with a mixer attachment:
- The mixture must be poured into a container and diluted with water in the ratio recommended by the manufacturer of the material;
- Perform the first batch with a mixer;
- Let the mixture sit for a few minutes (usually 3-5 minutes);
- Carry out the second batch.
The mixture is considered ready if it looks uniform in color and composition.
Due to the short shelf life of the finished product, it is better to mix the plaster in batches.
Using a spatula, we begin to apply the mixture to the wall. It is better to apply the mixture from the container with a small spatula. A 10-15 cm tool is perfect for this.
The rule must be moved along adjacent beacon slats in a bottom-up motion. So we fill the entire space between adjacent beacons with plaster.
The plaster is applied using smooth movements with light pressure on the rule. You will determine the pressing force yourself by filling out the first section, or maybe even less.
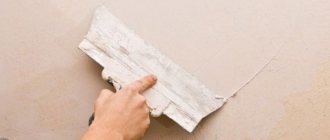
Protruding tubercles and surface irregularities can be removed with a sharp spatula. The same action can be performed with sandpaper, but then the surface of the wall will become dusty.
Pay attention to the recommended application thickness of each layer (indicated on the material packaging). If necessary, plaster is applied in several layers
When applying the second layer, the plaster will fill in uneven spots and holes. Between layers, many craftsmen lay a layer of primer for better adhesion.
Having leveled one compartment, they begin to work with the second, keeping an eye on the level. Wet plaster may settle slightly at the base of the wall, causing folds of excess material to appear. In this case, they must be carefully removed with a spatula and the surface leveled again without applying a new mixture.
We have described the manual method. You can also level a wall with plaster by machine, when the mixture is applied to the wall not with a spatula, but from a special mixer with a sprayer (beacons are also used here). The plastering process is accelerated by 4-5 times.
For mechanized application, you will need to rent special equipment - a plaster mortar pump. We have already written about how to choose the right one on the pages of our blog.
How to correctly set the markings for installation
Marking the wall for installing beacons has certain nuances. It is necessary to draw up a diagram for attaching the beacons. They should not protrude beyond zero. Where the mount is supposed to be installed, vertical lines are first drawn. It is necessary to retreat 200 mm from the corner. Holes are drilled in all corners of the wall. Install the dowels, and then screw in the screws. It is important that when marking the wall, the heads of the screws do not protrude beyond the plane. Otherwise, the wall will be uneven. It is very convenient to control the process using a laser level. If it is not there, you can use the building rule and the liquid level.
When marking the wall, pay attention to the intermediate fasteners.
Plastering on beacons - simple and effective
The technique for plastering a wall surface depends on the characteristics of the solution used. The easiest way to work is with light and plastic gypsum mixtures; the most difficult thing to plaster is with self-prepared cement-sand mortars. But in general, the essence of the process is not particularly different.
It is necessary to densely fill the spaces between the beacons to level the walls with plaster mortar so that the layer protrudes above their backs and then remove the excess mixture as a rule, using the guide posts as a guide. The presence of installed beacons simplifies the work and makes it possible to form a flat vertical surface. In order for the plaster to turn out to be of high quality, you need to follow several rules:
- if there are significant depressions relative to the plane indicated by the beacons, they are filled with the solution first and the entire surface begins to be plastered after the preliminary cape has set;
- they begin to plaster from the bottom, choosing one of the niches between neighboring beacons, gradually filling it with mortar and forming a plaster layer to the top, only then moving to the neighboring area;
- the plaster mortar is cut rigidly along the beacons, so that after plastering a certain area the backs of the racks are visible.
When the mortar on the plastered wall has set, the beacons are carefully removed, resulting in vertical grooves. They are sealed with the same solution, using the plastered surface as a guide for the leveling tool.
How to remove a beacon from a plaster layer
When the main finishing work is completed, all that remains is to remove the beacons, if they were not originally made from the mortar itself. In this case, the work is performed in the following sequence:
- First, prepare the necessary tools to hook and remove the beacons. It is optimal to choose pliers, as well as a plaster scraper.
- The next step is to determine the localization of the beacons. When using metal guides, it is more convenient to use a magnet when the profile has hidden the plaster layer. However, you should still leave marks in advance about exactly where the beacons are located.
- Each of the found profiles is pulled out from above and therefore a stepladder is useful. Using a scraper or other tool, you need to remove part of the frozen coating and pry off the strip.
- Next, use pliers to pick up part of the guide with twisting movements.
- Slowly, use pliers to remove the beacon from its seat - you should move in small sections with a length of 150-200 mm.
- The recesses remaining after the beacons are removed are sealed with the same plaster composition as the main coating (gypsum or cement mortar).
The work begins with marking, and after the laid coating has dried, the beacons are removed.
It is recommended to pull out the beacon using top-down movements
With the help of beacons, leveling of plaster is carried out at a high quality level. The surface is smooth, durable, and wear-resistant. In this case, it all depends on how competently the installation of the beacon profiles was carried out. The smoother they are fixed to the wall, the easier it is to plaster.
Was this information useful to you? Share in the comments!
Process of applying the mixture
In most cases, to level walls with your own hands, it is recommended to use plaster gypsum mixtures.
This plaster solution has a large number of advantages:
- This plaster has a high level of plasticity.
- The layers of this mixture can be thick; the surface will not be covered with cracks upon completion of the repair.
- Plaster with gypsum will provide a high level of sound and thermal insulation.
- It will not have precipitation or lumps on the surface of the walls.
Holes and recesses in the wall must be sealed in advance with cement mortar and allowed to dry. Before starting plastering, you need to carefully stir the mixture using a hammer drill. Only after this can you begin to distribute the plaster over the surface. When applying the solution, it is better to use a wide spatula so that you can apply the plaster in a thick layer. It is necessary to level the layers of the plaster mixture from bottom to top, using the rule (a bar of smooth reinforcement). After leveling the plaster, it is better to remove the excess immediately so that it does not dry out and interfere with the finishing work.