There are two technologies for decorating door slopes: plastering and decoration with hard finishing materials such as laminated MDF, plastic, plasterboard, etc. Leveling the door slope with plaster is the most reliable method from a safety point of view: there are no cracks or gaps left, and it will be very difficult to knock out the doors. That’s why slopes are usually plastered near the entrance doors. But, as always, there are disadvantages: this work takes quite a lot of time, and without skills it is difficult to achieve good results. It's easier to sheathe it with something. You don’t need to be a visionary to assume that most people make their own slopes from plasterboard. It’s clear why: the material is inexpensive, the technology is known, it’s easy to work with, and the results are good.
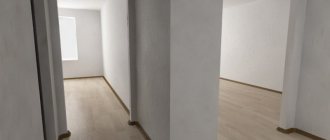
This is what the doors look like after installation - you need to make slopes
To decorate slopes indoors, ordinary drywall is used. If there is a need to make a slope outside or in a damp room, you need to take a moisture-resistant one. The thickness of the sheets is usual, the same as used for walls - 12.5 mm.
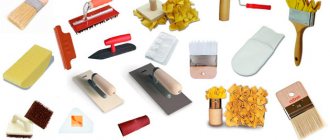
You will also need a good paper knife for the job; you may also need perforated paint corners and foam. You will definitely need putty: to seal the cracks and bring everything back to normal.
This is what doors may look like after finishing the slopes with plasterboard, and you can do it yourself
Ways to seal an opening above a door
Making repairs with your own hands is doubly pleasant. After all, this allows you to enjoy the process and gives you the opportunity to really get what you want. And independent actions are an opportunity to save money. As a result, this approach is very popular among us, but many suffer from it. After all, any repair involves certain difficulties that have to be overcome. And very often unforeseen circumstances or unusual situations arise. For example, there is a space above the door that needs to be filled. What is the best way to do this? What tools and materials should I use? How to properly lay the opening above the door?
Opening above the door
Let's try to answer all these questions, using photos for clarity.
Drywall installation
Before you seal the opening above the door, or completely get rid of the old passage, you need to measure it in order to cut the gypsum board sheets accordingly. The material needs to be cut with a sharp knife, and then broken at the point of the cut. Even if it is simply necessary to reduce the doorway, then to fasten the sheets, in any case, self-tapping screws are used, which are fastened in increments of 10-15 cm and indented from the edge of the sheet by 15-20 mm. To avoid problems with subsequent surface finishing, it is necessary to recess the head of the fastener into the material.
The opening in the wall is sewn up on one side first. The internal space needs to be filled with heat and sound insulating materials. Mineral wool is usually used. Polyurethane foam seals the gap between it, the wall and the frame. It is also used to cover the voids between the outer wall and the end of the drywall. After the foam has dried, its excess is cut off using a knife.
Removing the old door
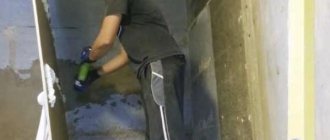
First, the door leaf is removed from the hinges. If you no longer need the door itself, then its frame can be cut into several pieces with a saw. After that, each piece is torn off from the ends of the opening using a crowbar.
Usually, during the dismantling process, the surfaces of the openings in the places where the boxes are attached deteriorate and do not meet the requirements in terms of technical condition. Therefore, it is recommended to putty the surface.
Since leveling a doorway is not at all easy, it is necessary first of all to pay special attention to the quality of assembly of the metal frame. How it all happens:
- It is necessary to assemble two frames at the edges of the doorway. That is, one will be closer to the wall of one room, the other closer to the wall of the adjacent room. In this case, both frames are usually not connected to each other. These are free-standing elements.
- It is necessary to cut four pieces from the guide profile with a length corresponding to the height of the doorway. They are secured using “quick installation” dowels along the edges of the vertical ends. To do this, each profile must be installed in place, using a plumb line and level, and holes must be made with a puncher every 30-40 cm. The dowels will be inserted there. Please note that each profile is installed slightly deeper into the opening, leaving space for installation of gypsum board sheets. That is, the distance from the wall to the profile should be equal to the thickness of the sheet. It is best to use plasterboard with a thickness of 12 mm.
- Now you need to cut several pieces from the rack profile, the length of which should be equal to the width of the doorway. They are used as crossbars that connect racks made of PN elements.
- On each side, one crossbar must be installed directly to the upper end of the opening, and one to the lower end, that is, near the floor. Intermediate elements are placed every 40-50 cm.
- If there is a need to increase the rigidity of the entire structure, then between the crossbars, right in the middle of the doorway, it is necessary to vertically install sections of the rack profile, which will connect the crossbars. The result is a cellular lattice of profiles.
The frame is ready, you can proceed to installing plasterboard sheets.
What you need to get started
Like any change of layout, this process requires official permission to carry out such work. If the structure of load-bearing walls is violated, this is strictly prohibited. And with simple interior partitions this is quite possible. After receiving the relevant documents, you can immediately begin work.
Before you start work, you need to make sure that all the required tools and materials are prepared in advance. Before installing the frame, the door frame is first dismantled, so you need to consider the tools that may be useful during disassembly.
So, to get started, you will need:
- hacksaw;
- crowbar or other pry bar;
- hammer drill or drill;
- scissors for cutting metal or grinder;
- construction or regular sharp knife;
- screwdriver;
- level and plumb;
- brush with metal bristles;
- putty knife.
Necessary materials that are best taken in reserve:
- several sheets of drywall;
- rack and guide profiles;
- insulating wool;
- putty;
- primer;
- dowels;
- self-tapping screws for fastening drywall;
- self-tapping screws for connecting the profile;
- polyurethane foam;
How to seal an opening over a door with plasterboard. How to cover a doorway with plasterboard
Before starting work, it is necessary to draw up a sequence of actions. It roughly looks like this:
- door dismantling,
- cleaning the doorway from debris, pieces of plaster, remains of the box,
- taking out the trash,
- taking measurements,
- frame installation,
- drywall installation,
- Finishing work.
Dismantling the door occurs first of all; firstly, this is the dirtiest work, and secondly, it is associated with certain damage, the degree of which determines the course of subsequent installation of the plug. Technologically, the process is quite simple:
- remove the door from its hinges,
- remove trims,
- unscrew the screws from the box (if any),
- make cuts parallel to the ground along the upper and lower edges of the side strips,
- remove one of the side strips,
- remove the top
- dismantle the remaining parts.
Next, we look at the result and move on to clearing the doorway of debris. If the work is done carefully, the wall will not be damaged, otherwise pieces will be broken off. There is no need to seal them at this stage. Using a hammer, carefully knock off all excess debris (pieces of plaster, broken stone, etc.). The end result is a smooth, even surface (there is no need to bring it to perfection, the main thing is that the rule is level at the end of the wall).
Work stages include
I believe that work on drywall can be divided into two technological approaches.
- The first approach is professional. It complies with all technological maps developed by drywall manufacturers. The most famous technological sheets of the Knauf company.
- The second approach is amateur. It is possible due to the versatility of plasterboard profiles.
For example, a proper plasterboard box should be made from PS rack profiles. In an amateur approach to installation, the rack profile can be replaced with any other PN or PP profile, the main thing is that the structure is durable.
Next, I will show two options for making a doorway in a plasterboard partition:
- Professional doorway in a plasterboard partition on a frame made of metal and wood according to the Knauf technological map;
- Doorway in a partition made of HA in apartments, private houses, small spaces.
How to reduce a doorway with drywall
When remodeling a home, owners sometimes encounter a situation where the size of the doorway requires reduction. It is very easy to do this with your own hands, but before you sew up the doorway with plasterboard, you need to apply a layer of plaster on the wall near the door corresponding to the thickness of the plasterboard sheet.
Using drywall, the doorway can be reduced in the following way:
- plaster is removed 10 cm from the edge of the doorway;
- markings are applied to the walls and floor;
- according to pre-prepared markings, the starting profile is attached to the floor and ceiling;
- Point profiles are placed on the finished starting profile, which are then connected with self-tapping screws;
- after the frame is completely installed, it is necessary to reduce the original dimensions and cut out fragments from plasterboard for the future structure;
- special glue is applied to areas of the wall that have previously been cleared of plaster (it is better to do this with gloves). Plasterboard sheets are attached to the applied glue and after its polymerization, the edges of the sheets are fixed with self-tapping screws;
- The doorway slopes must also be reduced in size, after which they are covered with a strip of drywall, and all joints must be sealed with your own hands.
The doorway, especially if it concerns the front door, can not only be reduced, but also insulated or isolated from extraneous sounds. This is done before covering with plasterboard, after the frame is installed.
It is better to choose polystyrene foam or mineral wool boards as insulation.
Instructions for installing plasterboard slopes
Elements cut from plasterboard can be installed:
- on polyurethane foam;
- for putty;
- on the frame.
On polyurethane foam
Any person can “glue” drywall onto the foam. It
is very simple to fix the cut sheets onto the polyurethane foam. But this can be done right away if there are no large holes on the slopes. If the depressions are up to 3 cm, you can install the slopes right away, only fill the largest potholes with foam first (do not apply a lot, about 1/3 of the volume of the excavation).
If the unevenness is deeper than 3 cm, it is better to pre-fill them with cement mortar or a composition for starting plaster.
The procedure for installing plasterboard door slopes on polyurethane foam is as follows:
- Having prepared the site (removing dust and falling pieces, filling too large recesses with foam), apply mounting foam to the back side of the plasterboard blank with a thin (no more than 1 cm) snake.
- Place the element in place, press it against the wall, the way this fragment should stand.
- Tear it off and put it aside for 5-8 minutes. The foam remained on the wall and on the sheet of drywall. In a few minutes it increases in volume.
- Place part of the slope in place and press it well. Leave in this state until the foam has completely hardened (12-24 hours).
- Seal the gaps between the plasterboard elements and the wall with plaster.
The plasterboard slope has been completed; finishing work remains.
The disadvantages of this method are quite serious. Firstly, the side and vertical surfaces must first be leveled, otherwise you will not be able to install the elements evenly. Secondly, there is a possibility that the workpiece will bend/bend. Thirdly, voids remain. Well, and the most important thing is that the mount is not the most reliable. But the door slopes are made simply and quickly.
For putty
Instead of polyurethane foam, you can “glue” the cut out fragments onto diluted putty:
- Apply cakes of a composition for working with drywall, diluted to a paste (preferably the finishing one, it is more “sticky”), onto the sheets. They should be located around the perimeter and somewhere in the middle.
- Spray the slope cleaned of dust and cracked old plaster with water from a spray bottle.
- Place the workpiece in place and press well. You can rest your palms on the plane and “sway” the fragment from side to side. Feel that the plaster has begun to blur, and the piece of drywall has “stuck.”
- If the fragment stands tightly and does not move, you can leave it until the putty sets (for a day, sometimes two). If an element is held unsteadily and can move, it needs to be supported with something. Preferably at the edges and in the middle. Leave it like this for at least 10-12 hours. Then the supports can be removed and wait for the putty to dry completely.
Methods for applying putty “patches” can be different.
The main thing is that the element holds well. The disadvantages of this method are the same. You just need to say that the slopes on the windows in our apartment are made in exactly this way. This happened 9 years ago, and still no problems.
On the frame
A more labor-intensive, but also more reliable and versatile way to install plasterboard slopes is on an assembled frame. The frame is made of wooden blocks or special profiles.
The guides are placed vertically along the door jamb and at the corner. Between them, at a distance of 50-70 cm, small transverse jumpers are placed.
To install plasterboard slopes with your own hands, first assemble the frame. It can be made from profiles or from wooden blocks
There is one peculiarity with this method: measurements are taken after the frame has been installed. The cut out parts are put in place and secured with self-tapping screws.
If the frame is assembled from profiles, self-tapping screws are needed for metal; if it is made from bars, screws are needed for wood. In any case, you need to twist it carefully so as not to tear the cardboard. If you overtighten, the plaster may even burst or crumble. A large number of defects of this kind will lead to the fact that the plasterboard slope will not hold up well.
Installation of finishing on a frame base
- Before starting work, to prevent the surface from crumbling, prime it. To mount the frame base, wooden slats or a universal profile are suitable. We need to do everything so that the frame fits tightly to the wall; if necessary, we will level the wall.
- The facing materials will be attached to the sheathing using plastic dowels and impact screws. Installation of the frame base begins with the installation of two slats with jumpers secured to them. Installation of sheathing varies for each material.
- The laminate is laid in different directions, but regardless of the direction, all elements snap into place. To ensure stability of the structure, the panels are additionally secured.
- Plastic is laid in the same way as laminate flooring, only it needs to be secured additionally, because plastic is not so durable.
Installation of gypsum board sheets
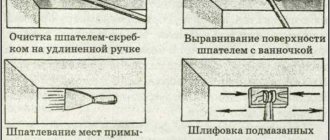
There is nothing complicated about installing gypsum boards. The main thing is to measure the size correctly and cut it carefully. This is done using a construction knife: first, cuts are made along the marked contour, after which the sheet is bent along the cut line. And so on along the entire cut line. There should be two such sheets. First, you need to seal the opening on one side and secure it along the entire edge with an indentation of 1.5-2 cm, as well as along the transverse elements. This is done using self-tapping screws screwed in with a screwdriver. The distance between the fastenings should be no more than 15 cm, and the heads of the screws should not stick out, but, on the contrary, should be slightly recessed deep into the gypsum board.
When the first sheet of plasterboard is installed and secured, you need to move to the adjacent room to close the second side. But before this, you need to fill the void with insulating material, and it is advisable to blow out the gap between it and the frame with polyurethane foam. Then apply the next piece and screw it with self-tapping screws. If there are small gaps between the ends of the wall and the gypsum board, they must be covered with putty.
Door installation and finishing
The main work has already been done, and installing the door is a separate topic for discussion. Let us only remind you that the door must be installed together with the door frame. Then it will be smooth. The box itself is attached to the created opening. The plasterboard partition with the door was reinforced with a wooden block. The door frame is attached to it, as well as to the top lintel. Knowing all these details, you need to think again about the initially chosen size of the doorway.
The finishing work in this case is quite standard. All sheet joints and screw heads are puttied. All joints are additionally reinforced with serpyanka, which is laid immediately after the putty and pressed into it. Further finishing depends on what finishing coating will be used.
To save space, some resort to using a sliding door. How to make a plasterboard partition with a compartment door can be found in the video.
Required tools and material
So, let's start by preparing the tools:
- impact drill with drills and bits;
- scissors or an angle grinder with a disc for cutting metal;
- screwdriver;
- a stationery or construction knife for cutting drywall;
- hacksaw and level;
- nail puller;
- spatulas, brushes.
Let's move on to the material:
- guide profile PN and rack profile PS in the required quantity;
Mounted frame made of profiles in the door opening - drywall, two slabs are enough;
- sound insulator, in our case mineral wool;
- polyurethane foam;
- fasteners;
- deep impregnation primer for drywall;
- putty for drywall.
Once the preparations are completed, you can begin laying the opening.
Arch device
This architectural element is now very popular.
Often this design of the opening is used at the entrance to the kitchen or living room. An arch allows you to expand a small room (for example, a corridor) by visually combining it with more spacious rooms. Despite its apparent complexity, it is not at all difficult to build it with your own hands. The operating procedure here is as follows:
- two pieces of drywall are prepared (they must be 20 cm wider than the opening, their height is determined by the formula - the size of the portal in diameter divided by 2 and plus 20 cm);
- then, using a pencil tied to a thread, the second end of which is fixed in the middle of the lower edge, a semicircle is drawn;
- the outlined area is cut out with a knife or jigsaw;
- do the same with the second fragment.
Thus, if the opening is 80 cm, then the height of the arch will reach 40, etc.
Having prepared these two main elements, we begin to manufacture the frame. The profile here can be used as a ceiling profile, since there will be no high loads on the structure. The UD is attached around the perimeter of the upper part of the opening, at the level of the brick, so that it does not reach the lower limits of the arch by about 6 centimeters.
You will need to secure the UD along the figuredly cut edge of the gypsum board. In order for this profile to repeat the bend given to the arch, it must be trimmed in a special way. Every 2-3 centimeters, notches are made on it with scissors (the side wall and end wall are cut), as a result it becomes flexible. It is fixed to the drywall with self-tapping screws as often as possible, with an indentation from the edge to the thickness of the sheet used. It is most convenient to do this on the floor.
Curtains and screens
Playing with interroom transitions, designers began to widely use screens and curtains, giving the rooms an aura of mystery. However, this rather unusual decor also requires preliminary preparation of the surfaces of the doorway. They are carefully leveled with plaster or drywall, since in any case these surfaces must be smooth and symmetrical.
Curtains that allow you to close the interroom passage are mounted on cornices fixed directly above the opening. In addition to fabric curtains, you can decorate the doorway with hanging curtains, which can be made with your own hands using:
- tree;
- ropes and harnesses;
- pebbles, beads, etc.
Such curtains will organically fit into the interior of the room and add uniqueness to it.