Apartment renovations affect every room, the bathroom in this case is no exception. Modern plumbing equipment is compact and aesthetically pleasing. However, Soviet-era apartments have old, bulky pipes and risers that cannot be moved to another location or removed completely. In this situation, a plasterboard box in the toilet comes to the rescue. This design looks neat and fits perfectly into any chosen style of room.
The simplest way is decor
When the budget does not include repair costs, and the pipes in the toilet are quite annoying, you can get by with minimal expenses. We are talking about decorating visible parts of the pipeline.
This method can be a real salvation when the head of the family, instead of repairing, chooses other ways to spend his leisure time - for example, fishing or basketball with friends. Moreover, both women and men can handle decoration. The main thing is to have inspiration.
Remarkable imagination and free time on a day off will help turn your thoughtful office into a realistic jungle
Depending on preferences and mood, the pipeline can be disguised as anything - turned into a tree, into an animal, or decorated with beautiful decorative elements.
Main types of decoration:
- stick a film with a suitable pattern over the pipes;
- paint with waterproof paint to match the color of the walls in the toilet room;
- depict a unique pattern or reproduce a birch trunk, oak bark or other material using paints;
- use decorative stones, beads, chains, twine and other elements used for needlework.
The simplest and most convenient option is to paint the pipes with paint that harmoniously matches the color of the walls. Or stick a film with a pattern.
Image gallery
Photo from
Decorative paint, shells, beads
The pipe can be turned into a giraffe
Make a birch tree from a pipe in the toilet
Unique pattern on pipes
It is important here that the material can withstand a humid environment and high temperature if hot water enters the apartment through one of the pipes.
For the toilet room it is better to use water-based paint, choosing the most favorable shade that can harmoniously fit into the overall style of the room
The decorating method is also great for hiding pipes in the kitchen or bathroom. In addition to decorating pipes in these rooms, you can use other methods of covering communications.
We also recommend that you familiarize yourself with the best options for masking gas pipes, used by resourceful owners.
Selection of material and necessary tools
For any installation work, you cannot do without tools.
To build the box we will need:
- container for mixing the solution;
- spatula;
- drill or screwdriver;
- perforator;
- construction corner;
- iron scissors;
- pencil and tape measure;
- laser level and plumb line;
- hammer;
- pliers;
- stationery knife;
- whisk attachment;
- rollers;
- bath.
Once the necessary tools have been assembled, we proceed to purchasing the material.
You will need:
- Green plasterboard – moisture resistant;
- rack and guide profile;
- metal screws;
- dowels;
- fasteners and hangers;
- putty;
- serpyanka;
- deep impregnation primer.
Performing markup
When all the preparatory work has been completed and the structure for concealed mounting of the toilet has been installed, markings are made for attaching the frame:
- In the example under consideration, the top sheathing is done to a minimum, so the mark is placed flush with the metal frame. If there is no laser level to align in one plane as indicated, the line is transferred using a square or a building level.
- Then the plane of the front frame post is transferred to the walls.
Preparatory work
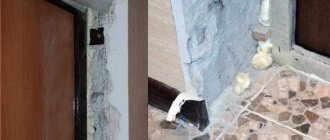
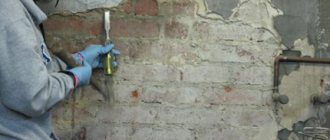
It’s worth noting right away that if the sewer riser is old, then it is advisable to change it before installing the duct. If a pipe ruptures, you will have to break the box to replace them. So, before starting installation work you need:
- prepare the walls in the toilet;
- draw up a work plan;
Designing a plasterboard box to hide a waste pipe in a toilet
- draw a marking;
- prepare the necessary material;
- assemble the tool.
It is worth noting that if you do everything correctly at the preparatory stage, then there will be no problems with installing a plasterboard box in the toilet.
Step-by-step instruction
A square will help connect the guides at right angles.
Let's take a closer look at how to make a box in a toilet from plasterboard. There are simple step-by-step instructions for this. In it, work is carried out with a vertical pipe that runs in the corner of the toilet.
- Markings are being made in the toilet. On the ceiling, 5-10 cm is removed from the pipe along both walls and a mark is made. Using a plumb line, both marks are transferred to the floor. A line is drawn through both points on the ceiling so that they form a right angle with each other and are perpendicular to the plane of the walls. The same is done on the floor. We connect the ends of the lines on the walls to each other, forming two more lines, but this time vertical. This is how we designated the places for attaching the profiles.
- The guide profile is cut to the specified dimensions and secured with dowels along the lines. There will be two long vertical profiles that run along the walls, as well as two small profiles that connect at right angles on the floor and ceiling. At this stage, it is very important to use a level so that the installation of the plasterboard box in the toilet goes perfectly. All guides must be secured level and perpendicular at the joints. They need to be attached end to surface.
- A stand is made from a long profile, which is inserted into the guides so as to form the corner part of the box. All guides must be secured together with small metal screws.
The most popular options for lintels
The guide profile is cut to make several lintels that will be installed between the central post and the vertical guides along the wall. Jumpers can be installed in 60 cm increments.- Drywall can be cut to the required dimensions in advance or done on site. The sheets are screwed to the profile with phosphate screws in increments of 15-20 cm. The joints of the sheets should fall on the jumper.
Self-tapping screws are also screwed into places where jumpers are installed.
This is what the simplified instructions for creating a plasterboard box in a toilet look like. However, there are a number of nuances that deserve additional attention.
What it is?
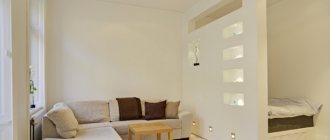
The box in the toilet is a kind of frame that allows you to hide its contents from view and brighten up the overall impression of the interior of the room . This design is made from various materials individually for each bathroom, taking into account its size and configuration.
Today, the production of boxes is possible from those materials that are sold in any hardware store and can be processed at home without the need to use special equipment. The shape of the product can also be any. Thanks to this, the owner himself can assemble the toilet box himself, especially if he is, in principle, no stranger to working with his hands.
In addition to its purely aesthetic function, a well-thought-out box can also perform other small tasks - for example, include shelves in its design for storing various useful things.
False wall
This is the simplest option: behind the toilet there is a compartment where the utility networks run. This compartment must be hidden from view. What are we doing?
- First, we set the depth of the new compartment and draw a contour according to this indicator: ceiling, walls and floor.
- Secondly, guide profiles are installed along the contour and secured with dowels.
- Thirdly, horizontal crossbars from a ceiling or rack profile are installed. There must be space left for an inspection hatch through which maintenance of engineering systems will be carried out. The distance between the crossbars is 40-50 cm.
- Fourthly, the false wall is covered with plasterboard.
- Fifthly, the joints are treated with putty using a special tape for seams. After which a complete finishing is carried out with a putty solution, followed by sanding and painting, wallpapering or ceramic tile cladding.
Of course, a false wall is not a plasterboard pipe box. This is a simpler design, but it can also be used to hide utility lines.
Finishing drywall in the bathroom
You can cover drywall in the bathroom with any suitable materials: tiles, stone, bathroom wallpaper, water-repellent paint, acrylic varnish and other means.
Between the tiles and the drywall, it is advisable to put a plaster polypropylene mesh, which is glued to the drywall using PVA and secured with construction staples, and the tiles are glued on top. All other rules for laying tiles apply here: the use of crosses, planks, levels, pauses between several laid rows, and more. The only difference is the use of materials, so all materials for the bathroom must have water-repellent properties: primer, grout, varnish and glue.
Drywall is a very convenient material for renovating various rooms; it can be used to perfectly level walls and hide all communications from view. And the bathroom is no exception.
The second way is to buy a ready-made box
Another option is to use a pipe box. This could be the construction of a home-made structure or the purchase of a finished factory product. The second method is simpler.
The shape and size of the purchased boxes allows you to choose exactly the option that will successfully disguise the outer parts of the pipeline not only in the toilet, but also hide the heating pipes in other rooms.
A significant drawback is that ready-made boxes cannot be used in bathrooms with complex geometry of communication systems. This is when there are a lot of pipes and they are randomly located throughout the room.
Image gallery
Photo from
Metal box to protect communications
A plastic box will help hide the pipes
You can choose the desired color of the box
Ready-made extruded polystyrene box
As for the material and color of the finished structure, there is room for the buyer’s imagination to run wild - it can be chosen to suit almost any room design.
When the desired color is missing from the palette of the material you like, this can be corrected with the help of moisture-resistant paint and a brush.
The improved structure can be installed only after the paint has completely dried. You should look at the jar for the exact time - the manufacturer must indicate this information on the label of its products.
The plastic box has an aesthetic appearance and, if necessary, can be easily dismantled to gain access to the pipe
The installation process is extremely simple - you need to measure the required length with a tape measure and, after marking it with a pencil, carefully cut off the excess part of the structure.
Then attach the box to the wall with fasteners or liquid nails - it all depends on the type of material from which the structure is made and the manufacturer’s recommendations for its installation.
Creating a door in the toilet behind the toilet: simple and useful
The construction of a cabinet behind the toilet is considered a multifunctional solution to the problem. Communications are securely hidden, while access to them is open, and household supplies can be stored in the locker. First you need to make a frame out of wood.
Hinges should be installed on the frame itself, on which the door will be hung. To protect against moisture, the wood is coated with varnish and paint. And the appearance of such a device is quite nice. You can make a screen for pipes under the cabinet.
Screen hardware features:
- The screen should fit snugly against the walls;
- Openings are provided for water supply;
- The screen should be easy to remove and put back in.
The material for the cabinet can be chipboard, plywood, or plasterboard. To build the doors, you need to take the necessary measurements. Then a blank is cut out from the required material and inserted into a niche. Then they cut out the screen.
Sheathing with plasterboard
Now all that remains is to cover the frame structure with plasterboard. The general technology is similar to the cladding of other frame systems, but is produced in two layers: this is necessary to enhance the strength characteristics of the cladding.
First, two strips are cut out of drywall and mounted on the top “shelf.”
Then the first layer of the front casing is installed, in which holes are pre-cut for mounting and connecting the toilet, as well as for the flush mechanism. Fastening to the profiles is done with ordinary black self-tapping screws, and to the frame - with self-tapping screws and a drill.
When the first sheet of drywall is secured, prepare the second sheet. Holes are also cut out in it, after which it is installed on top of the first gypsum board. Fastening is done with self-tapping screws of suitable length, and care must be taken not to get into the heads of previous hardware.
Marking
It is performed directly on the ceiling, floor and walls of the toilet.
Accurate markings are the key to a strong and durable structure
It is done this way:
- there is the most protruding point on the communications, from which they retreat 3-5 cm and mark a line with a pencil;
- then take a laser level and draw a straight line between the ceiling and floor, passing along this mark. If you don’t have a level at hand, you can use a plumb line with a dye thread;
- the same actions are performed on the opposite wall;
- markings around the installation are made with a distance of 5 cm from the frame;
- then the horizontal surfaces are marked, for this we need a corner;
- we place a corner to the wall at the intersection with the floor and draw a line perpendicular to the vertical mark at an angle of 90 degrees;
- We perform the same actions on the other side;
- on the ceiling we do the same;
- draw a parallel line above the installation, level with a deviation of 4 cm.
The marking can be considered completed. We begin to install the metal frame.
Markings applied to walls, floors and ceilings
Plasterboard wall covering in bathrooms
Drywall in the bathroom can be fixed in three ways, each of which takes up a different space and is used at the choice of the developer.
Classic frame made of metal profile
To install a metal frame, you need the following tool:
- Hammer – for fixing the guide profile to surfaces.
- Screwdriver - for installing drywall sheets and fastening frame parts.
- Laser level or plumb line - for aligning the frame exactly vertically.
- Metal scissors - they are used to cut profiles.
- Tools for marking: dyeing thread, tape measure, pencil, marker.
- Profile cutter - will allow you to connect some parts of the frame without screws.
- A hacksaw or scissors for cutting drywall and a hole saw for drilling holes.
Tools such as a rasp and a corner plane will not be useful. They are needed to create smooth edges and chamfers at the ends of the sheets, so that the seams can be better filled with putty. There is no point in applying putty under the tiles.
Step-by-step instructions for assembling the frame and installing plasterboard sheets
The first step is to check the angles in the room, which should be exactly 90 degrees. This is important for the bathroom, because when installed in the corners behind the plumbing fixtures, large gaps will form that will have to be covered with curb tape.
At a minimum, you need to set exactly the corner in which the bath will be mounted.
The bathtub must be exactly adjacent to the walls so that there are no gaps left
After drawing the lines on the floor, you need to check the planes of the walls with a level, since they can tilt upward towards the room. If so, then adjustments are made.
It is necessary to retreat 28 mm from the most protruding point on the wall - this is the width of the ceiling profile for plasterboard. From this point, verticals are lowered along adjacent walls from the one selected for alignment. The lines need to be drawn with dye thread.
To the resulting lines, add another 12 mm for the thickness of the plasterboard and approximately 10 mm for the thickness of the tiles with glue. This will give you the final position of the wall with finishing, so that you can calculate whether the plumbing and furniture will fit.
If drywall is taking up too much space, you may have to choose a different installation method. The minimum offset when installing drywall on a metal frame is 5 cm.
If according to the calculations you are satisfied with everything, we draw a closed contour on the walls and ceiling along which the guide profile will be mounted.
Drywall box for the toilet: how to hide the pipe?
Everyone loves a clean and beautiful toilet. A plasterboard box can give the design of a room a complete look, as it will hide all communication pipes and electrical wiring that are in sight.
Many owners imagine a bulky and heavy structure that only a specialist can install. In fact, everything is not so difficult and it is quite possible to assemble it with your own hands. Today, plasterboard material is in high demand on the market. It has excellent properties, which makes it a great way to decorate your toilet. How to make a box for pipes in a toilet. How to disguise a sewer pipe?
Important points
To summarize, we can highlight several important points that should not be neglected when installing a pipe box in a toilet:
- In places that require periodic inspection, you need to cut out a window. You can put a special door on it with frog hinges.
- Doors are also required in areas where there is a meter or valve.
- It is better to make an approach for periodic inspection on the front part of the structure. The door for any equipment can be mounted on the side panel of the box.
- The pipe joints may need repairs, so it is important to leave a clear path to them.
- If the pipe bends are located outside the edge of the box, then the hole for them is cut a little larger. Subsequently, the gap between the pipes and the box is filled with foamed polystyrene foam so that the vibration of the pipes is not transmitted to the box.
USEFUL INFORMATION: Ceiling frame from a profile for plasterboard: diagrams and installation
A DIY toilet box will not only hide unattractive pipes and risers, but will also give the room a beautiful, finished look.
Photo
Toilet 1.2 sq.m. with a plasterboard box - repair estimate
Toilet with pipes in a PVC box and a boiler in the closet
Roller shutters in the toilet
The easiest way to close the pipes in the toilet is to install plumbing shutters (roller blinds, roller blinds). This option is ideal if you need to cover the entire back wall. Guides are installed on the sides, a reel with strips is attached to the top, that’s all, the installation is completed, you can use it.
Roller shutters in the toilet can only cover part of the wall
The disadvantage of this option is the price of roller shutters. She bites. But at any time you can raise the roller shutter that covers the pipes, and you can repair it. There is another way to reduce the price - install roller shutters not from floor to ceiling, but cover only the central part, where all the connections are located.
You can hide the pipes in the toilet behind roller shutters
Even if you do not need to cover the entire wall, but only part of it, you can build a wall from gypsum plasterboard or wall foam blocks and attach roller shutters to this wall.
The third method is to assemble a homemade box
Often the option of decorating pipes is simply not suitable - there are too many pipes and they are not located in the most convenient way. Here another method of camouflage will come to the rescue - arranging a box, inside of which all the pipes will be located.
Stage #1 – decide on the design of the box
The option of installing a box to mask all pipes passing through the toilet room is the most popular among users.
This is not only an aesthetic, but also a practical solution - once you install the structure, you can forget about the pipes, at least until the next major overhaul.
Let's first take a closer look at the most popular types of box construction - with a solid wall and an opening one.
Option #1 – box with a solid wall
Boxes with a solid wall consist of a frame, walls and, if necessary, facing material. They must also be equipped with a hatch for carrying out an inspection - inspecting the external condition of the pipeline and shutting off the valve of the water supply to the house/apartment.
All the pipes are hidden inside this design, and also the cistern of a wall-hung toilet and bidet, a boiler and other unsightly communication elements can be hidden there.
Boxes come in a variety of shapes and sizes. Often a box the full height of a room is called a false wall. This solution is used for vertically running pipelines.
If the pipes run vertically, then you can build a false wall with your own hands by placing a profile and attaching drywall to it
Plastic panels are especially popular - they are easy to install and remove if necessary. And the price of this material is more than affordable.
However, even when making a plastic box, you should provide a hole that can easily open in the place where the valve is located to shut off the water supply.
If the false wall is made of plasterboard and tiled on top, then the presence of an inspection window is a necessity - in case of any problems with the pipeline there should be convenient access to the pipes.
The inspection window can be disguised by covering it, like the entire wall, with the same tiles. The main thing is that the door has a reliable mechanism designed for the weight of tiles + tile adhesive
Option #2 – design with an opening wall
The second type of boxes is with an opening outer wall. Moreover, the wall can open completely or a certain part of it.
The structure of these structures is similar to the structure of a box with a solid wall, but differs in the presence of shelves inside - the free space next to the pipes is often used as a cabinet.
Image gallery
Photo from
Wardrobe with sliding doors
Full-width blinds behind the toilet
Wooden cabinet with hinged doors
Plumbing cabinet from inside
Also, often with vertically located pipes, the outer wall is assembled from different materials - for example, at the bottom there is a plastic panel, and on top there are sanitary blinds or a roller blind, behind which a cabinet with shelves is hidden.
Roller blinds as the outer wall of the box are more often used in America and European countries - they are not so popular here, because they look quite simple
Owners prefer to construct capital multi-level boxes from plasterboard or install plastic panels in their toilet rooms. Moreover, the choice of colors of the latter can please with its variety and low cost.
An opening wall is an extremely successful solution, especially when behind it there are not only pipes, but also other communication elements - a boiler, water meters, etc.
Roller blinds undoubtedly win here, having the main advantage - they rise, revealing the entire internal space of the box. And if necessary, they can be completely dismantled in a couple of seconds.
For lovers of original solutions, manufacturers offer unusual blinds - these are models with 3D images of animals, nature or birds
Stage #2 – choose the shape and size of the structure
The shape and size of the future box, behind which the pipes in the toilet will be hidden, completely depends on the characteristics of the pipeline. Each specific case will have its own nuances.
So, if a full-scale renovation is underway in a room with the replacement of pipes with the involvement of a construction team, then you should immediately discuss with them the issue of constructing a box behind which the pipes will hide.
The number of pipes in each bathroom is individual. As well as their location - the placement of the box completely depends on this factor
The same applies to the size of the box - the fewer pipes, the easier it will be to disguise them.
The most basic condition is to maintain a distance of 3 cm from the outermost point of the most protruding pipe or water meter, if one is installed in the toilet room.
A convenient option is when all communications are located along one wall of the toilet - this way you only have to work with this part of the room
Placing the pipeline along one of the walls of the toilet is the most convenient option. If desired, it will be convenient to disguise all communications by installing a false wall made of plasterboard. And the top can be decorated with the same finishing material as the rest of the walls in the room.
In addition to the false wall, the shape of the box for masking pipes can be:
- rectangular or square , extending from top to bottom or from left to right;
- angular or complex in shape in the form of a polygon to maximize the usable space of the toilet room;
- stepped , when several boxes of different heights are installed in one room;
- round.
The most difficult thing is to implement a multi-level stepped design - you first have to make a sketch on paper and calculate the length of each of the boxes.
Then calculate the amount of materials required and, having purchased everything you need, begin installation work.
Image gallery
Photo from
Rectangular box shape
Complex shape of pipe box
Multi-level box option
Stage #3 – building a homemade box
You can make a structure for masking the pipeline in the toilet room yourself or invite craftsmen.
Regardless of the type of material chosen for arranging the box, one should not forget about the inspection window - access to the pipes should be as simple as possible
Among the materials used in the manufacture of boxes, the most often are the following:
- plastic panels;
- moisture-resistant drywall;
- moisture-resistant MDF panels or plywood;
- sanitary roller blinds, roller blinds, blinds.
If drywall requires additional finishing with tiles, wallpaper or other material, then all other options are used as a finishing coating.
Image gallery
Photo from
Colors of plastic panels
Plumbing blinds for the toilet room
To install panels or blinds, you need to build a frame. To do this, use a metal profile or a wooden block. Self-tapping screws, construction mesh and putty will also be useful for leveling joints.
Tools: level, tape measure, screwdriver, grinder, pencil
Before you start installing the walls of the box, it is better to cut out the parts from cardboard and check if everything is as planned
When the material is selected, you need to build a frame by securing metal profiles or wooden blocks with self-tapping screws.
Panels or sheets of drywall will have to be mounted on this base.
If the box is lined with plasterboard sheets, then it will have to be tiled on top, mosaic or wallpaper glued - the same material as on the walls of the toilet room
Each of the considered options for masking pipes is interesting in its own way. Which one to choose for your washroom depends on your needs and the location of the pipes.
As well as having free time to arrange things and the desire to do it. After all, masking pipes in a small toilet will take much less time than in a combined bathroom.
On our website we also have instructions for making a box in the bathroom and a selection of the best ideas that will help you securely hide pipes in a combined bathroom and toilet. And also useful recommendations for arranging plumbing hatches, which will be needed when constructing a box in the bathroom and toilet.
We recommend that you familiarize yourself with these materials:
- How to close the pipes in the toilet: how best to hide and hide the pipeline
- How to hide pipes in the bathroom: a review of the best ways to disguise a pipeline
- Making a box for pipes in the bathroom: selection of building materials + installation instructions
- Inspection plumbing hatches for bathrooms and toilets: types, placement rules, installation features
The nuances of installing the installation for further trouble-free cladding
In order not to destroy the newly installed false wall, during operation of the installation you must follow a few simple rules:
- choose the right installation location. After all, the future screen may limit access to important objects in the bathroom;
- correctly align the plane of the supporting frame so that the false wall has right (90o) angles with adjacent walls, ceiling and floor. This is especially important if two structures are installed in a line. For example, for a toilet and a bidet. It will not be possible to level installation defects with a frame or gypsum board, since the frame forms the plane of the false screen. Therefore, during marking, the vertical and horizontal of the frame structure is carefully checked. At this stage, the problem can be corrected without great expense;
- The functionality of the installation is checked several times. If necessary, the drain is adjusted.
If the above conditions are met, you can begin covering the installation.
Tips from the pros
- To ensure the durability of such a box in a toilet or bathroom, professionals definitely recommend using moisture-resistant plasterboard (its sheets are green). You need to screw the material to the metal carefully; you should not recess the screw head too deeply, otherwise the fastening will not be effective.
- If the box is lined with light PVC panels or painted, then the structure will not have to withstand a large load. For it, it is enough to select the thinnest sheets of drywall 0.65 mm. For subsequent tiling, it is better to take thicker varieties of 0.9 mm.
- Since the bathroom is a very humid environment, it is best to treat the inside surfaces of the pipe box with an antifungal agent.
- Markings for guide profiles along load-bearing walls must be made from the floor.
Choosing plasterboard for covering a toilet installation
Drywall is chosen from two modifications:
- conventional (GKL), which is intended for rooms with dry and normal humidity conditions;
- moisture-resistant (GKLV) - it is used in any conditions, including humid and wet conditions.
Visually, a sheet of moisture-resistant drywall differs from the usual color. Its cardboard shell is not gray, but a light green shade.
Resistance to high humidity is built into the production stage:
- the cardboard is impregnated with polymer dispersions, which prevent the penetration of moisture into the sheet, but allow water vapor to erode out;
- gypsum contains hydrophobic chemical additives;
- Reinforcing fillers are introduced into the gypsum “dough”.
You can play it safe and choose GKLV. But it is not needed to finish the toilet installation in all cases.
If the toilet is separate, then its humidity regime does not differ from ordinary living rooms. There is no “source” of hot steam (bath or shower) that can penetrate into the plaster and condense there. And the water in the toilet water seal is at room temperature. The volume of water is very small, and this does not create conditions for humidifying the air above its natural norm. In such conditions, “simple” gypsum board is used, and before finishing it is treated with a primer with hydrophobic properties.
Note. GCR treatment with a moisture-resistant primer can also be carried out on the “inner” side of the sheathing before attaching the workpiece to the frame.
In combined bathrooms, only gypsum boards are used.
Layout of communications in the body of the box
CW profiles with high load-bearing capacity will be required. The quality of the installation depends on them. To avoid the risk of rust or scale, it is recommended to additionally coat the profiles with a metal primer.
Be careful when choosing lamps. It is recommended to purchase lamps with minimal heating, protection degree IP 67 or IP 68, which will protect them from moisture.
Layout of communications in the body of the box
Regarding fasteners: you will need small dowels and screws. This is justified by the fact that the walls in the bathroom are usually covered with tiles. To avoid accidentally chipping the surface during the drilling process, it is necessary to make holes that are small in diameter and short in depth. It is better to drive in dowels near pipes or tiles using a hammer with a rubber tip.
Pipe preparation, planning and marking
To answer the question of how to make a plasterboard box for pipes in a toilet with your own hands, it is advisable to study drawings and diagrams of similar structures in order to better imagine what you should get and follow the recommendations of experts.
Attention! Before starting work, you need to inspect the pipes. Existing defects and breakdowns must be eliminated without fail.
If the pipes are connected by welding, then the box can be solid. Threaded pipe connections require regular inspection; in this case, free access to the pipes must be ensured.
Important! Do not tightly close valves, meters and filters.
The quality of work largely depends on proper planning:
- Before you begin installing the pipe box, you need to measure the walls and openings and draw a drawing on paper.
- The dimensions of the box should be minimal so as not to take up a lot of space in the toilet. In this case, a distance of about 10 cm must be maintained from the pipes to the walls of the box.
If condensation forms on cold water pipes, you need to put foamed polyethylene covers on them or paint them with special heat-insulating paint. If this is not done, even moisture-resistant drywall can suffer over time.
- The outline of the future structure is marked on the floor, then transferred to the ceiling. A plumb line will help facilitate this process.
USEFUL INFORMATION: Drywall adhesive: which one to choose?
Types of drywall installation
Before you start working directly with drywall, you must complete the preliminary stages of work. That is, electrical wiring and water supply networks must be installed.
Pipes closed in a gypsum plasterboard box can become covered with condensation, which is extremely undesirable for sheets. To avoid this, it is necessary to treat metal pipes with a primer and water-repellent paint. And also ensure proper thermal insulation. For plastic pipes, it is recommended to use sound insulation, for example, using mineral wool. After the preparatory work is completed, you can begin installing the plasterboard sheets.
There are two methods that are used in bathrooms:
Frameless method
This method is only suitable for bathrooms with perfectly smooth walls. Preliminary treatment of the base surface with a primer will be required; after complete drying, the VGKL is attached to the surface using a special glue. Dissolve the glue in water, strictly following the instructions on the package. Let's start gluing.
If necessary, drywall can be easily cut using a regular construction knife (similar to a clerical knife) and carefully breaking the gypsum base along the cut. You can use a jigsaw, but it leaves a lot of plaster dust, use a respirator. After the glue has dried, it is necessary to treat all seams with putty, with or without reinforced tape, depending on the edge of the sheets.
Frame method using metal profiles
Metal frame for fastening drywall.
This method is the most preferable, since the adhesive, when exposed to moisture and temperatures, can weaken its bonding properties over time. But for limited small spaces, the frameless method is also applicable.
Using dowels and a level, a metal guide profile for drywall is attached strictly perpendicular to the floor. Then the profile strips are also inserted horizontally at a distance of 40-60 cm from each other. Ready-made sheets of drywall are screwed to the resulting sheathing using flat-headed self-tapping screws.
The self-tapping screw must fit into the profile by at least 10 mm. Be careful and make sure that the heads of the screws do not stick out from the sheets, but you also should not recess them too much. Next, to connect the joints, use elastic putty and reinforced tape, if necessary. The screw heads will also need to be covered with putty.
When installing a plasterboard ceiling, only the frame method is used.