When we hear the word repair, for some reason associations immediately arise in our heads with wallpapering. Finishing walls using, for example, drywall is not an easy task and requires a lot of effort and time. If you decide to decorate the walls in your apartment in this way, you are probably faced with a lot of questions. Indeed, even the initial stage - preparing drywall for wallpaper - is already full of nuances and subtleties.
However, this is one of the best methods to level and guarantee to improve the quality and appearance of indoor walls.
Subsequence
So, to prepare plasterboard walls for wallpapering, you need to follow the step-by-step instructions:
- Make sure that the heads of the self-tapping screws or screws are deeply recessed into the plasterboard sheet and do not stand out on the surface. This is necessary to prevent holes in damp wallpaper during finishing.
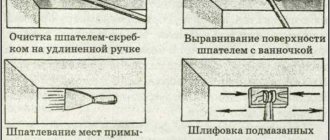
- To avoid stains and blisters, you need to check the joints: they must be perfectly smooth. If it so happens that a gap has formed, then it must be additionally leveled using putty. For this step you will need the following:
- two spatulas;
- bucket, basin or other container;
- finishing putty.
- Then follows the first stage of priming the walls, which will become the connecting link between the plasterboard sheet and the next layers of putty.
- Putty - usually this process is carried out in two layers, therefore different compositions must be used: one for the starting layer, and the second for the finishing layer.
- Then you need to sand the layers - this must be done carefully and efficiently, since otherwise roughness may be visible through the wallpaper in the future. Also, the canvas will lie better on a well-treated surface. For this step, use sandpaper first and then sanding material to finally smooth the surface.
- If after the previous stage a lot of dust has formed on the wall, then you need to clean it with a vacuum cleaner using a soft nozzle. This will make further work on the wall pasting much easier.
- And again, treating the surface with primer is a mandatory step before gluing wallpaper. If this is not done, the applied glue will form lumps and reduce the quality of work - unevenness and other defects will form. The primer will create additional fixation of the wallpaper and reduce glue consumption.
Puttying drywall
After the operations have been completed, another important step comes - you should cover the entire drywall with finishing putty. For this, all the tools used earlier will be useful to you, except take one of the spatulas a little wider, about 400-500 mm, for puttying the walls.
Spread a layer of putty in an even line on a large spatula, and then apply it to the wall, evenly distributing the material. Pay special attention to the inner corners, initially putty the wall from the corner on one side, letting it dry slightly, and only then start on the other side, this will help to avoid “burrs” on the finished side.
Important! It is better to finish drywall immediately with finishing putty and apply it to the wall in a thin layer. The wallpaper will fit more tightly to it.
After completing the entire process, let the walls dry, this will take at least a day. As in the case of the primer, it is important to avoid foreign objects getting into the putty, even small particles invisible to the eye, because when you move with a spatula, such debris will leave deep grooves, exposing the drywall on the surface, which are quite difficult to deal with.
Primer
One of the most important stages of preparation. To prime walls made of plasterboard, you will need:
- priming;
- brush;
- roller;
- container (wide enough to work comfortably with a roller).
This is done in order to prevent the occurrence of fungus on the walls under the wallpaper or ceiling, and therefore extend the service life of both the wallpaper or other covering and the plasterboard sheet. Do not think that waterproofing and high-quality ventilation will protect your apartment from the spread of fungus - protect yourself from a number of related problems by using soil for both external and internal work.
Moreover, if you apply the putty composition directly to the smooth surface of the sheet, it will practically not stick to it. Therefore, a primer is necessary. You should choose it carefully: it is better to give preference to a primer with acrylic in its composition. But you can find many other types in the store. Some can be used right away, while others you will have to mix yourself.
It must be applied with a roller, and where it is difficult to reach, with a brush. Make sure that no debris or stones get into the brush, otherwise it will be difficult to work.
How and with what to prime drywall
They begin work by priming the putty; applying it is quite simple. It is more convenient to use a roller. With it, it will be easier and faster to process the surface; you can use a brush for the corners, and you can also paint hard-to-reach places with it.
In order not to leave untreated areas, the primer is applied in several layers. Each one must dry before applying the next one.
To make drying faster, you can open windows and doors.
In order not to leave untreated areas, the primer is applied in several layers.
Sealing joints
After the soil has dried well (at least 8 hours), you can begin filling the joints. A number of materials can be used for this:
- construction bandage;
- serpyanka;
- perforated paper and so on.
This process is very important, because this is how the drywall will last you much longer. All cracks need to be sealed, not only factory joints, but also those formed by accident. The process is simple: apply the first layer of putty with a wide spatula along the entire length of the joint and press a piece of mesh onto it (or glue it). Finally, apply a second, finishing layer of putty and smooth the surface. Don't forget to work the corners as well.
Tools and materials
- two spatulas - wide and narrow
- construction knife, replacement blades for it
- brushes, roller
- sanding mesh with holder
- protective equipment - gloves, respirator
- ladder
- container for mixing putty, drill, mixer
- screwdriver or screwdriver for tightening screws
- serpyanka for sealing seams and joints
- primer
- two types of putty - for joints and for completely puttying gypsum boards
- perforated profile to protect external corners
- metal scissors
putty
At the puttying stage, a lot depends on you: how well you treat the surface, how evenly the wallpaper will lie in the future. It’s unlikely that you want to see lumps and irregularities on the walls, cracks and other defects that are an eyesore. Therefore, treat the puttying process responsibly and be patient. It will increase the service life of plasterboard sheets and finishing materials.
Also, by treating the surface with putty, you will avoid many problems in the future: without puttingtying the drywall, you risk tearing it off along with the wallpaper in the event of a new renovation. If you don’t want to redo all the finishing work, then spend extra time on this stage and save yourself some nerves.
As mentioned above, there are two types of mixture: starting putty and finishing putty. The first is used to level walls and ceilings, and the second is used to secure and remove minor defects.
Buy three different spatulas: one for picking up the product, a second and a third for applying. The last two spatulas differ in size - 40 and, respectively, 60 cm. Try to ensure that the layer of mortar is uniform, approximately 1 to 2 mm.
What does preparation consist of?
In order to carry out high-quality repair work with your own hands, you need to carry out the preparatory part step by step. The process includes:
- Repairs begin with the acquisition of the necessary materials and tools;
- Check the quality of installation of plasterboard sheets;
- Seal joints and screws on them;
- Apply primer to the base;
- Apply putty to the dried primer layer;
- Treat the putty surface with a wallpaper primer.
In order to carry out high-quality repair work with your own hands, you need to carry out the preparatory part step by step.
Grinding
The so-called putty grout. Here, as in the previous stages, you need to be very careful and careful. Don't rush, as you only risk ruining the surface. Be sure to wear a respirator or other respiratory and eye protection (for example, a scarf and tight-fitting goggles), since grouting the surface produces a lot of harmful dust.
First, let's choose a wallpaper
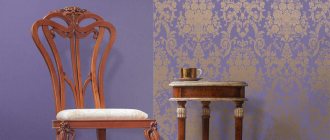
Today, countless factories and factories create for us a huge assortment of wallpaper in the most bizarre colors and prints, which can be three-dimensional, flat, or change color depending on the incidence of sunlight. All these factors in wallpaper design are important when purchasing, because you should take into account the style in which the rooms in your home are, or will be, designed.
But the main difference between wallpapers seems to be their types, which are intended for different purposes.
The following types of wallpaper are common on the modern market: paper, non-woven, vinyl, acrylic, textile, and photo wallpaper.
Among this variety, the cheapest are paper wallpapers, which have a short service life, about three years, low strength, that is, they tear very quickly, and in addition, they cannot be washed. But this wallpaper tempts with its low price, which ranges from 40 to 150 rubles for each roll, and ease of gluing. Another drawback is that the design on them fades due to direct sunlight.
Another type of inexpensive wallpaper is non-woven wallpaper. Essentially, these are the same paper wallpapers, only fabric threads are added to them, which increases their strength, reduces the fear of moisture, and hides minor wall defects, such as scratches and small cracks. A pleasant bonus is the fact that they, like paper wallpaper, have absolutely no effect on human health. They can also allow air to pass through, like paper ones. Service life up to 5 years, with good care. The price range for such wallpaper starts from 550 rubles and ends at about 4,000 rubles. As it turned out, the price of one roll depends on its print, i.e. the more complex the pattern, the more expensive the finishing material. At the lowest prices, the same type of wallpaper with a boring ornament of simple figures is available, while expensive copies are decorated with more complex designs.
Vinyl wallpaper consists of paper with the addition of non-woven fabric. This type of wallpaper has many advantages, among which we should highlight moisture resistance, thanks to which they can be washed as they become dirty, durability, colors that do not fade in the sun, and they can also be repainted. Naturally, they have shortcomings. Perhaps the most significant drawback is airtightness. Service life more than 5 years, with proper care. The price of such almost perfect wallpaper is approximately 950-13,300 rubles. Again, the price depends on the complexity of the design; if you try, you can find copies for 32 thousand rubles. per roll.
Acrylic wallpaper can last up to 5 years, subject to good care. They have good breathability, but less strength. Their price ranges from approximately 300 rubles to several thousand, it depends on the complexity of the design and its relief.
Unique textile wallpapers allow you to decorate your room with special chic, because the front part is made of expensive fabrics, silk, velor, linen, and the back part is made of paper, but more often from non-woven fabric. This wallpaper works as a heat insulating and soundproof barrier. Disadvantages include such factors as the complexity of installation, fragility, i.e. they are afraid of dirt, dust, pets, etc. But the most controversial factor is the price, because it sometimes repels the consumer, and sometimes attracts. This is explained by the fact that textile wallpaper is designer, so the price is so high, but tolerable for a connoisseur. The cheapest ones cost about 5,500 rubles.
Pasting walls
And here is the final stage, what everything was leading to - gluing wallpaper onto drywall. To begin, make the necessary marks on the surface so that you can use them to guide you in the future. This will also help you accurately calculate the required number of rolls of wallpaper. It is recommended to cut the wallpaper into strips before gluing, but if they have complex patterns, then do it gradually, in accordance with the pattern and only at the joint. Also, carefully select the glue according to the wallpaper material so as not to accidentally damage it. Apply the glue with a roller to both the wallpaper and the wall - now you can paste the strip onto the surface from top to bottom, not forgetting to level it from the center to the edges. To avoid swelling, bubbles and other troubles, iron the newly pasted canvas with a soft cloth. It is better to start gluing from the corner and further along the wall.
Now you know step-by-step instructions for preparing plasterboard walls for wallpaper, what is its sequence, what materials to use and how to prevent the appearance of defects, cracks, stains and other unpleasant manifestations on the wallpaper, which means wallpapering will go quickly and the result will only be positive and durable.
The following video provides step-by-step instructions on how to putty drywall:
Recommended Posts
Paper wallpaper in the interior for the nursery, kitchen
Options for combining wallpaper for the bedroom
Priming the walls before wallpapering
How to remove liquid wallpaper from a wall and stains from liquid wallpaper
Which is better: wallpapering or painting the walls?
How to glue wallpaper on painted walls
Gluing without the use of strengthening mixtures
The walls must be dry, the primer must dry for at least 24 hours. Wet spots are darker areas against a light background. Under no circumstances should you glue wallpaper to wet walls ; these places will come off later or become moldy and blackened.
Also, when sticking wallpaper, you must follow simple rules:
The wall must be clean , without various spots and debris, you can carefully go over it with your palm or with a lamp. The tape should be the same color as the drywall, for which you can add a little light dye to the primer to give the surface one tone. For glue, you need to use clean dishes that have not been used for priming, free of dust and dirt; they need to be rinsed well before use. Dust and debris will become limp and subsequently the wallpaper will not hold up as well.
Step-by-step process for gluing wallpaper onto drywall
When the surface is prepared, you can begin the final stage of finishing. Advanced craftsmen can handle wallpapering in no time. However, those new to this may need some help.
The algorithm of actions is as follows:
- Using a tape measure and a marking pencil, mark the joints of the wallpaper strips on the walls. We cut the rolls into strips of the required length, making sure that the pattern at the joints matches, otherwise the contrast will be too striking.
- We dilute wallpaper glue. Follow the instructions to ensure the correct proportions of mixture and water. The glue should be allowed to sit for a while; immediately after diluting it will not be too stable.
- Using a paint roller, apply glue to the strip of wallpaper. Then you need to cover the part of the wall where the strip will be glued.
- Wallpapering starts from the corner of the wall, from the ceiling to the floor, the stripes are placed without overlapping. We carefully place each strip and smooth it with a dry cloth from the center to the edges so that there are no air gaps left.
When working, you should not rush, you need to carefully check all the joints, and also coat the canvas with glue.
The finished wallpaper should dry, it is advisable to avoid drafts in the apartment at this time. The same step-by-step gluing process is also suitable for plasterboard walls pre-coated with putty.
Wallpapering technique
Once you've finished puttingtying, grouting and priming the drywall, don't forget to wet clean the room.
This greatly simplifies the work with glue and wallpaper, as it eliminates contamination of the materials and ensures reliable gluing. The length of the canvas is taken with a margin of 50-70 mm. After cutting, it is folded into a fan with a 2-3 cm shift with the front surface down. You should not fold more than 10 pieces, because even if you work together, it will not be easy to cope with so much material and glue
By the way, when choosing the latter, you need to pay attention not only to its technical compliance with the wallpaper, but also to moisture resistance, oiliness and antiseptic properties. Correct assessment of these characteristics will ensure the durability and beauty of the interior, which is especially important for rooms such as the kitchen, nursery and hallway
Calculation and cutting of wallpaper in the photo
When preparing the glue, you must observe the mass ratio of the mixture and water specified in the manufacturer's instructions
Particular attention should be paid to the hardening time - it is usually indicated on the packaging, but the standard is no more than 8-12 minutes. The mass must be homogeneous and have an optimal viscosity for work
Using a roller or brush, apply the glue evenly to the inner surface of the canvas and, if necessary, to the area to be pasted. Afterwards you need to wait for setting, which begins after 1-3 minutes and is expressed in a change in the consistency of the composition - it becomes more viscous and loses adhesion.
Stages of preparing plasterboard walls for wallpapering
The process is carried out exclusively in strict sequence.
Primer
This procedure is often considered optional, but it significantly increases adhesion and eliminates peeling.
For work you will need the following materials and devices:
- Primer mixture. Polymer deep-penetrating compounds are preferred. If the treatment is carried out in a room with high humidity, the solution should help increase the water resistance of the surface. The presence of an antiseptic additive will prevent the formation of fungus and mold that appear on unprotected substrates under the influence of moisture.
- Container for the mixture.
- Roller for large areas, brush for hard-to-reach places.
At this stage, general strengthening and adhesion-increasing compounds are used.
- Preliminary jointing of the joints between adjacent gypsum board parts is carried out if the edges do not have a chamfer. The areas are cleaned of dirt and dust.
- The surface is primed evenly without excess. Particular attention is paid to the seams: they are treated with a brush.
When performing processes in a room with stable humidity, one layer is applied, in the bathroom, hallway, kitchen and loggia - at least two.
Sealing joints
The presence of gaps between adjacent elements is a prerequisite that helps prevent damage to the surface during shrinkage of the structure. This is especially true in a wooden house or a recently built high-rise building.
To cover the joint areas of plasterboard parts, you need to prepare:
- Putty. It is recommended to use elastic acrylic compounds, but the treatment can also be done with a regular gypsum mixture.
- Reinforcing tape or mesh.
- Medium and small spatula.
- Tools and container for preparing the solution.
Proper sealing of joints allows you to paste the surface without causing problems in the future.
To reinforce joints, you can use either fiberglass or special paper tape.
- The composition is mixed according to the instructions, the finished product is mixed. It is important that the solution has a viscous consistency.
- The mixture is scooped onto a wide spatula and distributed over the joints with a small tool. All areas must be filled. It is also necessary to cover the adjacent space with material.
- Exactly in the middle, you need to stick a reinforcing tape or mesh onto the solution.
- A layer of putty is applied on top, after which the areas are leveled.
Separately, it is recommended to treat the places where screws are screwed in. The hats are coated with waterproof paint, which completely eliminates the appearance of rust.
Advice! If branded mixtures are used, then it is advisable to choose serpyanka from the same manufacturer.
External corner protection
External protruding areas are subject to the greatest impact and therefore require a special approach.
To work you will need:
- Solution (similar to the previous option).
- Set of spatulas and level.
- Perforated metal corner. It is better to purchase options with reinforcing mesh. There are also plastic varieties that can be quickly glued if you wet the inside with water.
Corners for reinforcement can be metal or carbon fiber; the second option is considered to be of higher quality, as it is stronger, lighter and not afraid of corrosion.
- The gap between the plasterboard fragments is covered with a small amount of the compound. If the perforated part has a mesh, then the adjacent areas are processed.
- A little mixture is applied to the inside of the corner, after which the element is pressed into place and leveled.
- The solution is distributed evenly over the entire part from above.
- For greater convenience, one part of the wall is processed first. When the composition has set a little, another one is finished.
Reinforcement of external corners
You can simplify the work with the corner segment by using two spatulas: the blade of a wide tool is applied exactly along the edge of the base, and the second device is used to level the applied mixture.
Wall putty
To properly prepare drywall for wallpapering, the entire surface is treated. This process is not always necessary, but if it is necessary to dismantle the decorative layer, the intermediate coating will protect the drywall from destruction.
For puttying you will need:
- Finishing mixture. To calculate the required amount of composition, the area of the walls is measured. The layer to be laid should not exceed 2–3 mm.
- Wide and medium spatula or rule.
- Container and accessories for mixing the solution.
- A mixture of viscous consistency is prepared. The composition is prepared without excess, since it cannot be restored after setting.
- They start putting putty from the corner, this will simplify the formation of the inner segment. The solution is spread over the blade of a wide spatula or rule, the tool is pressed against the wall from below at a slight angle and rises, moving slightly to the side.
- Consecutive actions form a homogeneous layer.
The process of puttying drywall with your own hands is not difficult, but working with a wide spatula requires a certain skill.
It is necessary to cover the surface evenly and without stopping, treating the maximum space.
On a note! Creating an inside corner is much easier if you use a corner spatula, but it does take a little practice.
Grouting the surface
Complete leveling allows you to achieve an ideal base, which is especially important if you need to paste with paper roll materials. The technology involves two methods of work:
- Using a grater with mesh or sandpaper. To finally finish the base, it is important to wait until the putty has completely dried. The tool is made in a circular motion with constant checking. To do this, use a lamp that illuminates the surface at a slight angle. Particular attention is paid to the corners. Work is carried out in a respirator and goggles, as a lot of dust is generated.
- Glossing of the plaster composition. The coating is left for 2 hours, after which treatment is performed. To do this, you can use a spatula or grater: the tool is constantly moistened in water and smooth out all the irregularities. This method requires certain skills.
To prepare the surface for wallpapering, glossing is not a necessary step; high-quality sanding is sufficient, but with its help it is easier to bring the wall to an ideal state.
Grouting external and internal corners is a responsible procedure, since it is in these places that the main defects form. If the defects are not eliminated, then adjusting the adhesive strip can be very problematic.
Re-priming
The plasterboard surface must be treated again with the compound before wallpapering. The mixture is applied to the coating in an even layer, it is important not to leave empty areas. Finishing is carried out only after the walls have completely dried.
The following types of plasterboard can be found on sale:
- GKL is a regular drywall used for finishing rooms with normal humidity and temperature parameters. These are gray sheets with blue markings.
- GKLV is a material with increased moisture resistance. The gypsum used for its manufacture contains silicone granules and antifungal additives. These sheets are green in color and have blue markings.
- GKLO is a fire-resistant plasterboard that has increased resistance to open flames. This is achieved through the introduction of reinforcing components into the gypsum composition. The leaves are gray in color with red markings.
- GKLVO - combines the properties of moisture and fire resistance. Almost universal material. The color of the sheets is green, the markings are red.
We advise you to study - The best manual wood routers - rating and comparison of models
We choose a mixture suitable for its properties - is the finishing mixture suitable?
We have dealt with the question of whether it is necessary to putty the wall plasterboard under the wallpaper, now let's decide on the materials. First of all, it should be remembered that such finishing mixtures are divided into starting and finishing mixtures. And if you have already covered the walls with dry sheet plaster, this completely replaces the rough finishing and even partially finishing. After all, the surface of drywall is initially very smooth. This is why we don’t even consider starting mixtures as an option for finishing; you only need finishing mixtures. But suppose you didn’t know this and have already started covering the sheet metal with a rough layer. What should I do - clean everything off and putty again? Not at all necessary. Actually, you have only strengthened the dry plaster, now you need to thoroughly rub the surface, achieving a certain degree of smoothness.
Applying finishing putty to walls
The disadvantage of starting mixtures is that, due to their coarse grain, they very quickly transfer moisture to the drywall, which absorbs it no less actively (if these are not moisture-resistant sheets). And often you simply do not have time to smooth out the damp layer with the rule. As an option, it is allowed to use plaster beacons, but in this case the layer of applied mixture will be too thick. Therefore, if you have already started with the starting one, you need to finish the wall cladding with it gradually, in small sections, and then just go through it with a float. It is much easier to work with finishing putty; it is fine-grained and is applied to a smooth surface in the thinnest layer, while sealing all even the most unnoticeable recesses. The main thing is that, regardless of the mixture chosen, first apply a primer to the casing.
Under no circumstances should you use putty for exterior use to decorate premises; it may contain components necessary for resistance to climatic factors, but harmful to health.
Be sure to pay attention to the main component composition of the mixture, in particular, to the filler included in it. It can be either cement or gypsum; there are also brands with polymer components. It is clear that in rooms where the air humidity is quite high, for example, in the bathroom and kitchen, it is best to apply a cement-based finish. Gypsum is best suited for residential premises, just where wallpaper needs to be glued. However, a primer must also be applied over the puttied sheathing in order to increase the adhesion of the adhesive you have chosen. Polymer putties are considered universal, but they are the most expensive of those listed.
There are also ready-made and dry mixtures. Here, too, you need to make the right choice. The fact is that the dry mixture can be purchased in large quantities, since it is stored for a very long time. This will allow you to avoid a situation where suddenly there is not enough putty, and there is no identical composition in stores. However, you need to know how to knead it, especially if you are going to finish drywall. A consistency that is too thick will quickly release moisture into the sheets of dry plaster and crack, while a consistency that is too thin will float around with unsightly streaks. The finished compositions are stored for a very short time, but they have exactly the consistency that is needed to cover walls and partitions made of plasterboard. This putty must be used immediately, opening the container immediately before finishing.
Necessary preparation of drywall for wallpapering
In some repair manuals you can find the statement that you only need to seal the joints after installing the gypsum board, and the drywall can be covered with wallpaper. We won’t argue – this is so. And let’s say more - you don’t even need to prime the drywall, the finishing material will lie, as they say, tightly without additional impregnation. However, several troubles loom in the future. Firstly, if you use light-colored wallpaper, there is a high chance that the drywall will show through. Secondly, if you want to change the design in the future (and sooner or later such a desire will appear), then you can tear off the old wallpaper from the wall only together with the top layer of the GC sheet - cardboard, and thus you will destroy the wall. Therefore, we do not recommend being led by short-term gain, but doing everything according to the rules.
1. Having completed the installation of gypsum boards, prime the entire area of the walls with a regular or antifungal (if high humidity is expected in the room) primer using a wide brush.
2. Apply serpyanka to all joints, including in corners. This is a mesh material in rolls, similar to a bandage. The material is self-adhesive, but it is better to additionally place it on PVA.
3. The joints, and at the same time the entire surface of the HA sheets, must be carefully puttied with a thin layer of starting putty, and after drying, with finishing putty.
4. Carefully sand any possible irregularities with a special mesh or sandpaper with fine abrasive - grade 80 or 100. But do not be too zealous so that the drywall becomes visible. If this happens, you need to putty again.
