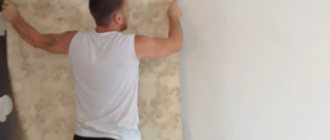
Is it necessary to apply glue to wallpaper?
Whether the canvas requires adhesive to be applied to the inside or applied dry to a smeared wall depends on the wallpaper material.
To avoid mistakes, look at the label. Those wallpapers that are coated with the solution are marked with the image of a roll with a brush.
The instructions indicate that after spreading the glue on the back of the canvas, wait five, and sometimes eight minutes. But waiting more than two minutes is undesirable. Excess solution may cause the surface to become limp and, after drying, to shrink. You can increase the time to four to five minutes if the layer of paper is thick.
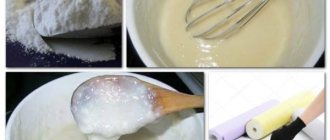
Preparing the glue correctly
You also need to remember that wallpaper glue is not a liquid substance in which you open the bottle cap and start gluing wallpaper. Everything is much more complicated here, since this is a dry mixture that needs to be diluted with water in certain proportions, maintaining certain temperature conditions. The further result will depend on how correctly you prepare the glue, so you need to carefully study the instructions from the manufacturer, which are located on the packaging. You need to pay attention to the main criteria that will be useful when preparing glue:
- The temperature of the water used to dilute the powder substance.
- The rate in time at which the adhesive begins to thicken.
- The time it takes for the dry glue granules to swell to the desired consistency.
There's really nothing complicated about it. The main thing is to strictly follow the instructions. To achieve an ideal result, you can pass the glue through a fine sieve to completely get rid of small lumps that could disrupt the ideal surface of the wallpaper.
Which wallpapers do not require glue?
Non-woven fabrics do not require this - durable, made from long-fiber cellulose in a non-woven way. Wallpaper is resistant to slight tension, there is less risk of tears and microcracks. Therefore, the composition is spread only on the wall, and then a dry cloth is applied. This method saves glue consumption and simplifies working with heavy facing material. The same goes for canvases made entirely of textiles.
Self-adhesive wallpaper does not smear either. The factory-applied adhesive is activated by wetting the inside of the canvas with water. Such wallpaper is marked with an icon with a bath into which the roll is immersed.
Non-woven fabrics come with a top layer of vinyl, acrylic, or silk coating. Single-layer and two-layer options are marked with the icon: “vertical stripe and brush”. He suggests that the solution is applied to the wall.
Video tutorial instructions on how to glue vinyl wallpaper on non-woven backing
Before gluing wallpaper, it is necessary to remove all sockets and switches, and it is also advisable to unscrew all the screws on which pictures and cabinets hung.
When you apply glue to the wall, immediately apply the roll of wallpaper to the wall; it is not necessary to cut the wallpaper into sheets; you can cut off the roll near the floor when you paste the sheet on the wall. If you have vinyl wallpaper without a pattern, you can save a lot of money; each new canvas will start from the end of the previous canvas. Even if you have vinyl wallpaper with a pattern, it is still much easier to glue the wallpaper when it is rolled into a roll and you roll out the roll as you glue it.
You only need to glue vinyl wallpaper on a non-woven backing end-to-end, applying the new sheet to the edge of the already glued sheet. The fact is that non-woven wallpaper does not shrink when it dries, as you pasted it, it will stay that way, so there is no need to glue vinyl wallpaper overlapping and make overlaps on the ceiling and baseboard, as is done with paper wallpaper.
There are situations when you need to combine two canvases together and it is not possible to do it end-to-end; as a rule, this happens in the corners of the room and when the first and last canvas are brought together. In such cases, we glue the wallpaper with an overlap, take a sharp knife and a level (long ruler), apply the level to the seam so that the edge of the level falls on both canvases and carefully cut both canvases with a knife, remove the cut strips and coat it with glue under the seam and smooth it with a rubber roller or with a spatula.
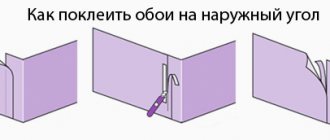
Sticking vinyl wallpaper in the corners is the most difficult and responsible process; it is almost impossible to get the corners in a room perfectly, and any defect will lead to a wavy edge of the canvas. Therefore, experts recommend gluing the canvas in the corner, so that it overlaps the second wall by about 5-7 centimeters, glue the next canvas overlapping and cut the joint with a knife. Before gluing the next sheet, it is necessary to draw a vertical line on the other side of the joint so that this sheet is glued vertically.
Which roller to choose
A paint roller with a sleeve width of 20–25 cm is suitable. Such tools have different surfaces:
| Coating material | Advantages | Flaws |
| Foam rubber | It is inexpensive, quickly restores its original shape, and is wear-resistant. Choose fine-pored foam rubber for uniform application. | Absorbs liquid strongly - excess will drip. |
| Faux fur and sheep's wool | It is characterized by absorbency, evenly distributes the composition over the canvas, and is resistant to wear. It is better to use fur coats with medium pile (from 50 to 100 mm) so that there is no excess liquid and the composition is distributed evenly. | May leave lint behind, causing bubbles to form. |
| Polyester | The material, similar to padding polyester, absorbs and holds liquid well, does not leave lint, and is cheap. | Short-lived. |
| Velours | A fur coat with plush pile on a woven base does not splatter glue, does not pill, and does not leave lint. | It goes bald quickly and takes time to absorb. |
There are paint rollers with replaceable coats on sale. If the repair is large-scale, replacing the coating is more economical than buying a new tool.
The tray-bath is chosen strictly according to the size of the roller. An unsuitable instrument will sink in it or not be completely saturated with the composition.
Do not confuse a paint roller with a wallpaper roller made of rubber. The latter do not work with solutions; they are used to smooth out glued sheets. In facing work, needle rollers are used. They are needed when gluing walls without removing the old layer. Metal needles pierce it, which ensures that the solution is absorbed and adheres to the new wallpaper.
How to glue non-woven wallpaper to the ceiling
The technology for gluing vinyl wallpaper to the ceiling is very similar to that described above, even simpler. You can glue vinyl wallpaper yourself. Draw a line parallel to the wall, coat the area of the ceiling under the canvas with glue, apply the edge of the roll to the ceiling, smoothing it with a roller, and gradually unroll the roll, making sure that the edge of the wallpaper is always on the line. When you reach the wall, simply cut the roll from the canvas with a knife and continue on.
In this way, you can glue vinyl wallpaper on a non-woven backing in any room, in the kitchen, in the living room, and even in the bathroom.
Brush
Those who prefer to apply the composition with a brush should choose a tool with dense bristles arranged in several rows. Check to see if the bristles are coming out. Those that fall out will create bumps on the surface.
Buy two types of tools: wide and narrow. The first is to apply glue to the canvas, the second is to smear along the edges or in hard-to-reach places on the wall. Instead of using a brush, the wall surface can be brushed to cover a larger area in one go.
What you need to apply glue to wallpaper
In order for the whole procedure to go as smoothly and successfully as possible, you need to immediately stock up on everything you need. In fact, you will need a minimum number of tools:
- Wide brush with soft bristles and a roller with a foam nozzle;
- Rags, preferably cotton;
- Several foam sponges that are used for washing dishes.
All this is quite cheap, and you can find it in any market, so there will be no problems with the search.
Do I need to coat the wall when wallpapering?
When the wall is smooth, prepared for finishing, and the wallpaper is paper-based, there is no need to spread it with adhesive. The canvas will become limp, shrink greatly when drying, and may tear.
There is no need to treat the wall before gluing self-adhesive wallpaper.
The solution is applied to the wall surface if non-woven fabrics are selected. A wall with small flaws can be primed with glue. The composition is diluted 4–5 times thinner and allowed to dry.
The glue application stage is decisive and determines how long the wall covering will last. Choose the correct method of applying the composition, taking into account the type of wallpaper and the appropriate tool.
Subtleties of applying glue
In fact, there is nothing particularly complicated about this procedure. It is enough to apply glue to the central part of the wallpaper and evenly distribute it with a brush over the entire surface. In order to remove excess glue, you need to use a roller that can create an even layer. But don’t get carried away, because you need to remember the basic rule. The thicker the wallpaper, the more glue you will need. In the case of thick wallpaper, it is best to apply the glue with a brush and let it absorb. Only after this can you spread it evenly with a roller. The glue dries faster on the edges, so once everything is ready, go over all the edges with a sponge to renew the glue on their surface.
AlinaAuthor of the article
Did you like the article?
Share with your friends:
What tools are needed?
To carry out the gluing procedure you will need a set of the following tools:
- Stationery knife;
- Tape measure and plumb line;
- Scissors and bucket;
- Roller and brush;
- A clean rag (necessarily soft).
For paper and vinyl wallpaper, glue should be carefully applied to the strips. If you use non-woven wallpaper, then the glue is already applied to the wall. When you have prepared the wall and have all the necessary tools, you can start wallpapering. It is recommended to turn off the electricity when working in the area of switches and sockets.
Features of gluing non-woven wallpaper
Even if each instruction clearly states several times how to glue, with what glue, and in what order, people often decide to do it on their own.
However: always level and prime the wall. Always mark and cut the blades in advance. Always use special glue without experimenting with its composition.
Is it possible to glue paper wallpaper with non-woven glue?
If there is glue left over from a previous renovation, or for some reason you decided to glue paper wallpaper rather than non-woven wallpaper, then you can use non-woven glue.
The only thing is that paper wallpaper is thinner in structure, so the glue for it should be lighter. In this case, when mixing non-woven glue, you need to pour more water so that it is not so heavy.
Is it possible to paste wallpaper on non-woven wallpaper?
It is not recommended to do this: there is extremely little chance of a good result.
You will need to remove old non-woven wallpaper, be it standard or wide meter. You can remove them if you go over the wallpaper with a needle roller and then moisten it.
If you decide to use a steam generator, be sure to:
- Put on gloves (rubber);
- Tuck your sleeves into gloves;
- Protect the floor from water.
If the old wallpaper is not removed, the fresh glue will begin to be absorbed into the pores of the old wallpaper, softening the old layer of glue, which may cause bubbles to appear.
Why non-woven wallpaper peels off
There are several reasons that influence poor-quality wallpaper gluing.
Why do non-woven wallpaper still peel off:
- Poor wall preparation. Even if there are small holes in the wall, the wallpaper may peel off. All defects must be removed, the wall must be leveled and primed.
- Use of unsuitable materials. The wrong glue and the whole job might stop.
- Wrong sticker. Apply glue only to the wall, and only to that part of the wall that will need to be glued in the near future. Glue end to end.
Also, do not resort to forced drying, otherwise the wallpaper will definitely come off. Sometimes this method is used if wide meter-long wallpaper is being glued. But such meter-long wallpaper is glued according to the same principle, and they are also afraid of forced drying.
Bubbles on non-woven wallpaper after gluing
How to glue non-woven wallpaper to prevent bubbles? They appear, as mentioned above, due to insufficient preparation of the wall.
To eliminate bubbles, you need:
- Make an incision on the bubble with a sharp stationery knife;
- After this, try to carefully straighten the wallpaper, fill the syringe with glue and squeeze it through the cut into the wallpaper;
- Straighten the piece of wallpaper well and press it against the wall with a clean cloth.
Wide meter-long wallpaper may also have bubbles after gluing; do not attempt to glue it alone, the risk of bubbles and peeling will be high.
How to glue correctly: subtleties and nuances
The process of wallpapering is simple, but it has its own subtleties.:
- The application technology is important: from the center to the edges, paying special attention to the corners and edges (how to properly glue wallpaper in the corners of a room?).
- The amount of composition is selected based on the thickness of the fabric. The thicker it is, the more glue will need to be applied.
- It is necessary to distribute starting from the opposite side. Only after complete application there move to the side that is closer.
- Thick and papery canvases require time to soak. Simply leaving a leaf is not enough. To avoid drying out, it must be folded, bending the edges towards the center. Then you need to brush the edges again, since here the composition is absorbed and dries faster.
- Thin ones should be mounted on the wall immediately after application - this way there is less chance of tearing them as a result of excessive moisture.
- Any excess that ends up on the front side is immediately removed. This error cannot be corrected subsequently. Use a sponge or rag to remove. Excess should be removed using blotting movements, without rubbing or pressing.
Possible problems resulting from incorrectly applied glue and ways to solve them:
- Bubbles appear immediately after gluing. This may mean unevenness of the applied composition or the presence of air. The cardinal solution is to inject glue into the places where bubbles form with a syringe. This method is rarely used if it is not possible to remove bubbles with a spatula (read about why bubbles appear and how to glue wallpaper without swollen areas).
- The canvas falls off the wall. Most likely, the reason is improperly prepared or low-quality glue. It should be prepared fresh or replaced with a new one.
- The seams on the wallpaper are noticeable. If the technology for placing the sheets is followed, then the reason is poor application to the edges of the sheets. The solution is to carefully glue the edges with a brush.
- Yellow spots. The reasons for their appearance are poor-quality glue or contact of the canvas with the coloring base after applying the composition. In this case, only plywood will help.
Wallpapering is a simple but labor-intensive process. The task will be greatly simplified by carefully following the instructions described in this material and correctly applying the glue to the canvas.
| Painting knife with snap-off blades. It is a plastic structure with a metal blade that breaks off. Quite sharp, easily copes with any type of wallpaper. Painting knives come in different qualities and therefore at different prices. A better quality one is used by professionals, but for you it will be enough to purchase the simplest and least expensive one. However, you should take care of purchasing spare blades, as they become dull very quickly and become unusable. |
| Wallpaper joint roller, designed for rolling wallpaper joints. It is also called "barrel". It is a plastic conical roller with a handle. It is used for rolling at the joints of wallpaper in order to hide the visibility of the joint as much as possible. You should use it more carefully if you are dealing with embossed wallpaper, there is a risk of indentation of the design and damage to the overall appearance. |
| Painting tray, designed for uniform rolling of wallpaper glue over a fleecy roller. It is a plastic utensil used by a painter during painting, priming, and wallpapering. There are baths of different capacities, from 280 ml. up to 1.8 l. Service life is short. |
| Fleecy paint roller, designed for applying glue to the surface of a wall or ceiling. Distributes the glue evenly around the entire perimeter. They are a fur element made of sheepskin or silk with synthetic admixtures, put on a bobbin with a plastic handle. Used for painting all types of flat surfaces. A fairly durable tool if used and stored correctly. For wallpapering, a roller 25 cm wide is suitable. |
| Bucket for diluting wallpaper glue. Any clean container, of any volume, at your discretion, will do. Read the instructions for diluting the glue carefully. |
| A painter's plumb line with thread, designed to determine a straight line on the wall vertically. Thanks to it, even strips of wallpaper are glued relative to each other and to the absolute vertical. It should be 1 meter longer than the height of the wall. It is a plumb metal weight with an approximate weight of 50 grams, tied with a nylon cord or strong thread. At home, you can build something similar yourself. |
| Paint brush, designed for applying wallpaper glue in hard-to-reach places where the use of a paint roller is not fruitful, such as corners, joints between wall and floor, wall and ceiling. This brush is also called the “Fleitz brush” and is the most popular both in everyday life and in professional repairs and decoration of premises. It is a wooden handle with a metal frame that secures the bristles. The optimal brush width is 4-6 cm. |
| Construction tape, designed to measure the required length of wallpaper depending on the height of the wall or the length of the ceiling. Keep in mind that you need to add about 5 cm to the resulting value; this will be a stock of wallpaper, which you will then level with a spatula and a construction knife. It will be useful to you only once, when you measure out the first template sheet of wallpaper, according to which, in principle, all the others will be measured and cut. |
| A soft rag will be needed to remove excess glue from the wallpaper and surface and wipe the seams. You can also use it to smooth the pasted sheet of wallpaper to remove any remaining air between the sheet and the wall. Whether or not to wet the rag depends on the type of wallpaper you decide to glue. |
| Scissors, preferably with long blades for more convenient and quick cutting of wallpaper. Also, the scissors must be sharp and sharp enough so as not to spoil the wallpaper. Many people do not use scissors, coping with the task perfectly thanks to a spatula and a construction knife, but for a beginner this method may seem a little difficult to begin with. |
| Wallpaper pressing spatula is designed for pressing and ironing wallpaper immediately after the next sheet has been pasted, to remove excess glue and air bubbles. Convenient to use and in hard-to-reach places. It is a plastic special tool, 280 mm long. |
| A stepladder is needed in order to easily reach the ceiling and glue wallpaper with great comfort. There are aluminum, wooden, and construction stools. Such an item in everyday life is often necessary for other needs, but you can get by with a fairly strong table or chair. It's up to you to decide. |
| A painting pencil is needed to mark the direction of the paintings and their order in accordance with the drawing. It happens that at first glance, for the pattern on the wallpaper, the direction of the canvas itself when pasting does not matter, but be careful, incorrect pasting will be noticeable in daylight. At home, it can be replaced with an ordinary simple pencil. |
Caring for instruments after completion of repairs
Construction tools, if properly cared for, can last you for many years. Therefore, after finishing wallpapering, put all the tools you used in order.
- Clean buckets and tubs of any glue residue. Thoroughly wash the available tools: spatulas, tape measure, scissors, and so on. Rinse brushes, rollers and brushes with running water and dry. If necessary, soak them in water for a while.
- Pay attention to tool storage. Place into bags and put in a separate box. The next time you make a repair, you won’t have to buy new ones; you can use the tools you already have. This will save you from unnecessary financial costs.
I talked about the tools with which you can hang wallpaper yourself, quickly and efficiently. As you already noticed, some of them are interchangeable. The choice depends on the material used in the repair and your preferences. When gluing wallpaper, the main thing is to be well prepared and follow the instructions for using glue and working with wallpaper. I hope that, thanks to my advice, you will be able to hang wallpaper no worse than the professionals.
How to properly hang non-woven wallpaper
Non-woven wallpaper is remarkable because it can be glued to virtually any surface - plaster, wood, drywall, chipboard, paper, concrete. Be sure to clean the surface of the walls from the previous coating; if the wall is painted, the paint must also be removed. If you find good reasons not to remove the paint, at least sand the painted wall so that the wallpaper adheres more easily to the surface.
Is it possible to glue non-woven wallpaper onto old wallpaper?
Theoretically, this is possible, but there are some nuances.
How to properly glue non-woven wallpaper onto previous wallpaper:
- The previous coating should be paper and thin;
- Old wallpaper should adhere firmly to the surface of the walls;
- Old wallpaper cannot be much darker than new wallpaper.
It is worth warning that the risks of defects in this case are high. For example, bubbles may appear under the wallpaper, or the wallpaper may begin to peel. It is believed that the service life of the new coating from such gluing is reduced.
Is it necessary to apply glue to non-woven wallpaper?
It happens that during repairs a person is overcome by doubts, and he still smears both the strip and the wall. If, as it happens, you have already smeared the strip, then you do not need to apply glue to the wall. Just wipe it with a cloth at the joints.
But it’s easier to apply it to the wall, and then glue the prepared strip. Many people mistakenly smear the entire surface of the walls, but only the immediate work area is needed. If the wallpaper is meter high, this zone increases.
Is it possible to glue non-woven wallpaper onto non-woven wallpaper?
It is not recommended to do this, especially with your own hands. As a last resort, if you don’t want to remove the entire wallpaper, you can remove only the top layer or do it as follows.
Use a needle roller to go over the surface so that as many holes as possible form on the old wallpaper, then the adhesion to the new ones will be better.
Do I need to prime the walls before gluing non-woven wallpaper?
Of course, you should always prime, no matter what kind of wallpaper you glue. And non-woven wallpaper definitely needs to be glued to a primed wall.
A primer is not needed only in the following cases:
- If the repair is temporary, and the wallpaper is, in principle, not intended to last long;
- Wallpaper is light and paper.
Why do you need wall primer? It's simple - it increases the adhesion (that is, cohesion) of materials, they will stick better to the base.
Is it possible to glue non-woven wallpaper onto a concrete wall?
Of course, there is no need to glue it directly to concrete. First, level the surface with your own hands, apply putty and primer.
How to prime a concrete wall:
- Take a liquid adhesive solution. Apply glue evenly in the first layer, and in the second layer the adhesive solution should be thicker.
- Double coating will increase adhesion, which guarantees successful wallpapering.
Without a primer, you can still cope with paper wallpaper relatively successfully, but heavy non-woven wallpaper needs to be glued with a preliminary primer.
Is it possible to glue non-woven wallpaper with an overlap?
If you haven’t glued it this way with your own hands before, you can use the technique of the masters. They glue non-woven wallpaper with an overlap, and then, as the glue is absorbed, they cut a line with a stationery knife according to the level so that the excess tape is removed from the adjacent wallpaper.
It turns out that the joint will be perfect, exactly in the middle of the “overlap”. But, nevertheless, it is quite difficult to glue it this way, so the best way is end-to-end.
How to glue non-woven wallpaper onto drywall
This sticking will not be radically different in any way. But there are features that are worth considering.
How to properly glue non-woven wallpaper onto a plasterboard wall:
- Make vertical markings on one wall and glue from there;
- When gluing the first sheet onto the drywall, adjust the height;
- Fold the other side of the non-woven wallpaper at an angle;
- If the wallpaper protrudes slightly above the plasterboard wall, you can trim it later.
Cut off the excess wallpaper with a sharp knife, and the cutting guide will be a flat spatula applied to the wall.
Technology of gluing walls with non-woven wallpaper
After the wall has been primed and the vertical markings have been made, you can start gluing it yourself.
Pasting non-woven wallpaper step by step:
- Mix the wallpaper glue and apply it with a roller to a section of the wall;
- Bring the cut canvas to the wall, you need to start pasting either from the window or from the corner;
- You can smooth the canvas with a plastic spatula;
- If vertical lines are drawn on the wall, the work will go faster;
- Trim off the excess near the floor with a sharp knife.
It’s good if the wallpaper extends 1 or 2 cm onto the baseboard, which is first removed and then put back in place after pasting.
In order for the surface of the corners to be smooth, even during the puttying process you need to decorate the corners with plastic corners. If the surface of the corners is uneven, the wallpaper will begin to peel off there first.
Tools for gluing non-woven wallpaper
Everyone who glues wallpaper themselves, with their own hands, has their own list of necessary tools. But if you are doing this for the first time, or are unhappy with past experience, you can use the following universal list.
Tools for gluing:
- Construction level (if there is a laser level - ideal);
- Roller with long pile;
- 5m tape measure;
- Plastic spatula for rolling wallpaper;
- A sharp knife for cutting wallpaper;
- Narrow spatula (metal);
- Pencil;
- Foam sponge;
- A bucket for glue and a bucket for water.
Perhaps some additional tools may be needed to prepare the walls. Wide wallpaper is glued using the same tools.
Preparing the walls
The preparatory process begins with removing old coatings from the wall. If the wall was covered with wallpaper, then it must first be wetted with water; for this it is better to use a sponge. You should wait until the wallpaper is soaked, after which it can be easily removed using a metal spatula.
If the walls have been whitewashed, they also need to be wetted with water and the coating removed using a metal spatula. To clean the wall of paint, the surface is initially treated with sandpaper (with coarse grain), after which the peeling paint is removed with a spatula.
After removing the decorative coating, you need to inspect the wall for defects. If there are cracks and chips, they need to be puttied, then we carry out the process of priming and drying. Due to the fact that the wall will be initially primed, this will increase the level of adhesion and reduce glue consumption. For the initial treatment of the wall, it is better to take a special primer, or you can use glue diluted with water (no more than 30% of water is added) and treat the wall.
Little tricks for wallpapering
- You need to start the pasting process from the window and finish above the door;
- It is recommended to stick the strips vertically, and you can use a laser level or a plumb line to mark the boundaries of the intended location of the strip on the wall;
- When carrying out the process of gluing wallpaper in the area of switches and sockets, it is recommended to remove them, this way you can eliminate unnecessary difficulties with cutting holes inside the strip. First you need to turn off the electricity in the house;
- If there is any excess (overlap on the baseboard or ceiling), it is better to cut it off after it has dried.
We also recommend watching the training video -.