Plaster corner and its varieties
Metal corner
Each owner, when undertaking renovations in his premises, very often faces the problem of leveling the walls and creating a high-quality cover for organizing the finishing. Paying attention to the corners in the room where the renovation will be done, many people do not know how to properly align them.
Modern developers involved in the production of various construction products have created and introduced into the “construction world” such an invention as a plaster corner, which is grateful not only to professional finishers, but also to ordinary people who independently carry out repairs in their apartments.
Plastic corner
This item is used to form an even internal or external corner. Despite its simple design, it requires certain skills to install it.
Today there are 2 types of design:
- metal profiled corner;
- plastic corner.
Metal corners for plaster
Aluminum fittings are lightweight and more reliable than the galvanized version
Plaster corners made of metal are classified according to the shape of the structure and material.
The materials used for the production of this type of plaster corners are galvanized steel and aluminum.
Despite the fact that aluminum can be classified as a rather soft metal that requires careful handling, corners made from it are widely used, since the material is slightly susceptible to corrosion, and products made from it can last for many years. In addition, the aluminum corner is lightweight, which subsequently does not place additional load on the surface.
A corner made of galvanized steel is more susceptible to atmospheric influences than its aluminum counterpart, but at the same time has greater reliability.
According to the shape of the structure, all metal corners for plastering work are divided into 3 types:
- Regular angle. It looks like a metal strip, bent at 90, up to 0.5 mm thick. Usually, depending on the manufacturer, there are perforations on the sides of the product, which lighten the weight of the product and give it additional adhesive properties.
- Plaster corner with mesh. Metal corners of this sample are widely used in wet plastering. The design feature of this product is that a metal mesh 2-4 cm wide is attached to the corner using special pads. Using this design, you can level a wide variety of surfaces.
- Combined angle. This is a type of metal structure consisting of aluminum or galvanized corner and fiberglass mesh. With its help, clear angle shapes are created on the surface, and the joint is formed correctly using a mesh. To find out which option is better to choose, watch this video:
Plastic plaster corners
Plastic structures for plastering corners create quite a lot of competition with metal analogues in the building materials market. There are several types of plastic linings installed in the corners:
- Standard plastic corner. Similar to metal structures. Its main difference is that it does not corrode. Its main drawback is the thickness of the product, which can exceed 1-1.5 mm, and makes its use impossible when putting surfaces, but it is excellent for plastering work.
- Arched plastic corners. The structures help to create a high-quality arched opening in the room. Due to the segmentally divided 1 edge of the corner, its surface can be bent to different radii, thereby creating an even angle even in a difficult situation.
- Corners with overlay mesh. Such products are used in places where a thick layer of plaster will be applied. Mesh extensions create an additional fixing base. This results in a high-quality angle even in the most difficult conditions.
- Universal angle. It has a mesh design and can be used to create non-standard angles (different from the usual 90 angles) due to the high-quality plastic used and a specially created fold line.
Varieties
The building materials market offers developers a huge number of such different types of devices, from which they will have to choose the most appropriate ones for a particular type of plaster finishing. Corner overlays vary in materials of manufacture.
Metal
To make a metal corner element, different metals are used:
- Galvanized steel gives the product special strength, but increases its weight. There is a significant drawback - after a certain period of use, the corner becomes covered with a coating of rust, and primarily in places where the plaster layer has become thinner. Such a negative manifestation can be avoided if, at the time of installation, you pay due attention to the corner - when installing, maintain the integrity of the galvanization, adjust the elements along the length with metal cutting scissors, check the corner for defective areas;
- Aluminum alloy gives the product special durability, it is reliably protected from corrosion and is lightweight. The main disadvantage lies in weak mechanical strength.
There are certain differences associated with the shapes of metal corners:
- The standard version, made straight and with a bend at a right angle, is popular. The metal thickness is 0.5 mm, the sides are perforated, which significantly lightens the element and ensures reliable adhesion to the mortar mixture;
- the corner with a mesh, which is used when plastering with wet mortar, has a slightly different shape. The steel mesh is fixed with special pads, its width reaches two centimeters;
- There is also a combined version of the plaster corner, equipped with a mesh made of polymer material. A corner with such a mesh for plaster is endowed with the advantages inherent in models made of metal and plastic. It costs more, but is considered reliable.
Craftsmen highlight the main disadvantage - susceptibility to rust formation, especially from the negative effects of acids and alkalis. For this reason, metal corners should be used when working with plaster compositions on acrylic, plaster or latex.
Plastic
Today, such accessories are gaining popularity and are represented by a special product line:
- in the form of simple overlays, shaped like metal corners. The main difference is the absence of corrosion. High-quality plastic is used for manufacturing, so such products perform well in conditions of high moisture content in the air. The disadvantage is the large thickness, which has to be covered with a three-millimeter layer of plaster mortar;
- Curvilinear wall joints are decorated with arched corners with one segmented side that can bend in the right place. The second one remains level, like other models;
- a mesh plastic corner is used in thick plaster layers, while the mesh acts as an overlay, providing reliable adhesion;
- universal corners with a grid are rarely used, in areas where the angles are not equal to 90 degrees. They are thin strips of plastic, bent in the right places. In most cases they are used for internal docking.
A distinctive feature of plastic elements is the absence of rust, and therefore they are used for plastering facades.
Finishing external corners
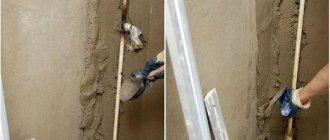
Processing external corners during new construction or renovation of premises can also be done in 2 ways. The first of them involves the introduction of a corner profile made of metal. This method makes it possible to plaster both combined walls at once and ultimately obtain a strong corner.
The second method is to first plaster one side of the corner using a beacon strip, and then the other.
The iron corner profile allows you to form an even and reliable outer edge of the walls without any special problems. Mesh shelves are adjacent to the central part of the profile on both sides. Their thickness can be different, depending on the model of the slats. Before you apply a continuous layer of primer, the solution that secures the profile must be allowed to dry properly.
The corner lath can also be placed on a narrow layer of plaster consistency, spread in a continuous strip from the ceiling to the floors. Then setting the profile by level is even easier. All metal corner profiles can be shortened if necessary.
The side shelves are cut with metal scissors, and the central part with a metal saw. A fixed strip can also be used as a beacon when smoothing a layer of plaster primer.
Once the mixture has set, it needs to be cut using a metal trowel, thus freeing up space for covering. It is spread as usual; the thickness is determined by the angular profile. To round the resulting plastered corner, lightly sand it with small sandpaper.
Plastering internal corners
The application of plaster, carried out with the aim of leveling the junctions of uneven structures, is most often carried out using beacons. When creating a thick plaster layer, and also if the husk is formed by walls made of dissimilar materials, the plaster layer is reinforced with metal corners with a mesh. If the layer of applied mortar is thin, then plastering is used using corner spatulas, reinforcing the corners with serpentine.
Using perforated profiles
The use of contra-shuls for plastering husks is rational, if the walls are sufficiently smooth, leveling is carried out with a gypsum compound. Perforated corners are installed together with beacon profiles, which are already installed and fixed 0.2-0.25 m from the corner.
How to properly plaster with counters?
- For installation, the mixture is applied pointwise (every 15-25 centimeters) or in a continuous line deep into the husk.
- A corner, pre-cut to length, is placed in the husk, pressing with a rule, alternately leaning horizontally on the walls.
- Applying the rule along the profile, check its verticality according to the level. If the husk made up by the walls is straight, you can press the corner with a square, resting it on the walls.
- After the solution has set, plaster is applied to the husk and leveled using the rule.
- When the laid mortar has set, the surface is rubbed and adjusted to ideal geometry using a metal template.
Applying the mixture
Pressing the corner with an angle spatula
Leveling plaster using the rule
Grouting plaster
With the help of serpyanka
To plaster the internal joint formed by sheet materials, for example, sheets of plasterboard, serpyanka is used for strengthening.
Sequencing:
- The solution is applied to the husk in a thin layer so as to cover a strip 10 cm from the rib.
- From the ceiling itself, a ribbon of serpyanka is lowered down to an outstretched arm, unwinding the roll, making sure that it lies strictly along the husk.
- Using a wooden block, carefully press the tape to the corner, avoiding its displacement and the appearance of folds.
- The excess plaster mass released on top of the serpyanka is removed with a spatula. They also level the tape and surface.
- They go down below and perform the same operations.
- The excess tape is cut off along the bottom of the wall.
Application of the solution
Serpyanka fastening
Aligning the tape and surface
The same joint is made if a straight wall adjoins a straight partition.
Adviсe
Alignment of the internal corner is carried out by making a beacon directly in the corner, with further tightening of the corner by the width of the rule. It should be borne in mind that the longer the rule used, the smoother and less noticeable the transition from the inner corner to the wall will be.
Before aligning the corners, you should use a rule to evaluate their overall curvature. By applying the rule to the corners, humps and recesses are identified and they are outlined with a pencil, so that in the future you can navigate in which places and how much to apply the solution.
Next, treat the surface of the corners with a deep penetration primer. This will strengthen the surface of the walls and ensure good adhesion of the putty. Priming should be done to a width greater than the length of the rule used. After the soil has completely dried, you can begin making a lighthouse in the corner.
The lighthouse is a path of prepared gypsum plaster 5 cm wide. To make it, the gypsum mixture is diluted and mixed twice (to ensure the complete disappearance of lumps). Next, the mixture is applied in a corner to the wall and leveled vertically, forming a flat surface (including vertically).
Achieving a flat surface can be achieved using a level and additional support points for the beacon (existing protrusions and self-tapping screws screwed into the wall can be used as support points). Two walls meet in the corner, so you will need to make a second beacon on the other wall (after the first beacon has dried).
After the beacons have dried, you can tighten the walls using the rule
As a result, it is important to reduce the corner and the wall to nothing. After applying putty to the wall (to the length of the rule), you should rest it with one end on the beacon, the other on the wall and then pull off the excess
To prevent thin layers of putty from tearing, you need to use a spray bottle before re-taping.
To fill in scratches and grooves, you can apply another thin layer (apply as a rule after the plaster has completely hardened). Then you need to wait for the applied layers of plaster to dry and sand the surface.
The video will demonstrate the process of plastering internal corners.
How to plaster wall corners using beacons
As a rule, husks are leveled along the beacons in case of large curvature of the adjacent walls. In this case, separate installation of beacons is not required, since before plastering the walls, the outer beacons are installed from the corner 10-15 centimeters. Plastering of internal corners begins after completion of plastering of the walls (in the same order of applying spray, primer, and covering layers).
- First, apply the solution to one side of the husk.
- It is leveled by applying pressure to the dried plaster of the wall. The excess mortar formed in the corner is cut off with a spatula.
- Allow the applied solution to set and dry.
- Only after the solution has been applied, the second side of the husk is also leveled using the rule, resting on the surface of the wall. The husks are adjusted with an angled spatula.
- After the solution has set, the beacon profiles are removed, filled with the mixture and the grooves are leveled.
- Apply a covering or grout the surface.
Applying and leveling the solution on one side of the husk
Applying and leveling the solution on the second side of the husk
Grouting the surface
How and what to glue
All that remains is to glue the plastic corner onto the corner edge of the slope. First of all, you will need to choose how to glue the plastic corner to the wall. Salons and hardware stores will recommend the Liquid Nails adhesive composition as the most suitable product. The only positive characteristic is the convenient packaging in the form of a tube.
Everything else is up to the manufacturer. This composition can be used to glue lightweight polyurethane bovelacci or a plastic corner measuring 10x10 mm to the joint between the tiles. In addition, the white adhesive mass becomes beige-gray over time, so traces of glue are very clearly visible on the seams and joints.
Slopes on windows and entrance doors must be glued with silicone; it can be transparent, but if desired, you can easily choose a colored version of the sealant. Not all adhesive materials adhere well to the smooth surface of PVC corner. Silicone sealant is a pleasant exception; it does not flow or shrink.
But the main advantage is to obtain a durable and elastic seam. If you have to glue something to a door frame or to light partitions that vibrate with every door slam, choose silicone. Any other adhesives that produce the strongest and stiffest seams cannot withstand vibrations and chip, especially when it comes to a plastic corner.
The technology for gluing a corner plastic strip is quite simple. Apply glue in thin lines to the inner surface of each shelf. If the glue is very thick, then the adhesive mass can be applied to the wall with short oblique lines or dots. You cannot cover the entire surface of the wall with a continuous layer. Firstly, such a plastic profile will be impossible to press into place, and secondly, 50% of the adhesive mass will be squeezed out uselessly beyond the corner. If the glue is too liquid, it will simply leak out from under the plastic strip.
Carefully place the prepared plastic corner with glue applied onto the gluing area. To ensure a strong adhesive seam, you need to carefully press the bar into place.
A small amount of adhesive mass may be squeezed out from under the plastic profile, but do not rush to remove it - first you need to level the corner. The polyvinyl chloride profile is very flexible, and it will not be possible to straighten it by hand, so the laid corner is brought into a straight state using a metal ruler and a building level. To prevent the plastic corner from falling off the wall and sliding down until the glue dries completely, you need to secure it with several strips of tape.
We glue the next strip of plastic profile in the same way, but before laying it in place you will need to apply a small amount of glue to the joint line. After settling, part of the glue will protrude at the joint; all excess can be removed only after the adhesive mass has completely dried. Until the glue has dried, any attempts to remove excess glue will lead to stains on the wallpaper.
Sometimes there is a problem with the length of the arched corner. The maximum length of the plastic strip is 3 m. This may not be enough if the arched opening is made across the entire width of the room; the length of the corner profile on such an arch can reach 3.5-4 m. In this case, the arched arc has to be sharpened with a small piece. It is best to make the central part of the arc solid, add two small sections to the sides, and seal the joint line with silicone sealant in the color of the plastic material.
After a couple of years, due to shrinkage processes, the seams may come apart a little, but the arch will still retain its original effectiveness. If you increase the length of the plastic corner on one side, the joint will be perceived as a stain and spoil the impression of the entire structure.
What is a straight perforated corner
A straight perforated corner is a metal or plastic corner trim that is secured with plaster or putty, thereby giving the wall a smooth appearance and making its corners stronger.
It can be external and internal, as well as different in width and strength. For example, a wide galvanized corner is much stronger; it is also used as a beacon for plaster.
- It is better to take scissors for trimming corners with a plier-shaped type, they are very strong and sharp. With ordinary scissors, you will simply damage the edges of the corner, and the work will be lengthy and inconvenient.
- If it is a plastic corner, then large sewing scissors will do; sometimes you can cut it with a construction knife, but then the edges will have to be leveled using pliers or a hammer.
- The right corner looks like two long rulers folded in half, and on each edge there are round holes - this is a perforation with its own top.
The top of the inner corners is directed inward, and the outer corners are directed outward.
The perforation is for fastening, and the apex is for direction; the craftsmen orient themselves towards the apex and guide the spatula along it.
If you have a lot of work to do, where you need to cut a lot of corners, then do the following best: put them in a row, measure them, lift them to a height and cut them with a grinder. This will make working quickly and conveniently, and you won’t have to align the corners. Metal corners can be cut with pliers three at a time, this is faster.
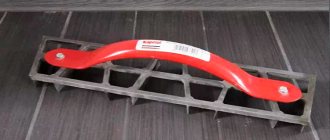
Grouting corners and leveling wall surfaces
- using a trowel placed at an angle of 30-40°, the base is grouted;
- then a solution is applied near the profiles, which is smoothed using a rule to eliminate excess mixture;
- smooth the surface with a trowel;
- the bases are leveled, while the corners should not protrude outward;
- Polymerization is carried out on the dried wall panel and the final grouting begins;
- internal corners are rubbed using a grater with a sponge surface.
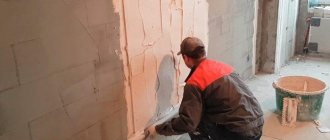
Plastering external corners
People who do not understand how to plaster the corners of walls may not understand what we are about to talk about. The fact is that there are two types of angles - internal and external. First, it is worth discussing the process of plastering the external corners, because this process is considered simpler, and any beginner can handle it on their own.
Experts advise leveling the plaster on external corners using special corners - the latest tools to facilitate the process of repair work, acting as beacons. Glued reinforcement mesh can also be used for this, which is also an incredibly attractive option for use.
The fact is that plastering using corners can boast a large number of advantages, despite which, unfortunately, it is often not recognized by builders with extensive experience. Here is a list of these advantages:
- the plaster will definitely not crumble, thanks to the steel beacon that strengthens the coating;
- you can make the coating monolithic with the help of additional reinforcing mesh, because it will very reliably connect the two walls;
- you will no longer need to carefully smooth out the external corners, because the lighthouse will be pre-set to the required level, which will become the zero point in the process of plastering the wall;
- the time that will be spent on plastering external corners along the beacons will not even compare with what you would spend on simple plastering without modern means.
Let's start work
To begin work, you need to find the place on the wall that protrudes the most. We are, of course, talking about those irregularities that cannot be leveled or eliminated in any other way. This point will become the starting point for the entire process of installing beacons.
Please note that absolutely all beacons must be installed strictly at the same level. Otherwise, there is a high risk of getting an uneven wall as a result
You can check the installation using the rule of a sufficiently long length. Just apply this tool to the outermost beacons, and then check that all the others fit tightly enough to it.
The corner can be plastered only after such work has been completed (all beacons must be well fixed). Any experts will tell you: “First we plaster the corners, and then we just go over them with sandpaper.”
It is important to choose the right angles used for this process. Different types suit different situations
If after the plastering process you are going to start gluing wallpaper, then you should use sharp corners.
As for decorative plaster, a rounded version will look better
As you may have already understood, plastering external corners is simple; all that remains is to consider the process of working with internal ones, when plastering which it is important to follow the technology, as well as competently work with beacons, which are somewhat more difficult to install in such situations
Slopes
If interior doorways usually have slopes with right angles, then window openings are turned out to let in more light. The unfolded earrings must be the same for both slopes and tops. In this case, a template square is used to align the corners. Using a template, install counters or beacons (the former are preferable, they additionally strengthen the outer corner).
The alignment of corners and slopes is carried out starting from the tops using a screed - a short strip with a protrusion at the end. Apply the solution between the guide beacon/counter beam and the door/window frame. Level the solution with a small spoon, resting one end on the beacon and the other on the box. The gypsum mortar is smoothed with a spatula, and the cement mortar is smoothed with a trowel (smoothing).
Plastering the corners is an operation that completes the leveling of the room when plastering the walls. For beginners who have mastered plastering and leveling walls according to beacons, it is no longer difficult to independently level the grooves and husks. This operation gives the room a neat appearance.
Perforated corner for putty: which one to choose and how to attach it
Puttying the corners of a two-level ceiling begins with the installation of perforated corners
If you do not live in a round tower without windows and doors, then your home must have corners - internal and external. And during repairs, you have to decide how to finish them so that they turn out perfectly smooth and protected from mechanical influences. If the joint between the walls and the ceiling or floor is easy to hide with a plinth/cornice, then the filling of the internal corners between the walls and the external ones formed by window and door slopes, niches and protrusions must be done efficiently. To simplify this task, special perforated corners are used, the purpose and types of which you will learn from this article.
What is it for?
Plaster corner is an element for repair and finishing work.
Installation of products is carried out under the plaster mixture or on its surface, depending on the stage of repair and the design solution of the finishing. Without corners, the joints between sections may end up with unevenness and roughness.
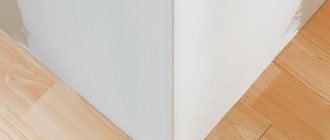
Where and how are profiles used to protect wall corners?
You have to get acquainted with the first version of the profile corner at the stage of plastering or leveling the surface of the walls using plasterboard. Installing a plastic corner under the wallpaper makes it possible to solve two problems at once:
- Strengthen the finishing layer of putty;
- Give the outer corner an ideal geometry, at least visually the line of junction of the two planes looks quite even.
Anyone who has at least once had to glue wallpaper on walls with crooked corners will appreciate all the benefits and practicality of a simple plastic profile.
The main difference between corner profiles and decorative plastic corners is that the installation option always has perforation along its entire length. The corner does not need to be glued; it is simply imprinted into a layer of putty or plaster. Even professional plasterers always use a plastic corner in their work.
But the use of mounting profiles for leveling walls does not solve the problems of the appearance of corner edges, both internal and external, especially if the walls are decorated with light-colored trellises. Therefore, plastic corners are often installed in addition to the perforated profile.
What does it give:
- Complete corner protection. No matter how carefully the owners handle the decorative finishes at the corner joints of the walls, after a few months, or at most a year, marks, scratches and chips of the cladding will appear;
- Eliminate cracks and gaps between wall panels, especially at wall corners and baseboards, on curved surfaces;
- Dramatic improvement in appearance. Colored plastic wall corners will help you transform and significantly refresh your wall decor at minimal cost.
At the same time, it is not necessary to limit yourself to the outer corners of the walls, although they are, as they say, in plain sight and require protection in the first place. Often, a plastic corner on the corner of a wall has to be installed after the fact; it is worth rearranging the furniture once and moving the largest interior items. Scuffs and dirt can still be removed or washed, but chips and deep scratches on the walls have to be hidden.
Internal corners also have to be covered in order to disguise the transition from one type of finishing to another, for example, when simultaneously covering the corridor walls with plasterboard, MDF or DFP panels, and living rooms with wallpaper and wall boards.
How to properly install a plaster corner
- products are placed on a solid area of the panel;
- Before installing the element, the area is treated with a primer;
- profiles are recorded by beacons;
- the solution is filled with a dense layer of the perforated surface;
- when placing an element vertically, a building level is used to level the area;
- when covering with a thin layer, the corners are fixed using dowels or self-tapping screws;
- First, the main surfaces are treated, corner surfaces are plastered at the final stage;
- The corners should not protrude above the plaster layer, therefore, if there are such parts on the surface, they are covered with leveling mixtures or sealant.
In addition to the general rules for installing corners, there are requirements for the order of fixing internal and external elements.
- the plaster solution is applied by spraying, then the base is primed;
- the area is leveled using the rule of the direction of movement from the corner;
- Markings are made on the treated surface, then an angle is formed.
Installation of paint corners
Perforated
Let's analyze the installation of the perforated corner, we will glue it to the window slopes using putty.
- We check the verticality of the slopes with a level (bubble or laser).
- We measure the required length of the profile and cut it with metal scissors.
- Lightly squeeze the corner along its entire length, because it may not be at 90°, but more, which will lead to its edges crawling out from under the putty.
- We apply the putty to the slope that we will use to level the surfaces in the future. We apply putty on both sides of the corner with a reserve
- We apply the corner to the solution and move it slightly up and down so that the putty passes through the holes. Then use two spatulas to press it against the walls along its entire length.
- Smooth out the putty on both sides. At this stage, using a laser, you can evaluate the verticality of the angle setting and, if necessary, correct it.
The internal painting corner for plaster can be installed in the same way: apply the solution, press the perforated profile along the entire length, smooth it with a spatula on both sides.
A corner with a mesh is more often used for facade work, because... it is more securely fixed in the plaster, reinforces the corner of the wall and protects against chipping. To expose it, you need to do all the same work described above.
Advice. When working with drywall, the corner can be secured to staples with a construction stapler before puttying. Press the profile not with your hands, but, for example, with a meter level, this way you will avoid bending.
Arched
For plastering arches, there are special corners on sale that easily bend and take the desired shape. Their peculiarity is that at one edge the shelf is not solid, but consists of segments.
Arched corner profiles, like regular ones, come in plastic and metal
It is quite simple to bend and secure such a perforated corner (the metal one generally holds its shape perfectly). It is pressed against a curved surface and secured with brackets. Then you need to putty on both sides.
Another option for decorating arched openings is to use an overlay PVC corner to match the color of the trim. It is more difficult to work with such a profile, because it is more elastic and can straighten out.
To paste over the arch, you need:
- Apply plastic glue (for example, silicate) along the entire length of the corner on both sides. Wait for a certain time, which is indicated in the instructions for the glue.
- Press the corner to the arch, starting from the bottom, moving to the opposite side of the opening. The cover must be fixed pressed against the wall along its entire length. Use masking tape for this and stick it a little tight.
- After the glue has set, you need to trim and remove the excess that protrudes from under the corner. When the glue is completely dry, you can remove the tape.
Paper
Corners made of paper finishing tape are glued in the corners of plastered walls or plasterboard structures during puttying work for painting. They have a minimum thickness, making them easily hidden with putty.
But paper corners will not be able to bring the corner into a vertical plane if it is tilted to the side, so the quality of the plastering work plays a significant role here.
Apply masking tape to the inner and outer corners as usual - on putty. The metal reinforcing strips must always remain under the paper, i.e. lean against the wall.
Fastening the plaster corner
Arched corner
It is not enough to choose a high-quality product for framing corners made of metal or plastic; the main task is its installation. There are certain nuances and postulates that every professional finisher recommends following. These include:
- there should be a strong wall at an angle;
- the corner must be primed, just like the walls;
- the corner is set according to special beacons mounted according to the level;
- the corner should be installed in such a way that the solution penetrates into all perforations;
- the verticality of the installed product should be controlled using a level;
- in extreme cases, when the layer of finishing material is too thin, it is allowed to use additional mechanical fastening, which can be dowels with plastic sleeves and self-tapping screws;
- plastering work on the corner element is carried out last;
- there are special tools for decorating a corner and removing excess mortar from the surface of a plastic or metal product;
- Grouting the corner should be done on both sides alternately, while the product itself should not protrude outward.
If, when comparing the corner trim with the wall surface, you see that the mortar or gypsum composition is not enough to recess the corner, you should use some kind of leveling compound or sealant for these purposes.
To summarize the material presented, it is worth saying that a plaster corner is an indispensable assistant for the owner of an apartment or house who is trying to do the finishing work in his premises for the first time.
By making the right choice of product and performing high-quality installation in accordance with the recommendations, you can be sure that the corners in the room will be even.
Arched corner.
Everything is clear with the finishing of right angles. How are various arches, multi-level ceilings and other figured structures brought to perfection? After all, neither the plaster rule, nor the building level, nor even a straight perforated angle will help here.
For this purpose, a slightly modified perforated corner for plaster is used - arched. Firstly, such a corner is always plastic. Secondly, one of its shelves is cut crosswise into petals. This solution allows this accessory to be so flexible that it can follow the shape of almost any smooth curves.
Tip: When installing arched corners under plaster, you need to remember that you cannot adjust them with a level or rule. This is done exclusively visually, by eye. Help from another person and good lighting will be a good help. Before installing the corner, you need to compress it a little so that the petals do not stick out from the plaster.
The arched corner, depending on the manufacturer, can be hard or soft. Hard is usually more expensive. But, when finishing large-scale structures with smooth shapes, it is indispensable.
The fact is that his desire to straighten ensures the ideal roundness of the lines and the absence of “angularities”. But attempts to use such a corner on small decorative elements with sharp bends will lead to its fractures, which cannot be corrected.
A soft arched perforated corner for plaster allows you to finish sharper turns, for example, arches with a small radius of a circle and other curves. However, the lack of rigidity in the profile of such a corner threatens the appearance of bumps and depressions on the lines being processed. To avoid this problem, it is recommended to install soft arched corners using a plaster mixture.
With this method of fastening, firstly, there remains a chance to correct visual defects during plastering. Secondly, screws and other fasteners will not pull the bend lines towards themselves. To make the arched corners look smoother, they should be mounted slightly under tension.
Beacon corner.
In the first case, the product will serve as a plaster beacon. To install it, a plaster mixture is applied to the base corner. By the way, it is more convenient to work with gypsum plaster than with cement plaster. It should not be applied along the entire length of the edging, but in such flat cakes - for the convenience of adjusting the angle along the plane and level. This adjustment is made using a building level and a plaster rule.
Tip: If you add a handful of cement or any cement mixture to gypsum plaster, the plaster beacon will set in a matter of minutes. You can continue working immediately. Where perpendicular planes intersect, it is advisable to cut the overlapping corners at 45 degrees to avoid overlap.
It should be noted that the internal perforation angle is extremely inconvenient to use as a beacon for plaster. It is only suitable to emphasize the straightness of the edging.
In walk-through areas where external corners may be subject to more intense mechanical loads, it is recommended to install a corner with a mesh under the plaster. Fiberglass plaster mesh. firmly connected to a plastic or metal corner, it serves as a means of corner reinforcement.
This type of perforated corner is used precisely as a beacon. After all, it is almost impossible to hide the mesh under a layer of finishing putty, since about 5 mm of plaster must be applied on top of it
Advice: If you want to reinforce a regular perforated corner, you can cover its shelves with a sickle mesh, covering the wall. Strips of non-woven fabric or fiberglass are also perfect for this purpose. The same putty can be used as glue.
Variety of shapes
Corners of various shapes allow you to perform the corresponding plastering operations.
Direct
Metal or plastic is used for manufacturing; the product resembles a strip, bent at a right angle in the central part. The sides of the element are perforated, which facilitates the fixation process. The thickness of the corner made of metal material is 0.5 mm, of plastic – 1 – 1.5 mm.
Arched
There are only plastic options, because it is impossible to create a shape corresponding to the arch from a metal corner. This element is suitable for finishing both internal and external corners. Perforation is usually applied to one side, or the side parts are segmented.
Universal
Plastic or metal corners, which are a tape capable of edging any non-standard area where the use of a conventional corner is not possible. The width of such a product reaches five centimeters, the fold line is located along the central axis, and there is micro-perforation.
With reinforcing mesh
A reinforcing mesh is attached to the sides of such corners for slopes under the plaster. The profile is perfect for plastering walls using the “wet” method or when finishing with a thick layer of mortar. The width of the mesh is from two to four centimeters, the corner is made of metal material or plastic.
Combined type
The basis of such an element consists of metal, onto which a mesh of fiberglass or plastic is fixed. Galvanized or aluminum plaster corner forms smooth corners and joints and adds strength to weak areas.
Do-it-yourself installation of a plastic corner
The process of laying a decorative profile on a corner or on the edge of an arch is not particularly difficult; it requires care and careful handling of plastic. Polyvinyl chloride scratches easily and loses its glossy shine. Often the front part of the plastic corner is sealed with paper to avoid damage and contamination with glue. After the adhesive base has hardened, the surface of the corner can be polished with a soft cotton cloth.
One of the advantages of using a PVC profile is the fact that during production the coloring of the material occurs throughout the entire mass; any scratches and abrasions do not lead to a change in color or shade. So you can polish the material an infinite number of times.