So, the renovation is coming to an end. All previous stages are behind us. Finishing surfaces ahead
Finishing is the final stage of repair work, after which you can begin arranging furniture.
the final finishing of an apartment include ? This is a whole complex of works on decorating a room with decorative finishing materials. This includes pasting the walls and treating them with decorative plaster or stone, painting the ceiling, finishing the floor, installing moldings, thresholds, baseboards and cornices, as well as working with drywall, plaster, and putty. Let's look at the most popular finishing .
Ceiling finishing
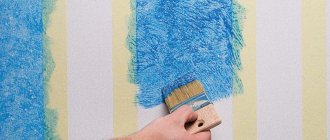
- Dye. The simplest and oldest way to finish ceilings is to apply water-based, latex or acrylic paint to them. The paint can be used in any room, even in rooms with high humidity. But despite all its apparent simplicity, the method is actually very complex. After all, it is necessary to carefully level the surface of the ceiling. Otherwise, any error will become a real disaster.
- Ceiling tiles. Another option is finishing the ceiling with special PVC tiles. There are certain advantages to this method of ceiling covering. This is an inexpensive material that is quickly and easily glued to the base. The slabs themselves are lightweight, suitable for moisture-resistant rooms, perfectly hide minor surface defects and do not require careful leveling of the ceiling with putty.
- Stretch ceiling. Currently, this is the most common method of decorating the ceiling, which is used as a finishing touch. The method has many advantages: a flat ceiling, any pattern, protection from “flood” from above, quick installation. There is no need to level the ceiling for this method, which certainly saves time and money. Such ceilings are suitable for all rooms in the apartment.
- Drywall. The option with finishing with plasterboard (GKL) is practical and durable. Despite the apparent complexity, specialists will install it quickly enough. It all depends on the complexity of the project. The fact is that drywall can be used in different ways. Firstly, it is used as a leveling material, which is especially important for finishing in a country house. This coating gives a perfectly smooth surface and does not crack over time. You can also hide wires and other utility lines under the plasterboard. The last option is especially relevant if you decide to decorate the room with lighting: spot or curtain lighting. In this case, gypsum board becomes a real salvation. Firstly, you get a beautifully designed, perfectly smooth ceiling, and secondly, you can make any lighting option, thirdly, the ceiling can be made architectural: with coffers, entablatures and other details. Or you can make, if the height allows, a fashionable multi-tiered ceiling. Plasterboard finishing can be used in all rooms. Only for bathrooms a moisture-resistant gypsum board is required.
- Suspended ceiling. Suspended ceilings, like stretch ceilings, perfectly hide all the flaws in the ceiling. They look neat and make it possible to hide communications. There are two types of suspended ceilings: slatted and cassette. The second option is most common for administrative and office premises, and the first is often used in apartments in bathrooms. Mirrored slatted ceilings look especially impressive. In addition, they increase space and provide additional lighting due to their reflective properties.
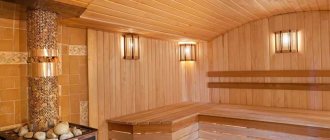
- Tree. Finishing the ceiling with wood is an expensive method, but extremely effective. We are talking about coffered ceilings. This type of covering is usually chosen for home libraries, offices or dining rooms.
- Venetian plaster. Finishing with plaster is used not only for walls. Today this type of finish is used for ceilings. Outwardly it resembles marble. But most importantly, they are not afraid of humidity. Therefore, it is successfully used for bathrooms, and in country houses for rooms with a swimming pool.
Stages of gluing wallpaper on plaster
Before gluing, you need to make sure that the surface is flat and smooth, without joints or cracks. After preliminary preparation and priming, you can begin working with the canvas. How to putty plastered walls with cement-sand mortars? The adhesive composition is mixed in a separate clean bucket. To improve its properties, it should be allowed to stand for 5-10 minutes.
Using a thick brush, apply a thin layer of glue to the wall and wallpaper. After application, fold the canvas in half, glue it inside and let it rest for about 5 minutes. This trick will enhance the wallpaper's adherence to the wall.
Then the canvas is unrolled and glued to the wall, starting from the corner. Evenness is checked using a plumb line. First, the canvas is pressed in the middle and, moving from the center to the edges, smoothed out.
You need to get rid of air bubbles under the wallpaper as much as possible. If this fails, then the canvas will have to be re-glued. Liquid wallpaper is applied to the entire wall in one go. The layer should be as thin as possible. They dry from 1 to 3 days, depending on the thickness.
Wallpapering on plaster without putty work is quite possible. If you strictly adhere to the application technology, the result will please the novice master for many years. How to hang wallpaper on concrete walls is described step by step in the video below.
Similar
Is it possible to put wallpaper on drywall, plaster and concrete walls without putty. ⇩⇩⇩ DON'T FORGET.
In this video I talk about the main stages of preparing walls for wallpapering. Especially, I note why.
Buy it, putty for walls under any wallpaper - https://goo.gl/rK8xfz How to putty walls under wallpaper! This putty.
Buy wallpaper for gluing on walls after preparation - https://goo.gl/6pFB2p How to prepare walls for gluing wallpaper.
Compositions for work are sold in dry and liquid form. By diluting dry mixtures, you can achieve the desired consistency. But ready-made formulations save time. The mixture must be prepared in small portions.
It hardens quickly. You need to work with it intensively. You need to stir it in a clean container.
There should be no impurities or inclusions. They may appear after drying on the pasted wallpaper.
- Putty allows you to get a smoother surface, so you can use any wallpaper;
- Over time, the old coating can be removed without damaging the drywall;
- The putty will provide the base with an even white color, so that no stains will appear under the topcoat.
- gypsum, which are easy to apply and process, practically do not shrink, but are afraid of moisture;
- cement, suitable for work in rooms with high humidity, but losing volume when hardening;
- polymer, providing better leveling and elimination of surface defects; in addition, these putties are very elastic, but they are also the most expensive.
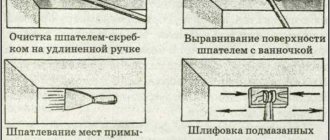
Grouting the surface. After finishing the application, you need to sand the wall with sandpaper. If it is possible to use a grinding machine, then it is better to do so. The machine will help treat the surface for the next layer.
The sanding machine is not cheap. What putty is best for plastering plastered walls? Many people make do with hand tools.
Their effectiveness is no less with due patience.
Due to its naturalness, the OSB board looks great, but despite this, it won’t hurt to treat it before gluing the wallpaper. If you putty the OSB board with your own hands and have done it efficiently, you can apply wallpaper glue to the surface without any fear and start gluing the wallpaper. In addition, treating OSB boards with a putty solution will extend the service life of the material for many years.
Once everything you need for work has been purchased, you can safely begin
After this, the room is thoroughly dried. In most cases, this takes exactly 24 hours.
At the next stage, you need to check, using a level, the geometry of the wall whose puttying is planned.
So, wall putty is needed, firstly, in order to make the walls smooth. Wallpaper will fit better on smooth walls than on bumpy ones (after all, there is an air bubble under each bump). The putty also smooths out all sorts of sagging plaster, fills potholes, and removes small defects on the wall surface. Finally, the putty creates a uniform wall surface on which the wallpaper will then fit well.
Floor finishing
After the preparatory rough work has been completed: screed, heat and sound insulation or leveling with OSB plates, you can begin laying the floor covering.
What material to choose is up to you. With the modern variety of types of coatings, you have a lot of options. Everything can be roughly divided into two categories:
- budget coverage,
- expensive coverage.
For a budget option, materials such as linoleum, laminate, carpet are suitable. These options have both advantages and disadvantages. One of the main disadvantages is their short service life and low strength.
For the second option, use parquet, natural boards, porcelain stoneware, expensive laminate, and natural carpets. These materials have a long service life and increased strength. They are lightweight and easy to care for. And they look amazingly beautiful. If you want the floor to emphasize the overall style of the apartment and last a long time, use natural, expensive materials.
Wall decoration
The modern market offers a huge selection of materials for finishing walls. And everyone needs different conditions. So, there are materials that require absolutely ideal surfaces, such as paint, wallpaper, fabric. And there are those who do not care about the condition of the walls, for example, decorative plaster.
In order to use wallpaper or paint as a finish, you need to level the walls. For this you can use the following materials:
- Gypsum fiber. GVL or gypsum fiber sheet is a more advanced version of gypsum board. It has better heat and sound insulation and is more durable, but it is heavier, stiffer and more expensive compared to plasterboard. It is used for finishing walls for leveling purposes. Since the material is moisture resistant, it can be used in the bathroom as a base for tiles. In addition to being used in apartments , GVL is used in country houses when decorating walls.
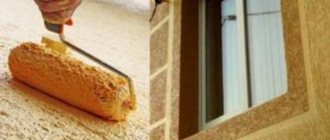
- Putty. Finishing with finishing putty means the presence of absolutely smooth walls, which allows you to subsequently use absolutely any materials as a coating: from painting walls to wallpaper. Before filling, use plaster, which copes with gross defects. The putty seals the smallest irregularities and creates a smooth, even surface. As for materials for finishing walls, today it is difficult to even list them. It all depends on the style of the interior. It dictates the choice of wall covering. But let's try to list the main options.
- Wallpaper. Considered the most inexpensive option. Wallpaper is divided into paper, vinyl, non-woven, fiberglass. Each type has its pros and cons. But, in general, the option is standard, well-known and time-tested. Today he has many fans. And I think this will last for another decade. Wallpaper helps create a cozy, warm interior. With their help, you can create interesting combinations and achieve all sorts of effects.
- Decorative plaster. Like wallpaper, there are several types of plaster: mineral, Venetian, structural and textured. The most commonly used is mineral plaster. The most interesting is Venetian plaster. With its help you can create an imitation of real stone.
- Tile. This finishing option is most often used in bathrooms and kitchens. It tolerates temperature changes and high humidity well.
As you can see, finishing is one of the most important and difficult stages in renovation. To learn more about finishing materials, call us!
You can find other interesting articles here.
Types of surfaces
Any surface that needs to be painted must be perfectly flat, which requires a series of preparatory work. Depending on the material of the wall surface, various actions will need to be performed. Plastered walls are ready for painting, but you need to consider how smooth they are. If the surface of the walls is smooth and the layer of plaster is also not damaged, you can proceed immediately to puttying or finishing with decorative plaster. The plastered walls are ready to be covered with the chosen paint and the renovation is brought to its logical conclusion.
It will also be necessary to carry out a number of small works with it so that the entire surface is absolutely flat, this is especially true in the area of joints and in places where the sheets will be fastened with self-tapping screws. The drywall needs to be puttied, then cleaned well and only then primed. When all stages have been completed, you can begin painting or wallpapering.
As for concrete surfaces or simple brickwork, the scope of work here is much wider than in previous options. In such cases, leveling occurs using plaster mortar, where beacons are also used so that the result is as accurate as possible. If you are afraid that the surface that you want to paint or on which you plan to wallpaper will crack due to temperature changes or other factors, then you can use fiberglass, which will protect the walls from such phenomena and strengthen them.
The texture of such fiberglass can be completely different - from thick and corrugated to very thin, like a spider's web. Working with this material is easy, and the result will please you for many years, when neither heat, nor cold, nor even humidity will change the appearance of your painting or wallpaper stripes.