Options for creating panels
The situation when after renovation there are many pieces of high-quality and beautiful wallpaper left is quite common. There is no point in throwing them away, but they can be used to decorate the interior or even for cosmetic renovations in another room.
The most interesting option may be a panel - a decorative piece designed to fill sections of a wall or ceiling in a room. Anyone can make a panel of wallpaper with their own hands, even those who have never hung wallpaper in their apartment.
There are several types of it:
- static, when pieces of wallpaper are glued directly to the wall;
- in patchwork style, consisting of pieces;
- panels for children's rooms;
- creation of individual paintings;
- use of false panels.
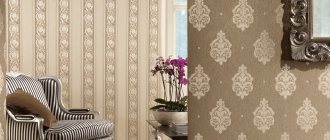
Design options
There are different design ideas and options for decorating framed wallpaper on the wall. Here are the possible options:
- For the younger generation. Every home will benefit from family photos. In today's fast-paced times, few people look into photo albums; many people like to look at photos in digital form. Therefore, portraits of relatives: grandfathers and grandmothers can be put out in the open for viewing.
- Wallpaper with print. For those who do not want to drill into the wall for holders, you can buy wallpaper with imitation frames - it can be in a simple form or with a cartoon pattern. The depicted frames of these wallpapers can be left unoccupied, but can be filled with photographs or small paintings.
- For replaced compositions. When you are tired of looking at certain drawings, it is recommended to make a frame for a replaceable illustration using clothespins or hang the decor at the top.
Static panels on the wall
For such panels, sheets with preliminary markings (rectangular or square) are used, and pieces from different rolls can be combined with each other. Static panels on the wall made of wallpaper (photo below) are often used to decorate niches or zoning a room to separate, for example, a workplace from a relaxation area.
Carrying out a composition requires preliminary consideration of the design and style of the room. For a harmonious combination of canvases there should be at least 2, you can use contrasting colors and patterns, and it is recommended to decorate the edges with baguettes. How to make panels from wallpaper yourself will be discussed below.
What are there, secrets of harmonious composition and the best design tips
The panel can be made from any materials. Not so long ago in the USA it was fashionable to make panels from what you found on the ocean coast.
Seafood wall decoration Source pinterest.com
The option shown in the picture is suitable for decorating a modern living room interior.
A classic panel can be made from the following materials:
- Tree. Natural material has a unique texture, pattern, and color. It is important to focus on the uniqueness of wooden elements and fit them correctly into the interior. From wood you can create both simple and complex compositions with the addition of other materials, such as stones. A wooden composition with an image of a world map will suit the modern living room interior.
- Stone. Pebbles are most often used to create a stone panel, but marble and granite are also suitable for wall decoration.
Composition of pebbles on the wall Source vannadecor.ru
A panel of small pebbles is suitable for decorating an urban interior, such as a loft style.
Small stones can be painted, creating real masterpieces from them.
- Ceramics. Ceramic wall panels can be made in any color scheme; the material allows you to create unique shapes.
Ceramic panels in the bathroom interior Source domvpavlino.ru
See also: Catalog of companies that specialize in finishing materials.
The panel depicting a wild animal blends harmoniously with the beige background of the interior.
Ceramic panels in the interior Source cozzyroom.com
A ceramic panel with a color image attracts attention.
- Textile. Fabric that can take on a variety of shapes and thus convey the author’s idea is ideal for creating panels.
Embroidered panel in the interior Source ua.all.biz
A panel made of embroidered fabric will fit into a modern interior.
- Gypsum. The material allows you to turn any ideas into reality. The panel can be designed in the form of a painting, with a specific plot.
Plaster panels in the interior of the living room Source gessostar.ru
Highlighting one of the walls in the room with plaster geometric shapes will help complement the interior in the high-tech style.
Plaster panel on the entire wall Source homeli.ru
A plaster floral panel will decorate a free wall in the room. This design can be used for the interior of a girl’s room.
- Paper. A paper composition for wall decoration can be supplemented with other materials. Modern technologies make it possible to apply any designs on paper.
You can arrange family photographs in the form of a panel. It can be one large photograph, like a painting, or several images that capture the best moments of life.
Paper flowers for the interior of a children's room Source domsmam.com
Paper flowers of various shades will fit perfectly into the interior of a children's room.
Floral panel in a bright interior Source keypartners.spb.ru
Wallpaper panels with a floral pattern will dilute the bright interior of the room.
Important Recommendations:
- A large panel is suitable for decorating a wall in a spacious room. For small rooms it is better to use smaller compositions.
- Instead of a large panel, you can place several small interconnected compositions on the wall.
- For a bright interior, it is better to choose panels in light, natural tones.
- The composition should not stand out from the general style; everything should be interconnected.
Do not forget that artistic construction requires maintenance. It may be necessary to varnish the parts. It is necessary to evaluate how to clean the panels on the wall from dirt and dust. Wiping dust off many small parts is not so easy.
The panel not only decorates the wall, but can also hide some imperfections, such as cracks; you can also hide a safe under the panel.
Applications of patchwork
With this option, the panel consists of many different pieces of wallpaper with different patterns, ornaments, and in a variety of colors. The decorated wall is an image consisting of small-sized cut “pieces” (the shape is usually square, rectangular or diamond-shaped).
The patchwork design is ideal for decorating a children's room, as well as for rooms in a vintage or retro style. However, when selecting a composition, you should choose no more than 3 combinations of patterns or shades of images.
Fragments of wallpaper are glued in a random order, one next to the other or overlapping, so that the resulting image resembles a patchwork quilt. Important tips: for patchwork it is better to choose wallpaper of the same density, and you need to glue them as tightly as possible so that the edges do not come off.
Using panels in different rooms
The panels can be used in almost any room in the house, including areas such as the bath, hallway or kitchen. It is worth saying that depending on the location, the design of the products used may also change. Also, wallpaper panels in the interior may differ in their characteristics. That is, it is recommended to choose the most environmentally friendly products for the recreation area, and for rooms with high humidity it is optimal to choose moisture-proof products.
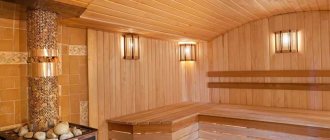
Wallpaper panels for the bathroom
As for design, you can adhere to the following recommendations from experts:
- For the bedroom, products in soothing colors, with a texture reminiscent of textiles, are perfect;
- for a bathtub, marine motifs would be a good solution; it is important that the product is reliably protected from moisture;
- Country-style products are perfect for the kitchen, with images such as still life, food, tea or coffee, fruit, and so on, as well as wood or stone textures;
- Bright images are suitable for children’s rooms, including those with characters from children’s animated films;
- for the living room, a panel consisting of several images arranged in one line with a general theme is relevant; these can be calm landscapes, animals or flowers, while it is important to maintain proportions, that is, in a small room they place products in pastel colors, but in large rooms it is better a large panel with a bright image will look good.
And of course, abstract pictures or various patterns will always look great in any room. It is important that the selected products are in harmony with the interior of the room. It is worth noting that by combining panels with lighting you can get an extraordinary design, distinguished by originality and luxury. In addition, you can make a panel for your bedroom or other room with your own hands. Let us examine in detail the process of creating such a product.
Wallpaper panels for children's rooms
Panel for children's room
Figures made from pieces of wallpaper will look great in the interior of a baby’s room. This will help you decorate the room in an original way with animal figures, colorful balls, letters or numbers, and plants.
This option resembles an applique, but its fragments should be selected according to color and harmonious combination. You can use fairy-tale characters or images from movies and cartoons.
Some recommendations for choosing fragments and material:
- in a children's room it is better to use washable wallpaper so as not to waste time erasing “children's works”;
- It is better to make the choice of drawings together with the child;
- do not use easily torn fragments or decorative elements;
- It is better to place the drawings in such a place that the baby cannot reach them.
What is a panel
A panel is a decorative monumental work that is most often used to decorate a free section of a wall, ceiling, or building facade.
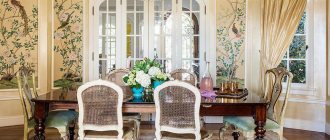
Panels in the interior of the living room Source gazeta-pravo.ru
The panels can be purchased at a specialized store, ordered from a designer or artist, or made with your own hands from available materials.
DIY wall decoration Source yaplakal.com
Some works delight in their simplicity. They are beautiful, unique, but making them will not be difficult for even the most inexperienced creator.
Everyone can do this option for decorating a wall; you just have to imagine how you can delve deeper into your thoughts and dreams while looking at pictures of nature.
Panel of paintings in frame
When small panels are framed, they are convenient because they can be hung arbitrarily at the request of the owner of the room. Fragments of wallpaper need to be inserted into frames, which is quite simple for non-specialists. However, when choosing a composition, you should make a selection according to the color scheme. You can also experiment with various patterns and shades (flowers and geometric patterns, etc.)
There are 2 options for this design:
- the paintings are made of the same size and then they are placed symmetrically in a certain order (along a ruler);
- the paintings have different sizes and are hung “chaotically” in any order.
This wallpaper panel in the interior looks perfect on a plain wall. For decoration, you can use drawings with any ornament (flowers, geometric shapes, abstractions and patterns). Exactly identical fragments in identical frames, hung close to each other, look very stylish.
As frames, you can use not only standard photo frames, but also wooden hoops. This unusual design will add zest to the design of the room, and round shapes will add softness.
Wallpaper paintings under glass
It is best to hide under glass compositions made from fabric and paper wallpaper, as well as paintings with details made from fragile materials that require careful care and are not resistant to washing:
- threads;
- ribbons and lace;
- dried flowers and herbarium;
- glitter and colored sand.
For example, you can make an unusual picture for the hallway, corridor or kitchen with the image of a vase. It is necessary to paste the silhouette of a flowerpot onto a background of fabric wallpaper. You can decorate the composition with dry herbs, unusually shaped branches, and dried inflorescences.
It is better to prepare flowers for decoration under pressure so that they are as flat as possible.
Anti-reflective glass, which is highly durable and very easy to clean, will help preserve the original picture. An original frame in a vintage style will complement a homemade panel of dried flowers.
Photo wallpaper can also become a special touch in the interior design of a home. This decor looks impressive in the bedroom and living room. Wallpaper can be placed either in one large photo frame or in several small ones, having previously thought out a modular composition.
False panels
This type of panel is often used by designers to update an existing interior, because with their help this can be done inexpensively and quickly. False panels can be glued on top of existing wallpaper or on a cleaned wall painted with water-dispersion paint.
To make such a panel, a piece of wallpaper of the required size and shape is cut out, and then simply pasted onto the wall over the existing trim. For false panels, it is better to take high-quality, thick and textured wallpaper. Hand-made wallpaper panels look very elegant in a bedroom decorated in a Japanese or oriental interior if the material with silk-screen printing is chosen. After drying, molding, wooden or plastic slats are glued along the contour and painted in the desired tone.
Inside the false panels you can hang mirrors, install sconces or other lamps, picture frames, clocks or any other decor. This is what a typical interior in a classic style looks like. If the design is made in more modern styles (high-tech, avant-garde, etc.), then it is better to choose metal or plastic for frames.
The headboard of the bed in the bedroom is made in the same way. The easiest option for making a wallpaper panel on the wall in the bedroom (photo below) is to imitate a headboard using wallpaper with a pattern on a plain background. The composition will become brighter and more stylish if you add decorative elements with a similar pattern to the interior (bedspread, pillows or bed linen with the same pattern).
One option for using leftovers would be to make a headboard for a bed from a sheet of plywood covered with wallpaper. A bright and intricate pattern is suitable for this, which will become an original accent in the bedroom composition.
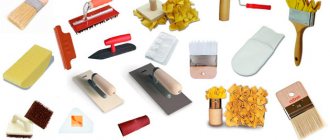
Necessary tools for gluing photo wallpaper
Before you figure out how to glue photo wallpaper on a wall, you should find out what tools and materials you need to prepare. To save effort and time, prepare in advance everything that may be useful to you in your work:
- Directly panels with a pattern. When purchasing, you must immediately decide on the future location of gluing and size.
- Adhesive. To choose it, it is better to consult with a sales consultant in the store.
- Wallpaper or stationery knife. With its help, you can easily trim the protruding parts of the canvases or adjust their ends.
- Brushes. The size of the brushes should be large, since with their help you will need to apply glue to the inside of the panel as quickly as possible. And for the joints, prepare a smaller brush.
- Tape measure, level, straight ruler. These tools are needed to maintain the correct proportions, check vertical and horizontal lines, and prevent the canvas from “collapsing” to the side.
- A block or other flat surface, with the help of which you can evenly draw the boundaries of the elements of the picture on the wall.
- Rubber roller. Using it, you can smoothly and correctly smooth the components to the surface.
- A simple pencil, a cloth.
- If you work at heights, prepare a stable chair or stepladder.
Using Frames
Before you make a panel out of wallpaper, you should decide on the choice of frame for it. You should know that frames look best on a plain or multi-colored (variegated) wall surface. Therefore, when choosing it, you should take into account the features of the room and its interior, and also think about what effect they will produce.
Decoration around the edges of the panel is done in various ways:
- without frames, when strips of wallpaper are glued end to end;
- framing from a strip of wallpaper, when a certain fragment of the desired color or pattern is cut out;
- volumetric baguette made of wood, plastic or metal;
- old or aged wooden frames (used in vintage style interiors);
- gypsum decorative overlays.
When choosing the type of frame, you should strive for its harmonious combination with other decorative elements.
Preparing walls for wallpapering
Here are some recommendations for your attention on how to properly prepare the wall for installation.
- You should not glue photo wallpaper onto the remains of old wallpaper; there is a risk that both coatings will lift over time.
- If the wall is painted, then it should be removed if it is prone to peeling and crumbling. If not, simply coat the surface with acrylic primer.
- Paint that is too bright can bleed through, so it makes sense to give the wall another coat of white paint.
- It is better to straighten any bumps, this is especially true if you have chosen paper-based wallpaper.
- Under the non-woven vinyl covering, only smooth out obvious flaws.
- Ideally, scrub the surface with finishing putty, “scratch” it with sandpaper after drying, brush off the dust and coat with acrylic primer.
Design tips
Before starting work, you should pay attention to 3 main factors:
- degree of illumination of the room;
- the predominant color scheme or background of the walls, their texture;
- accessories placed in the room.
Expert advice will help you choose the right and harmoniously compose the composition:
- in a small room you can achieve a visual expansion of the space using a composition in light shades, preferably pastel colors;
- when decorating a room in a classic style, warm colors are preferred: beige, golden, red or burgundy;
- in a spacious room, the place of the composition should be dominant, otherwise it will get lost.
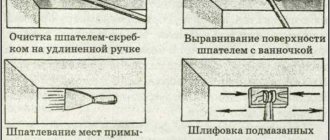
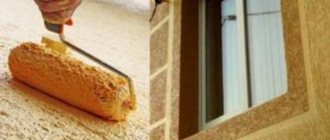
Working with paper bases
Many people are interested in how to properly glue paper photo wallpaper to the wall so as not to spoil the material. Note that paper wallpaper is a rather capricious material, especially if thin single-layer options are chosen.
They literally crawl apart upon contact with the glue. The gluing technology is as follows:
- Lay out the segments on the floor, cutting off the edges on the left side of the segments and leaving the edges on the right so that you can overlap them later.
- The wall should be smooth and white, and the glue should be as thin as possible.
- Use a wide brush to coat the wall, and then the first canvas in turn. Wait 2 minutes and apply to the surface.
Important! If the paper density is very low and they are visible, then it is better not to smear the segment, but to glue it dry.
- Align the first segment with the vertical markings, roll the middle with a roller, removing air bubbles. Be careful not to damage the drawing. The direction of movement is from the center - to the sides and to the bottom.
- Glue the next segment overlapping the edge of the previous one. Make sure that no remaining edges show through.
Important! Don't be alarmed if the surface wrinkles, this is normal. If the pasting was correct, then after drying the canvases will level out again.
Making your own panels on the wall: preparation
To figure out how to make a wallpaper panel on a wall, you should start by preparing the wall surface and the necessary materials. First you need to level the surface of the wall, peel off the old wallpaper and remove traces of dampness and defects.
The next step is to select pieces of wallpaper of different patterns, where the main criterion is their uniformity and harmonious combination. Here are some nuances to consider:
- for the center of the composition, it is better to take a large drawing with perspective, for example, an image of the sea, a natural landscape or flying birds;
- The wallpaper panel in the bedroom interior should contain a calm, peaceful image (park, sea, etc.)
- if the interior of the room is planned in a classical style, then it is better to choose an image similar to frescoes, paintings or engravings.
Algorithm and manufacturing technologies
Making panels from wallpaper and frames is a fairly simple process that anyone can master. You just need to follow a competent algorithm of actions:
- Bring the wall covering into proper shape. Level it and replace worn wallpaper, if necessary.
- Apply markings at the intended location for the frame using a level.
- Based on the intended dimensions, prepare the necessary molding elements and attach them to the wall.
- In accordance with the size of the frame, cut out the desired part of the wallpaper, photo, shapes or ornament.
- Paste the wallpaper inside the frame.
- Trim excess edges around the perimeter of the frame with a sharp utility knife.
- Paint the wallpaper if this was planned.
- Allow the created composition to dry thoroughly to avoid possible damage and defects.
Depending on the purpose and the required result, one of three well-known technologies for creating panels on the wall surface is used:
- integral pasting - the image is formed from a single fragment of the canvas (photo wallpaper is suitable for this task);
- patchwork technology - creating a pattern from pieces of different wallpaper in an abstract style;
- combination method - using in one room a complete picture and an image made from patches.
Creative wallpaper in a frame is a simple universal method of transforming any room interior. The main thing is not to forget about moderation and follow the rules for combining elements. Then it will be possible to highlight the strengths of the interior and add piquancy to it. If necessary, the composition will help to enlarge and delimit the space of the room. All you have to do is turn on the flight of fancy and start experimenting.
How to make a panel of wallpaper on the wall with your own hands: photos and procedure
To make a wall panel you need the following materials:
- pieces of beautiful wallpaper;
- slats or foam molding (possible for ceiling);
- miter box - a tool for cutting slats at a certain angle;
- paint for painting baguette;
- masking tape;
- pencil and knife.
Operating procedure:
- First, it is recommended to make markings on the wall using a regular pencil;
- cut the slats and glue them in the right places on the wall;
- paint in the chosen color, having previously covered the adjacent areas with masking tape so as not to get dirty;
- Cut the wallpaper to the desired size and paste it inside the frame.
After selection, the selected pieces of wallpaper are glued to the wall end-to-end. To highlight the edge, you can use ready-made slats or foam baguette, which are glued at the joints of different strips of wallpaper.
SovetRemont.com
Recently, more and more often, many people are abandoning ordinary paper photo wallpapers in interior decoration, giving preference to modular panels, even despite their relative high cost. Installation of a modular panel on a non-woven base cannot be rushed and requires careful preparation. In order for your panel to be glued correctly and accurately, you must follow certain rules described below.
General conditions for gluing modular panels to the base of a wall or ceiling.
The base for gluing the panels must be plastered, putty and primed. Before installation, the base must be absolutely clean, free of dust and completely dry. Before starting installation work, all windows and doors in the room should be closed to avoid drafts. If, over time, after gluing the panel, small bubbles appear on it, despite the fact that everything was carefully and thoroughly smoothed, do not worry, this happens with particularly heavy non-woven panels; as they dry, they disappear and the canvas will level out.
During the work, the edges of the panels may move away from the base after drying; watch for this by smearing them with glue and pressing them against the wall again. You need to know that when the canvas becomes wet, it is much harder to cut with a knife, so if your panel consists of two or more parts overlapped in a pattern, then do not delay with the trim. As with any other product, the panel comes with sticker instructions, carefully read its contents and when installing the panel, follow everything indicated in it.
If you have to install the panel alone, and its size is quite large, as in my case (2.5x2.0 m/p), then the question arises of how to deal with the problem of a break in the rolled panel. Everything was solved with a telescopic attachment for rollers inserted into the middle of the canvas roll. In this way, I could hold the panel with one hand, without fear of a break in the center, gradually unwinding the roll from top to bottom. At the same time, with a rubber roller, I rolled the canvas from the center to the edges, driving away the resulting bubbles and clumps of glue.
Installation of a modular panel.
To install the panel you need the following tools, here are the essentials:
- Rubber roller
- Painting knife (stationery)
- Tape measure, pencil
- Level 2m
- Container and brush for glue
- Humor FM
- Coffee with chocolate
The modular panel itself is much heavier and thicker than ordinary wallpaper. Therefore, glue for non-woven wallpaper should be diluted a little thicker than the norm indicated on the packaging. Use glue for heavy non-woven wallpaper; this should have been indicated in the instructions.
Unpack the canvas and spread it on a flat and clean surface; in this position, the panel should lie for at least a day to adapt. After this, take an accurate measurement of the canvas with a tape measure and transfer it to the base, tracing all the edges, using a 2m level. Mark the center of the canvas on the wall from above (beginning of installation). Also find the center on the canvas itself and mark it with a pencil.
Using a paint brush or roller, apply a thick layer of glue to the wall. Without letting the glue dry, attach the canvas to the plane, aligning the centers marked with a pencil. Using a rubber roller, roll the panel, starting from top to bottom, from the center to the edges of the canvas, removing excess glue and any air bubbles that have formed.
If your panel consists of two or more parts, glue them overlapping one another with a margin of a few centimeters, but so that the overall pattern of the canvas absolutely coincides. Immediately take a paint knife and cut both sheets at the same time with an uneven wave-like strip. Remove the trim and align the resulting seam by rolling this area again with a roller. Remove excess glue using a damp sponge.
After completing the installation of the panel, do not open the windows and doors for at least a day or even more. If the panel is placed not from edge to edge of the wall, but in the form of a large picture, glue polyurethane molding, pre-painted in a suitable color, to the edges, in places where it joins the wallpaper (can be painted in a universal color - bronze). By following all the above installation steps, you will not have any problems and everything will work out the first time.
In the end, I can say that the photo wallpaper we are all familiar with in a modern design is in no way inferior to panels on a non-woven basis, sometimes even brighter in color and the same ones are available for sale without seams. It will be much cheaper to get high-quality photo wallpapers in an online store, but try to buy them through the cashback service, it will be 2 times cheaper compared to ordinary construction warehouses!
Production of panel paintings
To make a wallpaper panel consisting of individual paintings with your own hands, you need the following tools and parts:
- frames (for paintings or photos) of different sizes or 2-3 identical ones if the paintings are large;
- acrylic paint;
- wallpaper glue;
- stationery knife.
First, you should determine the main background color; it is this color that will be used to paint the frames. However, sometimes you can use a contrasting color. After applying the selected paint to the frames, they should be dried.
The next step is to cut pieces of wallpaper to fit the base of the frame. The base, removed from the frame, is placed on a roll and cut along the contour. Then the fragment is glued to the base using wallpaper glue. The knife is used to trim the edges of the paper.
The frame is then placed on top and secured. The next fragment is done in the same way. Ready-made frames with wallpaper are hung on the walls. To emphasize the originality and border of a decorative element, designers advise using appliqués that are glued to frames or inside (leaves, old newspapers, small details from wallpaper, etc.)
Knowing the rules of how to make panels out of wallpaper, following all the advice of experts and using your own imagination and artistic taste, you can make the interior of any room bright and original.
Interesting decor and location
You can make wide frames from wallpaper, for example, about 15 cm. In this case, the inside of the picture will be empty, and the wall will be visible through it.
You can put an interesting inscription on a wallpaper picture, for example, a motivating phrase, a wish or a verse you like.
Location:
- paintings are hung on the wall;
- small paintings decorate the desktop;
- Large images are placed on the floor.
How to make a frame from ceiling plinth
To complete this work you will need:
- ceiling plinth made of polystyrene foam;
- universal adhesive base;
- acrylic wood putty;
- well sharpened knife;
- protractor;
- acrylic based paints;
- corrugated cardboard or packaging from household appliances.
The required picture is cut out of paper and glued to the ceiling slab. The latter should exceed the size of the picture by about 1 cm on each side.
Next, work is carried out on the production of frames from corrugated cardboard or ceiling plinth. First, a template for the future product is cut out. A rectangular shape is made from corrugated cardboard, and a hole is made in the center for a photograph or picture. The size of the frame depends on the size of the desired image that will subsequently be contained in it. Then an identical rectangle with a slightly larger window is cut out from the workpiece. Then the elements are glued to each other. The result is a ready-made place for inserting a picture. If you plan to use glass or a stretcher, you will need to make a couple more of the same rectangles with a wider window to glue them to the other side of the frame. The number of products depends on the thickness of the embedded image.
When the base is ready, they begin to decorate the frame with ceiling plinth. Each edge of the baguette is cut at an angle of 45 degrees. Mark the corners and cutting lines on the paper using a protractor, then lay down the strip and make marks on it. Then the 4 elements are cut off using a sharp knife. Next, the baguette is glued to the cardboard blank from the outside. The cracks in the corners are sealed with putty and paint. The work done must be left for some time until the glue completely dries.
Kitchen interior with photo wallpaper Source design-homes.ru
Then you need to putty the areas where the baguette meets the cardboard, as well as the joints at the corners and the back side of the frame. This solution will help strengthen the product and hide all uneven finishes. The ends of the frame are puttied several times, dried, and then each layer is sanded one by one using sandpaper.
The dried putty begins to be painted. It is best to use acrylic compounds or water-based emulsion. To get a milky tone, you can add a small amount of ocher to white paint. For a dark shade, black paint is mixed with red and dark brown. Then the finished product should be treated with water-based varnish.
Lastly, fasten the product. For this purpose, you can use thick twine, from which you cut from 10 to 14 cm. Then take a dense but thin piece of cardboard and cut out a rectangle with sides 5 by 7 cm. The rope is applied to the back side of the frame. After this, glue is applied and the cardboard is glued, which is pressed with a weight until it dries completely. Now the frame for photo wallpaper on the wall is ready, all that remains is to fix it on the mount and enjoy the result of the work done.
How to make a frame
When making a blank, it is important to monitor the dimensions of the frame so that it exactly matches the wallpaper contained inside. To do this, it is important to measure the size of the picture and cut the material according to the data obtained. Do not forget that the painting will be placed inside the product, so all parts must be measured from the inside. It is also important to make the corners correctly so that they are absolutely the same. To do this, use a miter box and set the tilt to 45 degrees.
Decorative frames Source serviceyard.net
The parts are sawed off and then the corners are checked for exact fit. After this, the product can be fixed on the surface. Any method will do - first stick a frame and then add a canvas, or first place a picture and then decorate it with a frame. Focus on your own habits and convenience.