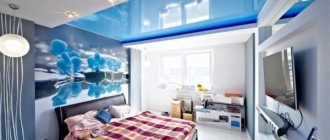
Suspended ceiling using Tigi-Knauf technology.
Let's look at the Tigi-Knauf ceilings. This technology was first proposed by the German company, they became very popular and are called by the name of this company. In Russia, they are widely used in industrial and office construction, as well as in the decoration of residential premises. Comparative cheapness, speed and relative ease of installation have made the Knauf suspended ceiling in demand in our market.
Advantages
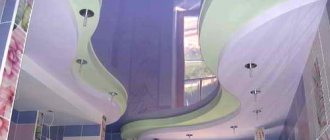
Plasterboard structures on the ceiling make it possible to adjust the ceiling height, allow you to hide communications and technological protrusions. The use of Tigi-Knauf technology allows the creation of ceilings of various shapes according to design drawings. Recessed ceiling lamps will also enrich the design of the room.
This ceiling, in combination with sound and heat insulation materials, provides optimal performance.
The Tiki Knauf suspended ceiling kit includes sheets of certain sizes made of plasterboard and a special metal frame.
Frame guides
For the wooden structure P 111, coniferous bars with a moisture content of no more than 12% are used. Before installation on the ceiling, they are treated with an antiseptic and fire retardant. The recommended cross-section of the bars is 50×30 mm.
The metal frame for the ceiling is made of long rolled elements made of thin sheet steel.
Ceiling profile
Frame with fastening to the base (P 112, 113). To assemble it, take a regular ceiling profile. It consists of the following elements:
- Guide profile PN. The cross-section has a size of 27×28 mm. There are factory holes in the wall through which installation to the base of the wall is carried out.
- Complete with the PN, a load-bearing PP profile is installed. In cross section it has a size of 60×27 mm.
The ceiling of the P131 system with fastening to the wall is made of a more powerful profile for the installation of partition structures (PS).
Wall profile
To strengthen the structure at the junctions of rooms, use a reinforced UA profile on the ceiling.
Conditions for installation
It is recommended to begin installation of suspended ceilings made of gypsum plasterboard during finishing work, but always after completion of the main work associated with the wet process. All wall leveling work must also be completed. If the walls are sheathed with plasterboard, then they must be sheathed by this moment; if plastering work is planned, then they must be plastered.
Installation must be carried out under the condition that dry or normal humidity conditions are maintained in accordance with SNiP 23-02-2003 “Thermal protection of buildings”. The temperature in the room where work is carried out and where installation materials are stored should not fall below 10°C.
Before installation, an accurate calculation of the future structure is carried out, the grid is laid out in accordance with the recommended pitch for this type of ceiling and the mounting of the suspensions to the base ceiling is marked in accordance with the type of load (see Installing a plasterboard ceiling with your own hands: video and detailed instructions)
Advice. All electrical, ventilation and other communications, if they pass above the suspended ceiling, must be installed and their functionality must be checked.
Installation stages
I will list the main stages of installation (briefly):
- Clear the ceiling of old structures;
- Make markings for attaching hangers;
- Attach the hangers to the base ceiling;
- Assemble the frame, constantly checking the level of the frame;
- Attach the Knauf sheets (gypsum plasterboard) to the KNAUF frame, observing the offset of the sheets;
- The seams between the sheets are puttied;
- If necessary, the ceiling surface is completely puttied in 2-4 layers;
- When ready, the ceiling is painted or decorated.
Elements for assembling the Knauf ceiling
PN 27x28
Guide profile mon 28x27 Knauf
PP 60x27
Ceiling profile PP 60x27 Knauf
Connector p60x27 or, as they are called, “crabs”
Krab Knauf (1-level profile connector P60x27)
Suspensions
Suspension with clamp 60x27 (spring, anchor)
Anchor suspension rod
Direct suspension P60
Connectors (extensions) for the profile (if the sides of the room exceed three meters)
Profile extension P60x27
Drywall KNAUF-sheet (GKL, GKVL, GKLO)
GKL KNAUF / regular plasterboard sheet 1200x2500x12.5mm
GKLV KNAUF / moisture-resistant plasterboard sheet 1200Х2500Х12.5mm
GKLO KNAUF/fire-resistant plasterboard 1200x2500x12.5
Fasteners (self-tapping screws, dowels for attaching hangers and profiles to walls)
- Self-tapping piercing screw LN 9. Used for fastening metal profiles, does not require pre-drilling.
- Self-tapping screw TN 25. Used for fastening gypsum board sheets with a metal profile.
- Anchor element.
Specifications
The weight of one square meter of the finished ceiling is about 13.5 kg, it may vary slightly depending on the sheets used. For example, in wet rooms, it is necessary to use gypsum plasterboard sheets - moisture resistant, and for fire hazardous rooms, gypsum plasterboard sheets - fire resistant - are provided.
For one square meter of finished ceiling you need:
- Knauf guide profile Mon 28x27 Knauf - for the entire ceiling in an amount equal to the perimeter of the room
- ceiling profile Knauf pp 60x27 – 2.9 linear meters
- connector 60x27 or, as they are called, “crabs” - 1.7 pcs.
- hangers with clamps 60x27 and rods for them or straight hanger 60x27 - 0.7 pcs.
- connectors for the profile (if the sides of the room exceed three meters)
- plasterboard KNAUF - 1 m2 (GKL, GKVL, GKLO)
- fasteners (screws, dowels for attaching hangers and profiles to walls)
- Self-tapping piercing screw LN 9 – 1.4 pcs.
- Self-tapping screw TN 25 – 23.0 pcs. Used for fastening gypsum board sheets with a metal profile.
- Anchor element – 0.7 pcs.
- Dowel K 6/35 – 2 pcs. for 1 linear m profile PN 28/27.
- Reinforcing tape (serpyanka) – 1.2 linear meters
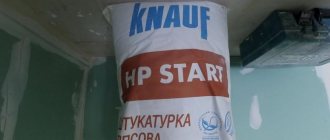
- Gypsum putty KNAUF (Fugenfüller) – 0.4 kg.
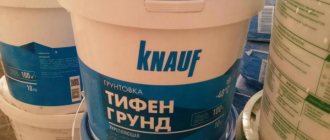
- KNAUF primer (Tiegengrund) – 0.1 l.
Marking the ceiling space
Before installing the material, markings are made on the ceiling and walls. Usually the sheets are placed 10-12 cm below the concrete base. In the gap between the slabs and the ceiling surface, hangers are fixed, communications and lamps are installed. This space can be filled with sound and heat insulation material.
Drywall sheets are fixed at the same level. To understand where the material will be attached, draw a straight line along the perimeter of the walls. This is done using a laser, water or construction level.
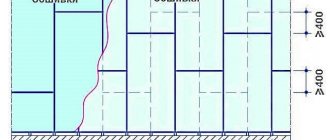
Next, markings are made for the frame, which is sheathed with slabs. Longitudinal guides are installed at a distance of 20 cm from the wall and 60 cm from each other. The transverse profiles are fixed with the same pitch. The distance can be increased or decreased, depending on the load-bearing structure and other factors.
Preparing for the installation process
What tools do we need in order to assemble suspended ceilings with high quality? Let's prepare the following set of tools:
- hammer drill
- screwdriver
Advice. Screwdrivers are best used with batteries. It's more convenient and safer.
- metal scissors
Important. For large volumes, you can use a grinder with a metal circle.
- paint pad with paint
- roulette
- rule with level
- laser or water level.
- knife for cutting drywall sheets
- special plane for processing sheet edges
Despite the impressive list of professional construction tools, complete KNAUF systems are installed quite simply, of course, if the master has an idea of how to use these tools and carefully studies the technology of ceiling construction.
Technology for installing plasterboard on Knauf ceilings
Many experts recommend studying the instructions for the Knauf plasterboard ceiling before installation. The first step is to prepare the construction tools and material that will be needed to install the ceiling. Only after this can you proceed to installing the frame.
Preparatory work
It is necessary to carry out installation work on arranging a ceiling made of plasterboard sheets using the popular Knauf technology only after all construction and finishing works that are associated with wet processes have been completely completed. In addition, it is necessary to take into account the fact that by the time of installation the walls in the room must be leveled and finished with finishing material.
When installing a plasterboard ceiling structure, you must initially pay attention to ensuring that the temperature and humidity levels are maintained. In this case, the optimal indicators are a temperature of at least 10 degrees, and the humidity level should not exceed 60%.
Before starting work, it is worth correctly calculating the ceiling surface, drawing up a design project, and carrying out the appropriate markings. It is at this stage that the operation of the ventilation system, electrical wiring and other communication elements should be checked.
Required tools and materials
In order to assemble a plasterboard ceiling using Knauf technology, you will need to have the necessary construction tools and materials on hand. Thus, for installation you will need:
- perforator;
- screwdriver - in this case, many experts recommend using a battery-powered tool, as it is not only convenient, but also safe;
- scissors designed for working on metal, if the volume of work is quite large, then it is best in this case to use an electric grinder;
- painting pad with paint;
- plane for processing the edges of drywall sheets;
- roulette;
- knife for cutting sheets of drywall;
- level – laser or water.
Despite the fact that the list is quite large, installation work is carried out very quickly.
Frame installation using Knauf technology
Before proceeding with the installation of the frame using Knauf technology, it is recommended to first prepare a level or tapping thread, thanks to which it is possible to mark a straight line along the entire perimeter of the room for fixing the profile. You will first need to make markings, placing points where the suspensions will be attached.
In the marked places, the suspensions are secured using anchors or dowel nails. Further work completely depends on what material the frame should be mounted from - wood or metal.
If you plan to install a frame using Knauf technology for a plasterboard ceiling, then the step-by-step work algorithm is as follows:
- It is necessary to install straight or quickly mounted hangers at the base of the beam. Thanks to the second option, it is possible, if necessary, to quickly change the side of the material fastening.
- The guide beam is fixed to the ceiling using special gaskets for this purpose, which will significantly reduce differences on the ceiling surface.
If you plan to use a metal profile in your work, then further work will look like this:
- The metal profile is connected using hangers, and do not forget about the presence of a gap of 10 mm, as a result of which it will be possible to protect the entire structure from temperature changes.
- A sealing tape is installed under the guide profile.
- To install the frame using Knauf technology, a wall profile must be used. Solid guide elements are attached along the length of the entire wall. In the process of fastening the dowels, it is necessary to observe a step of 30 cm. It is necessary to ensure that the supporting profile enters the guide by about 3 cm or more.
After the frame is assembled, it is sheathed with Knauf plasterboard.
Installation of drywall using Knauf technology
In the process of arranging a plasterboard ceiling using Knauf technology, it is worth considering one rule, which is quite important - the sheets must be fixed across the supporting profile with self-tapping screws at right angles. Before proceeding with installation, it is recommended that you be sure to treat those areas that are not covered with cardboard edges, which will allow you to remove the chamfers.
Installation work is usually carried out using special lifting mechanisms. Fastening should be carried out without joints, in a checkerboard pattern or in a running pattern. Many experts advise ensuring that the sheets are installed in the longitudinal direction without gaps, while in the transverse direction there should be a gap, but a small one. This is the only way in the future to putty the joints so that the seams are as smooth as possible.
It is important to understand that temperature changes can negatively affect the surface of a ceiling made of plasterboard. Thus, the material can expand quite easily and undergo a deformation process. In order to prevent deformation of the material, it is recommended to use special expansion joints with a pitch of about 15 cm.
Attention! Since there is a high probability that the finishing coating will be damaged by self-tapping screws, the caps will need to be screwed down into the drywall up to 1 mm. Reinforcing tape is used to seal joints.
Ceiling markings
- We will need a water level or a laser level and a lace - a paint tap. From the lowest point of the ceiling or technical protrusions on it, we will use a cord to mark the level along the entire perimeter of the walls.
Advice. What is the beating used for? If you use a water level or a laser level, then simply mark the corners, and then connect them using a tap.
- Next, we decide at what height we want to get the finished ceiling. You must understand that from the broken level the entire system will drop by the width of the profile plus the thickness of the sheet or, if desired, two sheets of drywall, that is, by 4-5 cm.
Advice. Pay attention to the location of all electrical and other process wiring in the space above the ceiling frame. Any possibility of accidental damage to them by the sharp edges of the metal frame or screws when attaching plasterboard sheets must be excluded.
Installation of the sheathing frame
- We proceed to fastening along the entire marked perimeter of the 28X27 guide profiles using any type of fastener that is suitable for your walls.
- We install the ceiling profile Knauf 27X60. The recommended profile fastening step is 40 cm. To connect individual sections of the profile, which are installed at an angle of 90 degrees relative to each other, use a single-level connecting profile, otherwise known as a “crab”. This element received this name due to the similarity of its shape to the shape of a real crab.
Having installed it at the junction, special fasteners are secured in the profile cavity, and the fastening itself should snap into place.
- The “crab” is screwed to the guides using self-tapping screws (LN) sized 3.5x9.5 mm, which also received their diminutive names from the builders: “bugs” or “fleas”.
As a result, we should get a sheathing from a profile with a cell of 40X40.
Lathing of a simple suspended ceiling made of plasterboard
- Then we outline the locations for installing the hangers. Using dowel nails, we attach the hangers to the concrete ceiling. If the ceiling is made of a different, softer material, then the hangers can be secured with screws.
- By changing the length of the fixed hangers, we adjust the plane of our entire structure to one level. The ceiling frame is ready.
- We proceed to covering the frame with gypsum plasterboard sheets. The sheets should be fastened from the middle to the edges or from edge to other edge. We use self-tapping screws (TN) with dimensions f3.5x25mm. Screws are screwed in strictly perpendicular to the sheets and deepened into the profile by 10 mm, no less. And the heads of the screws should be recessed into the drywall by 1 mm.
Wiring Guidelines
Electrical wiring performed behind suspended ceilings is considered hidden. It is carried out according to PUE standards for hidden wiring with the ability to replace it without dismantling the ceiling, in pipes or corrugation. For access to junction boxes, technical hatches are equipped. Recommended cable VVGng or imported analogues (NYUM). Electrical wiring is installed before the ceiling is installed.
You can download the instructions here (Yandex.Disk)
©Gipsokart.ru
Articles on the topic
- Selecting and installing a chandelier on a suspended ceiling
- Suspended flow frame with single level connectors
- Plasterboard finishing of attics
- Suspended ceiling with direct hangers
- Suspended ceiling with a two-level frame
- Plasterboard ceiling for narrow rooms
- Plasterboard ceiling on a wooden frame
- DIY plasterboard ceiling: single-level floating ceiling on rods
- Ceiling profile for plasterboard
- Marking a single-level suspended ceiling made of plasterboard
Sheathing with plasterboard sheets
Advice. When starting to finish the mounted plasterboard ceiling, check whether the screws protrude above the surface of the sheet.
- The edge of the gypsum board sheet should fall on the profile, overlapping it by three centimeters. The joints of the end edges of the plasterboard sheets should be spaced apart, offset relative to each other by at least a profile step (40 cm).
Advice. First, the end edges of the sheets are chamfered at an angle of 22.5° to a depth of 2/3 of the sheet thickness using a special edge plane.
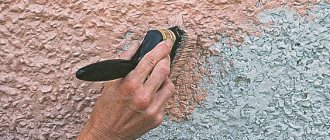
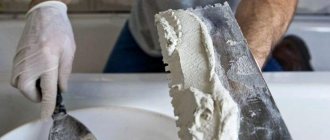
- Using a narrow spatula, apply the first layer of gypsum putty inside the joint. Spread the excess mixture evenly over the heat-affected surface of the sheet. Next, reinforcing tape (serpyanka) is applied to this seam using putty; it should cover the width of the entire seam by at least 100 mm on both sides.
- The tape should be pressed into the layer of putty that has not yet hardened in all places besides the very deepening of the joint. There should be no waves or bends. After fixing the reinforcing material, you must wait until the putty has completely dried.
Sealing joints
sealing seams
- When the first layer has dried, take a wide spatula and first dry clean the surface of the seam from particles of putty and its frozen drips. Next, apply a thin layer of putty with a wide spatula, but this time covering a larger area of the sheet.
Advice: It is recommended to use a 250 mm spatula, in this case the layer will be of this width. The task is to smooth out as much as possible that invisible bump that appeared when applying the reinforcing tape.
- It is possible that you will have to putty more than once until you get a smooth surface. Finally, sanding is carried out with regular fine sandpaper or a special mesh.
We looked at the construction of the simplest single-level plasterboard ceiling. You can install such a ceiling in an apartment yourself. It is only necessary to follow the technological sequence of work.
YOU MAY ALSO BE INTERESTED
Types of ceiling frames
There are two types of lathing:
- Cellular, when load-bearing profiles or beams create a kind of lattice (see next photo). As a rule, it is used in most cases of leveling the ceiling with plasterboard.
- Transverse. Profiles or slats are located in only one direction, and the gypsum board is attached to them across. This method is usually used by experienced craftsmen.
USEFUL INFORMATION: Features of the construction of a Russian bath
There are also single-level and multi-level designs. A ceiling with two or more tiers is quite difficult to calculate and install, but all costs are more than offset by the original appearance. To develop projects of such structures, it is better to seek the help of a professional designer.