11551 0 8
Rednasty October 22, 2016I'm not a wizard, I'm just learning. But I know everything about interior styles, comfortable home improvement and the transformation of Khrushchev’s apartments into luxury apartments. Hobbies: I like to give good advice.
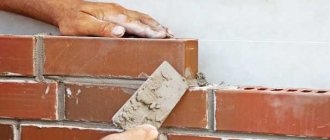
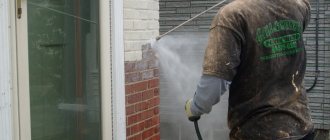
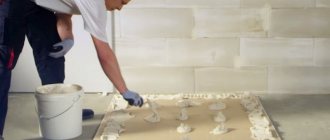
Decorative brick in the interior looks amazing, but can it be glued to drywall?
Widely used to create artificial niches and shelving, plasterboard occupies one of the leading places among finishing materials. No less popular among connoisseurs of stylish interiors is decorative stone, whose ability to add originality to the decor cannot attract attention.
Therefore, it seems to me that the desire to combine the two most popular finishing materials today is more than natural.
Many may wonder: is it possible to glue decorative stone to drywall, and how durable will such a structure be? I guarantee that in this article you will find all the necessary answers and get acquainted with all the intricacies of this method of framing walls.
This photo clearly demonstrates that you can decorate drywall with stone, and quite successfully!
The advantage of plasterboard bricks
It is necessary to understand that we are talking about finishing materials, the thickness of which corresponds to the thickness of the plasterboard sheets, plus a layer of applied putty. This is not a load-bearing structure at all, but simply a spectacular decor that plays an aesthetic function.
Decorative bricks made from plasterboard and putty have several advantages:
- it is light and therefore easy to lay;
- looks impressive and has aesthetic appeal;
- when properly manufactured, it completely replicates the appearance of natural brickwork;
- has a long service life because it does not lose its qualities during operation;
- unpretentious in masonry, and therefore for installation you can use liquid nails and similar compounds.
Wall made of gypsum plasterboard made of brick
It takes a little time to make decorative bricks. On average, you can prepare a fairly large batch in one day (about 7-8 hours). It will take about a few days for complete drying and decoration (if you decide to apply paint and give the faux brick natural colors and texture). After this, you can proceed directly to decorative masonry.
Note that the resulting home-made brick is suitable for indoor use only, and it is recommended to lay it in rooms with a moderate level of humidity. Yes, you can use moisture-resistant sheets of plasterboard as a base, but still, to decorate the facade of a house or apartment, it is better to use special finishing materials, since they have increased resistance to atmospheric factors.
Characteristics of drywall
It is not for nothing that drywall has gained enormous popularity since its appearance on the construction market. It is used both for interior decoration and for the construction of interior partitions. Of course, it cannot be used as a real wall - it is not as strong. But dividing a room with its help is quite possible.
Essentially, the material consists of two sheets of cardboard, between which there is a gypsum layer. This, in fact, explains the name “plasterboard”. Gypsum itself is an excellent material, therefore the same qualities are characteristic of the material in the creation of which it is directly involved:
- light weight. The lightness of the material means ease of transportation (as well as savings on it), ease of operation, and the absence of loads on the floor slabs in your home,
- flexibility. From sheets of plasterboard you can create a wide variety of structures, not just straight walls. Semicircular arches, various niches, ceiling cascades and other shapes - all this can be brought to life,
- low thermal conductivity. It is clear that external walls are not made from this material. But, firstly, it is possible to carry out interior finishing with its help, thereby increasing the thermal insulation characteristics of the structure. And secondly, there are times when you need to protect a warm room from a cold one, and here a plasterboard partition will come in very handy,
- fire resistance. Despite the fact that there is cardboard on the outer sides of the sheets, the material perfectly resists the effects of flame. Of course, its lining will burn if it comes into direct contact with fire. But the internal gypsum filling will perfectly withstand even long-term interaction without collapsing,
- ease of installation of structures and finishing,
- absolute evenness of the surface, which allows you to begin finishing immediately after installation, without wasting time on puttying, leveling and other tedious procedures,
- environmental friendliness. Since the material essentially consists of gypsum and paper, it is not capable of causing any harm to the environment and people. It can be used without risk to health in the bedroom, in the nursery - in general, absolutely everywhere.
To complete the picture, we list the disadvantages:
- low strength. Drywall can be damaged by the slightest load. This can happen during its transportation, during installation, and in general during use. Naturally, it cannot be used to hang something heavy on the wall. And in general, during operation you have to behave carefully - for example, do not lean on those parts of the walls that are finished with this material,
- water resistance. Ordinary drywall does not have this quality at all. There are, of course, special waterproof varieties. They can be distinguished from ordinary ones by their green color. But still, I personally don’t usually recommend using it in rooms where there is usually a high level of humidity, i.e. in the bathroom, etc.
- soundproofing. It’s also very low, it’s not for nothing that there is a common expression about “walls like cardboard.” When constructing an interior partition, this problem can be solved by installing drywall in two layers and filling the space between the sheets with soundproofing material. By the way, you can hide various wires and cables in the same place. But as a decorative finish, plasterboard will not improve the sound insulation of the room in any way,
- susceptibility to fungal infections. But this problem falls into the same category as lack of water resistance - just don't use drywall in areas of high humidity.
Now that you can fully appreciate this material, let's talk about how it can be used for decorative finishing of premises.
Required materials and tools
The advantage of homemade decorative brick is that it can be made using scrap materials. The key element is drywall sheets. Standard materials used for the construction of niches and multi-level ceilings are suitable. If you plan to decorate a bathroom or kitchen with artificial bricks, it is recommended to use moisture-resistant sheets.
You should buy textured putty. This will help recreate the natural texture of real brick, with pores, small cracks and abrasions. If there is ordinary putty left in the house, then it is also suitable for making artificial brick, and you can use other methods for decoration.
Other materials that will be required for the work:
- varnish - it is recommended to use transparent or matte, which will help consolidate the result and preserve the appearance of artificial brick;
- building mixtures - we are talking about compositions intended for laying sheets of drywall;
- sand - useful when decorating the surface of artificial brick;
- paint - water-based paint is suitable, and stock up on several colors in advance to give the brick a natural shade;
- primer - a deep penetration mixture is needed, as it will help strengthen surface adhesion;
- PVA glue - used for additional decoration.
As for the set of tools, it is standard: a construction knife for cutting, a profile with metric divisions or a hydraulic level, a spatula for applying putty, a brush and roller for painting, a container for mixing solutions.
If you have a drill with a mixer attachment, it will make the job much easier. To style the surface you will need a roughing plane.
To be a stone on drywall, or not to be?
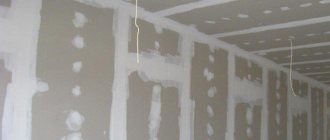
So, at the very beginning, as promised, I will tell you whether it is possible to glue artificial stone onto plasterboard. I note that due to its structure, drywall is suitable for applying wallpaper, paint, plaster, stucco and (drumroll please) the same decor using brick. Moreover, it is on such a leveled surface that it looks especially impressive.
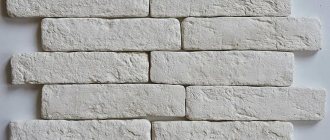
Drywall is an ideal base for artificial bricks
As for the strength of the structure: it will please the eye only if the finishing work is carried out correctly. Read below about all the intricacies of such an interesting matter.
Preparation and marking of workpieces
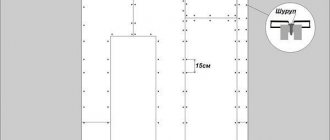
When all the tools and materials have been collected, you can begin to work directly. First you need to take sheets of drywall and apply markings. The cells must correspond to the actual size of the decorative brick that is needed in the end, but on average it is:
- height - about 60 mm;
- length - approximately 250 mm;
- thickness varies in the range of 9.5-12.5 mm.
Marking plasterboard for making decorative bricks
Next, you need to coat the plasterboard sheets with a primer on both sides. After complete drying, the final marking is applied (you can use a simple pencil).
Laying the drywall on a flat surface and pressing it with your hand, cut the sheet strictly according to the markings. The knife must be held firmly and at an angle of 45 degrees. Having made 2-3 deep cuts, you can break off the desired fragment and proceed to the next one. The result will be rectangular blanks for future decorative bricks.
Where to begin?
Below I will tell you how to glue decorative stone to drywall, but I will start, as usual, with preparatory work. Don't think that I'm trying to waste time by talking about unnecessary things.
On the contrary, I want to warn you that if you pay insufficient attention to the selection and preparation of materials, be prepared for the fact that the final result will be far from expected, if you are able to complete the work at all.
To obtain a worthwhile result, drywall should be carefully prepared.
Basic surface requirements
In order for a panel made of artificial stone to please the eye for not a year, not two, or even five years, the working surface to which it will be attached must be chosen with special care. She must be:
- perfectly flat . Any roughness or notches are a signal that you should find another material;
- completely dry and clean . Until this condition is met, there is no point in starting repair work;
- well low fat . This will allow the applied material to stick better.
When you are convinced that the drywall meets all the above requirements, you can proceed to surface preparation. It consists of the following steps:
- Removing previous finish. If the surface was previously painted, all layers of paint must be removed. It is prohibited to glue decorative stone in such a situation.
It is prohibited to glue decorative stone onto a painted surface.
- Alignment. Unlike brick walls, plasterboard sheets do not require careful putty. But a minimal impact will not be superfluous.
- Treatment. After leveling, the surface must be treated with a deep penetration primer. I recommend giving preference to acrylic primer as one of the most effective.
Acrylic primer (average price fluctuates around 200-400 rubles) is the best option for such work
- Applying plaster. Here you can use one of two methods: use a standard solution, or use a special concrete contact agent. The layer of the applied mixture should be quite thin and no more than 2 mm.
At this point, the instructions for preparing drywall for further application of artificial stone on it end. I will only add that you should allow at least 2 hours for the plaster to dry.
Selection of adhesive composition
When choosing an adhesive for finishing work, you should not have any particular difficulties. The construction market offers a truly huge range of products just for these purposes.
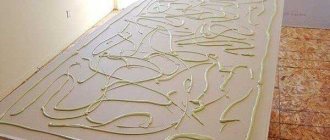
Many means are suitable for gluing decorative stone.
On my own behalf, I will add that you can quite successfully glue decorative bricks from plasterboard with your own hands on:
- any solution designed to work with ceramic tiles;
- silicone sealant or other elastic fastening compound;
- standard cement mortar.
Be sure to read the instructions on the product packaging before use. This way you will not only avoid unpleasant situations, but will also be able to achieve the strongest possible adhesion of materials. .
When using compounds, avoid exposing them to direct sunlight - this will reduce the adhesive ability of the product. If this cannot be avoided, after finishing the work, wrap the stone in film to reduce the rate of moisture evaporation.
While working, try to avoid exposure to bright sunlight on materials.
Preparation of tools
Successful decoration with artificial stone will not work without:
- grinders (can be replaced with a hacksaw);
- building level;
- spatula;
- adhesive solution;
- decorative stones themselves;
- pencil and tape measure;
- several containers for diluting the solution;
- wooden stick;
- rags.
As you can see, the set of tools is more than modest and can easily be found in almost any home (not counting glue and decorative bricks).
When the surface is prepared, it’s time to move on to active work.
Making bricks
Further work is reduced to the following order:
- the putty mixture is mixed with sand in the required quantity (try to calculate its volume taking into account the number of workpieces received in order to avoid overuse of the solution);
- the resulting mixture is applied to the workpieces using a spatula (it is recommended to work quickly until the mixture begins to harden);
- using a sponge, brush, plastic film or any other available means, it is necessary to give the surface of the putty the desired texture that replicates the appearance of real brick.
Next, the resulting fragments are thoroughly dried in a room with moderate humidity, and then sanded. This allows you to remove smudges (if any) from the surface of the homemade brick.
Applying putty to gypsum plaster boards
With a little imagination, you can give the bricks spectacular chips and natural cracks. To do this, you can use a brush with metal bristles, a knife or other tools. You can smooth out rough edges using sandpaper.
Having completed this stage and received high-quality artificial decorative brick blanks, you can proceed to the final stage - artistic design. To do this, you need to dilute a small amount of paint, add brown, burgundy or orange to it and apply the first layer to the surface of the brick. After drying, it is recommended to apply another layer, but of a different shade. The more heterogeneous the color of the surface, the more natural the artificial brick will look. After painting, a layer of varnish is applied.
Cutting gypsum boards and decorating artificial bricks
Cutting drywall into fragments is carried out according to the following algorithm:
- The slab is laid on a flat surface with the possibility of displacement.
- Using a construction knife, deep cuts are made (more than 2/3 of the sheet thickness).
- The piece breaks off in one motion, cutting through the underside of the drywall.
- If the bricks have an aged appearance, then the uneven edges are not processed. A plane is used to create straight sides.
- Long fragments are cut into separate parts.
Installation and finishing
When the brick is ready, you can proceed directly to the laying. Carefully clean the wall and coat it with primer, then make markings and begin laying the fragments, placing them on the adhesive mixture. When laying, you can use standard plastic crosses, and after drying, fill the seams with a grout mixture.
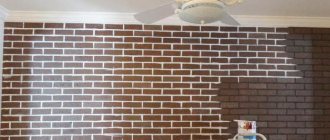
At this point, the bulk of the work can be considered completed. If desired, you can apply an additional layer of paint or varnish to the brick surface, making it more uniform, beautiful and attractive. With enough diligence, you can recreate natural brickwork using available materials. Happy renovation!
Plastering the plinth to look like stone. Which plaster to choose?
Before starting installation work, you should decide which plaster option will be used. To resolve this issue, various variations of the material can be used.
Finishing with cement mortar
The simplest solution is to finish the basement of the house using cement mortar. If necessary, the applied layer is painted. Silicone or acrylic variations of paint are used as paints and varnishes. The feasibility of using this method is due to the minimal consumption of materials used and the low cost of the work. It should be noted that this finish may crack.
- Read more →
How to choose the right material for making gypsum tiles?
Gypsum is a material that has long been used for construction and finishing. Its source is natural deposits of this sedimentary rock. These deposits are quite numerous, so gypsum is inexpensive and available to everyone. Construction stores sell rock mined from the depths of the earth and crushed into powder. The gypsum used in construction work does not contain artificial additives, is environmentally friendly and completely safe for humans. Advantages of gypsum as a finishing material:
- does not emit harmful substances;
- has an affordable price;
- does not burn or be destroyed in the presence of fire;
- has good sound and heat insulation properties;
- takes any form.
The powder packages have markings indicating the parameters of a particular product. The degree of grinding is indicated in Roman numerals:
- coarse grinding – I;
- medium – II;
- small – III.
The strongest and highest quality castings come from finely ground varieties, but this material is more difficult to mix. Coarser grinding is easier to work with, but products made from it are inferior in strength to those cast from fine gypsum. To make tiles, it is recommended to use finely or medium-grinded powder. Compressive strength is displayed in numbers from 2 to 25. The higher the number, the stronger the material. The best option is gypsum with a strength of 10 or higher. Based on the speed of hardening, gypsum is divided into class A (sets in 6 minutes), B (from 6 to 20 minutes) and C (over 20 minutes). The hardening speed can be adjusted by adding various plasticizers during mixing. The hardening process slows down when adding lime, wallpaper glue or washing powder. If you add table salt, the solution hardens faster.
Do-it-yourself gypsum tiles at home - an interesting video
How to prepare a plane
Before you begin to install the surface cladding, it is carefully prepared, bringing it to perfect condition. Do not forget that all work on preparing the plasterboard surface must be carried out at above-zero temperatures in a dry room. Preparatory work algorithm:
- Remove old finishing materials. Attention! Painted surfaces are not suitable for gluing artificial stone, so the paint will have to be completely removed.
Cleaning the wall of old finishing materials - The walls must be leveled so that the maximum difference on the wall does not exceed 1-3 mm. It is worth noting that drywall practically does not require long-term preparation, which cannot be said about brick and concrete surfaces.
Leveling the walls with plasterboard - Drywall must be carefully primed. It is advisable to use acrylic material, since it not only penetrates deep into the surface of the material, but also creates a stable film on the surface.
Primer of plasterboard walls - As soon as the soil dries, one layer of plaster is applied to the plasterboard surface, which should be no more than 1-2 mm, but if there is no plaster solution or there is doubt about its correct application, you can simply use concrete contact. The material is quite new, but has already managed to show itself on the positive side.
Plastering a plasterboard wall - As soon as the plaster solution has dried, approximately 1.5–2 hours, you can begin tiling. As for concrete contact, it will take a little less time.
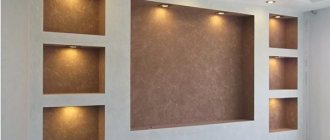
Wall cladding with artificial stone
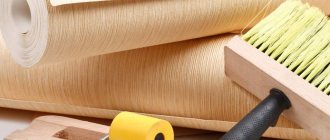
Decorative bricks for interior decoration - what does the market offer?
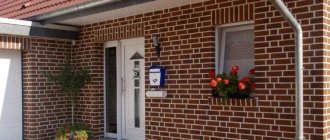
So, the use of brickwork in wall decoration now brings back memories of the style of England. Its widespread use was due to its high fire-resistant functions, so houses were built from it and all buildings were lined with it inside and out. Nowadays, imitation brick is used both in such colorful interiors and in the loft style and in the Scandinavian style it can be found.
To bring the idea of brickwork to life, it is not at all necessary to bring a ton of red or white brick into the apartment. Now manufacturers have come up with many variations of decorative tiles, up to 2 centimeters wide. This allows you to quickly and easily complete the finishing process and choose the color and size of the brick you want.
Colors of materials for decoration
It is worth considering what materials purchased brick tiles are made from:
- Gypsum,
- Cement,
- Ceramics,
- PVC panels,
- Flexible tiles.
Each type has its own pros and cons in use. And also different prices and characteristics. Often the corners of the room are finished with flexible tiles, because they bend freely to fit any recesses.
Brick imitation panels
Brick-like PVC panels are the cheapest finishing method, but they won’t have that natural effect and the high cost of repairs. And if desired, it is possible to make tiles from gypsum or cement yourself, we will talk about this below.
Manufacturers
Most popular brands:
- Glue for decorative stone "Monte Alba". Used for interior cladding. Sold as a dry mixture in a plastic bucket with a lid.
- Knauf is a well-established brand in the construction market. Perlfix gypsum assembly adhesive provides high strength and adhesion.
- “Volma-montazh” is a dry mixture with mineral additives to improve adhesive properties.
- Synthetic glue of the Bustilat brand.
- Liquid nails of the brands Klesel, Stauf, Henkel (the well-known “Moment”).
Surface preparation
To ensure that the cladding does not move away from the drywall during operation and that the surface is smooth, the surface should be prepared before gluing the material. To do this, dust is removed, and if there are finishing materials, they should also be gotten rid of. During all work, the room temperature must be maintained between + 5 and + 25 ˚С.
The sheets are treated with a deep penetration primer; it is better to use an acrylic composition. A thin layer of plaster no more than 2 mm is applied to the walls, and the joints are sealed with sickle tape. There should be recesses from self-tapping screws on the surface of the drywall; they must be filled with putty.
How to glue decorative tiles. How to glue decorative gypsum stone
Gypsum stone has such advantages as maximum similarity to natural stone, ease of maintenance, hardness, environmental friendliness, resistance to moisture and temperature changes.
Important details when working with plaster:
The cement-sand mortar is applied with a wide spatula, and the residue is removed with a narrow one. Tile adhesive requires the use of a notched trowel. Mastic is applied with a silicone spatula. It is more convenient to apply PVA glue with a sponge or short-haired brush.
When asked how to glue decorative gypsum stone, the craftsmen answer - first you need to prepare the tools:
- Read more →
Installation process
The gluing process is quite simple, but requires attention to some significant points. The first important thing is the choice of installation option for artificial stone. If you have chosen a seamless method, then you should lay the elements at a minimum distance from each other and, after pressing the tiles, immediately remove excess adhesive.
The second option requires placing the stones at a distance of about 1.5 cm from each other. In this case, it is recommended to process the squeezed-out excess 15-20 minutes after installation. As a rule, this time is enough for the glue to thicken. If the seams are made with the same material that is used to attach the cladding to the drywall, you can immediately make the seam using a stick, adding a little fresh glue as necessary.
If the seams will be finished with other adhesives, you need to use a stick to remove all excess main glue and immediately apply decorating material to the seam. Neglect of this rule leads to insufficiently high-quality fastening of the decor of the seams, and as a result, it is the seam that will become the most vulnerable point of the cladding.
Quite often there is a need to trim fragments of artificial stone so that they fit more organically into the overall fabric. It can be easily done with a hacksaw or grinder, so feel free to experiment to achieve the optimal result. However, try to place such fragments away from eye level. As an alternative, seam masking can be used, where a small amount of glue is applied to extend beyond the edge of the cut, hiding it.
How to choose the right glue
There are a lot of adhesive compositions that can be used when facing drywall. But many ordinary people want to understand which composition is preferable and reliable to use.
Any solution that is suitable for clinker tiles can be used for decorative stone. It is advisable to use elastic compounds, for example, silicone sealant, but then the cost of cladding will increase significantly.
You can also use gypsum or cement composition. The solution must be mixed strictly according to the instructions written by the manufacturer on the packaging. Important! Do not deviate from these instructions, otherwise you may end up with a short-lived structure from which the artificial stone will begin to peel off.
Adhesive for artificial stone It is worth paying attention to the fact that when the adhesive composition is exposed to sunlight, its adhesive ability is greatly reduced, since moisture quickly evaporates from the solution. If this cannot be avoided, then rapid drying must be artificially stopped. This is easy to do; after installation, the surface with the glued artificial stone is covered with a film. It is also advisable to close all windows in the room when working with this material to prevent drafts.