There are many apartments and private houses where furniture made from chipboard gradually takes on a non-marketable appearance. To put a closet, chest of drawers or table in order, it is not at all necessary to turn to specialists or change things to new ones if they are familiar and comfortable for the owners of the home.
High-quality restoration of furniture is a labor-intensive and slow process.
Old furniture can be restored using available materials in the house. Additional materials and tools can be purchased at any hardware store.
If the need arises, you can contact specialists, or you can study all the intricacies and do it yourself.
Benefits of DIY restoration
Restoring the appearance of chipboard objects is a low-cost process. In addition, it has a number of undeniable advantages:
- no need to take a cabinet or table to the workshop;
- all tools are usually at hand;
- You yourself monitor the progress of work and make adjustments if necessary.
By selecting the right materials and studying master classes, the updated table or cabinet will delight you with its appearance for many years to come.
During restoration, you do not use the help of expensive specialists; you can estimate the costs and labor yourself. The process develops everyday ingenuity, and sometimes unites fathers and children if you involve the latter in joint work.
Restoration methods
It is important to understand what material you are dealing with. A compressed wood-resin mixture is the basis of the slab. The easiest way to restore a fresh look to chipboard is high-quality painting.
Natural crushed material is mixed with synthetic resins and hot-pressed.
Restoring chipboard furniture by tinting, varnishing and decorating allows you to update the facade and internal surfaces of the piece of furniture. In this form it will last for a very long time. The main materials for restoration are paint, varnish, sandpaper.
Chipboard (chipboard) is made from shavings of coniferous and deciduous trees.
The second method, which is not too time-consuming, is using adhesive film in natural tones. It does not require glue - its base is quite durable, the film sets and smoothes over the surface very well.
Materials and tools needed for work
When working, you will need different materials. In order to disassemble old furniture, you will need a screwdriver. Glue is needed only if the surface was previously coated and it came off. Sandpaper and a spatula are needed to clean the surface from uneven surfaces.
The slab produced in this way is resistant to aggressive environmental influences and has excellent noise and heat insulation properties.
Updating the color will require:
- aerosols with paint;
- hairdryer;
- tassels;
- rubber gloves.
The easiest way to update a cabinet or desk is to simply repaint it.
Before starting restoration, degrease the slab using detergent.
Sometimes putties for wooden surfaces are used, since solid wood can dry out - for further work you need to seal small cracks and crevices.
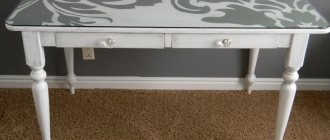
Such restoration of furniture will allow you to get rid of minor scratches and change the boring shade.
Using varnish as a final coating, you can achieve a more impressive look for the item being restored, so its use will not be superfluous.
Materials may vary depending on the scope of work, vision of the final result and method of restoration.
If there are significant defects on the surface, it is better to choose a different method.
If inserts from fabric, wallpaper, decoupage napkins, film are expected, then scissors are needed.
To quickly dry painted surfaces you will need a powerful hair dryer - it is better to use a construction hair dryer.
Chipboard is a specific material, and it must be painted using a special technique.
Features of chipboard lamination
In industrial settings, belt or conveyor presses are used to bond the base and coating. They not only press the laminate tightly to the base, but also heat it up greatly. As a result, the impregnation melts and spreads, and the coating is connected to the base as tightly and evenly as possible. Laminated chipboard is made by gluing the cladding to the surface. Pasting films at home is partially similar to both of these methods, but due to the lack of special conditions, the applied coating is not as durable as an industrial one.
It’s easy to laminate countertops or kitchen doors at home:
- Preparation of the slab begins with grinding. For large volumes of work, it is more convenient to use sanders with wood attachments. A small product (shelf, door, etc.) can also be cleaned manually using sandpaper stretched over a wooden block or a special holder. Grinding is continued until the surface becomes smooth, without protruding chips.
- After the initial treatment, it is recommended to putty the surface, dry it, and treat it again with fine sandpaper. Such thoroughness of processing is dictated by the properties of membranes for pasting: a thin film will not lie flat if even minimal defects remain on the surface of the board.
- The leveled workpiece is treated with any wood primer. Impregnation will increase the ability of the film or glue to form a strong connection between the cladding and the base. The primer is applied according to the instructions and dried.
- Pasting begins with cutting the film according to the size of the parts. If a mesh is applied to the back of the self-adhesive, then you can use it for cutting without resorting to additional measuring tools. But most often markings are carried out using rulers and squares. Any type of film should be cut with a sharp knife (breadboard cutter, office cutter). The edge will turn out straight and even if the cut is carried out along a ruler (it is better to take a metal one).
- The pattern is partially freed from the protective layer, the adhesive side is pressed against the edge of the part and gradually moved along the surface, trying to glue the membrane evenly and without bubbles. If there is still air left under the film, you can expel it with a rubber spatula towards the nearest edge.
How to glue films without an adhesive layer?
If the material chosen for lamination does not have an adhesive layer, different technologies are used:
- When choosing PVC or other cladding, buy glue for it. This composition must be applied to the prepared slab according to the instructions. Most often, you need to coat the surface with glue in 1 layer and dry it slightly (10-20 minutes). The cut film is applied and leveled with a hard roller or spatula. If it is possible to carry out the work with an assistant, it is recommended to slightly warm the film with a household hairdryer when gluing. It will be easier to level and lay without wrinkles. Smoothing is done from the center to the edge, trying to remove air bubbles.
- Melamine materials require heating during the gluing process. At home, the most accessible heating device is an iron. It must be turned on in advance and warmed up in the mode for ironing cotton or linen. Melamine is most often used to make edges. You need to cut the tape to the required length, attach it to the cut of the slab and iron it with an iron. After cooling, melamine forms an even layer on the surface. The tape for the edges is taken wider than the edge, and after gluing, the excess is cut off with a breadboard knife, moving it parallel to the edge. Then the edge of the material is treated with sandpaper.
The technologies used make it possible to obtain a chipboard coating that is not very durable, but reliably protects against water.
Restoration process: step-by-step instructions
Take help from members of your household if they have the skills to carry out restoration work. Maybe they’ll tell you how to quickly restore chipboard with your own hands.
Prepare the tools and necessary materials - everything should be within walking distance. Since the process is labor-intensive, it is better to carry out the work on a weekend.
Before starting work, you should disassemble the furniture.
Painting
Step 1: Carefully disassemble the furniture using a screwdriver.
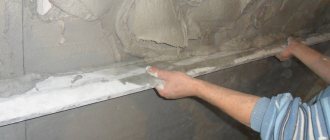
Step 2. Degrease the surface. Clean out any unevenness and roughness with sandpaper and a spatula. If necessary, fill cracks and cavities. Let the boards dry.
Step 3. Apply tint (prefer acrylic paint) evenly to the surface of the elements using an aerosol. If necessary - in 2-3 layers, taking breaks for them to dry.
Step 4: Apply polish and let it dry. Secure it by applying another coat.
The paint will lie evenly if there are no drafts in the room while it is drying.
If you decide to use another method - gluing film, then the materials used are quite inexpensive. No glue is used for this work - the back side of the film is sticky.
It is necessary to paint each element separately, this will allow you to more carefully work out all the joints and avoid the formation of drips.
After drying, all facades should be wiped with a weak solution of vinegar. This treatment will remove a thin film of grease that will interfere with the adhesion of the slab and the self-adhesive film.
Step 1. See paragraphs. 1-2 painting instructions.
Step 2. Accurately measure the amount of film. It is better to make a small allowance, as the axes may be uneven. Then you can remove it by carefully cutting it with a stationery knife.
Step 3. Level the pasted area with force so that there are no air bubbles.
It is better to choose a film in a natural color - shades of wood, light or dark, depending on which one you like best. The advantage of the film is that it can be washed repeatedly - a high-quality coating does not lose color and does not form streaks.
If the furniture has been previously painted, you can remove the paint using special solvents or sandpaper. It will be more difficult to dismantle the coating if the facades are covered
Repair of countertops made of various materials
Repairing a kitchen countertop differs depending on the type of materials:
- wood, chipboard;
- stone or artificial stone;
- plastic;
- strained glass.
Tabletop made of wood or chipboard
When planning renovation work on tables made of wood or chipboards, it is necessary to take into account the characteristics of the materials.
Chipboard or fiberboard boards are impregnated with special compounds that increase the resistance of the coating to moisture and temperature changes, mechanical stress and cleaning with acidic chemical compounds. The material is distinguished by a variety of shades, textures, and affordable prices. However, it is necessary to take into account the possibility of scratches and stains appearing during operation.
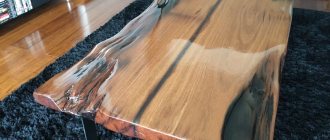
Wood tables have an exquisite texture. The material is environmentally friendly, aesthetic, and has a tactilely pleasant surface. However, the wear resistance of the material is average; the coating requires careful cleaning and renewal of the protective layer and coating, which prevents the negative effects of sunlight.
You can restore a countertop made of chipboard and wood using special restoration compounds. To eliminate chips, dents and cracks from the surfaces of wood and chipboards, special restorative agents are used:
- soft or hard wax for furniture;
- furniture touch;
- water-repellent sealant.
Hard texture wax is used to eliminate mechanical damage on coatings that can withstand medium and heavy mechanical loads. The material is available in a small palette of shades and gives surfaces waterproof characteristics. Before use, the wax must be melted using a gas soldering iron, then the desired area should be covered with the composition. You need to wait a few seconds for the wax to cool, then use a knife to scrape off any excess material.
Soft wax is rubbed into the damaged coating using a spatula or an edge knife. The composition is optimal for eliminating cracks and small dents, holes left by self-tapping screws. Soft wax is applied to the surface, then the coating is polished with felt. The composition is suitable for eliminating defects in natural wood and allows you to emphasize the texture of wood fibers using an alcohol marker.
A furniture touch allows you to repair minor damage. The composition must be shaken in a container, then applied to the area. Depending on the degree of damage, 1-3 layers are applied. Each coating is dried for 5-8 minutes. Remains of the product are cleaned off with a felt cloth or cotton rag.
A sealant with water-repellent characteristics is used to hide the joints of elements to prevent surface deformation.
Stone countertop
The countertop of a kitchen set made of artificial or natural stone is highly durable, resistant to mechanical damage, high temperature, and high humidity. It is necessary to take into account the massiveness of the natural material, the high price and low maintainability. If part of the coating is damaged (chips), the entire surface will need to be replaced.
Artificial stone elements must be carefully treated with special chemical compounds. Repair work is carried out immediately after damage. The maintainability of artificial stone is high.
To remove stubborn stains on the surface, a polyester composition is used. It is allowed to sand the coating using sandpaper with a grit level of P120-P400. After sanding, the area needs to be polished with a felt cloth.
To eliminate chips, you need a special composition based on polyester resinous substances. It is necessary to clean and degrease the surface of the area and the area around it. The damage is rubbed with the compound, left to dry for 18-20 hours, then the coating is sanded with abrasive materials and polished with a felt rag.
Plastic table top
Coverings made of plastic materials are waterproof, durable, and resistant to chemical detergents. However, the fragility and brittleness of the plastic surface must be taken into account. Chips occur in the corner parts of the table. In order to update the tabletop, you will need a special adhesive base.
The compositions are applied using a construction gun. If the surface thickness is small, you can apply “Moment” or “Superglue” glue with a spatula. “Titan” adhesive composition is suitable for plastic surfaces. Before performing work, you need to fix the table, process it and leave it to dry. When repairing joints, the adhesive can be mixed with powder compounds.
Glass table top
Glass surfaces in the kitchen are used in modern styles. The material is durable, resistant to air humidity and water ingress, temperature changes, and is available in a wide range of shades and textures. However, glass is expensive and requires careful maintenance.
Glass restoration includes the following steps:
- surface cleaning;
- degreasing the material;
- applying varnish or paint;
- After drying, the element is fixed on the legs.
In addition to plain coloring, artistic painting can be used. For severe damage, glass replacement is recommended.
The following methods are used to remove scratches:
- You will need water and an ammonia solution. The composition will correct minor scratches. When preparing the product, the proportions must be observed; water (6 glasses) must be added to ammonia (30 g). Then you need to dip a napkin in the solution and wipe the surface. Remains of the composition are removed with a dry towel. The procedure can be repeated several times.
- Restoration work is carried out using a specialized paste (GOI), which is offered in automotive departments. Before use, you need to grind the paste to a powder. Then a cotton swab is dipped into the mixture and the scratches are treated for about 10 seconds. The movements should be polishing. The treatment can be repeated 2-3 times. Residues are removed with a dry cloth.
- The universal method involves the use of toothpaste. The composition is applied to a cotton pad and distributed using circular movements over the glass surface. Then you need to wet the cotton wool and wipe the table, removing any remaining paste. The technology allows you to eliminate traces of scratches, enhance the protective characteristics of glass, and prevent further damage. However, it is not recommended to use bleaching compounds that contain abrasive particles that damage the integrity of the coating.
In order to prevent damage, it is recommended to provide special care to surfaces and take into account the characteristics of the material:
- Cleaning wipes should be soft.
- Specialized glass products are used for cleaning.
- Do not place hot dishes on tables with photo printing; it is recommended to use special stands.
To prevent scratches, it is necessary to cover the glass with a tablecloth or fabric linings for dishes while eating.
Finishing the product - decoration
Old furniture can not only be renewed, but also decorated, giving it an original look. Drawings or ornaments are used as unusual design elements. To apply the print evenly, use a stencil cut from thick paper or a file folder. You need to apply the paint very carefully so as not to splash the areas around the ornament. It is better to place it around the perimeter.
In order for furniture restoration to meet expectations, the coating must be applied carefully, avoiding the formation of gaps and smudges.
A large, subtle design looks good in large central areas or at the bottom. From above it will “weight down” the visual space. You can also use a combination of contrasting colorful elements - plain sides and decoupage parts with floral or thematic designs.
The DIY furniture restoration is almost complete, all that remains is to bring the new coating to perfection.
You can also decorate chipboard with your own hands using applications made from self-adhesive film or fabric.
If a defect is discovered after drying, the problem area must be processed again with sandpaper and covered with an additional layer of paint.
Carved elements must be introduced into the overall design with caution - the slab is very fragile. When carving, you must use a sharp chisel and sandpaper to clean out the grooves. We recommend that you first make a sketch of the future ornament - this way you can evaluate the aesthetics of the future decor.
Often, a good-quality and reliable table is sent into exile to the country only because its design is hopelessly outdated.
Using wallpaper or patterned fabric you can further freshen up painted furniture. Such inserts look interesting on the facades of tables, cabinets and chests of drawers. In this case, you will need glue. You need to choose a fabric that is waterproof; thin fabric will quickly become soaked and will look sloppy. This method is suitable for updating furnishings in country houses, apartment kitchens, bedrooms and children's rooms.
But any furniture can be given a second chance, just modernize its appearance, and external restoration will help with this.
These materials can also be used to decorate internal surfaces – walls and shelves. It does not require much effort, and the result often exceeds expectations.
Using decorative elements to decorate large items, do not miss the opportunity to add the same stylish note to the rest of the decor. For example, you can enhance the harmony of colors by upholstering the seats of old chairs with the same fabric that was used to decorate a cabinet or table.
The main thing is to purchase high-quality materials, carefully study the step-by-step work plan and follow all recommendations.
To decorate objects made of chipboard, napkins in the Victorian or Provence style are often used. Pastoral elements perfectly refresh the interior, making it light and bright.
Decoration is also carried out through the use of certain paints - gold, silver, copper. They make furniture more sophisticated. They can be complemented by an impressive-looking craquelure. For this you will need a special varnish. This method is perfect for classic interiors, where there is a lot of vintage furniture of unusual shape.
The easiest way to update a cabinet or desk is to simply repaint it.
Small mosaic inserts made of colored glass or plastic, glued to the facade, will give the closet or bedside table a new look.
The main thing is to know what material to use and how exactly, and then the restoration of furniture with your own hands will be completed quickly and with an excellent result.
Coffee tables look unusual with a “kaleidoscope” of newspaper clippings. To add immobility, glue them to the tabletop. Arrange them asymmetrically, but while maintaining overall compositional harmony. Then cover with glass or seal with two coats of clear varnish.
Replacing the fittings can also add a new note to the appearance of the furniture. Instead of simple handles, choose bronze or silver ones with a relief shape. Or paint them a different color.
After all, what could be more pleasant than updating and decorating your home without significant expenses.
If the furniture has legs, you can use twine for them, securing it with glue.
An old mirror can be used as an insert in one of the cabinet doors. An oval shape will look better.
But it is not at all necessary to change your favorite table or cabinet; furniture restoration will help, and you can do it yourself.
The decor should not be too colorful or garishly contrasting. Colors should be harmoniously selected and not irritate with excessive eclecticism.
You need to figure out how to decorate furniture that has lost its former appearance in advance. There are a great many ideas, so anyone can make an unpresentable cabinet or table look advantageous and stylish, even at home.
By selecting the right materials and studying master classes, the updated table or cabinet will delight you with its appearance for many years to come.
How to repair a countertop
You can repair the countertop using the following materials:
- acrylic paint;
- tiles;
- transparent or translucent varnish;
- self-adhesive film;
- napkins for decoupage
- strained glass.
In case of major damage, the table surface is replaced
Self-adhesive film
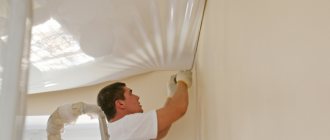
You can cover an old kitchen table with self-adhesive film. The method is inexpensive and easy to implement. Materials are produced that imitate marble and granite surfaces, ceramic tiles, wood, natural leather, etc. Before using the material, it is necessary to measure the surface to be treated. Then elements with allowance are cut out from the film.
Then the surface is thoroughly cleaned with water at room temperature, wiped dry and degreased with special compounds. The film is carefully applied, preventing air from entering. Irregularities caused by air are smoothed out using a plastic scraper.
Film produced using various production technologies is offered for sale:
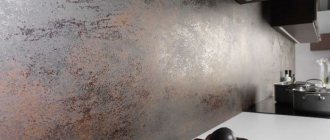
- Lithium film comes in a wide range of shades and can be used to restore kitchen furniture. After repair, the products are easy to use, retain color intensity, and are durable. The material has heat-resistant characteristics. Before applying the film, the surface must be thoroughly cleaned; it must be smooth. Lithium coating is used to decorate wood-based materials (MDF, chipboard, etc.).
- The film, made using the calendering method, is easy to paste. The material is resistant to shrinkage and damage, but requires regular updating.
When selecting materials, the color scheme of the room is taken into account. Bright colors and contrasting combinations are suitable for the kitchen, but for some styles (Scandinavian, minimalism, loft) it is important to choose a neutral palette (green, brown, ocher shades). For country style, films imitating the texture of wood and natural stone are suitable.
Dye
You can cover the tabletop with special dyes. For wooden surfaces and chipboards, acrylic paint is used, which is applied using a foam sponge or brush. Before decorating, the coating is cleaned and degreased. Then the main tone is applied, and a drawing is made on top of the composition using a sponge. The paint should be applied in a thin layer.
The following shades will be universal for different types of kitchens:
- beige;
- Ivory;
- snow-white;
- light gray;
- cream;
- metal;
- sand;
- light peach;
- dusty pink.
The coating can be matte or glossy. Matte surfaces retain a presentable appearance for a long time.
painting
An original way of surface restoration is artistic painting. You can select a sketch from ready-made drawings or make it yourself. For the kitchen, you can use elements of folk painting techniques (Mezen, Gzhel, Zhostovo, etc.). The method is universal, easy to implement, and does not require large financial costs. The image can be applied using a stencil cut out of cardboard.
Before painting, the surface must be cleaned, leveled, and degreased. Paints are applied with a brush in stages. It is important to consider the compatibility of colors and patterns with the interior of the room. The pattern is often applied along the edge of the table, in the central part; the rest of the space can be plain.
A universal ornament for the kitchen is a small pattern that allows you to hide chips and scratches. A light color scheme allows you to visually enlarge the space; to create accents, you can use bright colors on a light background.
Decoupage
You can update your kitchen countertops with your own hands using the decoupage technique. The technology can be combined with surface painting. Decoupage is easy to perform and does not require special skills. The design method allows you to eliminate defects, stylize a piece of furniture as antique and shabby chic, Provence, country, vintage, modern, art deco styles.
To work you will need:
- acrylic primer;
- acrylic dyes;
- light-colored wood putty;
- Sander;
- sheets of sandpaper of different grit levels;
- rubber spatulas;
- brushes for artistic coloring;
- wood varnish (matte, glossy);
- decoupage napkins or rice paper, old magazines, newspapers;
- scissors;
- PVA glue.
The work is carried out in compliance with the following stages:
- surface cleaning, priming or surface grinding;
- degreasing the material;
- PVA glue must be diluted with water in a ratio of 1:1;
- markings are made on the surface;
- decoupage pictures are processed with an adhesive solution;
- the images are applied to the coating and smoothed out;
- the surface is dried, then successively coated with transparent acrylic varnish in 3-4 layers.
The table can be used after 3 days.
Tile
You can treat the surface of the table in the kitchen with decorative tiles. The material is suitable for decorating countertops made of natural wood, plastic, chipboard, fiberboard, and composites. Tiles for cladding can be ceramic, glazed, or mosaic. The variety of decor allows you to create a moisture-resistant coating that is durable, resistant to mechanical damage, and cleaning with alkaline chemical compounds.
When choosing a shade, it is recommended to take into account the design and style of the kitchen apron above the work surface. An original composition can be created from slabs that differ in color and size. Blocks can be combined with large mosaics to reduce work time. Combining slabs of contrasting shades in mosaic laying can be used as accents; the main coating should be a neutral tone. In addition to the slabs, you will need an adhesive base and grout.
Restoration of the coating is carried out in several stages:
- cleaning the table;
- degreasing;
- applying glue;
- laying out slabs;
- After the materials have dried, grout is applied to the joints.