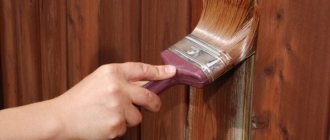
What paint should I paint the tiles with?
Various paints can be used to paint tiles. And in order to better understand which one to choose, you should familiarize yourself with the different types of paint and varnish materials used for finishing in modern renovations.
Various types of paints can be used to paint tiles. For example, water-dispersion paint with latex in the base performed well in this work. This material is intended for use in wet rooms. Alkyd and oil paints are also often used.
On a note! Coatings obtained by working with alkyd paints will be so strong that they will not even require additional protection of the painted surface - they do not need to be varnished.
To paint walls that are not particularly in contact with water, you can even use acrylic paints, although they are water-soluble. But for decorating and designing the floor, it is recommended to obtain compositions that are resistant to water and temperatures; otherwise, the work will soon have to be redone. Still, there is nothing better for a floor than a well-applied layer of alkyd paint. The main thing is to let it dry thoroughly before using it.
Simple tiles that can be given any color
Epoxy-based paints also performed well in the process of painting and using painted tiles. Or you can use latex paints to design the tiles. In any case, it is important to carefully read the instructions for use given on the packaging and make sure that this composition is suitable for application to the floor, and especially to tiles.
On a note! When designing bathroom tiles, you can use paint to give free rein to your imagination and draw patterns. For this purpose, stencils and car paints produced in cylinders are often used. This paint is not cheap, but it adheres well to the base even in extreme conditions.
The tiles will need constant cleaning
Is it possible to paint tiles?
Of course it is possible, several decades ago, this repair option was very popular, since getting good tiles was problematic. It is important to choose the right paint - this determines how long the coating layer will last.
Bathroom design with tiles
In fact, there are a lot of options - these include alkyd and acrylic paints. Although practice shows that oil enamels are best suited for painting ceramics. When choosing, it is also worth considering where the painting will be done. If these are walls in a corridor, then almost any enamel will do; no load will be applied to it. It's another matter when you need to restore floors or ceramics in the bathroom.
Important! When choosing enamel, you should buy one that is specifically designed for painting tiles.
In this case, the tile will be exposed to increased humidity and steam, therefore, it is desirable that the enamel is resistant to such influences. After all, porcelain tiles painted in the mass are initially made from the composition of the desired color, and when an additional layer of enamel is applied to it, it will no longer be so durable.
One of the best solutions can be a special paint for floors - it is very resistant to abrasion and has excellent adhesion to tiles. However, it is better to immediately abandon industrial options. They can be toxic, so it's best not to use them in residential areas.
Painting ceramics
The procedure for painting work
The floor is painstakingly washed and sanded as needed. Preparatory preparation of the base for painting is done. The baseboards are covered with masking tape so that they are not stained by paint.
The surface of the tile is cleaned of grease stains. This is especially important for kitchen areas. The liquid can be applied using a brush with a long handle. From time to time you have to create a function more than once. It is very important to handle all corners perfectly. Then the floors are washed with clean water and dried thoroughly. It is also recommended to apply a layer of primer to the tiles before painting.
It's time to apply paint. It should be distributed evenly over the entire surface. For convenience, it is recommended to use a roller with a long handle. The paint is poured into a paint tray - this makes it easier to wet the roller in it. It is recommended to stir the paint well before applying. The material is applied in several layers, and the smoother the surface of the tile, the more layers will be needed (up to 3-4). The layers are applied in stages, each after the previous one has dried. Coloring begins from the corner far from the exit.
Applying paint with a roller on a long handle
Corners in the room are perfectly processed.
Increased attention should be paid to the corners of the room
After the paint has been applied to the surface, it should dry perfectly. For the first layer, about a day is enough; later the 2nd layer can be applied. Then the waiting time until a new coat of paint is applied is about 6-12 hours, depending on the composition used.
After applying the final coat of paint, you must wait more than 72 hours before the floor can be walked on. This period is needed for all layers of paint to dry thoroughly.
In this example, the tiles are also painted on the walls.
- fine sandpaper needed for grinding surfaces;
- primer mixture, preferably epoxy based;
- paint rollers;
- brushes of different sizes;
- rags that will be needed to quickly remove paint stains;
- tray or other container for pouring paint;
- solvent to remove paint from tools;
- wide masking tape, which will be needed to protect the edges of objects or objects adjacent to the surface to be painted;
- degreaser (may be needed, although it is not necessary to use it);
- paint and varnish, which are useful specifically for performing work and protecting the finished painted layer.
It is recommended to do all work in old, unnecessary clothes or a painting suit. It is better to wear rubber gloves on your hands, and you can protect your hair with a scarf or cap.
How to paint porcelain tiles on the floor
The step-by-step process of painting porcelain tiles for floors looks like this:
- The floor is sanded and washed clean.
- The baseboards are carefully covered with construction tape. To avoid getting dirty during repairs.
- All greasy stains are removed from the tiles using special liquids and a brush. This is especially true in the kitchen. After removing the stains, the surface is washed again with water.
- The cleaned surface is coated with two layers of impregnating primer.
- The paint is applied evenly to the surface of the porcelain stoneware using a roller. After applying the first layer, the surface is left to dry completely for a day. Drying time for subsequent coats is reduced to 6-10 hours.
- Remove the tape from the baseboard.
- The porcelain stoneware floor is covered with transparent varnish.
Preparing for painting
Work on painting tiles begins with preparing the surface and the room itself. To begin with, it is recommended to free the room from furniture and interior items that may interfere with the work. It is recommended to cover anything that cannot be removed with plastic wrap to prevent drops of paint from falling onto the surface. While the paint on smooth objects can still be wiped off, the upholstery of upholstered furniture cannot be saved without dry cleaning.
The surface of the tile itself also needs preparation. If you neglect this step, the layer of paint and varnish material will quickly begin to peel off and crumble. The surface of the tile is first washed with any cleaning agent. If the tiles are painted in the kitchen, then it is important to remove all grease stains - the paint will not stick to them. You can degrease the surface with special water or use vinegar or alcohol.
Then, when the tile dries, it is painstakingly sanded with sandpaper - you need to make the surface a little rough. Only in this case will the paint adhere perfectly. If the tiles on the floor are rough on their own, then it is possible to do without the sanding step.
On a note! Not only the tiles are sanded, but also all the joints between them.
It is also important to inspect all the tiles before painting and make sure they are intact. Damaged elements must either be removed and replaced with new ones, or repaired.
Briefly about the main thing
The decision to paint the tiles in the kitchen will help if you want to update the interior, but a major renovation is still far away. To refresh the cladding, you will need a simple set of tools and materials. It is important to choose the right paint and varnish composition that is safe for health and suitable for working on tiles.
For a high-quality result, it is also important to prepare the surface: clean, matte and degrease; sometimes a little restoration is required. The technology for painting tiles on a wall or floor has some differences. Design options are quite varied: complete or partial color change, applying patterns using templates or by hand.
Ratings 0
Can tiles be painted?
Can. This unique, durable, moisture-resistant coating can be completely renewed in this way. With all this, the clay surface is painted very well - the main thing is to choose the right paint and choose the place where it will be applied.
On walls, floors and even ceilings, tiles can be safely updated with the freshest layer of paint - there their contact with water will be the least, and the paint is unlikely to quickly wear off. But it is not recommended to paint tiles located inside showers directly under your feet or directly above the bathtub. The fact is that the durability of the paint and varnish coating, even the highest quality, directly depends on the intensity of exposure to water. And in the shower and above the bathtub there is a very wet environment even for the highest quality and reliable paint. In such places, the coating will quickly begin to peel off and all the work will have to be done again. Conclusion - you can safely paint all tiles if they have moderate contact with water.
Painting tiles on a bathroom wall
With the help of paint, the interior of a kitchen or bathroom can be changed at any time, as the owner of the room desires. Previously, this was exactly how apartment owners got out of their situation; this method of renovating premises was quite widespread.
On a note! If high-quality paint was used, and all work was carried out strictly according to the rules, then such a coating can last on tiles for up to 30-50 years.
Design options
There are many interior design ideas that can be brought to life by painting tiles. This solution allows you to show your imagination and make your wildest dreams come true. Armed with a roller and a can of paint, only you decide how your home will look. You can use the following design methods:
- Capital. It involves replacing all colors, overlapping pictures and patterns, as well as creating new elements in their place.
- Color update. If you are generally satisfied with the design, you can simply refresh the shades and make them more saturated. Some elements and patterns are sometimes restored.
- Formation of ornaments. Depending on the idea, you can either completely cover the surface with patterns or highlight individual accents.
- Drawing. Small images and large pictures, which are made by the master himself or using special stencils, look beautiful.
Painting tiles Source stroyipoy.ru
Why paint tiles?
Many people wonder why they even take on this labor-intensive job and paint the tiles? In fact, everything is very simple. As mentioned above, clay surfaces were previously updated in this way, because previously interesting building materials were not as abundant on the market as they are at the moment. Well, it’s cheaper to simply paint than to completely dismantle and glue new ones. It is worth agreeing that much less labor will be needed to paint the tiles than to remove an old clay coating.
READ What is better to lay on the floor in an apartment?
The relevance of this method has not disappeared to this day. Sometimes there is neither time nor extra money to completely replace the tiles, then paint comes to the rescue. Moreover, at the moment, paint coatings are of very high quality and reliable, even waterproof, which are perfect for quickly and at the lowest cost changing the color of tiles by one hundred percent. This is especially important for young families who have just bought an apartment. There are few funds in the family budget, and it is necessary to move into a new home now. And the best assistant in updating the interior is paint.
What can I use to glue it?
- Tile adhesive remaining from previous installation. We are talking about the remainder of the dry consistency for the solution. Provided it is stored under appropriate conditions, a good-quality mixture can be prepared from it even after a year. Watery glue should not be used after its expiration date (which means several weeks when opened). The fallen tile will not hold on to this consistency for a long time;
- Cement. You can make the required amount of mortar from cement. To make an adhesive consistency from cement, you need to mix it with sand in proportions 1:3 (1:4, 1:5 depending on the marking of the cement). You can add PVA glue for strength, but if you don’t have it, don’t necessarily use it to glue the fallen tiles;
- Silicone sealant. This tool will be useful for gluing a fallen piece of tile, because large pieces fall off again after this procedure;
- Thick oil paint. It is necessary to use only a very thickened mass, while avoiding places with high humidity (bathroom), since there will be no result if exposed to moisture. Oil paint is well suited for gluing whole tiles and small pieces;
- Bitumen, resin. It should be used according to the principle of paint;
- Liquid Nails. It must be applied pointwise over the entire surface of the ceramic tile. After applying liquid nails to the surface, you need to wait 40-50 seconds and only then put everything in place. Use this method only if you need to glue the tiles to the floor urgently, and the fragility of the work is of last importance;
- Cement. If tiles constantly fall off in the same place, use a cement-based solution of the highest grade with water. They make the so-called “cement paste”, smear it on the fallen tiles and glue them. This glue is the most reliable;
- Assembly adhesive. Used in case of emergency repairs, mounting adhesive, for example “Moment”. Lasts very well and for a long time, applied without problems. After installation adhesive, the tiles will no longer fall off. The only negative is the price; such restoration will not be cheap.
In what cases do you resort to painting ceramics?
In each specific case, the reasons may be different, but we will name the main ones:
- a radical change of the interior, without dismantling the old tiles and, accordingly, laying new ones;
- DIY decoration of tiled surfaces;
- hiding minor damage to cladding fragments.
Painting tiles is an unconventional but very interesting way to update your interior.
Almost all ceramic tiles can be painted, regardless of where they are laid, be it walls or on the floor, kitchen or bathroom.
It is not advisable to paint places with high humidity and in areas where exposure to hot steam is possible, since there is a possibility that the paint in damp places will begin to peel off during use.
If you absolutely need to paint these areas, then it is advisable to limit yourself to fragmentary painting of individual elements. Ceramics laid on the floor can be painted in areas less susceptible to abrasion, namely around the perimeter of the room or in places under furniture and equipment.
Causes of detachment
To decide what is the best way to glue the fallen tiles to the floor, you need to know the causes of the problem. Why can tiles off the wall or floor:
- Violation of installation rules. Violation of technology can lead to various types of damage. Most often, voids form between the base and the tile, which means the tile may fall off. It is easy to diagnose this problem - you need to knock on the surface with a wooden object. If at the same time a dull sound occurs, it means that there are voids into which the tile could move. Moreover, if you find voids in different places, be prepared that the tiles ;
- Unsuitable solution. If the floor “plays” under your feet while walking, most likely, low-quality glue was used or it was not intended for this type of surface. You cannot use non-moisture-resistant glue for the bathroom;
- Use of incompatible materials. Often, builders, in order to speed up repair work, use a “quick-drying floor” to level the surface. Such mixtures contain polymers that prevent the glue from adhering to the base. To prevent the tiles on such a floor from falling off, you should use adhesive mixtures without cement;
- High humidity. This problem can occur in the bathroom if the seams have not been properly sealed.
As a result, moisture gets under the tile and the adhesive layer is destroyed. If a moisture-resistant solution was used, the process will slow down a little, but the problem still cannot be avoided.
Damage can be of different types. Sometimes it falls off the floor entirely, with or without the solution, then everything can be fixed. So, if you still have such a problem, you need to stock up on the following tools:
- Spatula (preferably rubber and metal);
- Sponge (you can use a clean kitchen sponge);
- Level (without it, you won’t be able to see how level the fallen piece is installed);
- Grinder or metal brush.
Before you begin to restore the coating, you need to determine the cause of the damage. Carefully examine whether there are glue residues on the entire surface, whether it was applied correctly, and whether the structure of the dried glue is the same. This information is needed in order to recover from past errors and not have such problems in the future.
Preparing for recovery
Before you begin, you need to carefully prepare the surface for applying glue. The first thing to do is remove the ceramic tiles if they have not completely fallen off. This must be done very carefully so as not to touch or crush the entire surface. After this, use a metal brush or grinder to remove all remaining adhesive. If the surface on which the tiles is uneven, level it. All humps must be cut off, as they will interfere with the correct installation of the fragment in its place. If the base was not perfectly leveled before the previous installation, you can pour a thin layer (no more than 2 mm) of mortar before repair. This procedure will help smooth out uneven surfaces that may create voids.
Video description
How to refresh masonry in the following video:
Choosing colors for seams
Before you paint the tiles in the kitchen, you need to decide what to do with the seams. The easiest option is to paint the seams the same color as the tiles. But, if you like contrasting combinations of tiles and grout, work on such a finish will be long and painstaking. The hardest thing is to make the seams perfectly even.
Work on the seams begins after the tiles are painted and completely dried. The tiles are carefully sealed with masking tape, and then the seams are painted over with a thin brush. If it is necessary to renew the entire grout, this is done before painting the ceramic tiles, and you will have to be very careful when painting the tiles so as not to touch the seams.
Pencil for grouting tiles Source plitkahelp.com
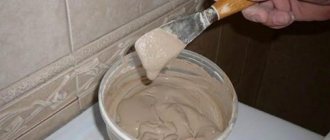
How to make repairs?
After the surface is cleared of glue residues and leveled, you can begin priming. Use a small brush or kitchen sponge for this. The primer must get into all the cracks to ensure maximum quality work. Do not apply glue before the primer has dried. All instructions for laying tiles indicate that the adhesive is applied only to a dry surface. Check the label for drying time. If necessary, you can apply 2 layers of primer.
The next stage is the direct application of the adhesive mixture. The technology allows it to be applied to the base and tiles. Here the choice is yours - apply it as conveniently as you like. Can be applied to floors and tiles to increase durability. Glue the fallen tile, while controlling the gaps: they should be the same on all sides. After pressing, a small amount of glue appears between the seams, which must be removed. After the mortar on which the tiles dries, you need to grout the seams.
Paint for ceramic tiles
The main question is how to paint tiles in the bathroom and kitchen. Ceramics are smooth and non-absorbent substrates, and there are many paints for such surfaces. They are not budget ones, but not all are very expensive. There are from the middle price range. Look at the characteristics so that it has high hiding power, strength, and the ability to wash, and with brushes. The surface can be glossy or matte. The degree of gloss and matte varies. This alone gives a sufficient number of options even in one color. You can also use templates, stickers and other methods.
Paint for ceramic tiles can be:
- superurethane enamel;
- epoxy paint;
How the bathtub changed after painting
- alkyd paint;
- paint for ceramic tiles;
- glass paint;
- enamel based on chlorinated rubber;
- auto enamel.
When you decide to paint the tiles in the bathroom or kitchen, immediately look for a pair - a primer and paint. They must fit one another. Typically, paint manufacturers recommend specific primers. Look through the recommendations, you may find what you need and you won’t have to think about the compatibility of the ingredients.
READ How to start laying tiles in the bathroom correctly
Dye selection
Paintwork materials are chosen not only as a decorative coating. Its level of adhesion to the surface is considered. If the ability is low, the ceramic tile paint will not last long and will soon begin to flake off. We must not forget that ceramics are smooth and it is difficult to achieve high tenacity.
Ceramic paint must withstand the negative effects of external factors (high humidity, contact with water and detergents, temperature fluctuations).
The decorating layer can be matte or glossy (semi-matte, semi-gloss). Matte hides defects, emphasizes the relief pattern of the tile surface, and enhances the feeling of nobility in interior design. Its solemnity is enhanced by gloss. A shiny surface visually expands the space. Gloss is not able to hide defects or chips.
Sometimes only the seams between the tiles are painted with special paints and varnishes.
Tile paint has an average consumption: 100-250 g/m2. The exact figure depends on the type selected by LMB.
Alkyd enamel
Painting tiles with alkyd enamel does not require large financial investments. The composition is based on alkyd varnish. The coating is not afraid of exposure to aggressive phenomena: it resists humidity and cleaning agents.
If we talk about the problematic aspects of the alkyd composition, then this is the short service life of the decorating layer, poor tolerance to the UV rays of the sun, and an unpleasant odor. Before painting the tiles, a primer is applied to enhance the adhesion of the paint and ceramics.
PF (Pentaphthalic) and GF (Glypthalic) enamels are part of the group of alkyd enamels and have similar characteristics. The tiles are painted:
- GF-115, PF-115 : Enamel PF-115 White Lacra glossy 20 kg, price 3054 rubles. Enamels GF and PF are used outdoors;
- PF-266 : Enamel PF-266 red-brown 2kg Lacra, price 528 rubles. For indoor use. Hard coating protects floor ceramics well.
The primer used in advance is: FL-03-K, 138, FL-03ZH.
KM polyurethane
Tile paint must have high adhesion and form a durable coating. The polyurethane composition has these characteristics: Tikkurila Temadur 90 / Tikkurila Temadur 90 two-component, high-gloss polyurethane paint, 7.5, price 7590 rubles.
Painting will not be expensive, the material is safe, tolerates temperature fluctuations and humidity. The decorative layer is resistant to abrasive wear and elastic.
It is important to remember that CM does not interact with other dyes. It cannot be used to cover an old layer of a different composition.
Epoxy enamel
Ceramic paint based on epoxy resins forms a highly durable coating layer to be decorated. But it does not have elasticity. Epoxy tile paint is not applied to universal primers; it is used with organic solvents. Recommended for use: EPOHA epoxy enamel Epoxy white gloss 0.7 l 1 kg, price 495 rubles.
KM for working on glass and ceramics
CMs for glass are designed for applying decorative patterns to problematic surfaces: glass and tiles. The dye is expensive, so it does not apply a continuous layer. Glass paints have been developed in an assortment of colors. The brightness of the shades remains for a long time. A clear varnish applied on top of the design increases its service life. The decor on the ceramic surface is not afraid of water. It dries in 3 hours.
Used in work: Set of paints for ceramics without firing Porcelain, 6 colors, 15 ml each, Marabu, price - 1004 rubles; Set of acrylic paints for glass and ceramics Decola 12x20 ml, price – 628 rubles.
Water-based paint for tiles
Acrylic dyes are in demand for coloring ceramics: polyacrylate (AK), alkyd-acrylic (AC). The biggest disadvantage of materials is their high price. This is a paint for tiles in rooms with high humidity levels. A matte or glossy coating is applied to tiles of different shades in the bathroom, bathhouse, sauna, and swimming pool.
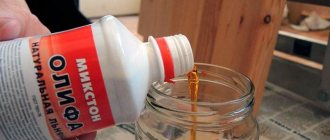
KM oil
The main advantage of the paint is its low price. The material is based on drying oil. Today it is rarely used due to its strong unpleasant odor and long drying time. Tile coated with oil paint quickly loses its attractiveness due to the appearance of yellow spots on the surface. Paint MA-15 Expert white 0.9 l, price 139 rubles.
Enamels for car painting
Auto enamels are developed for painting cars. Today their scope of application is much wider. They have good grip on porcelain stoneware surfaces. Therefore, they are increasingly applied to a smooth tile base. Auto paint (auto enamel) acrylic Mobihel (Mobihel) 601 black 0.75 l with hardener 0.375 l, price 930 rubles.
Paint simulators
The composition with polymer and mineral additives gives the surface an original appearance. Natural materials are imitated: brick, wood, stone.
CM imparting special qualities to surfaces
A group of specialized dyes is represented by Zinga paint. Strengthens the protection of ceramics from moisture. Fire-fighting compounds have been developed: “Polistil”, “Countfire”. For rooms with high humidity, KM V33 is recommended. If V33 is considered as a restoration dye (does not tolerate constant exposure to water), then Noxan paint is used to paint the inside wall of the shower stall.
Varnishing the tile surface
The question is often asked, is it possible to varnish floor tiles to protect the paint? Floor tiles must be varnished, since even the most resistant paint will not withstand the loads and moisture that occur in a bathroom. Varnishing is an important step and is carried out only after the paint has completely dried.
It is very important to choose the right varnish to cover the tiles on the floor. If you need to preserve the color of the paint exactly, then you can use a regular water-based glossy parquet varnish, since it remains completely transparent after hardening and does not change color. You can use oil-based varnishes, but this varnish turns a little yellow after hardening and interior designers actively use this effect to create depth of color.
From the proposed material, we learned whether it is possible to paint tiles on the floor, how to do it correctly and how to protect the surface, and to consolidate knowledge, we recommend watching the video clip at the end of the article.
We have Tarim Roble tiles It's cool, it imitates a wooden floor very well. But it is rough, easily and for a long time absorbs water when washed, and it is as difficult to wash as a wooden floor: you can’t carry a rag. In general, complete authenticity to the tree.
Painting ceramic tiles in the kitchen with your own hands is quite easy and quick. You can also do a very beautiful painting that will highlight the overall design of the room. This option is considered the most budget-friendly option for updating tiles.
Is it possible to apply decorative plaster on a painted wall? It is possible to very quickly improve the condition of tile joints.
The owner’s first priority is preparing the cladding from porcelain tiles. It must be cleaned very well, either manually with sandpaper or with a sanding machine. Proceed with caution as you may leave a chip on the tile or cause it to crack.
Good afternoon Dmitry! Please tell me, have you used this in your work? Water repellent ST 12 Ceresit may not be suitable? If you wax or varnish, can you then use cleaning products on the tiles?
The bottom line is that when choosing tiles for the “splash” in the kitchen, I was guided by the aesthetic properties of the tiles, and not by the practicality of use.
Varnish for ceramic tiles is a good way of additional protection, allowing you to protect the surface from scratches and other damage. It is especially often used for porous tiles with a matte surface, since these are the ones that are most often scratched and suffer from household dirt. Applying a special protective coating prevents damage and allows the tiles to look beautiful even after several years of use.
The tiles can also be coated with special paint. To paint a ceramic product, a special epoxy paint is used, and the method of applying it is quite simple. Before application, you must carefully prepare the surface. First of all, you need to clean the surface itself from dirt using a soap solution, after which you should wipe the tiles with a soft cloth soaked in an alcohol-containing liquid. The already degreased surface must be sanded, after which you need to apply a primer to the ceramic tiles and only then can you proceed directly to painting.
The paint will need to be applied in several layers. Typically, two layers are applied to ceramic tiles.
What paint is suitable for porcelain tiles
There are several types of paint that paint the surface of porcelain stoneware well:
- Latex paint is perfect for porcelain tiles; it evenly covers concrete, porcelain tiles and tiles. Wear-resistant, safe for humans, it has no odor.
- Epoxy. Expensive. But it is waterproof and adheres perfectly to stone. Over time, the paint will not peel off from the surface.
- Oily. Available in a wide range of colors and does not require preliminary preparation in the form of priming.
- Polyurethane paint for porcelain tiles is also an excellent choice. Wear-resistant, resistant to temperature and humidity changes.
- Stained glass. It’s easy to apply any design to polished porcelain tiles or glass using stained glass paint.
Special paint for porcelain tiles is not yet available. Therefore, before starting work, it is advisable to test the coloring composition for compatibility with the coating.
Tools for painting tiles
Before painting ceramic tiles on the floor, you need to prepare the entire set of tools and consumables, the availability and quality of which directly determines the quality of the work performed. To work you will need:
Important. Before painting the tiles on the floor, you must protect your hands with rubber gloves and be sure to wear safety glasses and a respirator. It is also advisable to ensure ventilation of the room.
While painting and drying the paint, do not use electric heaters or air conditioning.
What you need for work
Updating the cladding involves several steps, so you will need a set of tools and materials. They are necessary to prepare the ceramic surface for painting and apply the dye without contaminating surrounding objects and finishes. The work cannot be done without the following things:
- Primer and paint composition of a suitable color.
- When choosing what to paint ceramic tiles with, consider the type of composition. If you choose regular (can) paint, stock up on a set of brushes and a roller. You will need a container (tray) for portioned use of paint. All this is not needed if you purchased an aerosol.
- It is convenient to paint over a wide surface with a flat brush. To draw a pattern or paint a narrow spot, you need a paneled brush.
A set of tools for convenient work Source echo24.de
- At a certain stage, the surface will need to be degreased; You will need solvent or white spirit.
- Protect your health with gloves and a mask (goggles).
- To protect clean surfaces, you need a covering film (you can take newspaper). You will also need masking tape (paper tape).
- To pre-treat the tiles, you need fine-grained sandpaper.
- Household detergents, metal sponge.
- Construction varnish.
- If you are going to apply ornaments to the tiles, you will need a template (stencil), possibly a palette.
The roller simplifies the work Source pol-exp.com
Technology and sequence of work
Renewing old tiles in a bathroom or kitchen does not take as long, of course, than replacing them, but the work is not the easiest. Especially if the tiles have a glazed surface. There are only three stages:
- Preparing the base. This includes cleaning from dirt, deglazing, removing dust and degreasing.
- Application of adhesive primer. Pay special attention to the seams. They can be pre-coated with a brush, then the entire surface can be rolled with a primer using a roller.
Working out the seams when painting tiles in the bathroom is very important
If we are talking about painting floor tiles, another step may be required - varnishing. The varnish is taken with increased wear resistance and tolerates high humidity well. Usually - deck or yacht. They can definitely withstand the load. But make sure they are compatible with the tile helmet you choose.
And yet, long-term results are not guaranteed. To check, you can carry out work in a small area “where it is not visible.” True, the materials should already be there... In any case, this way you can work out the technique, and in the process a lot of things become clearer.
Choosing paint for porcelain tiles
It is with the selection of a suitable coloring composition that you need to start. It is chosen depending on the conditions in which porcelain tile cladding is used. If we are talking about exterior work, then a good option would be to use oil paint and varnish together. That is, first the painting is carried out, and then a protective varnish layer is applied. For interior work, you can get by with regular acrylic or silicate paint. In this case, porcelain tiles can be made beautiful again without spending a lot of money and effort.
What paint and how exactly to paint floor tiles - compositions and sequence of work
It is not always possible to change the floor covering. But if the tiles are holding tightly, you can simply repaint them. Question: what exactly should I use to repaint the tiles?
You can easily find advice on materials and paints for parquet, but finding what to paint tiles or floors decorated with marble or mosaic is not so easy. Having taken on this project, we decided to tell you whether it is possible to paint tiles on the floor to help those who dream of white floors instead of tiles and do not know where to start.
For work, we took garage paint - such coatings are 20-30 times more resistant than conventional ones. But there is an important “but”: this paint has too strong a smell - you need to work in a respirator and move out of the house for several days (being prepared to actively ventilate the room all this time).
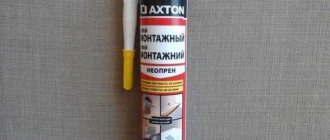
Fact: we advise Russian readers to use Tikkurila compounds for work. You can take Otex as a primer and use Betolux paint in tandem with it (the composition can be tinted in one of 20 shades).
Clean the tiles from grease using an abrasive liquid. We chose an Axton brand base designed specifically for tile and marble surfaces. The entire surface of the floor was mopped with liquid three times.
Finish the corners well. Wipe the floor thoroughly with fresh water and use a clean cloth. After this, dry the surface.
Tip: The more porous the tiles on the floor, the better the paint will adhere. If you have slippery and shiny tiles , then it is worth treating it with sandpaper. After that, the surface must be dusted off and washed with diluted vinegar (work with gloves).
Priming Wait until the tiles have completely dried, then coat the surface with a moisture-resistant primer with high penetrating ability. Epoxy-based primers give the best results. It is more convenient to apply them with a brush so that the layer is not too thin. Wait for it to dry - this usually takes 24 hours.
Painting Now you can paint the tiles on the floor: you will need to apply at least two layers (waiting until the previous one has completely dried). In our case, we had to apply 4 layers and it took twice as much paint as originally planned. Even though we painted non-dark tiles white, the “marble” inclusions and seams were still actively visible through the paint layer.
READ DIY unwinder for underfloor heating pipes
Tip: If you have a choice, look for paint with the best coverage. These are usually expensive compounds. Economical ones are cheaper, but they are less economical in consumption and require application of 3 or more layers. The cost is the same, but more time is spent - it is important for you to wait until the previous layer has completely dried.
Painting must be done with great care. It is necessary to distribute the paint evenly, not forgetting the corners. Make sure there is no dust on the floor and no lumps in the paint itself.
Paint in one direction in small sections, starting at the back of the room and working towards the exit.
Drying It is very important to observe the exact time required for the paint to dry. The first coat will require 12 to 24 hours before applying the second coat (read the instructions on your formulation can). Then you need to wait a day before starting the third layer. The same thing with the fourth.
When the work is finished, wait a day before you start walking around the room. And during the first 72 hours you should not go there in heavy shoes.
MORE PHOTOS... White floor in the interior – 345 ideas
TELL US...
Have you ever painted tile floors? Share photos and tips in the comments section below!
Preparatory stage
Before you start painting the toilet, you need to carefully prepare the surfaces to get a good result. Since the paint practically does not hide any irregularities, due attention must be paid to the finishing procedure. Stages of preparing a wall for painting:
- Removal of old paintwork and various facing materials.
This can be done using sandpaper, a grinder with an emery disc, a spatula or all kinds of solvents. To remove wallpaper, just soak it with water. Cleaning the ceiling from whitewash is best done with a sponge or soap solution. There are several methods you can use to remove old paint from ceilings or walls:
- mechanical - removing the old coating using a scraper;
- chemical - using a special solution called a wash;
- thermal - heating the paint with a blowtorch or hairdryer, after which a spatula is used to remove it.
- Cleaning the surface of walls and ceilings from dust using warm water. After this, the walls are carefully primed with one layer of mortar. Also at this stage it is necessary to prepare the pipes for painting by removing the layer of rust from them.
- Covering uneven areas with waterproof putty containing acrylic. For this purpose, it is best to take a wide spatula, which allows you to evenly distribute the putty over the surface in a thin layer. All movements should be as careful as possible in order to subsequently reduce paint consumption. If there is such a need, the walls and ceiling can be additionally treated using finishing putty.
- Sanding all irregularities and defects with fine-grained sandpaper. At this stage, it is better to treat the walls with antiseptic solutions, copper sulfate or regular bleach, which will avoid the appearance of fungus.
- Priming a carefully leveled surface must be carried out in several layers. This manipulation is best done using special latex solutions that contain antibacterial components. In this case, before applying each subsequent layer, you must wait until the previous one has dried.
How to achieve good results for many years?
The most important thing in such a project. This is to achieve long-lasting results. Therefore, let's discuss which ceramic tiles be painted and which cannot. You can paint any tile that will not be in regular contact with water. This means that you can paint the tiles on the walls, floors and in the kitchen, even those next to the stove. You can even paint entire pictures on ceramic tiles. BUT! The only tile I would never paint. this is the one that is on the floor of the shower or directly above the bathtub. The paint on the tiles will peel off very quickly due to the large amount of steam in these places.
The first thing to be done. This is a deep cleaning of tiles and grout. You will need to completely remove all dirt, grease, mold, etc. This can be done with any detergent. But personally, I would use a bathroom cleaner that contains mild abrasives. Here you need to remember that the better you wash the tiles before painting, the better results you will get later. I highly recommend using a stiff brush for the most aggressive cleaning. After all, any paint. this is nothing more than glue that contains a coloring substance. And most of all, any glue likes to bond with a perfectly clean surface. And it’s even better if this surface is a little rough.
From my experience, I can say that I achieved the best results when painting tiles when I used oil-based paints. Nowadays they have become a little more difficult to find due to the production method that is not the most environmentally friendly. But such paints, in fact, firmly adhere to the surface after they dry and harden. Water-based paints peel off very quickly from the smooth surface of ceramic tiles. Epoxy paints can also give you amazing results. But before using it, practice on a small area first, because when you first get acquainted with epoxy paint you may have some difficulties.
To paint tiles, use gloss or semi-gloss paint. If the paint is too thick and it is difficult to use a brush or roller, then use a little thinner to thin the paint a little. Be sure to follow the instructions on the paint can to ensure you do not exceed the maximum amount of solvent allowed.
Use masking tape to protect surfaces closest to the tile from paint. It is most convenient to use masking tape that contains a less aggressive acrylic adhesive. These tapes do not leave marks or damage the surface when they are torn off.
Can tiles be painted?
Hello, Nikita. I want to paint the tiles in my apartment. We have tiles The budget does not yet allow for changing the tiles. Is it possible to paint ceramic tiles, or is that not done? Please tell me the truth, is this a stupid idea, as my husband says, or can I then rightfully brag to him and to our friends? Daria Kuznetsova.
Hello, Daria! I'm telling the truth: if you paint the tiles, you'll have to blush for a long time later. from all the compliments and praise that your friends will tell you when they see the updated tiles. But the best. this is that with the money you save you will be able to take your unbelieving Thomas several times. husband to a good restaurant. After this, he will definitely listen to you more.
How to beautifully paint tiles. My advice.
The process of painting tiles itself should not cause any difficulties. Moreover, it can become a very exciting activity. After all, you have countless design options for painting absolutely any ceramic tile surface. For example, you can use stencils or mix different paints. Feel free to paint different tiles different colors and create different geometric patterns this way. It looks great. In addition, you can easily draw frames or stripes.
Let your imagination run wild and experiment on a small section of tiles. If you don't like what you get. start over. And remember, if you ever get tired of this tile design, you can always layer a new design on top of the old one.
As for the question of whether or not to paint the grout between the tiles, this is a matter of taste. Of course, if you paint the seams in the color of the tiles, this will make the whole job much easier and faster. If you want to create a contrast and paint the seams a different color, then you will have to spend a long time and painstakingly covering them with a special masking tape that does not stick to fresh paint.
If you want the grout color to remain natural and you need to regrout, do it before painting the tiles. The regrouting process will ruin freshly painted tiles. But keep in mind: in order to ensure that when painting tiles the paint does not get into the seams, you need a lot of patience and skill.
How to paint porcelain stoneware cladding
The cladding, laid from porcelain stoneware, is characterized by the highest strength and wear resistance. But still, after some time of intensive use, there is a danger that porcelain stoneware will become unusable.
It will lose its original appearance and will also begin to crumble. You can restore the finish to its former shine and practicality if you apply paint directly to the porcelain tiles. Only which procedure requires a very careful approach.
How to protect paint on ceramic tiles for years to come.
After you paint your tiles, you need to protect the paint so that they always look like new. This is especially important if you have painted ceramic tiles on the floor. Give fresh paint two or three days to dry. Then apply two coats of water-based varnish. It will adhere very well to fresh paint. I do not recommend using oil-based varnish because... Over time, it turns slightly yellow (however, this yellowish patina can be used for design purposes), and the water-based varnish always remains purely transparent.
In general, varnish coating. This is an integral part of a project such as painting ceramic tiles. Varnish. It's very durable and does an amazing job protecting the paint from threats like foot traffic, constant movement of glasses, plates, pots, pans, etc. on the kitchen countertop. Everyone knows how well varnish protects wooden surfaces from wear. The same can be said about painted surfaces. This is especially true for painted ceramic floor tiles. The varnish coating will protect the paint and give you many years of beauty. I can give the following example as proof. Think about the gym at your school or your children's school. There is also a painted floor. And it can withstand super-heavy use while requiring only minimal maintenance.
Sources:
https://izplitki.com/vybor-i-dizajn/kak-prikleit-oTValivshuyusya-kafelnuyu-plitku.html https://sibkif.ru/keramogranit/mozhno-li-pokrasit-keramogranit.html https://lsmd. ru/pokrasit-plitku
Choice of enamel
There is a wide variety of options here. However, in order for the paint coating to last a long time and not begin to peel off, the paint for covering the tiles must meet the following criteria:
- was resistant to high humidity;
- The coating must have high adhesion;
- it is desirable that the enamel is intended for painting difficult areas;
- it must be resistant to abrasion and withstand temperature changes well.
Alternatively, you can use oil-based floor enamel - this is a proven method. However, today there are other types of coatings. For example, epoxy would be a good solution. They are characterized by:
- quick drying;
- strength and durability;
- resistance to mechanical stress.
Most often, these compositions are made two-component. That is, they are supplied in the form of a base and a hardener. Working with them is quite simple - a hardener is added to the base, then everything is thoroughly mixed and the composition is applied to the surface.
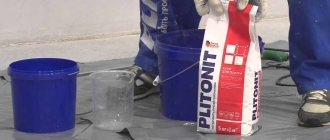
Important! The paint should be prepared in batches - otherwise it may dry out, since the diluted composition is usable for 6-8 hours.
However, before preparation, you should carefully read the instructions and add the hardener strictly in proportion. Since its deficiency, or vice versa, excess, will lead to the fact that the enamel will not gain its technical properties and will quickly peel off the tile.
Applying texture
Another option is to use automotive enamels. They are specially designed to work in harsh conditions and are characterized by durability and high strength.