Decorative brick made from plasterboard - making the wall stylish with your own hands
Things are easiest for those whose homes are entirely built of brick.
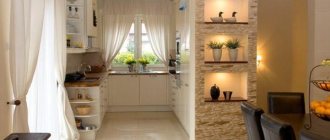
It is enough just not to finish one of the walls. But not everyone is so lucky; many live in ordinary concrete boxes, while striving to create some kind of authentic country-style style inside. To be honest, I’m a builder, not a designer, and I don’t understand styles. To me, brickwork is just a wall made of bricks. But even I admit that it often looks very harmonious even in an ordinary average apartment.
The only problem is that not everyone can afford to spend money on facing bricks to achieve such an effect. Fortunately, you can get by with “little expense” by creating only an imitation of masonry on one of the walls of your home. For example, making decorative bricks from plasterboard with your own hands is not a difficult task, and the result is quite decent.
Therefore, I decided to devote today’s article to this issue. But first, let's figure out why you should use drywall and not any other material.
Advantages and disadvantages of products
The advantages and disadvantages are summarized in the table:
| pros | Minuses |
|
|
What and how to create bricks from
When choosing a material, be guided by where you plan to place the artificial stone. Suitable building materials for interior walls include plaster, plasterboard, and putty. Exterior decoration - walls, house foundations, fences - require cement products that are more resistant to temperature changes.
The suitable texture for manufacturing is molding gypsum - GF 10. Quite expensive, but easy to use, hardening time is about 10-20 minutes. The bricks are beautiful and durable.
It is possible to replace it with “G 5” alabaster; at home, a gypsum thin putty solution is also used. If you add GKL glue to the mixture, you will get a durable brick of excellent quality.
Portland cement “M 500”, filled with river sand, is used for the production of concrete tiles.
What surfaces can it be glued to?
This parameter will serve as a criterion for choosing the adhesive composition. For brick and concrete partitions it will be one glue, but for drywall and putty a different composition is used.
For gluing plasterboard stone to different surfaces, the following adhesive compositions are used:
- Tile adhesive - made from white cement. This is a standard adhesive for gray tiles, it can be seen through the seams, it is suitable for decorating walls, but you should use it carefully, as the adhesive can smear the stone and leave behind gray stains.
- Drywall adhesive is a universal option, suitable for almost all surfaces (with the exception of non-standard situations of cladding plastic surfaces, metal, smooth wood - the glue simply will not stick).
- Liquid nails - for non-standard situations when covering plastic, wooden or metal surfaces. Liquid nails secure gypsum stone to any smooth surface.
You can attach a gypsum stone to a partition or other surface using any adhesive, even non-glue. For example, for installation on drywall, brick, concrete, you can glue the stone blanks with putty, and then seal the seams if the decor requires it. The cladding will stick in this way no worse than with glue.
Plasterboard
On the surface of drywall, decorative gypsum stone can be glued to the primary layer of plaster. You can use liquid nails or choose universal glue . For example:
- Acrylic.
- Cement dry mixes.
- Bustilat.
- Tiled.
- Liquid Nails.
- Thick rubbed paint.
Surface preparation and marking
Preliminary work is carried out according to the following scheme:
- The optimal size of the bricks is determined. The actual parameters of the products are taken as a basis: length – 250 mm, width (height) – 55–65 mm. The thickness depends on the thickness of the drywall, which is 9.5 or 12.5 mm.
- To facilitate subsequent procedures, the sheet is treated with a primer. The mixture is applied to both sides of the product. This will avoid difficulties, because working with small fragments is much more difficult.
- After drying the slab, markings are applied; for this, the material is laid on a flat surface. Clearly visible lines are drawn with a simple pencil.
- If the room does not allow placing a solid panel in a convenient position, then cutting into the required parts is carried out immediately.
To make parts, you can use plasterboard sheets of different types and thicknesses, and “bricks” of different thicknesses will look even better. An
excellent solution is to use leftovers. To mark them, the optimal cutting pattern is selected. In order to obtain an attractive and harmonious decorative appearance, the same height of the masonry should be maintained; deviations are possible only in width.
On a note! You can use another method: gypsum plasterboard tiles are adjusted to the required dimensions and covered with wallpaper with an imitation material.
What you need to know about profiles and drywall?
The desired size of the rooms will be slightly different from the planned ones, because part of the area will be “eaten up by the new wall. To understand what to expect in the end, you need to know the width of the profiles and the thickness of the drywall sheets (GKL).
Characteristics of profiles and their purpose
Before buying materials and starting to mark out rooms, you need to understand the purpose and differences of the profiles. So, according to their intended purpose, they are guides (PN) and rack-mounted (PS).
As the name implies, the guide profile is attached to the floor and ceiling and vertical posts are inserted into it.
Profile marking depends on the characteristics:
- D – rack and guide profiles 60x27 mm and 27x28 mm, respectively, designed for fixing drywall on one side only;
- W – profiles for forming a full wall, sewn on both sides;
- C – rack profiles with a rib height of 50 mm;
- U – guides with an edge height of 40 mm;
- 50, 75, 100 – profile width, which should match the racks and guides.
For example, the marking CW 100 means that this is a rack-mount wall profile with dimensions of 50x100 mm. It requires a guide profile UW 100 (40x100 mm). When choosing a profile, you need to focus on the desired thickness of insulation/sound insulation. So, for profiles with a width of 75 mm, standard insulation laid in one layer (for example, mineral wool) is suitable.
The length of the profiles also depends on their purpose. The guides are produced in one length - 3 m, but the racks can be 3, 3.5 and 4 m. The thing is that it is highly not recommended to increase the height of the guides - this will weaken the entire structure and can lead to cracks. Therefore, before purchasing racks, you need to measure the height of the ceilings.
Drywall sheets - thickness, dimensions and characteristics
Wall plasterboard is available in a thickness of 12.5 mm - this is its minimum permissible value. The load on the wall in this case cannot exceed 40 kg per square meter. This sheet is quite enough for finishing for painting or even laying tiles with your own hands. If you plan to install heavy equipment, shelves or other interior elements, you should choose sheets:
- 15 mm thick - for loads from 40 to 50 kg;
- 18 mm thick – for loads up to 70 kg;
- double sheets - for heavy loads from 70 kg.
The dimensions of the sheets are standard - width 120 cm, and height can be from 2 m to 3 m in increments of 0.5 m. Also, do not forget that only moisture-resistant gypsum plasterboard is suitable for the wall in the bathroom. Fire-resistant sheets are also becoming increasingly popular - they do not flare up, but slowly smolder and quickly go out in the absence of a fire source.
Based on these data, you can determine the dimensions of the future room - you need to step back at least 8.75 cm inward from the original markings (7.5 cm for the profile + 1.25 cm for drywall). If it is necessary to lay water pipes or cables in corrugated large diameters in the walls, the walls are built from two rows of CD and UD profiles, and the width of the wall will depend on the selected distance between them.
Types of imitation bricks
Manufacturers of false masonry take into account not only the great demand for products that create the appearance of a brick wall, but also the impossibility of cladding partitions with real ceramic blocks. Therefore, several variations are made that can completely replace the natural appearance of brick walls.
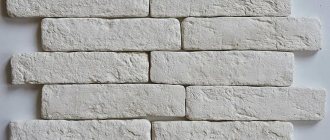
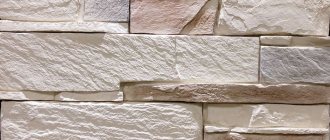
You can imitate any type of brick and even natural stone
This finish is produced in various shapes and structures. Solid or plastic tiles have dimensions identical to those of ceramic stone or a combination thereof. Large panels are made from polyvinyl chloride, fine wood fraction, and glass fiber cement. One element is capable of covering a relatively large area of the partition, creating an overall brick imitation appearance.
VIDEO: Plastering brick walls
Flexible material
Flexible tiles are considered an excellent solution for cladding walls that are regularly exposed to aggressive environments. The product serves not only as a decorative element, but also to protect walls from mechanical and chemical influences.
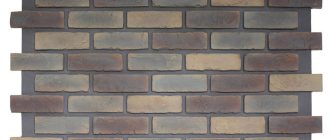
Soft tiles, already painted to match the masonry - you just need to stick them on the wall
Installation of flexible stone is carried out both on flat surfaces and on embossed, internal or external corners. It is used for cladding corridors, kitchen rooms, loggias. Also suitable for exterior decoration of facade walls, decorative structures in the form of columns or fireplaces.
In manufacturers' catalogs there are many flexible materials with different textures, colors, and shapes. Thanks to this, you can create a unique style that is in harmony with the overall design of the home interior.
Hard material
Brick facing panels are made from a variety of raw materials. The workpiece is often gypsum, cement mortar, clay mixtures with the addition of coloring components, plasticizer or fiber fiber. Some materials involve making imitation bricks for interior decoration with your own hands.
Brick look tiles
The process of creating rigid tiles, based on almost all components, is identical. Differences can only occur when laying the product, since each type of finish is attached using a specific adhesive mixture.
Gypsum products
The gypsum coating option is considered the most budget-friendly. This is justified by the low cost of raw materials and the low degree of resistance to a humid environment.
However, there are additional components that improve the moisture resistance of the outer and back layers of the slabs. In this case, the product can be used both for interior decoration of any premises and for cladding facade walls.
The product is lightweight, which makes it easy to attach it to the wall surface using gypsum glue.
Before making an imitation, you should first prepare the necessary materials:
- Gypsum;
- Mixtures to improve the moisture resistance of the product;
- Forms;
- Grout for finishing seams.
Next, you need to dilute the gypsum mortar, fill the molds with it, wait until it hardens completely and begin laying the brick wall.
Important step: applying plaster.
So, you have completed the preliminary preparation of the wall (cemented, plastered defects), primed it and waited for the base to dry. Now proceed to adjusting the working mixture. The simplest and most common option involves adding dye to the plaster solution. There is another way, but it will be discussed at the end. Now let's focus on the first one. Dilute the dry mixture according to the instructions, then add the coloring pigment and mix everything well.
Without experience in this kind of work, you should not mix a whole basin of mixture. The thickness is like viscous sour cream, so that the composition gradually slides off the spatula, but does not drip or fall off in pieces. The composition is good, if there are no lumps. For the first time, it is enough to cover 1 square meter of wall. If you hesitate, the solution will dry out and you will have to throw it away.
The mixture is scooped up with a spatula and thrown onto the surface, then leveled upward. If you want a brick wall made with your own hands from plaster to look as unnatural as possible, do not try to smooth the surface too much. Brick is rarely perfectly smooth; more often it is rough and has irregularities.
- Inexpensive way. Such coverage will not require financial investments.
- Eco-friendly. The plaster does not contain harmful impurities.
- Simple. No special skills or tools are needed here. Just a little care and patience.
Marking
Before starting the main work, it is necessary to prepare the surface - remove the old finish. If it is not level, level it with plaster and cover it with a primer. Another option is to use drywall, this is a dry leveling method. However, if the area of the room is small, this method is unlikely to be suitable, because the sheets will “eat up” the space.
Please note: if the apartment is in a new building, you can start decorating the room no earlier than 1 year after the completion of the house. Otherwise, the walls may shrink and cracks may form.
Once the surface is prepared for work, you can begin marking. And there are two options here.
First: some construction stores sell a ready-made mesh form; this method is simpler, but also more expensive. Second: independent marking. How to make an imitation brick wall with your own hands?
- The standard brick size is 250 mm x 65 mm, the size of the joints is about 15 mm, although this is not important, and they, of course, can be changed.
- Cut a brick out of cardboard with seams on the sides.
- Mark the center of the brick, also taking into account the seams. You should get a blank like in the photo below.
Marking starts from the left corner. Provide in advance for indentations from the ceiling and floor - at least 5 cm. First, you can mark out the area according to the lattice principle, marking a grid, and then draw half of the brick through the row. Trace the resulting stones and you will have standard brickwork.
What you need
Externally, the surface of the gypsum plasterboard bears little resemblance to brick and requires additional processing. Therefore, to create a relief and a beautiful texture, you need to stock up on one more material - a plaster mixture or putty. In principle, it does not matter which mixture is used, the main thing is that it “sticks” well to the surface of the gypsum board. In addition to putty or plaster, you will need a small set of tools:
- Small spatula.
- Sandpaper for finishing the edges of parts.
- A hacksaw or other device for cutting gypsum boards.
- Roulette.
- Masking tape.
- Marker or pencil.
You also need to prepare the paint that will be used to paint the surface being created. In some cases, ordinary white paint is enough, but if you want to achieve high-quality texture detail, you will have to prepare several paints of different colors, similar to real bricks. However, in the case of decorative parts made of gypsum board, it is quite difficult to achieve high realism and it is better to choose a simpler option with one color.
Gluing and finishing
- The walls are cleaned of all excess and covered with a primer.
- Markings are applied. This will allow you to quickly distribute the bricks over the surface. It is taken into account that a gap is formed between the parts, and the rows are laid offset.
- The adhesive mixture is mixed. The solution is applied to the back of the tiles, which must be glued in strict order.
- An alternative option is to cover the walls with the composition. In such a situation, spacers are placed to form joints between the fragments.
- Upon completion of the main work, the surface is left to dry.
- Next you need to grout the joints. To do this, fill all the gaps with the mixture. It is taken into account that the joints can also be decorated by creating recesses of different shapes.
- Final painting is carried out. A lighter shade is applied and the seams are highlighted.
Step-by-step algorithm of actions
Drawing the wall
The easiest way is along a long rail. Naturally, with exact observance of the distances between the horizontal lines (the bricks have the same dimensions). You can focus on the standard. The thickness of single – 6.5, one and a half – 8.8, double – 13.8 (cm).
Application of imitation coating
There are many techniques, so we will limit ourselves to only the most common ones, based on the fact that the work is done independently.
Using adhesive tape (masking tape)
Before starting work, the wall must be painted in the color that should be at the seams. Typically gray or white (or something in between). The fact is that depending on the components and their ratio in the mixture, the dried solution takes on a different shade. Next, horizontal seams are marked (using tape). After this, it is easy to highlight individual bricks, simulating masonry with shifting products in adjacent rows (pieces of tape are attached vertically).
Peculiarity
: Since the tape will then have to be removed, there should be free ends left, sufficient to grab them with your fingers. After this, the prepared mixture is applied to the wall.
Important
: the consistency of the solution should be such that it does not flow down the wall. And the layer should be applied minimally, no more than 2 - 3 mm.
Option #1
- based on gypsum. But this material hardens quickly. Therefore, it is necessary to introduce a so-called “moderator” into the mixture. Its use leads to the fact that the layer of gypsum mortar does not harden for 20 to 40 minutes. Otherwise, it will simply not be possible to remove the tape to mark the masonry seams.
Option No. 2
– plaster mixture + tile adhesive (1 to 1). In this case, only the smallest fractions of sand are used in the preparation process. This means that you will have to purchase it specially, since the usual one (from a river or from a quarry), even well sifted, will not work.
Flaws
: If the object is large, covering the wall with tape will take a lot of time and material. If the solution hardens too quickly, it can lead to problems in removing the tape from it in order to preserve the appearance of the design.
Stenciled
The method is more complicated, since you will have to prepare the grate. It is made from a sheet of plastic or rubber, knocking out rectangles in it.
In addition, it is advisable to create a template from thin slats, the undoubted advantages of which are:
- the ability to work with solutions that harden quickly, since they have time to “set” and dry;
- a large selection of materials and flexibility in carrying out any set of works. The shape of the structure fully repeats the elements already discussed;
- the ability to create a template directly on the wall and an image of any shape;
- naturalness and authenticity of the appearance of the resulting brickwork.
Decorative walls
Imitating masonry is just one way of decorating, but there are other options. For example, you can use decorative plasterboard for walls. What it is?
These are plasterboard wall panels, which on the front side have a decorative vinyl coating that imitates wood, plaster, leather, etc. That is, they do not need finishing - they do not need to be puttied and painted, like regular plasterboard. Such panels are called Gypsum Vinyl or Viprok.
They are mounted using a special system of profiles, the shelves of which are decoratively designed and cover the ends of the drywall. Thus, the coating has a certain geometricity, which is why it is more often used for finishing office premises.
But in an apartment they can be used to decorate a loggia or hallway. They are also suitable for the kitchen, as their coating is water-repellent.
Constructive decor
But most often in the design of residential premises, plasterboard is used structurally - that is, various forms of installations and suspended ceilings are made from it. With the correct calculation of proportions and a competent approach to assembly and finishing, stunningly beautiful structures are obtained.
This type of design is based on the construction of a false surface from a galvanized profile, which is given the desired shape. And it, in turn, serves as the basis for installing sheets of drywall or parts made from it. You can always find information on how to install a ceiling or decorative wall made of plasterboard in the topical articles on our website.
And we wish you success in finding successful design solutions that will be most optimal for your interior.